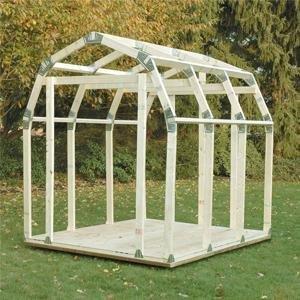
2×4 Basics Hopkins 90190 Gazebo Kit, Barn style roof, Wood not included, only gaskets
| | | |
|---|---|---|
| | | |


Customisable DIY Storage, Organisation, and Outdoor Furniture Kits
DIY Projects Simplified
Our 2×4 Basics brackets have been designed to make garage organization and outdoor furniture projects as simple as possible. Only 90° cuts are required, no miters or angles, and projects can be built to any length up to eight feet.
To simplify the process even more, only 2×4 lumber is needed for most projects.
High Quality Products
Being made of heavy gauge structural resin, all 2×4 Basics brackets have a simple yet durable design allowing them to hold up to rough conditions.
Includes
- 39 connector brackets
- Materials needed list
- Lumber cut list
- Assembly instructions (enough to complete one 7×8 foot shed)
- LUMBER NOT INCLUDED – must purchase lumber separately
| Dimensions: | 17.27 x 29.21 x 12.7 cm; 6.58 Kilograms |
| Model: | 90190 |
| Part: | 90190 |
| Manufacture: | Blitz USA |
I was able to fabricate the roof truss assemblies off site and bring by trailer. I deviated from the plans in spots and built a 8×12 shed, with higher side walls and 2×4 floor sills. Due to the snow load, I went with 2 foot centre’s so I needed 2 kits. Most of the measurements were spot on in the instructions, one critical one was missing and I can’t remember what it was but I figured it out. All screwed together on site, with cordless drivers. I used solid 12 foot 2x4s in the roof assembly and a 14 foot ridge, allowing a hang over for hoisting a deer. I also built gable ends on the roof giving additional rain and snow shedding abilities over the door and where I will be installing a window on the far end, and extended the width of the lower roof panel so that rain will run off and not onto the walls. It survived this past northern Ontario winter with no issues, and we broke records for snowfall this year.
If carpentry isn’t your strongest suit, then definitely look at this kit.
I am not a builder, so this kit helped me a lot. The supports build a stable unit. I bought a used kit, and all parts were just fine for assembly.
Yes the material is thin and at first glance you might think it is too thin, but give it a shot and don’t rush, the kit is cheap and it holds up very well if done right. I’m not a small guy and I was able to walk around all over that roof when I was done – very sturdy. You will need help due to the thin material needing to be braced while installing. Watch a YouTube video or two as the instructions included could be a bit better. Really it’s Well worth the money and saves a headache later on. Would definitely recommend you create a template on the floor somewhere for the roof gables – again watch videos on how. Best to make the template on ply that you don’t mind drilling into and marking up with chalk line or pencil.
There is no easy way to get the long roof pieces in. And I can figure out how our ended up having one corner out 2″ when our floor was square and the corners and side wall level and even. The roof pieces pushed one corner out and I’m going to say the angle was off on one piece.
I’ve put 3 of these up, and never had a problem with things being square. Instructions are WRONG depending on which build you are doing so DO READ the instructions and highlight each section for your build. Trust me, you will find a section that does not match. So…be sure you buy extra wood for kit so you are covered.
I built 2 of these as a weekend project. Very easy to build a shed myself.
Purchased this kit and built a greenhouse with it. The walls are only sheets of plastic, so it isn’t super sturdy, but this thing survived Hurricane Dorian that just came through Nova Scotia! We decided to add a more protective roof and are getting it ready for colder, winter weather to keep growing all year round. The kit is easy to use and instructions were fairly straightforward. Would recommend 🙂
If you have a teenager or tween, this could be a great outdoor and building project for them to work with an adult.
I was able to put this together by my self with the help of just a few clamps. I cut and marked each board first and it went together very quickly
he instructions were a little difficult to understand but workable. You definitely need two people. the no angle cuts made it very easy to assemble. easy to change size as well. I made mine 8×10 with 8 foot high walls.
I had canceled this when I realized that husband does not have to put this togethe
Great product kit! The instructions are very well layed out, tells you all the pieces of wood you need to buy and where to cut them. Definetly recommend at least two people for assembly. There are a few spots where the second set of hand will be a saver for time and just ease of assembly.
Easy to put together, follow instructions. I ordered two kits and was able to make an extra long shed with no problem.
Had no issues with this kit. Its a bit expensive considering what is included but the time it saved me makes up for it.
The first kid I received had no instructions had to re-order the second ki
I have not built it yet waiting for better weather . But it looks like it will be easy-to-use .
Got it because I needed to build something to use, to storage a few things. I use at work, and works grea
hese where ok but we sent the box back to yous
The cost is probably just as much as a pre-made plastic shed you will find in Lowes, but the built quality is much more stronger, you can also customize the inside to your liking.
Fun project for a weekend or two.
good product just follow instructions.
As most said ,,, FOLLOW the measurements for cutting .
Put down a good base ,I used patio stones and your good to go .
I also purchased econo 2x4s and it kept the cost down .
Enjoy .. Happy building
you wont be saving much money, but its a nice little project
make sure your base is square and this is a breeze
Update, DO NOT build the floor the way it says on the ground, use pressure treated and elevate it with piers or blocks, my sub floor rotted after three years, it has to be vented!!!!!!
Update: so after learning what not to use on the subfloor, I jacked up the shed, removed the rotted floor, installed pressure treated 4×6 perimeter with 4×4 pressure treated, 16″ on center, screwed and glued down 3/4 ” plywood, and sealed the plywood with primer sealer. I used blocks to elevate it 2″ off the ground.
This shed kit is great. When I first opened it, I was a little doubtful when looking at the metal pieces and seeing how flimsy they are by themselves. Worry not though. Once everything gets tied together it becomes very sturdy.
As a previous poster mentioned, you need to TRUST the measurements in the book. If you follow those, everything will all work out.
I bought 3 kits to make the 10×22 shed. One thing to be aware of is this. The 10×22 shed is 11 feet tall! By the time you add some bricks to keep it off the ground and 4×4 runners (which I highly recommend) it gets really tall.
One of the kits I got didn’t have all the correct pieces in it and I was 24 pieces short. I called the company and they promptly shipped me replacement parts.
When you go to build this shed, spend a little more time and be SURE the base is flat. I put three 4×4 runners under my shed and spent a long time making sure they were level all the way down. Time well spent because the rest of the shed went up with ease.
Oh yeah, after my comment above about following the directions…on page 13 of the book it calls for 2 pieces of wood labeled ‘NN’. Problem is they forgot to put NN back on page 5. Not a big deal since it’s easy to figure out the correct length (97 inches), but you’ll end up two 2x4x10’s short.
I also recommend printing out the instructions and then going through and marking out all the instructions that don’t pertain to you. Makes it much easier.
After all is said and done the 10x22x11 (WxLxH) shed cost around two grand total. That’s materials only, not labor of course. Not bad at all. Go price one that size pre-built somewhere.
As far as the person complaining they didn’t get an entire shed….REALLY???