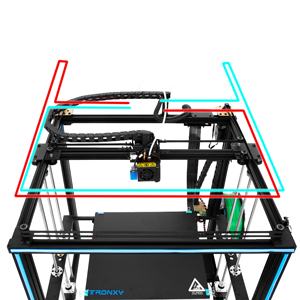
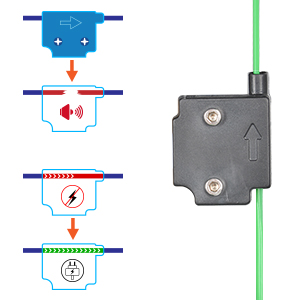
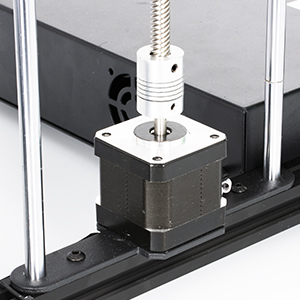
TRONXY X5SA 3D Printer 🎅 Metal Square CoreXY Structure Dual Z Axis Stable Large Printing Size 330×330×400mm DIY Kit with Auto Leveling Filament Sensor Resume Print For Industrial Home Educatio


| Dimensions: | 58 x 64 x 66 cm; 15.22 Kilograms |
| Dimensions: | 58 x 64 x 66 cm; 15.22 Kilograms |
| Origin: | China |
| Reference: | Tronxy X5SA / Filament PLA+ |
Having owned 3 previous 3D printers I would say that this is my favourite out of them all, despite the negative review videos I’ve seen on YouTube! While it might not be the fastest or best in the market, you can’t get any other printers with the same build volume for the same price thag I’ve found (I got it for 177)
Great printer. You do have to assemble but easy instructions and video in box.
Took a while to set up and a few attempts to get the printer running perfect, but this was due to this me being quite inexperienced as this is my first printer. After a few trail and errors it is now up and running perfectly, I would recommend using new filament as the sample that comes with the printer is low quality, other than that I highly recommend this printer especially for the low cost as a first printer. The instructions to assemble was easy to follow and I had no issues in the assembly.
IM NOT NEW TO 3D PRINTING, have kept my eye on this machine for a few years now and it doesn’t disappoint about 5 hours to build, instructions a little off, little adjustments needed to pulleys but good over all.
seems some upgraded parts from ones on video, very quite and adhered to bed no problem with a little bed leveling, some might strugle if new to the hobby, but well worth the 50% off voucher at check out.
I was bought plug and play 3d printer for Christmas, having used this for 4 months I purchased this printer as a lightning deal.
Firstly please be aware this printer is in kit form and must be assembled from flat pack furniture style instructions. Being from a technical background found this realative easy but if you are not this printer may not be for you. Once assemble it will need minor adjustments ensuring bed carriage is level, belts tensioned and level sensor adjusting. Software downloads and updates, followed by the usual learning curve. I read several articles on different types of software to use, my opinion is use the one your most comfortable with.
Initial set up I found to be an issue auto bed levelling was hopeless as a starting point had to manually set up first. Adhesion also proved an issue however after adjusting Z offset this was resolved. The machine once set up I found print quality as good as my other printer.
I’ve still got the odd niggle but I’m slowly ironing them out, this is to be expected as ineffect your the one doing what you would pay the extra money for it to come working out of the box.
Overall I’m more than happy with the printer. Value for money for a printer this size is excellent. Plus although my original printer worked out of the box, building this kit had improved my knowledge and capabilities. I think this is a very important point, once you invested the time and effort you’ve gained much more than a printer.
Overall
– Probably the best printer you can get at this price with good print quality at high speed.
– An amazing platform for mods and upgrades.
– Works well as an entry into 3D printing if you are interested in learning about how a printer works and how to upgrade it.
– Not the printer to go for it you just want a plug-and-play machine, that is always a Prusa.
Pros
– Very easy to assemble. The main complaint you see is that the belts are hard to tension but it’s not that bad. I managed to get them to the same tension in a few attempts. There are lots of printable upgrades to alter this if desired.
– Very rigid frame which is excellent for high speed printing, will print some corner brackets to make it even better.
– Print quality out of the box is very good, easily on par with my Ender 5-pro but at twice the speed. I went straight for 150mm/s at 2k acceleration and the stock hotend keeps up just fine.
– Thermal runaway protection enabled as default as it should be
– Large build volume
– Easy to manually adjust bed levelling with the levelling knobs, bed stays level between prints
– The best pro of all, amazing upgrade path to the VzBot, one of the highest performing FDM printers you can build.
Cons
– Whilst the touch screen works fine and the included firmware gets you going, to add or change advanced features (like thermal protection settings/custom fan curves) you will have to create you own Marlin firmware binary. It is not hard and you will have to do it with most any printer you buy, but it is an additional step which some might not be comfortable with.
– The stock mainboard works fine and you could absolutely never need to change it, but it does lack some expansion such as changing the stepper drivers or adding fans. I plan to change it with other upgrades.
The motherboard had a fault making the z motor lock would not turn they would just make a noise. Tronxy would not send another motherboard out so I had to return now I have to fight to get my money back. . Do not buy one of these. Unless you want a headache. Trying to keep the bed level.
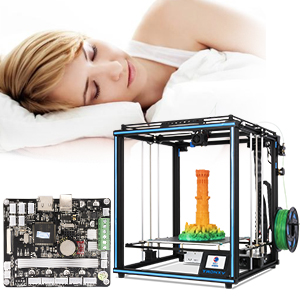
I was given this printer from my dad as a gift for my college 3d printing classes for graphics and architecture, I chose this printer for its stable and cube corexy design and the print size. It’s apparently hard to build yet it only takes half a day to make it fine, this youtuber here explains how to build it pretty well and that’s how I made it work well, I just appreciate how for the price I could get another ender 3 pro and instead can get a printer like this. Thank you 🙂 (purchase not verified because I had someone else buy it for me) and also one final thing, the printer is quiet to the point where I can calmly sleep as it prints right beside my bed
Massive print bed, great quality, and so much easier to set up with auto levelling.
Great machine, bit of an adventure to assemble but once it was built its pretty easy to use and the prints come out well, Om impressed
This printer has a great build quality and Tronxy has really made some huge improvements by listening to customer reviews. They have a great support team as well which makes owning one of these printers a privilege. Would highly recommend there printers for beginners or professionals.
Be warned the assembly instructions however are AWFUL. I mean bad. Really bad. Badly translated and non-sensical I just followed the pictures, which led to a couple of mistakes resulting in a disassembly and try again. Make sure you’re in a patient mood.
Tensioning the belts is interesting and the instructions dont give you any clues how to do this. I found that g-clamping all the moving rails in place exactly in the middle, and then stretching round the belts made this significantly easier and it was working well after my first attempt.
However once it is together and square, you’ll have a great printer which has more than enough build volume, is easy to use, easy to operate, and has been producing some really great prints from really early on for someone who is a complete novice to 3D printing. It is my new favourite toy and I am obsessed with it.
I’ve tried lots of different filaments and so far the Jayo branded filament has been the best. Its only a couple of quid more expensive than the Eono or basics filament and definitely worth it. And buy a bottle of the BDLac spray adhesive. The difference this made to both first layer adhesion and release of the piece at the end was phenomenal.
All in all, a good and reliable printer. The after sales service has been absolutely brilliant as one of the sensors was missing from the box. This was sent out no hassle and they even sent me a program so I could still run the printer while the sensor turned up, and another to restore it once it had. Emails are answered promptly and they genuinely try to solve your issue without a corporate fob-off.
the machine is very solid i built it square, built it tight and it was just right the chitu firmware is sucky but with generic tft support in marlin it only took 10 mins to replace
the only complaint i have is they could have had the second z run on a different driver (there is space for one on the board) and then you could easily run auto allign z axis to ensure the bed is level at all times
i have built many core xy machines in the past so tensioning belts and ensuring x was alligned wasnt an issue i could however see someone new to core xys struggling with i
It’s an absolute pig to assemble. Allow at least 4 hours to put it together. Then 2 to set it up. It’s vital you get the levelling right. Otherwise everything will be awful. I’d recommend using the instructions as a guide, then using the various YouTube videos to actually put it together.
Perseverance is certainly paid off. This won’t make professional standard prints, but it makes great prints. The software is relatively intuitive, again just use a few YouTube videos to understand what you’re changing.
Bed leveling was a little tricky at first but keep doing the auto level and tweak the bed leveling screws until it is as level as possible.
Printer is very quiet but I did notice a rattle from z axis..but if you look very closely you will see it is the active auto level adjusting the height.
Print quality was very good out of the box…but with any 3d printer there are always little tweaks and settings to get the most out of it.
Finally my mainboard developed a driver fault but the Tronxy support was fantastic in diagnosing the problem and a replacement board is on its way. Support is based in China so be aware of time difference.
I’ve had this 3D printer since beginning of July 2020, this is the newer updated 2020 model.
I had issues with the auto leveling, The company I must say are great, you email them and in my case send them the problem actions on a video clip by me you tube account, and they really try to solve the issue for you and are fast at replying! In the end I find that I put two of the electrical plugs used by the machine to control the X axis and the Filament exturder in each others ports? So this helped the printer work better, the real problem we both were puzzled about was the printer head trying to zoom out of the X axis side of the frame?
I happened to press the ” Return to Factory Set up ” icon on the touch screen, and bingo the printer works right! Tronxy really were great in supporting the solving of the problems. The printer is I tell you great when you get it’s Hot Bed Leveled right, This can take some time even though there is a auto leveling system? You like me find that the 6 hand turntable hot bed adjustment knobs can take some time to adjust right to level the hot bed right?
The sensor for bed leveling on the head works well, But those 6 adjustment knobs can really test you. turning them clockwise or anti-clockwise to adjust the level of that hod bed is a real important action so the printer prints Okay. it takes time to get the right adjustment. So don’t rush take your time and do tiny turns of the 6 knobs. Printing wise after you leveled right, is very good.
The thing I found is you must use the building instructions that are on the small SD CARD that you have in the USB reading orange unit for the PC USB slot. That is better building guide than the paper one you have! The two long rubber belts for the X & Y control pulley’s do stretch a bit after you used the printer a bit. so cut off the zip ties one by one of the two on the hot head unit and tighten the belts and re-tie in place with the spare ties. The company do care about feedback and do help you so email them and watch the videos online about the printer and you be fine. ENJOY your new hobby.
had one issue when the x motor and extruder were switched, found the supplier had connected the wire incorrectly, easy fix. also needed to tweak the steps on the z-axis which was a fiddle but with help from the web was resolved in a couple of hours.
Working ok now and very pleased with it , massive build volume.
the basic build is good but there is room for improvement such as building an enclosure and maybe make it more rigid so you can move the head faster and cut print times, which given the size of the prints you can make could run into tens of hours. All the upgrades can be found online.
Over all very pleased, if you want something that will run out of the box this isn;t for you, but if you don’t mind a bit of tweaking your all set and with a bit of effort you could make a good printer grea
The machine on a whole prints well, I have done a few upgrades myself swapping out the corner pivots and the Y axis runners, and changing the bearings to toothed bearings over smooth ones, this has made the machine nearly silent running, there is no noise from the steppers, belts or mechanical parts now. Only noise generated is from the fans.
The print quality is great and a few minor tweaks and I’m sure the prints will be perfect, the bed adhesion is good, if not too good (had a problem lifting a few pieces once printed).
I only have a couple of gripes with the machine and I’m not going to knock the rating because of it overall I am very impressed with this machine, firstly the Chitu software that runs the printer is good but not as good as marlin, it’s difficult to configure (different M codes from marlin), would be nice to see them change the running board for an skr/sky clone and have it running marlin. Secondly The auto bed sensor doesn’t work on a glass bed, and finally if Tronxy didn’t offer a 40 reduction through amazon and instead put in the upgrades that most people are doing (myself included) then they would have a near perfect core xy out of the box
Received quickly and didnt take long to assemble I did have to do a few little running tweaks in slicer software but this printer is printing great absolutely love i
Allow plenty of time to build. If you rush the build, you will incur problems.
Apart from that it’s a very good baseline for a 3d printer imho.
There’s plenty of extra nuts and bolts should be you require them.
First test print was encouraging. A little vibration ripple on the z axis and a slight miss alignment on the x axis. But these were quick fixes. Just needed to tighten down consentric nuts on the runners.
Hot bed heats up in about 3 minutes on this version. 24 volt. And was real happy to see it was insulated.
Would recommend adding a hot bed mosfet for your own piece of mind.
Noise level while printing is quite high. Hoping new belts will help with that.
Auto levelling seams to work well. Layers are consistent throughout the print.
Touch screen is well laid out and gives all info you need. And is realy responsive to the touch. If you use the tronxy slicing software provided then the screen will display the model when your browsing your print files which was a nice touch.
The removable bed surface is also a nice touch. Less frequent bed leveling required this way but I would have preferred it to have been magnetic rather than relying on paper clips to hold it in place. The surface has maybe too good adhesion at least on the pla I have testing. It is realy hard to remove your print. You will need the metal scraper provided to remove your prints.
Only other gripe is just my own opinion. The card slot should realy have been a full size sd card. A bit of a pain having to remember where you put your USB converter for the laptop as I don’t have the room to put my laptop close to use USB.
Last but not least. It’s a monster. Massive print size compared to most. It was a choice between this unit and the ender 5 of the same size for me. I made the right choice and it was 100 cheeper than the ender 5.
Would I recommend this. The answer is yes. Great for noobs and pro’s with lots of scope for personal touch upgrades. The only shame is I don’t get paid for this review
Pros:
The build manual is good and easy to follow,
The quality of components is good, everything fits together well,
The fasteners are of reasonable quality and extras are provided,
The printer runs relatively quietly,
The included build plate works well, with excellent adhesion,
Cons:
NO THERMAL PROTECTION IS ENABLED AS DELIVERED. The safety aspects of this cannot be over emphasised. Do not leave the printer unattended without downloading new firmware with Thermal Protection enabled,
The dual Z motors have only 1 endstop, so the carriage needs to be leveled before printing each time.
The inductive sensor will not work well with a glass bed if you choose to add one.
Overall, this is my new favourite printer.