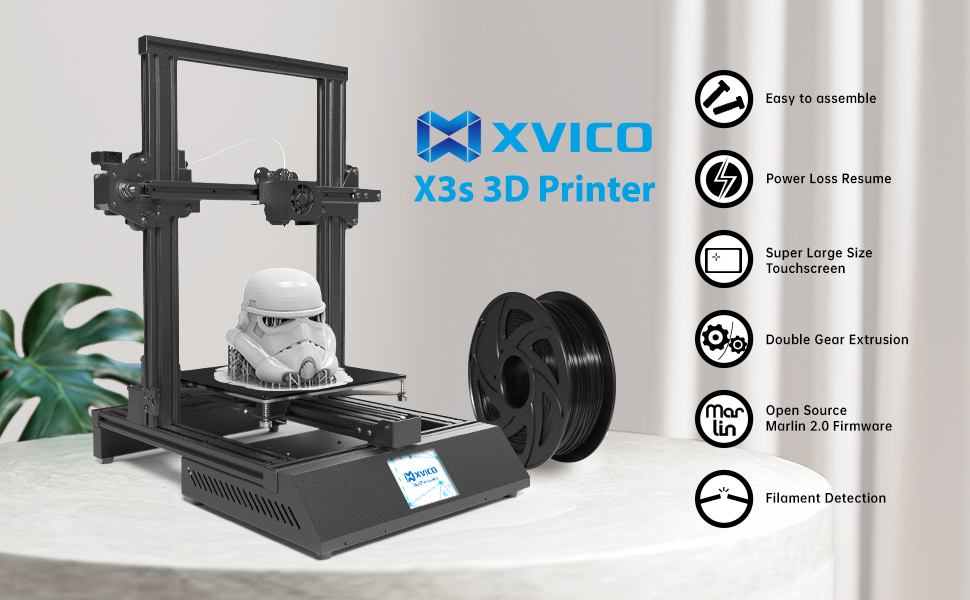
XVICO 3D Printer X3s DIY Kit Rapid Assembly with Open Source Marlin 2.0, Large Build Print Area 220x220x250mm for PLA, PETG, ABS, TPU Filaments


Develop Personal Hobbies
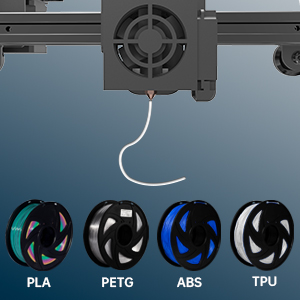
The model in the picture uses XVICO white PETG filament.
Holiday Gifts: enhance families or friends relationships
Ldeal Choice For STEM Projects: lead children to explore the 3d world
Very important summary-problems and solutions frequently encountered by customers.
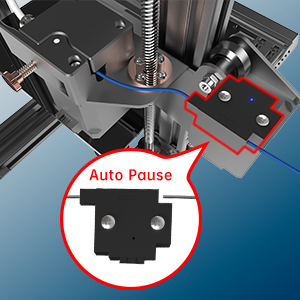
1. When you encounter the printer constantly prompting you to replace the filament, please pass the filament detection switch first. When the blue light is on, it means that the filament is detected. When the blue light is off, it means that the filament is not detected by the material break detection switch, so a prompt box will pop up.
2. Touch screen touch error, please try to touch the screen with your fingertips first, if the problem persists, please send us a message to replace you with a new screen.
3. If you find that there is a filament color at the nozzle that does not belong to you when printing, please don’t worry. We will print and test each machine before shipment, so there will be some filaments left in it.
4. If the goods you received are defective or damaged, you can request a replacement. Although we will carry out strict machine inspections before shipment, during the long period of sea transportation and delivery to Amazon warehouse, I cannot know whether the machine is undamaged. So if the machine you received has any defects, you can directly apply for a replacement. Another situation is that you may receive goods returned by other buyers. Because Amazon will repackage the goods returned by the buyer, provided that he believes that the goods are not damaged.
5. If you are a new player, you have just contacted the printer or soon, you can communicate with us about any machine-related problems, we are happy to provide you with a good solution.
| Weight: | 8 kg |
| Dimensions: | 31.19 x 44.48 x 51.18 cm; 8 Kilograms |
| Part: | XV-X3s-001 |
| Colour: | Black |
| Batteries Required: | No |
| Batteries Included: | No |
| Manufacture: | XVICO |
| Colour: | Black |
| Reference: | XV-X3s-001 |
Once you down load the right slicer settings it works like a dream
Love this printer had a few issues however contacted the Manufacturer and have spare parts coming soon, this printer is definetly a great first time 3d printer to get to learn the ropes, would highly recommend this printer.
Great value. Touch screen is a little frustrating to use. Best to slice in Cura as Ender 3 profile to SD card then print.
This is my first 3D printer, and I have to say, for the price I paid this is an awesome printer.(with some caveats)
After watching the setup steps via youtube, I came to my first print to find that my extruder was grinding when I started printing. I opened up the hotend to check for a blockage and sure enough there was some white filiment stuck inside from testing at the manufacturers I pressumed. After removing the filiment I began my first prints from Cura’s calibration plugin. After calibrating you can see my first print in attached video.
The touch screen is quite badly calibrated or just cheap, however using octoprint server means i dont even have to interface with it.
All in all for the money you pay this is a capable printer, but remembering that 3D printing isn’t quite at the convenience stage yet and may require solving your own problems on the way.
I love this printer. But first a warning, read up before buying. I read the reviews on here, watcvhed you tube, learnt whats involved in starting with a 3d printer before buying, and it paid off. For the price of this unit, I was shocked by just how good it is, but out of the box there are a few things that could leavce a new user crying if they arent aware. Not sure if this is a quality control thing or not, but if you check first then you will save a lot of heartache. The instructions for set up are very basic, too basic if youve never used one before, but online videos will get you going ince it’s built. Prinmarily, the nozzle is loose out of the box. If you don;t tighten this before starting, youll end up ruining it quickly, and molton filamend dripping onto your bigger projects, ruining them before they get going. Id recommend heating the extruder to about 190 deg, then tightening it. it;s easier to do this with the fan removed, and will save you alot of problems later. Also the tension in the belts was way too loose, but again, a quick check and tightening sorted this out.
Next make sure youve learnt abour levelling the bed, and are happy to spend as much time as you need to get this spot on. If you dont, you will not get this to work. That goes for any printer. It’s the number one thing Iv’e learnt to help you to be successful. Its not difficult, and the inbuilt tools help, but it is time consuming at first.
There are a number of features that youd expect on a much higher costing printer, and once set up youll be very please.
My only concern is the touch screen. It hasnt given me any issue, and is a greatfeature, but I’m not overly taken with the feal of it.
Overall, I would have no hesitation, if the need arised, to by this again if I needed 2 printers
Update: Used it a fair few times now and obtained a new screen from Xvico which I changed myself and it’s not much better (but it is fully functional to all corners).
The minor head ‘leaking’ seems better having played with the setting in Cura.
I’d advise having a few spare nozzles and a prit-stick handy as this really does help improve the print.
Over all, it’s well worth the money
Ok, little experience of 3D printing, only used an Anycubic machine prior. The touchscreen is very poor, often selecting wrong area and it is lose. The head appears to leak although this sometimes stops and doesn’t really cause any issues. The warning about the bed temp is strange but will see. The stops seem to be out by a long way and the belts are held with cable ties so they are deformed and do affect printing even after adding tension. I have printed a few things and once it gets going it is ok, just make sure it’s on its way before leaving. I’ve not tried other filaments and only played a little with bed and nozzle temps. As I only paid 110 I’m not complaining too much as a beginner but if you can buy a better printer.
However be aware that tweaking and adjusting things takes quite a bit longer. This isn’t particularly a problem just with this printer, most have similar issues except as most of them require you to build them from a box full of parts you tend to do that as you assemble them.
Points to check;
1. Belt tightness – I found both the ‘x’ axis (left right) and ‘y’ axis (forwards/backwards) were loose. In a worst case scenario you will find the belts coming adrift and ruining a print totally, more likely is if they are loose the quality will suffer artifacts and other defects resulting in poor quality prints. The ‘x’ axis is tightened by loosening the two bolts on the front right bracket that are nearest to the gantry (i.e. not the one on the far right of the bracket). Once loosened pull the bracket to the right till the belt is nice and tight, but still allows the carriage to move smoothly. At this point re-tighten the bolts to hold the bracket in this position. Similarly the front bracket is loosened by loosening the 4 bolts (2 per side) closet to the bed (not the pair furthest forwards). Again pull the bracket toward you and fasten the bolts again.
2 – Bearing wheels, you will see the bearings with rubber tyres on them that roll on the ‘x/y/z’ extrusions (i.e. bars) you should check each wheel to make sure it is properly in contact with the bar, in other words it does not rotate without moving the relevant axis or carriage. I found one on the right hand ‘x’ axis bracket that was not in contact with the uppright (z) extrusion, a turn or two of the bolt and it was fixed. The ‘x’ axis itself also had a problem as when trying to move the print head carriage I found it was binding slightly in a couple of places, checking it more closely I noticed it was everytime the bottom wheel reached a certain point in its rotation. Loosening and re-tightening the two upper wheels slightly fixed it in no time.
3. This is the most important issue, the print nozzle. This was not tightened on my model fully and seems to be a common fault as my sis-in-law had the same problem on her machine and other reviewers on youtube have commented on this as well. To fix this you simply need to tighten the nozzle in the heat block (this is under the print head carriage, remove the blue silicon sock to allow you to tighten the nozzle with the little spanner or better still a small wrench and socket. If you do not do this you will likely get melted filament leaking out of the gap between the nozzle and heat block. Apart from making a mess this can result in plastic leakage which will eventually burn and drip onto your model as you print resulting in some nastly looking blobs. Longer term it is likely to lead to print head blockages as the leaking/burnt plastic will cause clogs in the print head, something you don’t want if it is possible to avoid it.
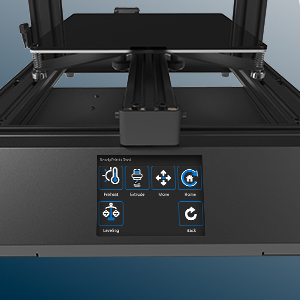
Once all the above is done check you connected up the wires the right way before you try to print anything. Use the printer touch screen menu to select ‘tools’ then ‘movement’, you can then see up/down for the z axis, left/right for the x-axis and back/forwards for the y-axis. Firstly select ’10mm’ as the movement amount then check each axis moves in the correct direction when you press the buttons.
Finally level your bed, this is achieved using a piece of copier paper or similar, you simply use the menu options and select each point and then using the small brass wheels on the bottom of each appropriate bed corner twist them (left to move the bed closer to the nozzle, right to move it down away from the nozzle). You will have the correct distance between bed and nozzle when you feel a slight resistance when trying to move the paper. You may find that you’ll have to go round all the points a few times as adjusting one can change the setting for the others, especially the one on the diagonally opposite corner.
Once that is done you can then put the micro-SD card into the printer socket on the right hand side (contacts facing upwards) and then select printer from the menu and look in the ‘gcode’ directory. Here you will find a couple of relatively simple test prints. The brush barrel is the nicest as it is a form of a pen/brush pot with a decoration on it. This will take a number of hours to complete, but if you have everything adjusted correctly you should end up with a nicely finished model.
If you want to setup your own models you should install the copy of Cura software included on the micro-SD card or alternatively you can download a generic version of Cura if you want the latest version, but be aware it probably will not have a profile for this particular printer at this time so you will need to configure it yourself. The Creality Ender 3 profile is a good starting position for that.
One thing you may have an issue with is getting your prints to stick to the bed, this is a common problem for virtually any 3D printer and unless you want to spend time checking the levelling each print (even auto levelling systems are not perfect) the best solution with the type of bed provided here (glass) is to use a very minimal spray of a product called 3DLAC, this helps the model to adhere but then releases it when finished if you allow the bed to cool properly. It’s a bit of a cheat, but oh so convenient for reliability.
So there you go some hints and tips as well as an overall assessment of the ease of assembly.
As for features this printer is great value, it is fundamentally a Creality Ender3 clone, but in addition has several upgrades you don’t get as standard on a stock Ender3, specifically you have a nice useable touch screen, a filament run-out detector which pauses the print if you run out of filament so you can replenish it before re-commencing the print, a dual geared extruder (Titan clone) which ensures better filament feed, and a glass bed surface as well as upgraded bed springs. Normally all of these are after market upgrades for an Ender3. So overall this is a geat value package even at its full price.
The best part though is as it is an Ender3 clone (like many on the market) it does have the advantage of access to a widely available range of spares as many things are compatible between the two machines. I should add I only gave tech support 3 stars, not because it is poor, but simply because I never used it so have no view on their reponsiveness or reliability.
on any problems with machine contact support @xvico first, point questions to Mia very helpful and super fast with assistance , i lost the micro card when i assume I was unpacking the unit had a new one within 1 week thanks to suppo
I have to say, I’m very happy with my purchase so far, it was really easy to set up and print quality is excellent! The glass bed really makes a difference.
Set up is just 4 bolts and all cables are numbered/lettered so you just have to match them up so there’s no complicated instructions or wiring diagrams to follow which makes things much more straight forward.
Overall, I think this is a great printer whether you’ve had printers in the past or even if you’re just starting.
If you are a beginner this is perfect, 4 bolts and connect cables 10 mins set up. Then level the bed and off u go!
Iv had no issues with this printer at all. Fantastic for the price also arrived with a uk plug…. Happy mome