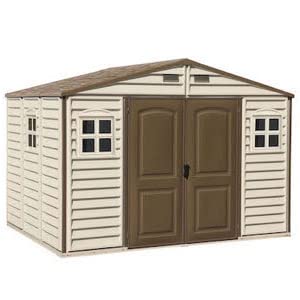
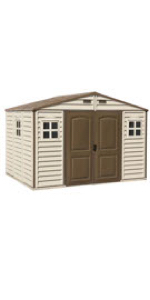
Duramax (30214-4) 10 x 8 Feet V2 Wood Side Vinyl Shed
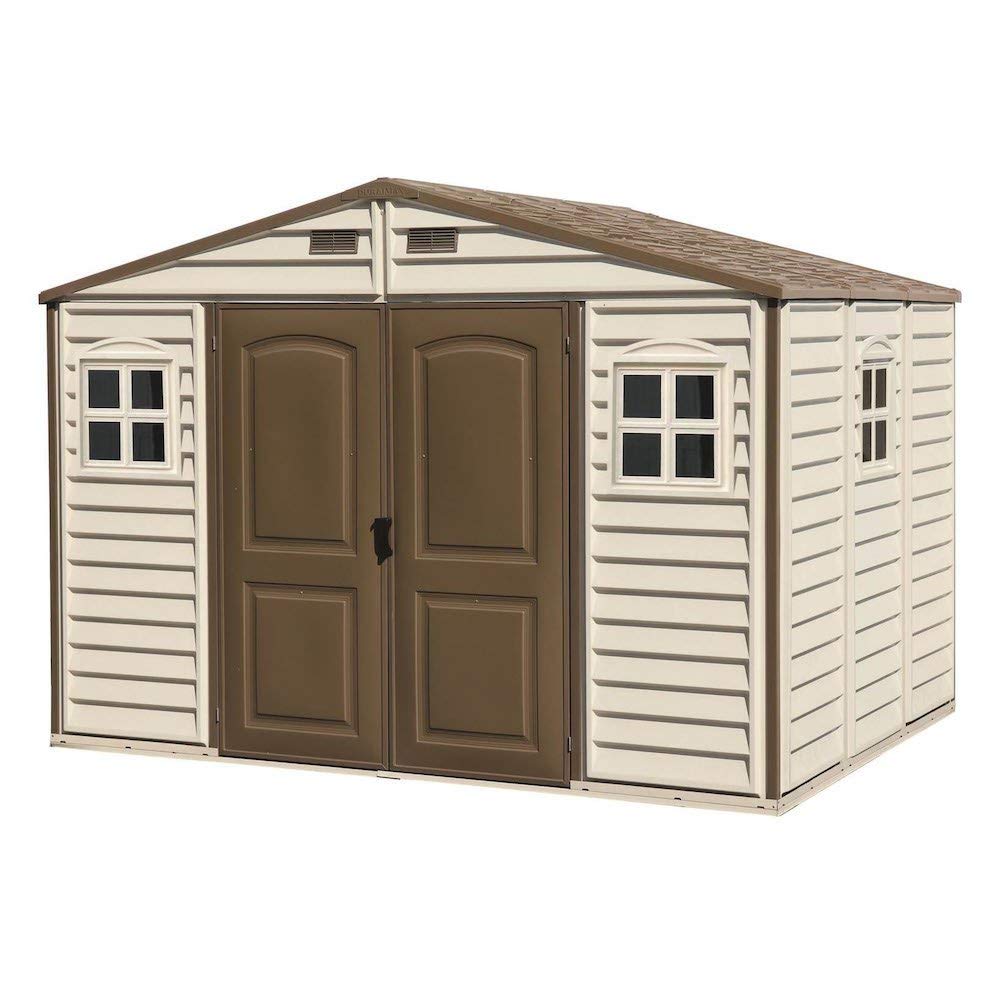
Duramax (30214-4) 10 x 8 Feet V2 Wood Side Vinyl Shed – Ivory/Brow

Features
| |||
|---|---|---|---|
 |  |  |  |  | |
|---|---|---|---|---|---|
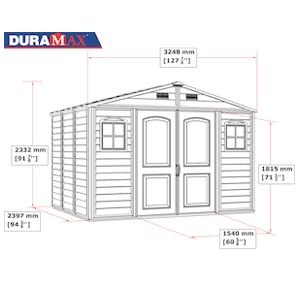
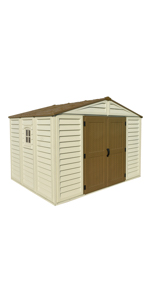
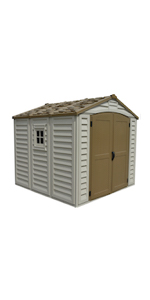
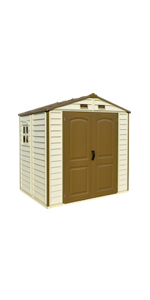
| External Dimensions (WxDxH) | 324.8 x 247 x 233.2 cm | 326 x 250 x 234 cm | 324.8 x 247 x 233.2 cm | 246 x 247 x 234 cm | 245.4 x 168 x 222.7 cm |
| Internal Dimensions (WxDxH) | 313.3 x 234.3 x 215 cm | 313 x 234 x 215 cm | 313.3 x 234.3 x 215 cm | 234 x 234 x 220 cm | 234.3 x 155.3 x 210 cm |
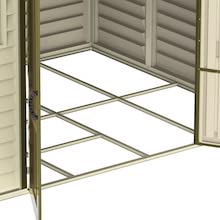
| Metal Floor Kit Included | ✓ | ✓ | ✓ | ✓ | ✓ |
| Window Included | 3x Windows | 2x Windows | 1x Window | 1x Window | 1x Window |
| Shelving Option (Optional) | ✓ | ✓ | ✓ | ✓ | ✓ |
| Dimensions: | 239.39 x 318.77 x 231.14 cm; 127 Kilograms |
| Model: | 30214-4 |
| Part: | 30214-4 |
| Manufacture: | Duramax |
| Dimensions: | 239.39 x 318.77 x 231.14 cm; 127 Kilograms |
First impressions when we opened the box and felt the panels was “This is going to be flimsy” but when fully erected its solid please note you have to sort your own floor we bought 3 sheets of 18mm osb 8×4 all in all really happy
Wow what a lot of parts,but with the help of my son and my grandson for a couple of hours we had it erected in7 3/4 hrs most impressed with it feels very sturdy and looks nice at the top of our garden just got to put in a new path to the central doors and it’s finished,well worth the money well instructed book easy to read pictures
This item needs an option for flooring, it’s been a nightmare as I have not been able to use the shed since i brought it, due to no floor and is costing more money than expected.
I am terrible at DIY so used an experienced builder to assemble mine. It cost me a days labour. The instructions were clear and easy to understand but there were hundreds of pieces to be identified and assembled in the correct order, as ever there were some screws and nut sand bolts missing or not clearly labelled but a builder is experienced with dealing with issues like this. The product does not come with a floor and costs an extra 130 so my builder used 2 sheets of ply which worked well.
The finished product is water tight and sturdy but I would not like to have attempted assembly by my self unless I have a great deal of DIY knowledge or am a builde
I just love my new shed …needed two people to erect but wasn’t too difficult,I have it for my washing machine and drier ..in it ..well worth the money and it looks good too
Good quality shed and is very good value for money, comes flat pack so obviously some assembly required took me and my brother an afternoon to put up and does the job nicely and is rather aesthetically pleasing. Bit larger than ibthought it would be but I had plenty of space for i
I had done my homework, read the Amazon reviews which, as usual, ranged from terrible to excellent – watched the YouTube videos which were amusing, but best of all I downloaded the instrction manual beforehand and read it so that nothing was a particular surprise when I opened the box and began construction. I recommend that you do this. It saved me a lot of time.
It took me around 2 hours to construct the base, screw down the channel onto the base that the shed sections sit in and all the rest of the metalwork that form the roof supports, very important that the roof supports are put together before thinking about the shed sections. This is all a one man job with the help of a good cordless screwdriver.
Now to the shed sections themselves. Extremely thin, very flexible and sapped my confidence completely! I enlisted the help of my neighbour – this is definitely a 2 person job – it took around one hour to complete the shed sections, all parts fitted and all holes lined up. when completed the whole structure swayed in the light breeze and at this point I truly questioned the sense of buying this shed. Around another hour later the metal roof supports were fitted and I could not believe how strong the shed had become! That was it for the day, I was now confident to leave the shed as it was overnight with no roof, to complete the job the following morning.
Started the roof at 8am and was all done by 10am. Went to builders merchants for some OSB sheets to make the floor and that was it, quite a sturdy, maintenance free shed!
To sum up, I recommend downloading the manual first to get the general idea of how to construct this shed, the manual is fairly well written and straighforward. Follow the instructions carefully and do not be tempted to skip sections as the construction will rely on you having done as you are told!
It did rain after the job was finished and the only spots of rain that entered the shed came in one window as I had forgotten to seal it – my fault, not the shed’s. Good Luck!
This product was considered a bit flimsy. There was a lot of screws to fix for strengthening the whole structure. The fixing pins for roof panels were found a bit tricky for fixing them right in particular those long pins. Fixing holes were needed to be lined up significantly before your fixing. I bought a 8 x 10 shed. If a wooden base is needed, it should be at least 2400 x 3200 mm for fitting the frame base of the shed.
They say there’s a base but beware there’s no floor add another 200.00 for the hardwood ply, 600.00 maritime ply
Now its up looks good it hasn’t rained yet so hoping it is weather prof
very frustrating to build at the start , the side panels fell down 3 times before i got another 3 people to help and once the roof was on it all came together . looks good and seems to be leak free.
Yes very heavy to move, ready for erecting.
Once floor frame down, very easy to erect following instructions.
Me and my wife did over the space of a weekend.
Must say could of really done with arms the length of an orangutang at times, to reach some of the central roof fixings.
On a couple of occasions roof holes not quite lining up fully, nothing a jig with a drill couldn’t solve.
On a serious note, we are both really happy with this shed.
Would highly recommend.
The major bugbear is that the shed arrives in one 135kg box – a nightmare for the delivery company, and for the hapless purchaser trying to move it. You have to open it upon delivery and split the box contents – luckily there are three boxes inside which makes splitting it more manageable.
However – reasonable value, excellent quality, and robust once assembled.
Not sure if waterproof as only been finished a few days.
Putting the base together was pretty simple and fitted together with no problem. One thing to note about the base though is that its really flimsy metal strips. When we boarded the bottom of the shed you definitely feel like they’re bending and going to break. We have built ours up off the floor and I think it may have felt sturdier had we built it on the floor.
Sliding the sides in and clicking them together was a bit tricky at times and we had a couple of side edges that were damaged so had to straighten them with some pliers to get the edge straight enough to click into the side panel next to it. There are thin metal strips you screw to the inside of the panels once they’re in place, but to be fair, they didn’t really make the sides feel sturdier even once they’d been attached. This is the part were we used pieces of wood and the spade to hold the panels up and not wobbling about as we proceeded to put all the sides together.
Putting the roof and doors on was pretty straight forward and easy enough without a hitch. And once the roof was on and everything screwed together it shed it pretty sturdy. We had a bit of rain a couple of days after it had been put up and the rain water had got in round the windows a bit, so I would definitely recommend sealing round those.
All in all I think its a pretty good shed, but I think they should make the metal base strips like the ones for the roof, the roof ones are much thicker, stronger and sturdier, which would be more appropriate for the floor. I also think having 3 or even 4 willing volunteers would have helped with the erection, especially with the big one.
Anyway it was fine, although the condensation was bad in it, but that as due to the hot tub and it being plastic was of no concern. It was ok !
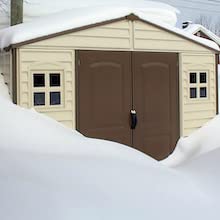
Then there was a storm that hit the UK, we knew it was coming so we went and removed anything that could possibly be damaged or get blown away in the garden. We placed all furniture inside the two sheds, a small wooded one and this plastic one and closed them up and secured it. The wind was bad and the storm passed with no damage to fence panels of which I have 20 in back garden, no damage to the small wooded shed, no damage to the picket fence or wooden gate or no branches fell from the trees that surround my garden. BUT the roof of this shed was in next doors garden smashed to bits, maybe it wasnt secured properly you may ask ? It was very secure as our grandchildren use the tub and my son ad husband are builders and know how to erect a plastic shed, we would have just re-secured the roof , but it was broken and smashed, the side panels all snapped as well it just collapsed and broke .
The metal around the plastic was sticking out as the plastic had come away from it as you can see in photos. It was dangerous as I have 3 dogs and 8 grandchildren so I had to dispose of it in the local tip.
I contacted Amazon as this product comes with a 15 year warranty, so i wasnt unduly concerned about a replacement, my house insurance didnt cover it, but again it has a 15 yr warranty and they are that sure of the sturdiness of the product as it stated in the description. Amazon said they would replace if I sent back the damaged shed ! But the shed had to be removed as it was dangerous to my pets and grandchildren. But I have a video and photos if the shed that proved the extent of the damage, but no they didnt want to know. So I contacted the manufacturers, who replied quickly saying go through your house insurance ( relinquishing any responsibility at all for their inferior expensive product) and saying they do not stock or own any Duramax sheds in UK their factory is in Dubai, so as a goodwill gesture I can have one at cost and to collect from their factory in Dubai !!! So basically it’s going to cost a lot to ship from Dubai, so they told me to just go and buy another one in UK – end of, goodbye have a nice day, adios !
Therefore I would advise you to think carefully before you buy this product and maybe secure it more yourself outside of the screws and nuts that come as standard, as they clearly arent good enough!
So, myself and Mrs G got the box out of the garage on a fine and sunnyish day (this is rural Devon, not known for it’s blazing sunshine in winter!). We then decided that we were not moving it any further as it was just too heavy, so we opened it and then took the items bit by bit to the garden.
We obviously needed to start with the anchor kit bit did not realise it was in the large box but nicely separated out for ease. The reason we had not noticed was because it was in a box with nothing written on it. A bit of advice to the packaging department, please write on the box, it’ll make someone’s life so much easier!
Anyhow, we put the anchor kit together (OK, Mrs G was off doing something else so I pretty much built the whole thing myself!) and then started on the rest.
Very easy instructions and with a bit of patience and ensuring you lay out each piece properly, it went together in around 4 hours. When the wind blew it was a pain but that’s when I called for a spare pair of hands.
As you can see from the photos, it looks good. I must admit, for the price (the smaller, flimsier grey one was only 100 less and only weighed 39kg) it is very sturdy.
I removed the central parts of the anchor kit and put down decking which is painted grey and looks much better than the wooden base it is secured too (I had a 15′ x 9′ shed that I knocked down and kept the base of).
All I would say is:
Lay ALL parts out first.
Take your time.
Have a spare set of hands when needed and do not try to erect it in wind.
Seal those parts they have stated, I sealed all around the floor edge too.
Seal all pins on the roof, I missed one which was a right pain to get to when all together.
Check the numbers on the roof panels. I got one wrong as they are quite hard to read. Had to remove one side and start again.
The last roof pin on the past panel (furthest from where you stand) it a total pain to reach unless you are 6′ 6″, I’m 5’6″, it was not fun. get yourself high enough to reach.
Enjoy your new shed/summerhouse or whatever you use it for.
Takes 2 people to PRE assemble. Takes 3 people to put together.. all boards need stabilising whilst you line up the walls.. have 1 person instructing. As there are tiny bits of information you do not want to get wrong. On pre ensemble, pay attention to the pictures on the manual. There are parts with multiple holes in.. they all need to face the correct way.. or when you get to the roof you will need to dismantle to correct it.. windows are pointless and flimsy. When putting the roof on with plugs you need a mallet and sylicone. You must sylicone the entire plug and hole. Or the roof is pointless.. we was missing a few items,, I had to improvise. 1 wall sheet was cracked. Too late when I noticed. The floor on this product is the metal frame. If this is your first time you also need to spend 60-70 more on the flooring. The doors are flimsy and its not insulated in the slightest. I did 3 temp tests at Christmas inside was exactly the same temp as outside. So if your storing you will need to insulate with boards. I spent a further 40 on that. I also spent 20 on expanding foam for the gaps where the roof meets the walls all away round the shed. After building an inner frame, securing the doors a little more it was good its solid.. a good size.. 6 hours project to put up with 2 people in the rain. Its taken 7 further days to correct all the snags.. I rate it a 8/10 I like it. DELIVERY was a joke. 2 guys left it in my front garden with my pregnant wife! It clearly says delivered to specific room. They refused and left it in the rain. My front door goes straight into my front room that is 22ftby34ft. I spent way more on it thatmn I wanted!
Yes the item does come in one big heavy box, which is a bit daft, but once you are prepared for that you can easily plan where to put package. The drivers were extremely accomodating and placed the package in the garden until i got around to building it, after all it is meant to be in the garden once built!
All items in the box were in tact, clearly labelled and all present and correct.
At 57 pages of A4, the instruction booklet is quite daunting when you unpack it. On closer inspection the instructions are mainly pictorial with a few written notes to clarify the pictures. Take time to read through the instructions and make yourself aware of the components. Remember these drawings are not to scale, so check and recheck you are assembling the pieces the correct way.
The quality of the pictures in the booklet are excellent and very clear. if you take your time and follow the instructions you will have a perfectly solid shed that does not move. All the holes line up perfectly and the quality screws hold the pieces together well.
When assembling the roof panels i did find the roof panels did not align with the holes in the frame. I realised that whilst assembling the frame I occasionally lent on the frame causing the frame to slightly twist. Once I recognised the problem, some very slight movements of the shed ensured the holes all aligned and the roof was then easily completed.
This shed requires one competent DIYer and one helper, yes when you place the walls in place it is very scary and flimsy and you think you have made a mistake but once you start placing the frame in place, you very quickly realise this is one clever construction and it is going to be a really sturdy building.
The end of the booklet has a number of suggestions for floor bases, which should be considered before you start.
One final tip. Once you have completed the base frame at page 13 I would suggest you go to pages 31-36 and assemble the pieces you require for the roof frame. Once they are complete restart construction from page 14 through to the end.
If you do it this way, you will limit the time the shed is in the ‘scary flimsy’ state that others have complained about. I would not recommend starting from page 14 if there is any wind at all.
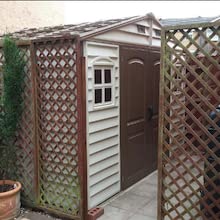
All in all there is some room for improvement from a packaging point of view, but once complete it is better and easier to erect than any wood or metal shed I have previously constructed. This took my wife and I three half days to erect, not because the instructions are poor or it was complicated or difficult, simply because this is a really big shed.
A few things worth noting:
1. This shed does not come with flooring-you need to buy this yourself and dimensions have been kindly provided at the end the instruction manual.
2. Before you start building, bear in my mind that you will need to access the shed from all four sides to complete it-especially at the roofing stage. It is therefore important to leave enough space for a ladder on all sides to do this. Its probably important to consider this before even setting up your concrete base. The shed can still be moved after setting up the roof-though not ideal as the roof plugs might come off.
3. You definitely need a tall ladder to complete this. Power tools is a must as there are over 200 screws.
4. Ensure the shed base is level before fitting the roof. Uneven shed base is a common reason for misalignment of roof holes which can be frustrating. Bear in mind that the concrete base needs to be a bit bigger than the 10 by 8 inches specified on the product.
5. Some of the diagrams of the metal panels for the roof are not drawn to scale in the manual-best to go with your DIY intuition.
6. The door could be a bit more secure. However, there are ways around it and its only a minor point.
7. You need clear silicone for roof plugs (a must in my opinion), windows and to seal wooden flooring.
8. Read lots of amazon reviews when setting up the shed-it will prevent costly mistakes.
Overall, I’m very happy with the shed. Its the biggest DIY I’ve done to date and the end product is very solid, warm and cosy on the inside. It will not corrode like wooden sheds and does not need painting.
Update: Its now over a year since setting up the shed and its now gone through autumn, winter, spring and summer. I would say that condensation at the roof is a main problem for me-it makes the shed quite damp in cold weather. There’s been a few leakage here and there from the roof (I managed to resolve by putting more sealant though I feel this is only a temporary measure)-the roof itself probably needs some re-inforcement with something like epdm immediately after setting it up to prevent leakage. Overall, the shed is very solid structurally-just the leakage from roof and condensation to watch out for.
Don’t even bother to try install it when its windy.
Amazon is unable to supply parts for this item if any are broken, damaged or missing.
The shed is from the USA and the company will not reply or help if you are outside the US and need help or replacement parts.
All Amazon will do is offer to replace the whole shed, or take it back and refund you.
Or give you a small discount on the price paid.
The Sheds weak point is both the doors. They are so badly made, and the locking handles are a joke.
So you will need to buy yourself and fit a hasp and padlock.
I also had to fix the poorly made doors by adding more rivets around the metal edges,
Over all i’m pleased with it in the end.
Only due to the fact I was able to fix both doors myself, and only paid the sale price of 470 April 18 and not the full price of 719
it has a 15 year warranty but how that would work when no parts are available I have no idea.
Oh and what ever you do make sure it got a flat place, slabs or whatever to stand on.
And use a battery powered screwdriver as the number of screws in the box is unreal.
You will also need to seal each of the clips/pegs that hold the roof on, and also around all of the windows.
(It does tell you to do this in the instructions)
After installing the shed I have found it to be great, rain, wind, snow, you name it the shed is fine.
What you will notice, is that during winter there is condensation that forms on the inside of the roof.
This then drips off the roof a leave a little puddle on the floor.
It’s not chronic, but does happen.
What I do dislike is the fact you can’t hang anything on the walls due to them being plastic.
Only way to make the most of the floor space, is to buy or make shelves/racking and buy a work bench.
good luck..
List of other things I found I needed…………..
STAINLESS STEEL Garage Shed Van Door High Security locking Hasp bar – Heavy Duty 100mm x 100mmAmtech B3400 Rivet Gun with 60 RivetsWER WIRELESS PIR MOTION SENSOR ALARM + 2 REMOTE CONTROLS SHED HOME GARAGE CARAVAN 2-PACKPowerBee Solar Ray Solar Shed Light 48 Superbright led’s Motion Activated Mains equivalent for your garden shed, garage or outbuildingOutdoor and weather resistant Excell Disc padlock with shrouded shackle; stainless steel titanium reinforced disc padlock; 60mm wide; Key locking mechanism
The shed comes very well packaged in a single box, but beware it’s 133kg! The delivery guys struggled with it on a sack truck, but fortunately stood the box on end in the garden, so all I needed to do was lay it down and remove the parts, which are all labelled with their part numbers.
The fittings all come in a cardboard box, and there are only 3 sizes of self tapping screws plus 2 sizes of plastic rivets/pins for attaching the roof. Rather than provide exactly the number of fittings that you need, they have included standard packs of each, so there were a few screws and rivets left over, which is good as it’s very easy to drop screws during the construction.
The instructions are fairly clear, with little text but plenty of diagrams (similar to those from a well known Swedish furniture store).
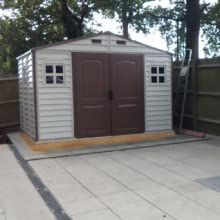
Since our shed was being built on the 10×8 GARDEN SHED BASE GRID = FULL ECO KIT 3.05m x 2.55m, we assembled the foundation on our concrete patio, and then carried it upright to where the shed was to be assembled, which worked well.
Attaching the sides of the shed was easy, however you are required to screw the uprights into the foundation and clip the side panels into them for the whole shed. Since the panels are very light, the slightest breeze causes the sides of the shed to wave back and forth, so needless to say you need two people to assemble it, and in our case one of us spent most of the time making sure the assembled sides of the shed didn’t get blown over, while the other fetched the next pieces and clipped them into place. You can clearly see how the panels move in the photos.
Once the framework for the roof was fixed onto the sides the whole structure became a lot more solid, however the instructions have you installing the side panels before you assemble the roof framework, which itself took about an hour. I would advise doing this first.
There are several things to be aware of. Firstly, the roof framework has holes that need to be aligned properly, and there are several places where you should not screw it into the uprights until later. Despite trying to read the instructions carefully, we fell foul of this, and had several screws that were difficult to remove. The other thing is that until the floor is paid in the shed, it’s still fairly light, and can be moved on the base. Maybe that’s a good feature, since it does give you the opportunity to adjust the position slightly before it’s completely finished.
You also need to ensure that the base is completely flat, since if not, the doors may not align correctly, and the handles and holes for a lock will not align either. We have this problem right now, however at this point we have not paid the floor, so we hoping that once this weighs down the foundation, they will align better.
At this time, which is early November, it’s damp outside, the shed sat for a week in the rain before we could put the roof on, so the inside is quite damp. Despite wiping the insides dry, and also applying clear silicone to the base and around the windows, we can’t yet be sure that it’s leak proof.
Putting the shed together took about 5 hours. It then took a further few hours to cut and install the plywood floor (sheets you buy from local hardware store, wickes in my case) as i had to treat them first. Note you must silicone the windows or else rain will get in, its easy enough to do!
The only weakness in this shed is how you lock the door, through two plastic loops in the plastic handles. I have purchased separately a metal padlock hasp for around 10 that will be bolted through the door to a metal plate for around 3 each to overcome my issue of security with this. I may even change the handles if i can find some different ones with the same span. Aside from the issues, its a great shed and looks very nice in the garden!
Updated:
Added pictures of the hasp and plate, if doing this do not over tighten the bolts (note this may invalidate your warranty). The plate should prevent anyone pulling the hasp off by spreading any pressure placed on it across the door. You can then use an additional padlock on the door handle for extra security.
I spent a total of 2 long days with my Dad to clear out an old shed, take it apart and to the tip before moving and expanding the existing base and building this. Overall it was very straight forward and if it wasn’t for tiredness no mistakes would have been made. I have now kitted it out full of shelving units and huge 2.8m x 0.6m work bench that could have been 0.2m longer.
Negatives
Delivered in one box, at over 130kg it really needs a trolley or several people to move it. Two boxes would make life soo much easier.
Size is closer to 10.4ft by 7.8ft if you put in internal floor panels the total size internally is 2338mm x 3129mm.
Need to have access all the way round when building the shed.
Positives
Fantastic price when it was in the low 400’s was annoyed when it dropped to 380 but with no reviews its a lot for people to commit.
It’s heavy in a good way quite steady, no chance it is going to blow away or collapse easily.
Frame and walls was rigid by itself so can leave it half built without the roof once the top bracing on the walls are up.
Space is huge on the in side, doors are plenty big enough no ducking at 5ft 10″.
Roof supports 20lbs per square foot, using a board across the roof I’m able to spread my weight I’m able to lay across the roof with no issues of it collapsing.
Things that may help others
Plan for it to take 1 1/2 days with 2 people doing it.
Plan ahead of time how your going to the base of the shed or if leaving it. I would have put wooden floor panels down with the frame if I did it again which would of really helped the rigidity of the base and would have stopped it shifting a bit while building and kept everything at right angles.
Anchoring isn’t needed but recommend to at least at the doors.
Side Window panel can be moved if wished no difference between the panels
Expect it to take longer if you build against a wall as you regularly have to get all the way round the shed to secure it.
When you get to the roof section (page 30) it will ask you to build everything before putting it up, everythng previous was built as you needed. If your running out of time and want to secure it ready to be left for the night build up to page 34 and then jump to page 37/38 to secure the top of the walls and it’ll be rigid enough.
Page 35 / 36 be careful when putting this together it is not quite as obvious as it and screws will fall out it’s done wrong.