OWC – 240GB Aura Pro X2 – Solid-State Drive for Select 2013
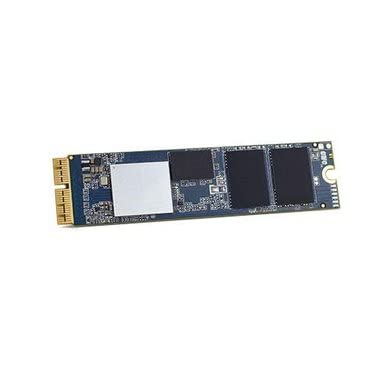
OWC – 240GB Aura Pro X2 – Solid-State Drive for Select 2013 and Later Macs
OWC Aura Pro X2 : Your Mac. More Space. Twice as Fast.
- Consumes less power and runs cooler than any drive before it. (lower power consumption vs. comparable factory SSDs and OWC SSDs for all systems)
- The ports you need. The keyboard you love. Your setup. Your style.
- Your Mac, better than new, with the latest Solid-State Drive technology.
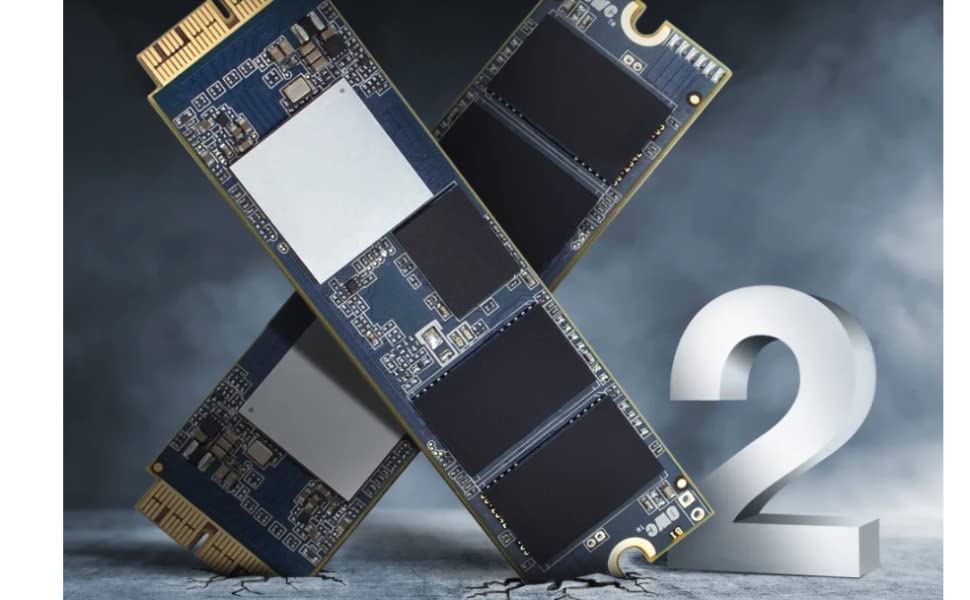
The Aura Pro X2 SSD gives you up to 16 times more space and the speed to keep up with your imagination today and tomorrow. Upgrade your Mac with Aura Pro X2 SSD for a fraction of the cost of a new model and keep your Mac running for years.
Blazing Fast and Super Cool
Aura Pro X2 combines speed, stamina, and efficiency that will change the way you experience your Mac. With read speeds reaching 2989MB/s and write speeds of 1208MB/s, the Aura Pro X2 is up to twice as fast as the original SSDs, delivering performance on par with the latest models. It runs cooler and consumes less power than earlier SSD models, so you can run at peak for longer than ever.
When it’s go time, getting off the line and maintaining a high level of performance are equally important. Aura Pro X2 is engineered with advanced SLC caching, providing instant full-speed write acceleration, meaning those media projects and games stream fluidly and respond without lag time. Aura Pro X2 PCIe-based flash storage upgrades are precisely engineered for your Mac, so you’ll never need to compromise your data by relying on complicated software hacks or TRIM-enablers to get the most from your upgrade. Just install, migrate your data, and enjoy the great performance of flash storage with up to 16 times the capacity of the factory-installed drive. OWC SSDs perform maintenance tasks in the background that optimize the health, performance, and endurance of your flash drive. These jobs take advantage of available, unwritten areas on the SSD. Aura Pro X2 PCIe-based flash storage reserves 7% of the overall capacity as free space. Always. With this allocated free space, Aura SSDs can perform these normal maintenance tasks making your drive more stable, dependable, and ultimately a safer place to store your data.
- Up to 2400MB/s write speeds
- Up to 2TB capacity
- Up to 3200MB/s read speeds
- NVMe – PCIe 3.1 x4
- macOS 10.13+
High-Performance + High-Style
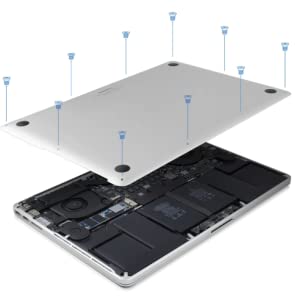
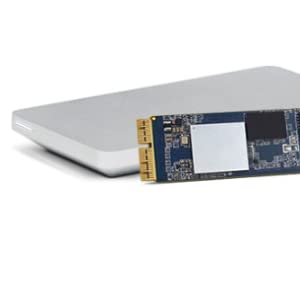
Your upgrade should be a seamless experience. That’s why Aura Pro X2 SSD upgrade kits come with Envoy Pro, the beautifully designed, high-performance SSD enclosure to reimagine your original PCIe-based flash drive.
When you remove your original flash SSD, it fits perfectly into Envoy Pro so you can transfer all your data to the new Aura Pro X2 inside your laptop. Once the file transfer is complete, enjoy using your Mac’s original flash SSD as a fast, external USB drive with transfer speeds up to 426MB/s.
NOTE: The Envoy Pro is designed to work with your factory drive ONLY, The Aura Pro X2 is not designed to work with the Envoy Pro as an external drive.
| Weight: | 40 g |
| Dimensions: | 1.5 x 9 x 13 cm; 40 Grams |
| Brand: | OWC |
| Model: | OWCS3DAPT4MB02 |
| Colour: | SSD Only |
| Batteries Included: | No |
| Manufacture: | Other World Computing |
| Dimensions: | 1.5 x 9 x 13 cm; 40 Grams |
Definitely does what it says it will do. Upgraded from the original 128GB to 1TB which solves the storage problem and as an added bonus it’s comparably lightning fast.
But I gotta tell you getting it recognized formatted in the OS installed was a major pain in the (redacted)
Some detailed instructions in the box would’ve helped a lot, all I got from the videos and everything else posted all over the Internet only gave me brain damage… luckily I was able to suss it out.
Uso questo prodotto sul mio Macbook pro 13 Retina del 2015, senza problemi. Durante la prima installazione ho avuto qualche problemino nel far riconoscere al Mac l’SSD ma dopo un rimontaggio andato tutto bene. L’ho installato da solo, e da quando ce l’ho il mio Mac tornato a funzionare come nei primi mesi dopo che lo acquistai, prima con l ssd pi piccolo avevo sempre problemi di memoria
Arrived earlier than expected to my address in Chile and import fees were cheaper than anticipated (Amazon automatically refunded me the difference). Reliable product which will hopefully extend the lifespan of my (old) MacBook Air.
Macbook pro 13 retina late 2015 con os catalina. Il disco si monta in 5 minuti con i cacciaviti in dotazione. Il problema nasce quando si prova a copiare il back up dal vecchio dico per farlo diventare il disco d’avvio del mac. Ho inserito il vecchio disco nell’enclosure in dotazione col kit e da li ho fatto una copia con carbon copy del vecchio disco d’avvio sul nuovo. Purtroppo non si avviava e ho perso molto tempo, invano, per cercare di passare un backup leggibile. Ho risolto copiando il disco su un altro disco esterno e aggiornato a os Monterey. Avviando da quel disco esterno l’ho clonato sul nuovo ssd interno, che avevo formattato, e ho riavviato dal nuovo incrociando le dita. Il disco molto veloce, supera i 1300Mb/sec e il computer pi veloce di quando era nuovo
Pas trs facile installer (il faut acheter les bons tournevis pour le dmontage du Mac) mais une fois installe, le disque dur SSD est top.
Product arrived in a good package and install was super easy and quick. I needed to replace the original SSD in my 2015 MacBook Pro and this did the trick! Only minor con is that it’s a smaller capacity than original. This SSD is 240gb compared to the 256gb the MacBook originally came with. But I’m ok with that considering the cost of this drive was substantially less than other options. I was even able to use OWC technical support line when running recovery on my MacBook and they guided me through the best procedure to reformat this drive to work the best for my Macintosh. Would recommend it and buy it again.
Krde en full Time Machine-backup p gamla disken, bytte disk och nyinstallerade OSX frn internet p den nya disken och sen en restore. Funkade kanon. Jobbigaste var nog att skaffa fram Pentalob-bitsen i rtt storlek d min var fr liten men det lstes med ett IFixIt-kit.
This drive is easy to install with proper tools to Macbook Air (2017). It was the easy part. Laptop was updated to Big Sur to get the EFI firmware in order. Something has gone wrong in that episode because the disk utility did not recognize the drive. I used bootable installer (10.13) to start over, and luckily that solved the problem. The process took considerably longer time than I have expected, but now we have laptop up and running Big Sur again. And without those space limitations.
First class hardware, massively impressed with everything. Install was a breeze, everything you need is included, OWC even supply an external caddy for the Hard drive you’re replacing. Highly recommended update for your Mac. I wish I’d have known about this update sooner. Still, my MacBook Pro mid 2015 now has a TB of space which is a massive improvement in both speed and performance from my old 250gb SSD which is now in the supplied Envoy caddy. I am very happy as I can now use my Mac again. Unfortunately it bottlenecked due to lack of space (you try running Unity on a 250gb hard drive), and it’s so great to have a fresh install of OSX Monterey (which is the last compatible OS for my Mac and was installed via a Monterey USB install drive. This only took about 30 minutes on top of the 15 minutes it took to upgrade. I was re-installing apps within the hour. Don’t mess around with an M2 and an adapter for your Mac and risk overheating and melting your machine it’s doesn’t really work out much more to get a lab extremely high quality bespoke/proprietary designed SSD which is twice as fast as the original and slots in like a dream and line sup perfectly with the screw hole. Super impressed.
Wenn man ein passendes Macbook hat und die SSD ersetzen will ist das das beste Angebot. Die SSD passt ohne Adapter, das Case ist sehr gut verarbeitet (gibt es aber auch einzeln). Die Leistung ist sehr gut. Die alte SSD hat bei mir gestreikt, ich konnte trotzdem damit alle Daten retten.
Couldn’t be simpler. My OS was within spec so all I had to do was open the laptop, pull the old drive, swap it out and put it back together. (Disconnected battery first of course). Tools were great, housing worked with my old drive and I was able toninstall the OS using recovery on the new drive, then restore from backup from my old drive without issue. Kid 2015 MacBook Air went from 128 to 500ish Gb drive. Been running for weeks now. Performance is great.
My trusted MacBook Air 11-inch would have trouble booting up and eventually did not boot into MacOS at all anymore. I was not sure whether it was the SSD, the logic board, or something else, but I took the risk, made sure to buy a compatible SSD, followed the iFixit instructions and it has been running perfectly for several months now.
Needed a larger SSD, this one works in my machine. Keeps an older machine useful for another few years.
Excellent upgrade for 256GB MacBook Pro 15″ 2015. Hardware install easy, plenty of online advice especially from the manufacturer OWC. Current OS Monterey so OS not included in TimeMachine backups, so performed an internet boot, formatted the SSD and a clean install of Monterey. Then restored the data at the Migration prompt using the data from an external USB3 backup. Mac now performs faster, no issues with sleep problems mentioned with earlier Macs so battery performance unaffected. Good product all round.
The item comes well packaged. OWC do provide instructions and videos online but these are not signposted in the pack so you have to hunt around for them. The process for installing a new SSD in a Mac is horrible compared to a PC and it’s taken me hours today. Seems expensive but all kits are similarly priced.
Replaced hard drive in MacBook Pro was easy to do and set up was a breeze with added bonus I used old drive as spare external ssd in case they supplied.
Drive is great we’ll worth the price I’m well pleased .
Prima dell’acquisto come mio solito ho letto la miriade di valutazione ed esperienze fatte a mio avviso forse da persone poco ferrate in materia.
Detto questo prodotto arrivato in 24h.
Effettuato backup della mia macchina con ultimo aggiornamento IOS15.
Aperto il coperchio posteriore fatta la sostituzione del SSD nei criteri richiesti , riavviato con CMD-R-Tasto accensione mi chiede password della linea Wi-FI inserisco ma dopo qualche minuto errore 2003.
Spengo inserisco la pendrive con ultimo aggiornamento IOS15 avvio la macchina normalmente da tasto accensione, dopo 30 secondi schermata con la scelta con selezione ssd aura Pro 2 invio installato il tutto.
Nota dolente la macchina rimasta lenta anzi forse pi lenta nell’accensione come la precedente ssd ,
nota positiva ho 460g di spazio.
Se pensate di ottenere maggiore velocit upgrade inutile come spazio ok
The upgrade memory was easily installed and worked perfectly in my old MacBook Air, but it seems to have now a sleeping disorder: it goes in hibernation if left closed for more than a few minutes, and I suspect this has something to do with the new memory, since it is a new behaviour.
I but the old 128 Gb memory in the provided enclosure, and it worked, although with caveats:
(1) The enclosured heats A LOT, even when not in actual operation.
(2) Do not try to use APFS with it, it won’t work correctly —you must reformat it with HFS+ of exFAT.
(2) Sometimes it gets corrupted unexpectedly and the only way to repair it is to backup what you can, reformat and get the salvaged content back.
So the external SSD drive you get by reusing the old memory is completely unreliable, and usable only for work which is transient or not critical.
While install took 15 mins. Simple to do and added bonus, the pentalobe driver was in the kit! Great price from Amazon really pleased.
Followed online guidlines and fitted no problem, I used carbon cloner to rebuild (don’t find time machine reliable). After a month no problems to report. No heat issues with this size. possible slightly more battery drain but hard to tell.
ATTREZZI: cacciavite pentalobe p5 – torx t5
MONTAGGIO:
smontato il retro con un cacciavite pentalobe p5, ci sono due clip interne, basta fare un po di forza e si toglie, poi scollegare la batteria c’ da fare un po di leva sui lati, poi svitare la torx t5 del ssd e rimuoverlo, montare SSD OWC Aura pro X2 da 480GB facendo attenzione ad inserirlo bene, magari facendo un leggero movimento DX SX, ma con calma e un po di forza ed entra, riavvitare la vite dell’ssd, ricollegare la batteria e richiudere la scocca senza fissarla con le viti nel caso in cui ci fosse la necessit di riaprirlo.
INSTALLAZIONE:
PRIMO TENTATIVO Accendere il mac e immediatamente premere CMD+ALT+R e aspettare il riavvio.
ERRORE: apple.com/support -5101F non c’ nessuna indicazione
SECONDO TENTATIVO reset NVRAM
Ho spento ilMac. Premere il pulsante di accensione . Prima che venga visualizzata la schermata grigia, premere i tasti CMD+ALT+P+R contemporaneamente. Tenere premuti i tasti fino al riavvio del computer e si sente il suono di avvio una seconda volta. Ho reimpostato la password del wifi di casa e provato anche con hotspot cellulare ma il risultato stato lo stesso.
ERRORE: apple.com/support -5101F non c’ nessuna indicazione
TERZO TENTATIVO
Accendere il mac e immediatamente premere CMD+ALT+MAIUSC+R e aspettare il riavvio per eseguire macOS Recovery tramite internet. Si avvia la recovery apro l’utility disk ma non vede il disco OWC.
QUARTO TENTATIVO
Reinstallo il vecchio SSD creo una chiavetta usb con l’installazione scaricata di Catalina versione 10.15.17.
1. Collega l’unit flashUSB
2. Apri Terminale
3. Digita o incolla il comando nella finestra Terminale.
sudo /Applications/Install macOS Catalina.app/Contents/Resources/createinstallmedia –volume /Volumes/MyVolume
(Se il volume ha un nome diverso, sostituisciMyVolumein questi comandi con il nome del tuo volume).
Dopo aver digitato il comando:
1. Premi Invio per inserire il comando.
2. Quando richiesto, digita la password di amministratore e premi di nuovo Invio. Mentre digiti la password, i caratteri non vengono visualizzati in Terminale.
3. Quando richiesto, digitaYper confermare che vuoi inizializzare il volume, quindi premi Invio. Terminale mostra l’avanzamento durante l’inizializzazione del volume.
4. Dopo che il volume stato inizializzato, potresti visualizzare un avviso che indica che Terminale vuole accedere ai file su un volume rimovibile. Fai clic su OK per procedere con la copia.
5. Quando Terminale comunicher il completamento della procedura, il volume avr lo stesso nome del programma di installazione scaricato, a questo punto puoi chiudere Terminale ed espellere il volume.(vedi immagine).
Poi rifai il montaggio del nuovo SSD OWC Aura pro X2 da 480GB come prima e ti ricordo di mettere il coperchio e non chiudere con le viti.
Con il tuo Mac spento inserisci la chiavetta usb bootable creata in precedenza,tieni premuto il tasto di accensione finch non visualizzi “Carico opzioni di avvio”.
Quando vengono visualizzati i dischi di avvio disponibili, seleziona Aura pro X2 Media, quindi fai clic sulla freccia su o sul pulsante Continua. Se non vedi niente entra in Utility Disco
Lo vedrai sulla sinistra.
Io ho formattato (Volume APFS * APFS) e ripristinato da Time Machine perch avevo un backup in un’altro disco, ma se volete potete fare un installazione nuova.
Ho fatto dei test con file da 2gb e 5gb il lettura e scrittura, ma francamente non me ne frega niente se veloce o no.Per me era importante la capienza, mi dispiace di non aver comprato quello da 1gb.
Ps: la temperatura del disco lavorandoci (non rendering video) arrivata a 40 gradi con video lezioni e applicazioni di scrittura.
Ho chiesto al venditore se poteva aiutarmi con l’errore 5101F e mi ha inviato una mail con la lettera di vettura per la restituzione del prodotto presso l’ufficio postale. Mah
No problems fitting it into a (late 2013) MBP. I bought this SSD simply for more storage as an internal drive.
My advice would be simply to make sure you have updated the operating system to the latest version (Big Sur) to make sure the firmware is compatible with the new drive before you fit it into your Mac. Back data to time machine (I used an old SATA HDD to do this). Quite time consuming having to download OS again but I knew it would it be!
Make sure you have a T5 screwdriver (to remove SSD) as well as a P5 when you install.
Cloned the old drive with Carbon Copy Cloner and all worked straight away.
About 30-40% faster than stock one.
You will lose your MS office license, and I had to reinstall Adobe CS (kept crashing) but that is not the fault of this SSD. A real shame the stock SSD now has to be destroyed as there’s no economical route to reuse it.
Apart from the comfort of knowing the OWC brand is one of the best known and respected in Mac upgrade solutions, this kit provides everything necessary to make the process painless, it just works. The only challenging bit is making sure that you have the right upgrade for your particular vintage Mac…
Great product, worth buying if you want a faster laptop but not actually buying a new laptop. Takes a while to set up properly but following instructions all achieved.
The original SSD failed just before Christmas and i needed my MacBook Pro 15 ( mid 2014) up and running ASAP. After some careful research I order this via Amazon Prime same day delivery and got to work with installing. Ver y important to note that the SSD needs Mac OS High Sierra minimum to be recognised. Luckily I had an external HD to boot from to load Mac OS Big Sur on an SD card then install Big Sur onto this SSD. The drive is fast and works very well. Recommended.
Overall I was very pleased with the functionality, performance and delivery of the product, and the installation documentation on the OWC website was comprehensive.
The only negative I have is that the OWC SSDs are almost twice the price of generic SSDs which could be used (requires an adaptor to allow them to be used with the apple specific socket) . However for me it was worth the extra to avoid any fitment issues.
Did work for me but CPU temperature increased to around 95c. Cut off on 2017 MacBook Air is 105c. Fan speed was set to 1201rpm set it to 2500rpm and temperature dropped to 73c. Maximum fan speed is around 6000 so not too bad.
OWC products all tend to be very good and their online installation tutorials are thorough and easy to access. I did however have some problems moving data from the old drive (or time machine backup) into the new install of MAC/Catalina on the SSD. But that is not a fault of the product but rather online information that had not yet been thoroughly updated for this operating system. I purchased and installed the 1.0 TB Aura Pro X2 drive and so for noticed no speed improvements over the original Apple SSD. Boot time seems a little longer, other functions seem about same speed as before. The additional Envoy Pro enclosure for the Apple SSD out of the MacBook is a very nice, small aluminum case to hold the original drive–but note it is for the Apple SSD specifically. Definitely a Pro looking item!
Verpackung ist super. Das Alu-Case ist auch sehr schn, schlicht und passt sich ganz gut in das Gertedesign ein.
Im Upgrade-Kit sind Schraubenzieher dabei mit denen man die Festplatte tauschen kann.
Leider wird die Festplatte bei vielen nicht erkannt und kann im Festplattendienstprogramm nicht erkannt.
Ich selbst musste den OWC Support anrufen um den Datentrger auch ans Laufen zu bekommen.
Der Datentrger ist auf jedem Fall kompatibel mit dem Macbook Pro 2015 13″ Mitte 2015.
Wichtig ist, die OWC SSD darf NICHT in dem Alucase benutzt werden, da sie dadurch beschdigt wird. Dieses Case ist AUSSCHLIESSLICH fr die aus dem Macbook ausgebaute Original-SSD.
Vor dem Einbau sollte unbedingt mal ein PR-Ram Reset durchgefhrt werden. Dazu geht man wie folgt vor:
1. Macbook komplett ausschalten.
2. Macbook wieder einschalten undsofort gleichzeitig die vier Tasten cmd — alt — P — R.
Halten Sie die Tasten gedrckt und warten, bis der Startton 4x zu hren ist. (ca. 20 sec)
3. Stromversorgung trennen und den Rckdeckel vom Mac abschrauben. Bitte Schraubenlnge beachten.
4. Stecker des Akkus durch vorsichtiges anheben lsen und alte Festplatte des Macs abschrauben.
5. OWC SSD in den mac schrauben, Stecker des Akkus wieder auf das Mainboard drcken und Deckel verschrauben.
6. Den Macbook in den Recoverymodus starten. Dazu UNBEDINGT direkt nach dem Einschalten des Macs die Tasten CMD-ALT-R gedrckt halten um in einen besonderen Recoverymode zu starten, da sonst die OWC SSD NICHT ERKANNT wird.
7. Sprache auswhlen udn besttigen.
8. Im Recoverymen das Festplattendienstprogramm starten und dort die OWC SSD lschen udn als APFS datentrger formatieren.
9. Das Festplattendienstprogramm beenden und eine externe Festplatte ber USB/Thunderbolt anschliessen, auf der sich das Timemachine-Backup befindet.
10. Backup von der externen Festplatte auf das OWC Aura Pro2 aufspielen. Das kann je nach Datenmenge 1,5 bis zu 6 Stunden dauern.
Der komplizierte Installationsvorgang fhrt dazu, dass ich dem Datentrger einen Punkt abziehe.
Der Hersteller wrde sich viele Reklamationen und den Kunden viele Fragezeichen ersparen, wenn er den Datentrger vorformatieren wrde.
Since all Apple stores are closed (currently), I went the ole “watch a bunch of YouTubes and fix it myself” route.
How did the install go? Smoothly. Much easier than I expected.
Here’s what I did:
1. Back up to Time Machine (no-brainer)
2. Make a MacOS Catalina USB boot drive (easy)
3. Remove the old SSD (simple)
4. Insert new SSD and boot up using the boot drive (easy)
5. Format new SSD and restore backup from Time Machine drive (simple)
So far, I’ve put about 60+ hours on the new Aura Pro SSD and it works perfectly.
I can’t say I notice a giant speed increase but everything is still snappy and knowing I have hundreds of gigs puts a smile on my face.
If you are a “tech-lite,” person like me and your drive storage situation is sad and depressing, don’t be afraid.
If I can easily upgrade my drive, anyone can!
I blanched a bit at the price! Left it and came back later over a couple of days then bit the bullet and ordered it. Easy to fit, good instructions and tools. Works a treat. Upgraded my 250gb to this and used mine to upgrade my wife’s 128gb.
Comprehensive guide to replace module step by step. Enclosure included made old ssd available for initial installation and keep old osx installation available.
After over a year of constantly being at 10GB remaining, and weekly purges of files that I honestly would have rather kept, I decided enough was enough. Installation of this product was very quick and easy, and after restoring from a Time Machine backup made earlier that day, my MacBook is back on and working normally – just this time far fewer of those “Disk space nearly full” messages popping up hourly! Saved me hundreds as now I can hold off on purchasing a new MPB model and all 40 adapters necessary to use a laptop with only a couple Thunderbolt ports… Very happy with this purchase.
his is a fantastic upgrade and saves a lot of money buy doing it yourself. plus you get a external ssd harddrive as well. very easy to do just make a bootable drive on a pen drive before taking old harddrive out . with 1 terabyte hd
it is big enough to have a copy of windows on at same time….win win.
Honestly, it’s the best decision I have made. For the sake of 150 and 30 minutes work the quality of life improvement is brilliant. All I did was follow the instructions on iFixit and hey presto I have 1/2TB of storage. Plenty to keep my mac running for another year or two until I can upgrade
After a bit of you-tubing it because clear that MacBooks are modular and you can install the product yourself with the correct screwdriver. A few screws later and this SSD was in place and just needed to install the software.
No problems with any of the installation and it was very quick and easy.
Cost was great. I managed to double the size and speed of my old hard drive for less than a third of the price Apple quoted for the smaller like 4 like hard drive.
Overall absolutely thrilled! managed to keep my MacBook for a while longer, saved myself hundreds and did an upgrade all at the same time with this piece of kit. 10/10
Also their aftercare service is fab! I had an issue with sleep wake failure and was put through to a specialist from their team via a phone call and walked through how to fix the issue very quickly!
Excellent service and easy to install. Only issue is cost… don’t understand why these things are so expensive!
2014 macbook air 13″ installation was a breeze. formatted just fine. mac os install was fine. there are some issues in mojave with sleeping or hibernation. i think just told it, not to sleep the hard drive at all. mainly, it didn’t want to wake with the space bar or trackpad or even power button. you had to turn it off and back on to get the computer to work again.
make sure you got a good thumb drive with mac os high sierra handy. you’ll need it.
we ran into issues the APFS, when you initially format the drive in disk utility to prepare for new mac os, make sure you select mac os extended (journaled). we couldn’t get high sierra installed if it was formatted with APFS, which is weird because it changes to APFS once high sierra is installed. this is just my personal experience. not trying to give tech advise, because i don’t need that pressure. ha.
Runs hot but its quick and unlike the 1gig doesnt seem to need the cooler to work
That said, my dear daughter had not updated OS X since Mavericks. This prevents the computer from seeing the OWC SSD, even in internet recovery mode. Required blank 64GB USB-3 stick drive to load (from Disk Tool) OS X Mavericks. (Started with a 32GB stick, couldn’t handle the upgrades described below.) I then had to upgrade the USB drive to OS X Sierra from the App Store. (search create bootable MacOS USB disk and use the support.apple links or MacWorld). If you run into problems getting Sierra to install, it is likely a certificate date issue; wind your clock back to 2016 or so and try again.
Upgrade of the USB stick to Mac OS Catalina (from AppStore) required re-installation of the corrupt Mac SSD to get around “missing firmware” alert. Once Catalina (HighSierra or above) is installed, swap out Mac SSD for OWC SSD and it will be recognized. Time consuming process, even with pretty good internet speed and 15x USB3 stick.
Once OWC SSD recognized, drive formatted easily. Rebooted to Internet Recovery mode to install Catalina to the SSD and finally back in business. Bottom line – would have been an easy process if OS was up-to-date, but with patience recovery of the computer was possible. I also now have a Catalina recovery USB drive with enough space to get her through the next inevitable crisis.
Let me tell you, if I could give OWC 10 stars I would! Their videos on their website and step-by-step instructions are SO easy to follow, ANYONE can do this! It took me literally 10 minutes to remove and install the hard drive. Thanks Geek Squad- I saved myself $100 in this step! This product comes with a case for the old hard drive and the MUST have special screw drivers, do yourself a favor and purchase these items with the new drive! The time consuming part was reinstalling the Mojave OS- I have slow internet and that took about an hour. No problem, go do something while the installation is proceeding. Once OS was re-installed, I had the old hard drive already connected to the Mac and just followed the directions to transfer the files and apps to the new drive. Took about 25 minutes and DONE! Saved myself ANOTHER $100 Geek Squad…
You can erase the old hard drive and use it as another USB/external hard drive, but I plan to keep it as is in case I ever need to reinstall the data for some reason. What I really love about OWC is that they have all of the videos and instructions you need to do this yourself and a hotline for help if you need it, but that was not necessary for me.
Cose da tenere in considerazione per l’installazione:
1) Verificare di essere su macOS 13.10 (High Sierra) o superiore prima di installare. Questo fa la differenza in quanto se si cerca di montare l’SSD su un Mac con OS precedente, il sistema di recovery cerca di installare il sistema che originariamente era installato sul Mac nel momento in cui lo avete tirato fuori dalla scatola (nel mio caso, Mavericks). I vecchi sistemi non riescono a riconoscere l’SSD OWC e quindi nella lista dei possibili drive da utilizzare per reinstallare l’OS non troverete il nuovo SSD.
2. Possibilmente, non effettuare un ripristino a partire da una immagine time machine, sempre meglio per esperienza ripartire installando tutto da zero per evitare possibili incompatibilit, che spesso risultano in problemi (uno su tutti l’eccessivo riscaldamento del drive).
3. Nel momento in cui si smonta il back-plate del Mac, le due viti centrali in prossimit della cerniera di apertura sono pi corte delle altre 8 attorno. Vanno rimontate pertanto negli stessi alloggiamenti.
4. Staccare per sicurezza la batteria seguendo le istruzioni che si trovano online per evitare cortocircuiti o problemi che possono compromettere l’utilizzo del nuovo drive. Occhio a non fare troppa forza per sollevare il connettore, sembra piuttosto delicato.
Possibili problemi e risoluzioni:
Nel mio caso, in una prima installazione, l’SSD non veniva riconosciuto e il sistema cercava di installare Mavericks, come se non provenissi da un sistema High Sierra o superiore (al momento della sostituzione ero su Mojave), e l’SSD non compariva in disk utility in nessun modo. Anche da terminale il drive non veniva elencato. Ho smontato di nuovo l’SSD e mi sono assicurato che i connettori fossero puliti usando aria compressa e avvitando meglio/chiudendo completamente il backplate. A seguito di questo il recovery andato nella modalit di installazione di Mojave e tutto andato liscio (sto digitando dal mio Mac proprio ora).
Non ho riscontrato problemi finora. Consigliato a chi ha un po’ di dimestichezza con i computer.
Good news: Customer Support is excellent! Really excellent. So far: Drive seems excellent.
Bad news: The external drive (with the Envoy Pro) was not recognized by my system.
More details (these are the steps that eventually worked but showing hassles as well)
0) High Sierra or above installed. You must do this or the new drive won’t be “understood” by the old Sierra and below OS. It requires the High Sierra (10.13 or above). I actually think that you want to reboot a few times and get that settled down and updated to 10.13.6, too. But, not sure if it really matters. 10.13+ does matter though!
1) Everything backed-up using time-machine to an external USB (specifically a Western Digital 2 G – a nice drive, for what it’s worth).
2) Old 512 GB SSD placed in Envoy Pro (this is required and not entirely clear unless you read both inserts that came with the drive)
3) New OWC 1TB (actually about 960GB) in Macbook (it has the built-in interface but only High Sierra and above can understand it.
4) When you press the Option key on the Macbook at bootup, the Envoy Pro should be shown in the list as a bootable restorable option. All I had was Internet options. Customer service actually was going to send me a new Envoy Pro, but… more below.
5) I was able to do a partial restore to the new OWC 1TB from the WD but then nothing. FYI, I used a trial version of Carbon Copy (it’s so nice they actually will let you make 5 copies – what a great company Bombich software is!) to clone from both the WD (and we’ll see below) the old SSD drive.
6) So, after many false attempts, I used the cable from the WD instead of the one from the Envoy Pro. It (my old 512MB SSD) booted from the Envoy! So, you think it was the cable, right? Well…
7) So, everything is finally working and I’m about to call Customer Service to tell them so, and that the cable was bad. But, here’s the weird thing: The Envoy Pro with my 512 MB SSD can now be accessed just fine from the old cable (supplied in this kit!)
Anyway, that’s my story. I’m happy with this drive. A little frustrated that I had to spend a few evenings getting it together, but very happy to get some more life out of my Macbook Pro! I still wonder why the Envoy Pro could not be accessed – maybe there is a glitch in it, but as I said above, I also had trouble completely restoring from my backup WD drive – a different issue, sure, but it might point to some kind of weird low-level problem with my Mac, just to be complete here. Hope this helps someone.
For what it’s worth, I trust this company, OWC. Really excellent support.