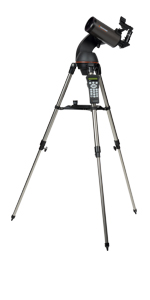
Celestron 22097 NexStar 127 SLT Mak Computerised Telescope
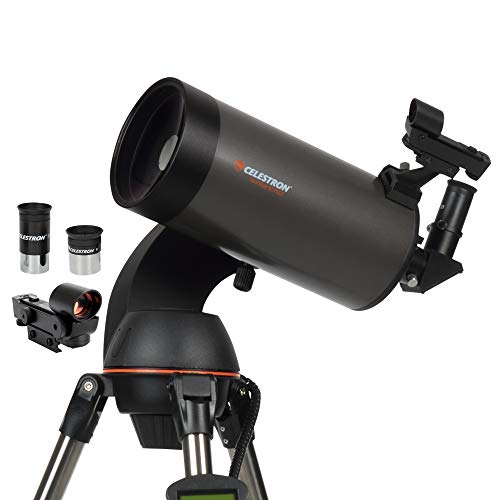
Celestron 22097 NexStar 127 SLT Mak Computerised Telescope, Black

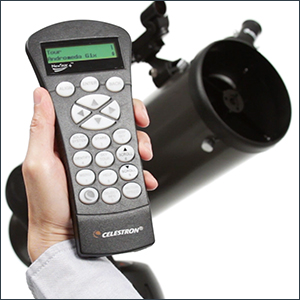
Fast Setup with SkyAlign
Celestron’s proprietary SkyAlign procedure has you ready to observe in minutes. Centre any three bright objects in the eyepiece and NexStar SLT aligns to the night sky, ready to locate thousands of stars, galaxies, and more.
Sky Tour
If you aren’t sure what to observe, check out the Sky Tour. It automatically generates a list of the best objects currently visible based on your exact time and location.
A wholesome of Astronomy
Compatible with all Celestron’s most popular accessories, including StarSense AutoAlign and SkyPortal Wi-Fi Module, the NexStar SLT can grow with you.
 |  |  |  | |
|---|---|---|---|---|
| Optical Design | Maksutov-Cassegrain | Refractor | Maksutov-Cassegrain | Newtonian Reflector |
| Aperture | 90mm (3.54”) | 102mm (4.02”) | 127mm (5”) | 130mm (5.12”) |
| Focal Length | 1250mm (49”) | 660mm (26”) | 1500mm (59”) | 650mm (26”) |
| Focal Ratio | f/14 | f/6.47 | f/12 | f/5 |
| Magnification (with included eyepieces) | 50x, 139x | 26x, 73x | 60x, 167x | 26x, 72x |
| Limiting Magnitude | 12.3 | 12.5 | 13 | 13.1 |
| Low Useful Magnification | 13x | 15x | 18x | 19x |
| High Theoretical Magnification | 213x | 241x | 18x | 307x |
| Assembled Weight | 12 lbs | 14 lbs | 18 lbs | 18 lbs |
| Weight: | 20 Pounds |
| Dimensions: | 101.6 x 48.3 x 27.9 centimetres |
| Brand: | Celestron |
| Model: | 22097 |
| Part: | 22097 |
| Colour: | Black |
| Batteries Included: | 8 AA batteries required. |
| Dimensions: | 101.6 x 48.3 x 27.9 centimetres |
| Origin: | United Kingdom |
I bought this used and it came looking brand new. Thank you so much Amazon!!! Delivered w care as well and great packaging. Only down side is the 12v plug doesn’t come with it. But I had one around I could use.
As a novice to telescopes but not astronomy, this telescope is more bang for buck than you can imagine.
Managed to attach my DSLR successfully and use the SkyAlign feature to capture the Moon and Venus in all their glory. Its a sizeable piece of kit and works better with a power cable rather than batteries.
The tripod is great, solid and has a spirit level to help you ensure you have a level platform too.
Definitely need to invest in some new eyepieces, but will do that later. Need to get accustomed and get the best out of what I have first. Best investment made and glad that I did!
Absolutely brilliant telescope!. Just no clear skies to use! Only so cloudy not been able to set up properly!
Took it outside at dark. I could see Jupiter and just used the hand controls to find it. It focused like a dream. Then I did the 3 bright stars alignment. After that I told the control to find Mars. It worked a dream.
Lots of accessories available and I am looking forward to using it when we have some clear skys. I purchased the used option which was 100 cheaper and it came brand new and boxed.
My only gripe is the mount. It’s reasonably sturdy, and I’m not worried about it tipping over. But the scope sits quite high so the centre of gravity is high. The result is a sensitive bit of kit, so when you touch it takes a few seconds to stop shaking. I’m going to hang some weights off the legs to see if it sorts it out.
Saying that the mount has a built in bubble level which is rare at this price point.
Red dot finder and scope fit on with dovetails. For the main scope it’s worth sitting it quite high, it exacerbates the problem above but helps keep the scope clear of the mount when looking at objects overhead.
Everything you need to get started is in the box, but I did get a Barlow lense and some filters, moon filter is essential when it’s near full and skies are clear.
SkyAlign seems easy to set up but mainly exploring myself at moment.
Haven’t had to long and weather’s been bad, but details of the moon breathtaking, wow moment with saturn and cried a little when I got Jupiter with Io, ganymede, callisto and europa.
Excellent starter scope with bags of potential for upgrades
The go-to capability works, but has a couple of caveats. It requires precise location information (a la phone gps coordinates), and locating 3 stars in the sky twice (once with the range finder and a second time with the view finder). That process takes about 10-15 minutes, and the first couple of times that I did it, it took a couple of tries. Star tracking and auto-identification is awesome, but still takes some work 🙂
I have not seen the problem with it going through batteries quickly as some people had mentioned, but have only used it a couple of hours at a time. (I bought a 48-pack of inexpensive AA batteries and am on the 2nd set of 12 [it uses 12 AA-batteries to power the scopes’ motors]). Note: it must have batteries installed to position the telescope, there is no full-manual mode.
All in all, it is a great telescope, and has a beautiful, clear image. Even with the default lenses and no filters, I could see the moons and colored bands of Jupiter, and the rings of Saturn.
DEFINITELY buy the AC to DC adapter power supply if you’ll run it from home like I did. Take the time to get the viewfinder / targeting scope on the side correctly aligned during the day, which is easy to do, so you can use it quickly to center objects in the big telescope’s eyepiece. Don’t forget to power off the viewfinder scope red-dot led when done, since it’s battery powered by a replaceable CR2032 thin remote type battery. One thing I wish the viewfinder / targeting scope had is lock downs for the azimuth and altitude adjust knobs. They are easy to hit accidentally, or mistake for the led on/off wheel. If you move them, your targeting will be thrown off for the main scope. I used simple scotch tape to lock them into place (and avoid mistaking them) which worked well enough for me. Love this telescope. As a complete beginner, I enjoyed thoroughly, right away. Also, when viewing far off objects like planets and stars, put on solid ground. My sturdy deck vibrated too much with even small movements.
Pictures of Jupiter and Saturn were from my iphone, which does not do a good job with black background and very bright objects in foreground – you can’t see Saturn’s rings in this poor picture, be we could all see them clearly through the telescope.
Excellent quality, easy to use, clear images of the planets and galaxies.
The mount is so-so sturdy. But the weight is what I like: it suits my wonky back.
The GOTO system is okay. The red dot finder is alright until you need to find a star at the top of the sky (by necessity because the light pollution in Toronto) for alignment. To find a not-so-bright star with the finder is also a challenge. The Red Dot in the finder simply out shine the star that it becomes very hard to find, the star, that is.
To power the GOTO you need to buy a dc power supply from Celestron or better still, if you have a automotive dc power pack in your garage, get a cigarette lighter cable made up to connect the GOTO. The system’s built in battery chamber hold 8 AA cells. The thirsty GOTO system probably will burn through 8 cells in one outing.
The OTA Is a 127mm Mak cassagrain. I yet have to see any nabula in Toronto through this telescope. For that I can only blame the city lights, I guess.
Bon, c’tait pas mal le seul point ngatif, maintenant le tlescope lui-mme est excellent! J’arrive voir Uranus et quelques galaxies dans la pollution lumineuse de Montral. Jupiter et saturne sont spectaculaires. Le systme “go to” semble bien fonctionner mais je ne l’ai essay que 2 fois pour localiser des objets invisibles l’il nu. a n’arrivait pas directement sur l’objet mais suffisamment prs pour le trouver rapidement. L’autre point fort est la portabilit et c’est la raison pour laquelle je l’ai prfr un Dobson plus gros.
En gnral, je suis satisfait de l’achat mais la vibration excessive et le fait que la plupart du temps je n’utilise pas le “go to” (Pas besoin de a pour trouver la lune, mars, jupiter, saturne et bien d’autres) me font parfois regretter de ne pas avoir t avec un Dobson.
Only used a couple of times so far due to the cold nights. Fantastic close up pictures of the moon and setting up looks to be relatively easy for finding other planets.
Pros: Relatively easy to align
Portable (bought a bag for it)
Easy setup
Cons: Batteries/Power issues
Unstable base
Can’t point it manually.
So, there are two things that I really didn’t like. 1.) The telescope uses 8 AA batteries, but it will consume them after aligning and pointing once or twice. You will definitely need the power bank that Celestron sells, or a lot of batteries. 2.) I can’t point this telescope to any random objects in the sky. If the planet, star, nebula or object of interest is not in its memory, you won’t be able to point your telescope there. And that really sucks. The only alternative I’ve found to manually direct it is during alignment, and then it won’t compensate for movement. The tripod is not the most stable base, but it’s not the worst either.
I had to play with it for a while before deciding on setting up my location with coordinates. It was less of a hassle than that city selection list.
Everything else about this telescope I love, from its weight to its design. I had some filters, a Barlow, and some additional lenses, so thay may have helped in giving me an overall positive experience.
I knew I would be able to see faint objects with this scope, but it surprised me that I can often see objects that I expected to be obscured by haze and city lights. The Pleiades is a good example. Sometimes, with unaided eyes, I can barely make out a glow (no individual stars) through the haze, but when I point the scope at them, I see several stars. I can’t wait to try viewing from a clear sky location.
The first night I used this I was hampered by cloud, so could only do a basic setup and some initial lunar observing, but I was pleased to find that this was easy to set up in a short period of time, using the quick setup guide. The lunar views I got were excellent and my kids (and even my wife!) were enthralled with the first views of the moon that we obtained.
The second night, although cloud was again an issue, I managed to set the scope up fully. the set up was easy, following the instructions, although it is sometimes tricky to remember that the arrow buttons are only used for controlling the movements of the scope from the handset and not navigating the menus, however they were largely self-explanatory and made the initial setup easy. I would advise using a custom site for alignment using a smartphone with GPS (almost ubiquitous these days) to obtain the precise location, just remember you will need the location in degrees, minute and seconds of arc, rather than decimal. This is quite easy to find with a quick internet search on a smartphone however. Exact times from a reliable source, such as a synced smartphone is also required, along with your time zone. Once these are in you can choose to align the scope using any three bright stars or other celestial objects (moon or planets), simply align the object in the finder scope, then centralise in the eyepiece and align using the handset. This was done in minimal time, even with poor visibility due to cloud and the computer accurately aligned the scope at the first attempt with no need for firmware updates or similar for the handset. Following alignment I used the sky tour to find appropriate objects and after checking that the sky model was correct (it was able to find the moon without difficulty in the solar system mode) I used the handset to move to Andromeda, which was visible as a fuzzy patch, despite poor visibility and quite bad light pollution. The tracking seems to work fairly well and will keep an object in view for a significant amount of time (quite sufficient for real-time observing using the eyepiece), but did exhibit some element of drift, so would not be suitable for deep sky astrophotography, but this is to be expected with an alt-azimuth mount, as compared to an equatorial setup.
Unfortunately, the sky conditions deteriorated further preventing any more testing on other objects, but overall this telescope is easy to set up and provides a quick means of finding astronomical objects. As a starter scope at a reasonable price it would seem that it is difficult to beat. In terms of power, I did buy the external battery pack which allows extended observing and this seems to be the best way to power the scope as while using the internal 8xAA batteries would avoid any problems with cord entanglement, the lack of battery life may limit it without a substantial supply. Cord length and wrapping would be even more of an issue with a mains powered supply and could be problematic for anything more than a small distance outside. The scope does need power to operate though and cannot really be operated without it, which is definitely a downside if you were wanting the use it in an unpowered alt-azimuth mode.
Overall, this seems to provide a good observing experience for the aperture and price and is highly recommended for a beginner. Obviously, you could get a larger aperture without the goto function for the same price, but this really wins on convenience. I look forward to may happy nights observing with my kids in the near future.
I sold my Celestron Super C8+ because it had become too big to set up and transport in my retirement and bought this to replace it. The clock drive ran on 120 VAC. The C8+ was wedge mounted and difficult to align for it to track properly, and I had to find objects using charts and its setting circles. I was concerned that a MAK would not be as good as the SCT, but this telescope appears to me to give images that are just as clear. There is no chromatic aberration and the telescope arrived with perfect collimation. The baffle on the secondary spot appears to be slightly off-center, but does not cause any problems. The alt-azimuth drive and battery operated GoTo drive make this telescope a pleasure to use. When the telescope arrived, the bubble in the tripod level was much larger than the circle and Celestron sent me another level promptly. The new level is 18mm in diameter, and is meant to stick on top of the original level with double-sticky foam tape on the bottom of the new level. Obviously, they knew how difficult it would be to remove the original level from the tripod. However; I had removed the original level from the tripod, which took me over two hours because it is solidly glued in and VERY difficult to remove, especially without damaging the tripod. I contacted Celestron again, and they sent me a new original level with the metal ring on it. I had to modify the orange ring to allow the metal ring to fit under it and glued in the new level with one drop of glue at the bottom so the level could be easily removed in the future if necessary. Overall, I am very satisfied with the performance of this telescope. I purchased a Celestron 13% ND moon filter and 15mm Plossl eyepiece to complete my needed accessories.
The Nextstar 127 SLT was delivered from Amazon’s Doncaster centre to Whitworth in superfast time. Packaging was substantial ( triple boxed ) and everything present that should be.
Assembly of the main parts was dead simple to the point where I was using the hand control to drive the telescope to view distant ( terrestrial ) objects within minutes ( daytime ).
Then came a snag . The finderscope ceased to operate ( no red dot ) on the first day ! During online chat to Amazon support it bacame apparent that all they could do was refund the money for the entire order on reciept of the goods when I really wanted a simple replacement part !
Instead, I contacted Tring Astronomical Centre with the issue who could not have been more helpful and sent a new finderscope the next day, no questions asked. Happy boy !
Tonight was the first clear night with a 3/4 moon low down. Set up outside and used the single object alignment ( Altair in this case ) which was pretty straight forward, although selected objects tended to the 10 oclock position. I expect a more careful setup using the three objects method would be an improvement.
The first view of the Moon was magnificent ! Next up was Mars, showing up as a clear pink disc but again low down and unfortunately Saturn and Jupiter were obscured from view. Very happy so far !
Absolutely amazing exactly what i was expecting. Looking forward to using it as soon as we get some decent weather and clear sky’s.
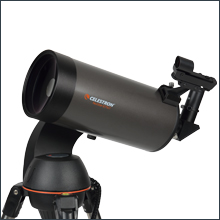
The compact tube size makes it much easier to handle and transport than longer telescopes. Being a closed tube design also means it more easily keeps dust and other debris out of telescope tube. As long as one uses the tube cover on the front, and eyepiece holder plug in the back when not in use, the telescope optics will require cleaning much less often than a typical Newtonian system. The closed tube also means no thermal tube currents to distort the image.
The 127 millimeter diameter aperature equates to about 5 inches in size. While this is considered small in today’s era of large Dobsonian monsters, the telescope system fits in my car, and is light enough that I can take it outside easily. I get more use out of this scope than my older larger Newtonian, mainly because this instrument is just so much easier to handle. The aperature size is quite sufficient to get good views of solar system objects. It’s a bit tricky to focus, as the image will easily show any motion from the focuser knob, but this is mainly a mount limitation. Once focus is acheived though, and the scope settles down, the views are great. I’ve used the 127 SLT with a Celestron NexImage 5 camera, and FireCapture camera software, to get great images of Jupiter’s moon eclipsing the disk, Saturn’s ring system, lunar craters, and solar sunspot groups (with an appropriate glass solar filter mounted on the front). Using the camera is ideal with this telescope, as it makes it a ‘hands-off’ system.
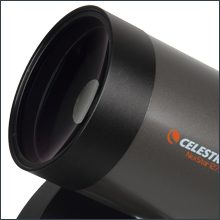
The other great feature is the fully computerized “Goto” capability of this telescope. Once the computer system is initialized, it is able to point the telescope to any object in the sky. (Yes, one can even enter arbitrary Right Ascension/Declination coordinates to point the telescope at.) The SLT came with the NexStar+ Hand Controller, which contains the object databases, and interfaces with the user via a red backlit LCD and a red lit keypad. The hand controller I got was not the absolute latest hardware variation, which has a USB port on it, so as to allow updating the firmware in the system via a PC. Instead, I received a slightly older version (2014) that still had the RJ45 phone jack interface providing an RS232 serial connection. (Older stock in the warehouse still?) This required a USB-to-RS232 converter to connect to my laptop to update the internal flash. While the internal motor controller was at the latest firmware revision, the hand controller firmware did need updating. The Celestron Firmware Manager, available onine at their web site, did the upgrade flawlessly.
The one armed fork system that connects the tripod mount to the telescope tube contains the motor control system for the alititude and azmimuth DC motors, as well as monitors their optical encoders to keep track of position. This motor controller communicates to the hand controller via a coiled cable. There is a plastic holder on one of the tripod legs made for holding the hand controller when it is not needed.
The weakest link in this system has to be the ‘wobbliness’ of the mount. With the legs fully extended, and the tripod standing on a cement patio, every gust of wind and and hand touch is transferred to the image view. It makes it quite difficult to focus well. However a few simple tricks can be used to lessen the effect. First, don’t extend the tripod legs fully. The shorter the tripod legs, the shorter the time it takes to dampen out vibrations, and the sturdier the mount becomes. Second, adding a weight to the tripod helps provide more mass, and lowers the natural vibration frequency. I’ve seen a picture of one user placing a small sandbag on the central tripod tray to add stability. Third, place the tripod on dirt or sand. A cement patio is not the best foundation for the tripod legs. I have gotten much less image movement by pushing the tripod legs into the dirt in the lawn. Of course, Celestron does sell vibration dampening pads to help with this issue, but they are quite pricey according to my wallet.
Now if you want to get a beefier mount, go ahead and spend another grand. Celestron has bigger mounts that are better. You get what you pay for. Just be prepared to lift that heavier mount. I’ll stick with this lighter variation, and save my back. I can work around its limitations.
Oh, and the eyepieces that come with the telescope are probably not the ones you will want for regular use. I already have a nice set of Plossl’s that I obtained years ago. I recommend doing your homework and get the eyepieces separately. My lowest power eyepiece is a 40 mm, and I like the views it gives me in the 127 Mak.
One bit of information you will also find useful relates to initializing the NexStar control system. The designers did what they could to make setup as easy as possible, within the budget they had. (I’ve also bought the SkySync GPS accessory to help make setup easier. However their StarSense AutoAlign product is the ultimate alignment tool, and costs nearly as much as the telesope itself!) Anyway, the more care you take in initialization, the more accurate the NexStar will be in finding objects. I know this, not just from using the NexStar+ system, but from building my own telescope controllers over the years from the wire-wrapped IC sockets on up, and testing them under the night sky. Small errors in alighment will add up. So, if you want the most accurate pointing, follow these tips that are NOT in the manual:
1. Level the tripod as accurately as possible. You must do this FIRST. Every alighment option, with possibly the exception of the two-star alignments, requires a level tripod to work correctly. That’s why the tripod includes its own little level, and the instructions do mention that you need to level the mount. I don’t trust that little built in thing though. I use a six inch level that I place on top of the tripod, before I put the one-armed fork there. My level is placed in line with each leg in turn, and that leg adjusted until level, before moving onto the next leg. If you have some OCD like me, go around and do it again, just to be sure. Once the tripod is level, then the rest of the mount and telescope can be put together.
2. Enter in Latitude, Longitude, Date, and Time, as accurately as possible. If you have a smart phone, get a GPS app and use it. I eventually got the Celestron SkySync accessory to do this part for me. (However, you still need to double check and make sure the Time Zone and Daylight Savings settings are correct with the SkySync. The instructons don’t tell you that.)
3. Use a lighted Reticle Eyepiece to center your alignment stars/planets. Don’t use the Sun or Moon if you have an option, as it’s very difficult to know where the exact center of those objects are in the eyepiece. A double crosshairs reticle eyepiece lit with a variably dimmed LED works great for this.
4. Keep your chosen alignment objects far apart, and at least 20 degrees above the horizon. I don’t know how well the NexStar+ handles refraction corrections, but to do it right requires both temperature and pressure/elevation data. Nexstar doesn’t ask for these values, and I doubt the system includes the sensors to measure the quantities directly.
One final recomendation: Get an alternate power source to suppliment the eight AA batteries that need to be placed in the half fork arm mount. You still need the AA batteries, as I discovered when I attempted to get by with just a PowerTank attached. Any glitch in the power cord connection to the mount will reset the Nexstar controller, and you will find yourself staring at the intialization prompt again. So, keep the AA batteries. Just suppliment them with either an AC adapter or PowerTank gel cell battery. Otherwise the AA batteries used alone will go dead within that observing session. (I’ve heard they will drain in as little as 30 minutes. I didn’t push it to prove that.) I recommend the PowerTank battery accessory, since you can’t always guarantee that an AC power source will be reachable from where you place the telescope. For me, I’m always tripping over cords in the dark. So any long power cord to an outlet that I can get rid of, I will. I place my PowerTank directly below the tripod tray on the SLT tripod mount. That keeps the power cable to the mount away from my toes.
There are cheaper telescopes out there, but for ease of use, I just can’t think of a better alternative than this 127 SLT NexStar+ system.
At least I’m out with it regularly, and have been for over six months now. My old Newtonian never saw this much usage.
Eventually I settled on the 127SLT Maksutov-Cassegrain. It was small enough that I could transport it to and from the local astronomy club, which is a big plug for a beginner. An 8″ Dob is great if your backyard is dark, not so much if you need to travel for some darker skies.The GoTo functionality is also a plus in my book, as my wife has never used a telescope, and showing her how to check out Jupiter in just a couple minutes was pretty incredible.
I knew that buying this there would be some opportunity areas, and there are a couple. First, the tripod is described as wobbly, and it is. I’ve found much less vibrations in the grass/dirt than a hard surface. Second, I’ve put an 8lb. weight on the accessory table which certainly helped to dampen the vibrations. I’ve read other solutions to super glue joints, epoxy stuff etc. After tightening the bolts on here, I would say the vibrations are only a slight annoyance, and as long you don’t manhandle the focuser or smack the eyepiece when you’re viewing, they calm down quickly.
2nd is the alignment process. I read people having tons of issues with this. If I try to align using my starting point as a city, it fails. Almost every time. Whenever I punch in my GPS coordinates (compass app on iPhone by default) it aligns immediately on SkyAlign. To me, this seems a nonissue.
Overall, very happy with my purchase. You’ll need to add a few things to this telescope to really make it complete, but you aren’t hamstrung up front by any means.
1. AC Adapter or Celestron Power Tank. This thing will eat your 8 AA batteries in no time, buy the AC adapter, or better yet the Power Tank, which is a pretty impressive piece of kit.
2. Dew shield – you will want to buy one, or craft one. Foam rubber sheets from your local hobby store work well.
3. Additional eye pieces.
4. If you’re transporting it, some sort of case. HomeDepot sells an 18″ Husky tool bag with a strap that works PERFECTLY. Using the two pieces of foam from the box, it fits snugly in there and doesn’t slide around.
Very portable, easy to set up with GoTo handset, I mostly use it with one star set up as its the quickest.
If you want a scope for Nebulas and to take pictures of them, don’t get this scope. The aperature is 5 inches with a long focal range; however think about this. If you go from a 5 inch aperature to a 6 inch aperature, it will cost you about 200 to 300 dollars more.
I think this a good beginner scope because of the “Go To” capability. You don’t need to know that much about the stary sky to find Jupiter, Saturn, Mars, Venus or Mercury. Just find out where they are in the sky, point to it, use the solar alignment and the scope follows whatever you have programmed it to follow. The scope gives clear images of whatever you have pointed at. I am think about getting a 3x barlow for the scope. I used a 2x barlow on this scope with a 32mm lens and the image is great, so I wonder how a 3x barlow would be.
The scope comes with a variety of different software for use on the computer. I think you can hook the telescope up to a laptop and control it from the computer with the provided software. This telescope does not come with imaging software; however I think when you buy a camera specifically for a telescope, the camera comes with the software. Also this scope comes with a “Lite” version of SkyX software. For SkyX, you can input your location and it will give a map of the sky showing where objects are in the sky compared to your location to make planets easy to locate. If you wanna control the telescope with SkyX, you have to buy an upgrade from the website. This version does not allow for control of the telescope.
The only cons are that you have to buy a lot of accessories for this scope. Two cables that go together just to hook it up to a laptop,(to update the motor and hand control software). If you want to run it on AC power you gotta buy an adapter, plus if you take this out in the middle of nowhere, you need to a get a battery pack for it and a I suggest the 12v car adapter, so that way it does not draw as much power as a 120v adapter. Note: You don’t have to buy Celestron’s battery pack, any generic one you get at a deparment or auto store will work as long as it has the car adapter outlet. I have not tried using it on batteries. I have heard that the batteries will only last one night, so getting rechargeable batteries would be the best best over regular batteries.
All in all a very good scope for the money. The focal length is long which means a more powerful scope, but the field of view is smaller. Good buy.
One thing I will add. I have not tried to look at nebulas or distance stars with this telescope. I want to see the sun(must use a solar filter, do not look at the sun with this telescope or any telescope without one) and the planets. I have not used the sky align with it, just the solar system align. Basically, align the telescope with the planet you wanna see and the press align. The scope will track, but you might have to realign every 10 minutes or so. Also if you look at the moon with this telescope or any telescope, use a moon filter; otherwise you will see spots on your eyes for a while.
Oh it does shake a little when it is windy out. Also when you try to focus using a powerfull eyepiece, the image shakes a lot. The viewfinder is good. May have to make minor corrections every once and a while. The control pad takes a lot to get used too. Not user friendly but works.
The only thing I don’t know about this scope, and it has to do with the tripod…is if I get a bigger aperature telescope, would it fit on the mount for this one.
Just ordered a solar filter for this scope. If anyone is looking for the right solar filter, go for Orion 07710 5.81 filter. It fits snuggly and you don’t have to use any of the foam inserts for it, because it is already foamed lined.
Some scopes suffer from a software bug that manifests itself as a “bootloader error” message. If this occurs, the scope will be unusable until the problem is resolved. This happened to me once and it was necessary to re-flash the handset through a free software upgrade via the Celestron website. No big deal – thankfully the problem has not reoccurred and the scope continues to give me hours of viewing pleasure.
The 127 SLT is best suited for observing bright solar system objects. The Lunar surface is breathtaking and Jupiter’s cloud belts and Saturn’s rings appear clear and well resolved. However, I did upgrade the supplied eyepieces with Revelation plossls. Due to the long focal length the scope copes less well with nebulous deep-sky objects and galaxies which generally appear as smudges of light through the eyepiece. Consider something with a wider aperture / shorter focal length if these are your thing.
Not suitable for “serious” astrophotography due to the Alt-Az mount; respectable images can still be obtained through short exposures with a DSLR camera or webcam.
I agree with other reviewers who have commented about the tripod. The 127 SLT is quite top heavy and prone to oscillatory vibration at the lightest touch of the focus knob. I invested in Celestron’s anti-vibration footpads which do not fully eliminate the problem but do improve it considerably.
Overall I am delighted with my purchase and thoroughly recommend this scope to enthusiastic stargazers everywhere.
The pros:
– Very portable, easy to setup. You will probably get to use it more than larger telescopes.
– Great at planets. Couple it with an inexpensive webcam and process through Registax and you will get impressive photos of Saturn, Jupiter etc
The cons:
– Not well-suited for “large” deep space objects, such as open clusters. I upgraded from a smaller newtonian and I was underwhelmed by some of the DSO views, due to the limited field of view. There is a way to fit an (expensive) f/6.3 reducer, however the thin 1.25″ barrel limits your field of view, so the reducer is not really a solution.
– Not sturdy enough tripod gives a lot of vibrations (when you touch the focuser, when the wind blows etc). See tips below.
So, overall, this is a very easy to set up and use scope that is great for viewing and even photographing the moon, sun (with a filter) and planets. If you have looked through a wide-field telescope the deep space object performance may disappoint. I would say this is a great telescope for an urban location, as the GOTO will be useful when there are few stars visible to use as pointing guides and also planets are anyway the best targets when there is light pollution.
Tips:
– The Celestron Vibration Pads are a good investment, halving the vibration if you are setting up on a hard surface. When using the vibration pads you can also try putting some weight on the accessory tray, I had good results with the vibration pads + at least 5kg weight on the accessory tray.
– A good and inexpensive choice for an eyepiece that will improve your planetary viewing is the skywatcher Ultra Wide Angle (UWA) 6mm (or even the cheaper “Ultrawide 6mm”). It provides 250x (which is the max you would ever want to use and it is usable more often than not – depending on seeing conditions), a generous field of view and eye relief.
– An illuminated reticle / crosshair eyepiece will make the initial alignment easier/faster.
– Don’t even try the batteries. Get an AC adapter. A generic will do, although I have to use a rubber band on the arm of the mount and pass the cable through it before plugging it in so that the cable is not pulled when the telescope is moving around (the more expensive Celestron AC adapter screws on, so no issue).
– Get a solar filter and it will give you something to do with your telescope during the day! The least expensive solution is to get the Baader solar film and create your own cardboard holder (instructions are widely available). Careful: NEVER point at the sun without a solar filter IN FRONT of the main optics.
I am attaching a couple of photos of Jupiter shot through the movie-crop mode of a Canon 550D, just for an idea.
My training is in the physical sciences but not specializing in Astronomy or Astrophysics. I have always had interest in the stars from childhood and from having been a navigator in a destroyer during my naval service where I used them to navigate by. Several years ago when I retired I purchased two 1960s vintage equatorial mount 60mm refractors at garage sales and I have been using them while I did some research and reading to decide on the best next telescope to purchase.
I decided on a Maksutov-Cassegrain due its reputation for crisp, clear images and on Celestron NexStar for its quality reputation and the features of its GoTo/tracking software program. The deciding factor was that it was on sale at a large discount. I did consider Meade and Orion scopes before deciding on this particular Mak.
This year (2013) I took some of my tax refund dollars and purchased the Celestron NexStar 127 SLT Mak and also purchased some of what I consider to be essential accessories.
The purchase price of the tube and mount are only part of the price for a complete capable system. Beyond the sock items provided in the initial package, you will need lenses, filters, adapters, etc to fully exploit the capabilities of the mount, software and optics. In other words, to see the most, coolest stuff. By the time I have purchased all of the essential accessories to do this, they will cost almost as much as the telescope itself.
I have used the telescope every clear night for the last several weeks and I am very pleased. The NexStar program and alignment are easy to use and provide a better that ballpark result when going to an object. I did purchase the GPS unit, the Celestron accessory kit with additional lenses and filters, the house current and car battery power adapter chords, the USB interface cord, and the light pollution and oxygen filters. I live in the Phoenix suburb of Glendale so light pollution is a factor. The filters help.
So far everything works beautifully. My only two complaints are not vital but more nuisance
-that the GPS can take some time to synch — be patient, I was not and had some self inflicted difficulties the first time I used the Mak.
-the tripod can be a little wobbly.
I will eventually get a heavier tripod, the GPS is what it is. I will try adding some five or ten pound weights to the tripod to see if that stabilizes it sufficiently.
I am not done with accessories.
Next on my list is a hard case for the tube and a canvass bag for the tripod and accessories so I can safely carry the system to the dark sky sites and star parties. I do want to try some web cam photography of solar system objects so a webcam purchase is in the future. Further down the road, I will get a digital camera adapter, a collimation lens and some higher quality viewing lenses and perhaps a dielectric diagonal.
Though I want to eventually get a large GoTo Dobsonian and I always lust after a nice, large Apochromatic telescope with a solid EQ mount for astrophotography,for now I am very happy with my NexStar 127 SLT Mak.
I will update as I do new things with the Mak or as I learn new things that may be of interest to buyers.
May your skies be clear and dark.
Iigo de Oa
Nome de plume
I would agree with some previous comments; the mount should be a bit chunkier, on high magnification just a light touch on the eyepiece causes the image to wobble a lot and it takes a while to settle down. Also you have to be very accurate for the alignment to work properly, And make sure you choose alignment stars a good distance away from each other – nothing worse than having aligned three stars and then the handset telling you ‘alignment failed’!
This scope eats batteries, so it’s well worth getting a 12v dc adaptor.
The GoTo calibration isn’t always accurate and it might take 2 or 3 attempts to get the telescope aligned before you can start using it. It’s important to set the time correctly and to make sure the tripod is absolutely level before you begin. There’s a spirit level for this purpose, but you have to be spot-on. Once aligned, the GoTo functionality is easy to use.
I almost regret getting a GoTo telescope because I haven’t actually learnt all that much about astronomy (although I have had fun). With a manual telescope I would probably have learnt more, but used it less – swings and roundabouts!
The telescope takes 8 AA batteries and runs them flat in a couple of hours, especially if it’s cold. Rechargeable AA batteries don’t work well because of the lower voltage, so you do need to invest in good alkaline batteries. Alternatively, the telescope has a DC power socket so you can use an external power source. You could hook it up to a 12V lead-acid leisure battery which will keep it running for many observation sessions, or if you plan to use it in your garden, you can use a 12V DC transformer and an extension lead. Make sure to check the maximum current rating because the telescope is quite demanding.
Optically, this Cassegrain-Maksutov telescope is better suited to planetary viewing. If you want to look at galaxies, nebulae and other DSOs, you would be better off choosing a Newtonian formula telescope such as the SLT 130. Newtonians have lower magnification but better light-collecting ability.
You can easily get a T-mount for this telescope and attach a digital SLR camera in place an eyepiece for excellent astrophotography. The motors in the mount seem happy enough with a reasonably heavy camera piggybacking on the telescope.
Do take note that this telescope has an altazimuth mount, rather than an equatorial mount. This means that throughout the course of the night, the field of view shown in the telescope will rotate. Bear this in mind if you are taking long exposures for astrophotography. An equatorial mount is the “real deal” for astrophotography.
I probably wouldn’t recommend this telescope to a complete beginner, but it’s excellent for a second telescope after you’ve learnt the basics on something a bit smaller.