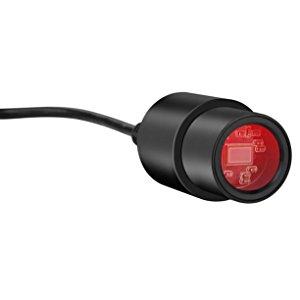
Bresser USB Microscope MicrOcular Telescope Camera Full HD
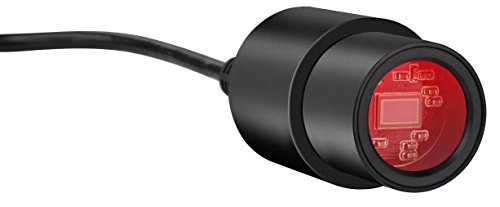
Bresser USB Microscope MicrOcular Telescope Camera Full HD Resolution, with Integrated UV/IR Blocking Filter and Various Adapters for Microscopes and Telescopes


Products
| Weight: | 30 g |
| Dimensions: | 2.7 x 2.7 x 4 cm; 30 Grams |
| Model: | 5913650 |
| Part: | 5913650 |
| Colour: | Black |
| Pack Quantity: | 1 |
| Batteries Required: | No |
| Batteries Included: | No |
| Manufacture: | Bresser |
| Dimensions: | 2.7 x 2.7 x 4 cm; 30 Grams |
| Quantity: | 1 |
Very happy with this.
Up front I’m going to say that I had a Neximage camera. It’s software was abandoned by Microsoft and Neximage forcing me to either buy the same gear for my new laptop/windows 11, or find an alternative.
At half the price but delivering the same image quality I’m a happy bunny!
Neximage used windows upgrades as an excuse to sell new imagers. No software upgrades/updates, they are happy for their equipment to fall into obsolescence.
Using the camera, I managed to gather enough frames to get alright images of Jupiter and Saturn. However I did not use the Bresser software to record, I used Sharpcap which is a free download and has really helpful settings that can be adjusted according to views.
The camera itself along with the attachments fit well in the eyepiece slot of my telescope, however there is nothing to hold the camera in place. Which is why this product loses a star. The problem is easily fixed with a little bit of bluetac, though it shouldn’t have to be used at all.
Overall a nice camera, perfect for the beginner planetary photographer!
Equipment used to produce the attached images:
Bresser eyepiece cam
Celestron astrofi 130
Sharpcap
Registax
Manually tracked with an xbox controlle
ot much use as a deep space camera. o.k. for close up of near trees
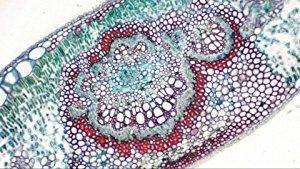
So i originally purchased this to start out with astro photography. I think it’ll be great for this as i’ve had it fitted to the celstron 130 and the adapters that come with it are a good fit. In fact the quality of everything is amazing. What i have used it for so far is capturing microscope images, and it is honestly incredible how good it works, even with my old zenith microscope: images better than i’ve ever seen. For the price it’s a no beainer, buy it now!
Have recently developed a prototype quick change LED-ring illuminator to extend the capability of traditional BIOLOGICAL microscopes to examine ‘opaque’ specimens.
Very successful test results prompted me to replace the conventional eyepieces with the Bresser USB2 ocular, to facilitate group demonstrations via a monitor.
This robust versatile product provides excellent image clarity and sharpness, is very easy to install and use, for a reasonable price. In my case, an ideal ‘development’ accessory. Allan Curtis.
Gives a brilliant quality picture on a computer monitor from either a microscope or a telescope. It avoids the necessity to crouch down over your worktop to look down your microscope or crick your neck when looking at the stars or anything else through your telescope You see it all from the comfort of your office chair. It also removes the fact that in some instruments the image is inverted. All you have to do is rotate the eyepiece in its socket to put it right.
This camera does work with newer Android devices and a USB camera app from the Google Play Store. I have used it with a tablet and smartphone. You just need to make sure that the device is OTG compliant and can supply enough current to power the camera.
A few other comments:
The capture frame rates I have been getting are a low 10fps, using either Bresser CamLabLite or SharpCap 3.0, even with a very short USB lead plugged into a USB3 socket and reducing the capture resolution (in SharpCap) to 1280×720. I’m not clear whether that is fast enough for good planetary results.
As expected, the camera sensitivity isn’t good enough with my relatively ‘slow’ scope, for deep-sky objects, or many stars come to that. The reducer should help a bit though.
No risk of the camera dropping into the non-stock 90 deg diagonal on my scope, as it sits on a ridge inside the diagonal. I was planning to wrap tape around the body but there was no need.
I had problems importing CamLabLite captures into Autostakkert (memory errors) but am successfully using Autostakkert 3 Beta with SharpCap captures.
I’ll try to update this review once I’ve had a go a capturing some planets!
This is a great product. I’ve had one for 9 months and love it, however I can’t use it anymore as I’ve changed from PC to Mac. They don’t do software for mac yet, but if you are good at Linux or making a partition on your Mac it can still be used. Please make some Mac software soon.
It is roughly the equivalent of a 6 or 7 degree telescope eye piece, so it does get really close to objects like the moon.
This really works well. I use it with a microscope using bright field and UV optics and it also fits my dissecting microscopes. It produces photoimages that are completely suitable for teaching. It would be possible to produce better images but this could only be achieved by spending a very significant extra amount of cash.
Downsides, for me, are that it sometimes has issues with automatic exposure, especially in low light, where it will sometimes ‘bounce’ from bright to dark, but I can usually compensate for this in Bresser’s software. I’d also rather like a higher resolution and perhaps some image processing in the camera, to allow for optimisation for the specific setup I’m using, though that’s a bit much to ask in such a low-price camera and it does great as a starter, which I’ll keep using on my secondary scope, after I’ve gotten a higher-end imager for the main unit. The only other issue I’ve had was (I believe) caused by having accidentally placed a magnet next to the USB cable (silly me) and thus getting some signal loss that corrupted some video. Probably best not to put strong magnets next to electronics…
All-in-all, very happy and I’d recommend it, especially if you want to get kids fascinated by microbiology and don’t want them being put off by having to find the focal-spot on eyepieces! 🙂
The video you see here is just the camera plugged straight into the eyepiece hole.
There are several different shots in the 2 minute video. For some reason, the first shots is jerky and flashes a little, after 30 seconds the second shot is smoother. Excuse the shakiness – a clear night but very windy up on the hill.
Video was taken in mid-Wales on 10th February 2017.
WARNING! While video that you take seems to autosave, images don’t, and must be saved on at a time.
Don’t spend an hour getting frostbite only to find ALL your images from the night vanished when you closed the laptop… RTFM!
As a bonus (which doesn’t affect my rating) I bought this on the Amazon “Big Thanks 10 off” day, so got it for 41. Well pleased!
Talking of money, this video is what you get for 140 (99 for scope from another place and 40 for the camera). Well worth the money to excite the interest of a young person.