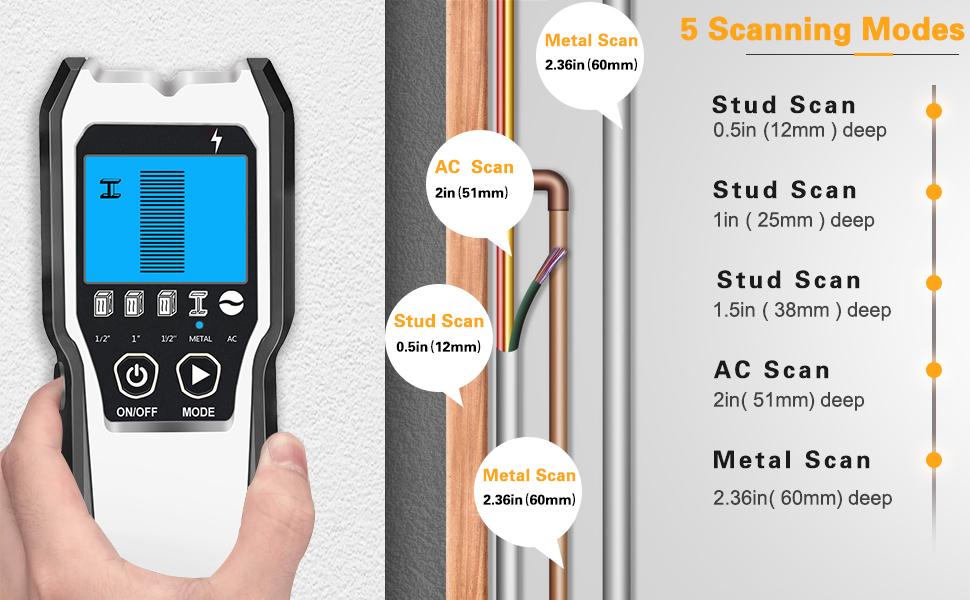
Stud Finder Wall Scanner – 5 in 1 Stud Detector Detector

Stud Finder Wall Scanner – 5 in 1 Stud Detector Detector Beam Finders Wall Detector Sensor Center Finding with LCD Display for Wood AC Wire Metal Studs Cable Joist Detectio
Step 1: Calibration
Important notice: Calibrate before scanning
Please insert a 9V Battery (included).
Press Power Button to turn on the device.
Put it on the wall where you want to detect and choose the Scan Mode, then press the scan button to start calibration. The decreasing bars will disappear and the buzzer will beep one time and the calibration is completed.
Step 2: Moving
Then move the stud finder along the wall slowly.
If shake or lift the stud finder by accident, the device needs to re-calibrate.
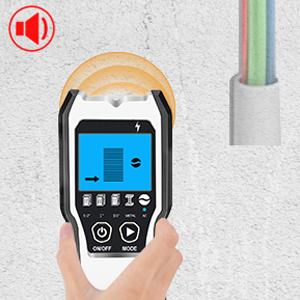
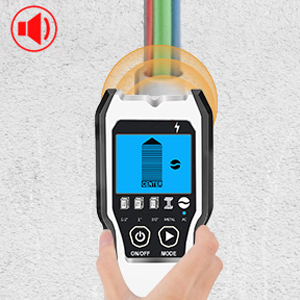
The bar on the screen raises with the beep signal alter, which means the device is close to the AC wire.
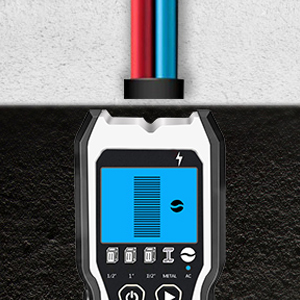
Step 3: Find the AC Wire
When the signal bar is full and the beep alarm is loudest, it means you have found the AC wire. Mark it with your pencil.
| Weight: | 260 g |
| Dimensions: | 26.9 x 11.1 x 6.3 cm; 260 Grams |
| Model: | TH550 |
| Part: | TH550 |
| Colour: | Silver |
| Batteries Required: | No |
| Batteries Included: | No |
| Manufacture: | FOLAI |
| Dimensions: | 26.9 x 11.1 x 6.3 cm; 260 Grams |
I bought this initially to move my bedroom tv to a cavity wall. Worked brilliantly. Found the stud first time and so far my telly is still up. I’ve used it to find electrical wiring and also water pipes. Works very well and easy to use. I would definitely recommend
Very simple to operate, no more tapping on walls looking for studs, or guessing where pipes or live wires are located.
Easy to use and worked well, identified live electrical wires and studs making installation of a TV bracket much easier. Good product.
Does what it says on the tin, only sometimes it gives a funny reading but work well for the most part. For the price you can’t go wrong!
Had an extension built and stud locations not marked before decoration. Didn’t want several holes in wall or use plasterboard fixings to mount TV. Bought this and it really works, can be set to find wires, metal and different widths of studs giving the edge’s and stud centre. Tried on other walls to prove stud spacing of 450 or 600 spacing. Well impressed and found the device simple and easy to use.
The product (instructions were in English only) packaged well with handy storage bag and a battery included which allowed immediate use. I found having to keep button depressed awkward as suffer RSI and arthritic. This meant recalibrating often. I trialled it to check operational and studs and metal located although cantering was a bit tricky. Generally pleased though.
it works finds electrical wires and I have just checked this out breathily as will not use for some time properly to its full but i believe it will find beams through the plaster ceilings and studs in walls more testing and use needed to give a full account of its functions good for the price good delivery good instructions.
Added manual images as someone requested in questions sectio
Does work but not as easy as expected. May be the way I used it but it definitely good and done the job
It will go back in the tool box until the next time I’m pressured into a bit of DIY.
The battery supplied lasted approximately 5 minutes befor it ran out, I would suggest you have a spare 9v battery if you want to do anything longer.
Battery (9v) supplied, easy to programme
and use. Electric cable finder has its own
setting but is activated while under other settings.
Recommended and would buy aqain.
I noticed that at least one of the window reveals had a socket right next to it. I wasnt about to drill into live cabling, so bought this to check first where the wires were oriented. I found the wires and was able to easily avoid them. The scanner also found studwork and some metal dry lining channel, too.
An inexpensive means of avoiding a nasty accident. Totally recommended.
* Separate little lights show the selected scanning mode.
* Scanner always scans for electric wires, even in other modes.
* Top of scanner is a good shape to guide your pencil mark to record the positions where studs and wires are found.
I noted that on this machine the display is black and white rather than back-lit green. Its very clear and I really like it.
Calibration >>
Calibration is really simple, but you must do it before every scan. Turn on the machine and select the scanning mode by clicking on the mode button (cycle through the options to the one you want). Place the scanner on the wall, click the scan button and wait a second or two for the calibration screen to clear. You are ready to start scanning the wall.
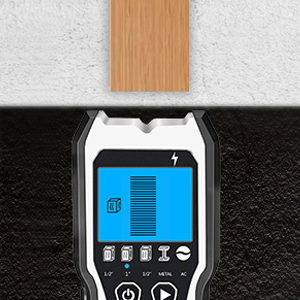
Scanning for Studs >
Turn on, select stud mode and calibrate the scanner. Move the scanner over the wall. There are felt pads on the back to protect the wall. The indicator arrow column pops up on the display when a stud is near. An arrow at the base of the column shows in which direction to move the scanner to find the centre of the stud. When you move the scanner over the centre of the stud the direction arrow disappears and an upward pointing arrow head is displayed at the top of the column.
Scanning for Electrical Wires >>
The machine constantly scans for electric wires. At the top right above the display there is a little red light with a thunder flash symbol over it. If this indicator lights up, then there are some electrical wires under the plasterboard near where you are scanning. To find exactly where they are: change the scanning mode to scan for electric wiring, calibrate the scanner, and scan the area again. This time the scanner will show exactly where the wiring is. It will do it the same way it shows where the centre of a stud is.
The scanner comes with instructions that go into more detail, but this is most of what you need to know.
Conclusion >>
This is a very handy tool. It works, its simple to use, and its reasonably priced. It couldn’t be better, so I’m glad I didn’t pay more.