Nicesolar 100W 12V Solar Panel Off-Grid System, Solar Panel
Nicesolar 100W 12V Solar Panel Off-Grid System, Solar Panel Kit Charging Battery for Camping, 20A Solar Charging Controller + Solar Cable, for Home,Car,Shed,RV
From the brand

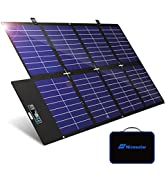
Foldable Solar Panel
| Weight: | 4.54 kg |
| Size: | Pattern 5 – 100W Solar Panel Kit |
| Dimensions: | 30.48 x 30.48 x 12.7 cm; 4.54 Kilograms |
| Model: | AM-M100C20WZ-1 |
| Part: | AM-M100C20WZ-1 |
| Batteries Required: | No |
| Batteries Included: | No |
| Manufacture: | Nicesolar |
| Dimensions: | 30.48 x 30.48 x 12.7 cm; 4.54 Kilograms |
| Size: | Pattern 5 – 100W Solar Panel Kit |
Good solid solar panel, kit to hook it up is easy enough to understand and you can get a decent amount of power on a sunny day coming through the panel.
Decent set up.
This is a review for the 20W solar panel kit. Overall, I’m pretty happy with it.
The metal frame feels nice and solid and is easy to mount. The photovoltaic panel itself sits a bit wonky in the frame, but as long as the electrical connections are fine that’s purely cosmetic. The charge controller seems to work well for Lee per situations and the instructions for setting it up are good. The connectors do the job, but at some point I’m going to get some higher quality ones to be on the safe side.
This is only a small, beginner system for low power situations. Don’t expect too much of it.
This solar panel is selling for 49.99 at the time of this review. I think that’s an okay price for what you get.
This is a really well made and sturdy solar panel, it’s easy to set up and comes with very detailed instructions which I appreciate, best for smaller applia2or devices but a good size for travelling with
This comes with 99% of everything you need. I love this and I am only just getting used to this all but I have used this in my shed for a little light and other bits and it works well.
This comes with 99% of everything you need. All you do need separately is a battery. The kit is comprehensive, instructions pretty easy to understand. We have this at our cottage, for times when the electricity goes down. We’re quite happy with how it works
This is a fairly decent kit, although I miss a battery that could charge easily.
I use this for some lights in the garden where I don’t have a mains socket. I also have it hooked up to other things to charge them in the shed, saving me the need to get power out there. I can really see the benefits of this, and can see that in the future much more DIY in this area will come about, allowing one to hook up other devices so as to reduce energy consumption from the grid.
I am impressed with the build quality and the overall set.
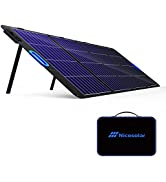
Nice solar panel mounted on a lightweight aluminium frame that comes with comes with cables and controller unit all you need apart from a battery although the controller has USB sockets so you could charge powerbanks from it.
I plan to put this on the roof of the shed and run the garden lights from it once the sun returns. A good kit.
A solar panel always comes in handy, it’s free energy and that adds up to a lot right now. The area covered by the solar panel is about 32*38cm, while the outer frame is about 34*40.5cm.
But this product has me confused by its inconsistencies and variability of qualities. On the one hand the box has a label indicating details of the manufacturer, the type of product… where it is indicated that it is a 100W panel. But the box itself says in big letters that it is 20W, which is the same power indicated on another label on the back of the solar panel itself.
On the other hand, the quality of the metal frame where the solar panel is installed seems to be of good quality and well made. The mounting holes are well made. But looking at the solar panel itself, it looks completely off-centre, not well positioned. These details give an impression of poor quality and even less manufacturing quality control.
Included with the panel are the cables and the charge controller, which is a PWM regulator, a standard that only provides power in full sun, in cloudy conditions PWMs do not provide power. PWMs are intended to compensate for low power installations, up to 200W. For the power of this panel and the application, a PWM is the right thing to do. But, if you want to use it for other uses in higher power panels, it may not be the best option. You will get more with another type of regulator, mppt, which optimises the recharge point of the battery with the panel.
It is a cheap kit and you can see that the connectors are not of high quality. In electrical matters I always recommend replacing them with elements of higher quality and safety.
Great little solar panel, I’ve attached it to our small touring caravan with the help of a friend and it worked immediately as a small charging unit for devices, it’s a plug and play system aside from the fitting of the panel and the wires etc isn’t as difficult as I though, literally plug in and away you go.
I’ve been considering solar power as an off grid option for some time and this has convinced me of just how good solar power could be for our off grid adventures. It isn’t enough for heavy use or for powering a whole off grid set up obviously but for trickle charging our leisure battery it’s ideal. Great price and build quality.
I’m very impressed. It’s compact enough to use for camping trips and it’s great value for money. Set up was quick and easy and the instructions were clear and helpful.
I got the 20w panel kit and will be using it to power the lighting and some usb sockets in my garage to try and save some money on electricity.
The panel looks good and solid, I hooked it up to the included controller on an overcast day and it was generating a strong consistent current that was good enough to charge a couple of phones or recharge a battery.
The connection process was straight forward – note you’ll need a leisure battery to use this properly, which I had already.
This would also be good for topping up the charge on an off grid setup – caravan, camper etc.
Can’t wait to get this mounted and start saving some money.
All assembled and ready for the sun, I will be using this to trickle charge my Swary portable power solar powerstation, keeping it topped up during the day time whilst at work. Great little 20 panel well made and all the kit in one box to start you off. Just need a sunny day now to test it.
20W Selected. Higher power versions of this kit are available (50W, 100W) and may be more suitable depending upon the intended usage. Note also this kit uses a PWM controller which is a cheaper alternative to a more efficient MPPT charge controller.
In the box:
A solar panel
2 x 5 metre leads — one positive/one negative
1 x PWM Solar charge controller
There are no fixings or plugs included, this is a “bare bones” kit. In the manual the installation refers to using “z” brackets for the panel but these would have to be sourced separately. Not a major inconvenience but I would have thought these could have been included.
One thing I found annoying about the kit was that the screws on the controller terminal block were *really* hard to unscrew even trying a variety of cross head screwdrivers for the purpose. Make sure you have a crosshead driver of exactly the right size or you may damage the crosshead trying to turn the screws. I had to apply a *lot* of force to open the terminal jaws — no idea why these screws should have been so tight.
A user guide is provided for the panel and for the controller. Text is very small though. Scans attached.
Instructions for installation make it clear that the following sequence of connectivity should be followed:
First: Connect the battery
Second: Connect the load.
Third: Connect the panel.
Disassembly is the reverse.
= = =
The controller works on either 12V or 24V batteries. The controller automatically determines which set of values to work with when the battery is initially connected.
Press the MENU button to browse the different displays — the information cycles through the following:
1. Main Interface
2. Float Voltage
3. Discharge Recovery
Voltage above which power out is enabled. See manual for defaults.
4. Discharge Stop
Discharge cut off voltage — see manual for defaults. Power below which power out (load) is disabled.
5. Load Working Mode — time ranges over which load is enabled. Default 24H.
6. Battery Type – Default : BAT / Lead-Acid.
Note that pressing the “Down” button whilst on the Main Interface display toggles the load On/Off manually. By default the “work” mode is set to 24H i.e load is always enabled.
Note the float voltage default (12V) is set to 14.2V and is non-adjustable. Float voltage is the voltage at which a battery is maintained after being fully charged to maintain that capacity by compensating for self-discharge of the battery.
The horizontal bars on the battery icon indicate the charge level.
The wires from the panel are bare tinned tails, insulation colour coded for polarity. Unless you are able to mount the controller very close to the panel you will need to use a connector block or similar to attach the panel tails to the leads provided in the kit.
Two pairs of leads, each 2 metres long are included. One pair nominally for connecting the panels to the controller and one pair to connect the controller to a battery for charging.
At time of review the price was 48.99 which is competitive — but there are some cheaper options available if you search online.
The stated purpose is “battery maintainer / trickle charger” which is exactly right. If the intended use is to use solar to run lights for a shed or a radio, then there are purpose-built solutions for this which might be more suitable and cheaper. However purely as a battery maintainer this unit should work well. With only 20W power though the specific usage should probably be where the battery is not used often and/or for smaller loads. So it might be that a battery is already installed for the purposes of low power lighting or running an inverter and this panel can be used to keep the battery charged between infrequent short periods of use.
The controller also has two handy USB charging ports but bear in mind these won’t charge a USB device directly from the panel output – a battery still needs to be attached to the controller.
I tested the kit on a 12V battery running a 240V inverter. The kit all works as expected. The controller is simple and the instructions are quite straightforward. For the right use-case this kit seems very capable. It is also a good introduction to solar PV, but to avoid this kit ending up as “spare” I think you need to do some homework first to make sure you have sized your system correctly for your intended needs.
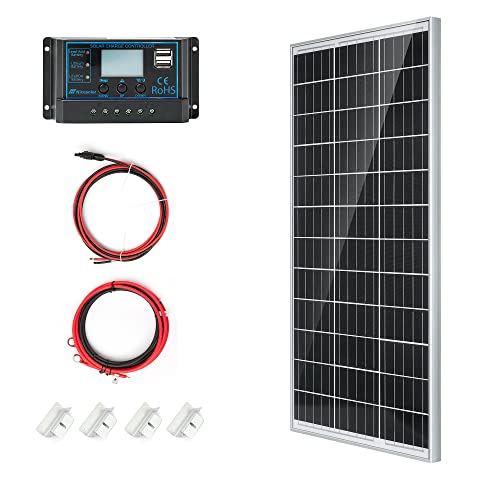
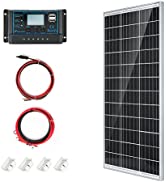
20W 12V NICESOLAR solar panel set is great for small projects, powering smaller devices or adding it to your camper van.
Next to the solar panel, you will receive 2x solar cables, 2m O- ring terminal solar cable and a 20A controller with LCD screen.
The controller itself is suitable for lead acid, lithium and LiFePO4 batteries. A great feature is that controller is indicating what battery you are using through LED light.
Full instructions and schematics are included, so you can carefully follow and easily assemble the whole set-up. The only piece you are missing is a battery, which would be nicer if a small one was included. However, this set is great to get you started.
After receiving it, inspecting it and setting it up I could not find anything wrong and everything worked perfectly and the new small system is up and running perfectly.
This solar panel sorted out a little problem for me, I built my granddaughters a playhouse and it has two small strip lights that run of a small 12v battery, it works well but obviously discharges over a period, when I was able to try this out the first thing I did was just connect it up on my patio and see if it worked, it’s a doddle to connect, the first two connections are for the panel, the second two are for the battery and the last two for lights, it started working straight away charging the battery, I must say the instructions are a bit hard to read as the writing is so small and my eyesight is not the best so used a magnifying glass.
It charged the battery so I felt confident that it would work in the playhouse, I had to fabricate a couple of brackets to fix it to the roof and then just run the wire inside to where I fitted the controller, joined all the cables to there correct terminals, pulled the light cord and on came the lights, the controller also has two USB slots for charging phones etc and they work quite well as I plugged in a small fan the girls have for when it gets hot and it run, so they can now plug in various items that use USB type plugs.
This panel is the smallest of the set at 20W so probably only good for trickle charging a small battery like I am using, it comes with all you need apart from a battery that is to connect it up, the panel looks quite robust but time will tell on that, so I’m pleased so far with this product it works for me, please note those that watched the video, I did not paint the inside of the playhouse the girls did that, paint was everywhere but they had a great time doing it.
Having recently got into Solar for home use due to the spiralling energy prices, when i came across this product i thought it would be good to order and test.
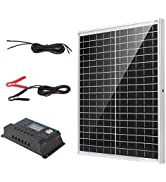
This solar set up contains everything you need to get started. Contained within the pack is a 20w monocrystalline glass panel, a PV charge controller, 12v battery lead and crocodile clips and another 12v wire for small loads.
The instructions provided with the kit are confusing to say the least. They don’t really explain anything to you. The charge controller instructions is beyond useless! Luckily i have experience in this sort of set up so was able to wire up pretty easily. If you have never wired up a small PV system before then there are plenty of tutorial videos out there for you to review. Most important message here is ensure you wire the polarity right!
The 20w solar panel is good quality and is small and compact. It won’t generate a lot of power due to the size of the panel, however 20w should be enough to trickle charge a small 12v battery. The charge controller is a very cheap one – it is a PWM controller and not an MPPT controller (which are a lot more expensive) A PWM controller draws the current from the panel at just above the battery voltage whereby an MPPT controller draws the current at the maximum power voltage resulting in a more efficient charging solution +20/30%.
As stated the instructions for the charge controller are terrible – i ended up watching a few tutorial videos in order to work out the different settings and menus within the controller. To be fair it did require very little setup, the main thing you need to ensure is that you set the right battery type. I was using sealed lead acid 12v 9Ah batteries.
Having connected up the system and the batteries to the charge controller i could see that the solar was charging them – the batteries were already around 75% and this little panel did a good job of topping those up over the course of a semi-sunny day to around 95%. I did test out the load output but this kept tripping the controller – therefore i would say this is only suitable for very small output loads such as a single led light bulb. Anything more substantial like a small power inverter would need to be wired directly to the battery. One thing i did like about the controller was the 2 USB ports – you can use these directly to charge USB device. I tried my S22 Ultra mobile phone, and it did start charging it albeit at a low output power (no fast or super fast charging).
If you are just getting into solar and looking for a very small, uncomplicated started solar kit then you can’t go far wrong with this set up. For just under 50 for everything i do not think it is terrible value. If you have bigger batteries to charge such as 50ah or 100ah leisure batteries then you would need a more substantial system – whilst this wood charge okay it would take an age! Also i personally would only charge those more expensive batteries with an MPPT controller. For top up’s of phones/tablets or small batteries then this would work great.
Would i recommend this kit? As a starter experiment then yes, it’s fun to set up and play with and will draw a little bit of free power from those suns rays. It’s surprising how satisfying it is to get free electricity no matter how small! As a decent charging setup then i would suggest you invest some more money and go for a bigger more serious setup with 100w+ panels and an MPPT controller.
I hope that you found my review helpful.
I think this solar panel is a snip. I have another, but it was over twice the price, so coming in at just under 50 at time of review, this little unit really delivers at a budget price.
It’s neat and lightweight, ideal for camper vans or camping as it takes up little space. I have no idea about the technicalities ie the outputs and wattage, volts etc. what I wanted was a compact panel which can be set up to gather the rays and deliver power to a battery. This does that even in October when sunlight wasn’t optimum. It seems well made and I’ve no complaints. I’m sure there are multiple uses for a panel like this and fir orice and performance, it’s an all round winner. Very happy to recommend.
I decided to install this on our camper to allow for a more environmentally friendly use and also to be able to power a few items from it when we are out of reach of an electrical hook up or when we don’t want to drain our main batteries. This kit arrived with everything needed from the solar panel to battery intake which is very easy to setup and a little manual was provided to show how to do this too. Could be useful for many areas around the house too! Seems to have set up great on our camper and is right away drawing in the power. Works a treat and I will most certainly be looking into the large kits of this item. I didn’t realise how good they was!
Nice solid panel with decent looking controller module.
Looking forward to installing this in my bbq shack at home to provide some power and lighting.
Couple of downsides are that there are no mounting brackets for the panel, so you will need to make your own.
Other downside is that the connectors (both ring terminals and battery clamps), aren’t great quality, but this is a minor detail, and are easy to replace with higher quality items.
To be fair, it is a much cheaper kit than most out there, so you get what you pay for, but for a basic cheap supply of solar power, this has the potential to be a good, cheap system.
The kit comprises
A monocrystalline solar panel
Claimed 20Watts peak panel output , or 21.8V (Open circuit) or 1.23Amps (into a short circuit). Please remember: ‘Peak’ power output will of course happen in full summer sun while my tests were done in the low, mid-October afternoon sun.
A ’20A’ PWM charge controller
Balancing voltage vs current and supplying 10 — 15V to ‘pulse’ charge a battery is the job of the controller. A menu allows the battery types etc. to be selected. A 10A output can be switched via the panel button but high power inverters etc must go directly to the battery.
Having read the User Guide, I tested the panel and charger on a bright October day (so ‘peak’ output wasn’t expected).
In sun I measured 22.6V open circuit or maximum current of almost 1.2A on my own digital multimeters so that’s all good.
Then, connected up to my own Yuasa 12V lead Acid leisure battery (NOT INCLUDED !) it all worked as expected with an initial charge current of 1.1Amp and still about 1 Amp (both measured on my own multimeter) going into the battery even with the battery nearly full (14V reading). (So power being delivered into the battery was an impressive 14 watts even in October !)
A user guide and some battery cables / clips are provided and were used for my tests.
The charge Controller has a pair of 5V USB charging outlets which can work from the charged battery and be used whether there is sun on the panel or not.
The kit was easy to set up and worked well, I’m impressed with its ‘real-world’ output and it seems good value at 49 !