ELEGOO Neptune 3 Pro FDM 3D Printer with Auto Bed Leveling
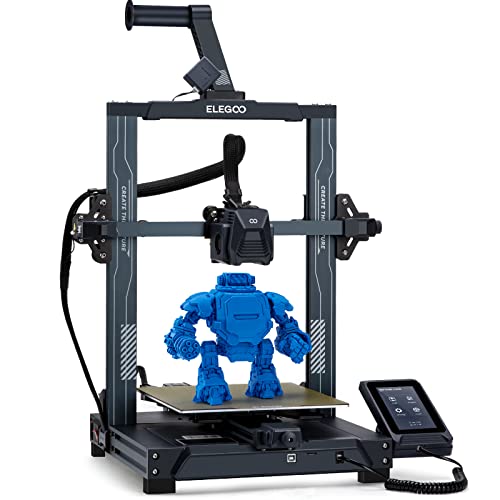
ELEGOO Neptune 3 Pro FDM 3D Printer with Auto Bed Leveling, Dual-Gear Direct Extruder, Dual Lead Screw Drive, Removable Capacitive Screen, 225x225x280mm Large Printing Size
From the brand


ELEGOO develops the high quality, cutting-edge and user-friendly 3D printers.
At ELEGOO, we go beyond being a 3D printer company. We recognize the crucial role businesses play in fostering a sustainable ecosystem. We believe in the power of innovation and sustainability to shape a better world.
Fantastic printer, was very easy to put together, well packaged, the printer was easy to level and the self levelling is amazing – this was something I’d always struggled to get right on my old printer. This printer feels really well made and solid, the most impressive thing is the speed…wow it’s fast..printed a small dragon flower pot I found on cults 3d…it’s about 60mm round at the base and 100mm tall (ish) in about an hour, on my old printer this would have been 6-8 hours, really impressed with this printer.
Some technical issues where print would slip even after calibrating and leveling everything. To solve the issue I done a factory reset on it. And works great now
The quality of prints are amazing and would recommend for a first timer. Elegoo software is easy to navigate as well.
A superb printer although my first IM glad i went for this model fast setup self leveling and can take a number of different heads and spools. Connection to PC or Mac for use with elegoos own software and the accessories it comes with for maintenance including tools and free USB for loading you own models as well the supplied main USB that comes with manuals and test models. All that plus the larger build size i cant recommend it enough
I don’t have windows system so it took a long time to get the slicing software right. Now the cura apps works perfectly with iOS and I can finally print.
The machine is good and service email replies to my requests with great patience.
A good starter printer.
Glue is recommended otherwise it moves away from the base.
Overall it is pretty simple to use(I spent most of the time figuring out the slicing app).
It has auto leveling so in theory you won’t need to level every time. Auto leveling still works for me after about 10 prints.
his is my first 3d printer, had it 3 months and it’s been amazing! the only issues I have are USER errors, for example, it takes a few days to learn how to get good-quality prints via the software but you will get there! i have wanted a 3d printer for 10 years and I’m so glad I waited!
Here’s some tips:
Follow the instructions for putting it together and install Elegoo Cura (the latest version)
Ditch the supplied USB and use a new one.
Do test prints for dimensional accuracy to ensure belts are not tight or loose (mine are still perfect after 100 hours+)
Turn off the large gantry fan, which is for going super speedy (500m/s) and you will most likely stick with the default “fast” setting of 200m/s for quality prints, unless you want to try going faster of course….
use elegoo filament and Set your material temps to 200c, this will help you print without supports, not saying you will never need supports (it can’t print in mid-air after all) but this will help reduce the need for them.
Go with tree or 10% gyroid supports if you have to use support.
use “hidden seems” or “smart seems” under the “walls” drop down.
Don’t use the glue stick, If your filament is not sticking use dawn of fairy dish soap to clean the pei plate, dry with a microfiber cloth and use it again straight away. try not to touch the middle of the build plate with your fingers as the grease will stop the filament from sticking.
You can buy 16mm silicone spacers for replacing the bed springs, this saves manual levelling every 10 prints or so.
Remember that print orientation matters, some times rotating an object 90 degrees will make it stronger!
Test, Play and have fun!
Overall not a bad printer but good for the price. BUT YOU MUST do the following to get a decent print.
Heat soak the bed at 60 for atleast an hour.
while the bed is at 60, do the bed levelling where you adjust the 6 springs, then let it do an auto bed level.
Thats it. adding ‘lift while move (.3)’ to your gcode helps to0.
this is beacuse the bed is nowhere near fully expanded when you turn it on, heat the center of the bed to 60 and auto level.
I first tried 3D printing about a year ago with a second hand Ender 3 and boy, I must have spent 50+ hours trying to level that bed before I finally gave up and sold that heap of trash to someone else.
It wasn’t until I went to a convention recently and saw all the cool stuff people were making that made me want to try it again, and after a bit of searching I decided on the Neptune 4 Pro, mainly for the low price and decent featureset
Setup was painless, took me about 35 minutes to get it put together with my clumsy fat fingers, if you’re more nimble than me, you can probably do it in under 20 minutes. Plugged it in, turned it on, and… It just worked. I levelled the bed once, using the “basic” 36-point system instead of the “pro” 121 point system, and it worked straight away!
I’ve printed about 10 items in the last day, and aside from a few issues with getting things to stick to the bed (solved by using the included glue stick and a good clean to remove any oils), it’s worked perfectly! I cannot overstate how happy I am right now!!!
I. Am very pleased so far with this printer the only thing on the sd card I had with it the trial print was lovely and smooth but since then can not get same finish
Print has an goods resolution and is very quick.
The Neptune 4 (standard) has been a great printer… when it’s dialed in, but that rarely last’s. If you are new to 3D printing and want something to just work, then have a look to the likes of Bambu Labs A1 Mini, it has a smaller build plate, but you probably wont have to deal with the headaches of having to always re-calibrate and figure out what is wrong from the myriad of possibilities (you could even spend a little more and go for the A1 Mini Combo which enables multi-filament printing).
These aren’t as much a problem if you know your 3D printers and can see what the issue is from looking at your prints, but you will spend more time asking Reddit and googling to figure out what is wrong with it than you will printing if you don’t know.
I had high hopes for this, especially for how much it provided in terms of high speed, but it just doesn’t really stack up when all I want to do is print.
I will say though, when it comes to calibrating and tweaking, Elegoo do have some great guides on their YouTube channel which have helped a lot, but it would be nice to see a decision tree or guide to figuring out the issues in the first place.
UPDATE:
Elegoo support are fantastic. They have been there to help assist with any issue’s I’ve had also proactively took on board some of the feedback I gave. I genuinely believe that Elegoo are a brand I can trust in this space and really appreciate the time they took to suppo
After 15 to 20 hours of use, the X axis bottom U ball bearing completely seized with red sugar like substance all over it. The staff at Elegoo where helpful and responsive and helped me to solve my issue and replace the faulty part.
After its arrival, the assembly process involved two main parts – the base housing essential components and the gantry forming a U shape over it. Setup was a breeze, taking less than 30 minutes thanks to well-structured and intuitive assembly steps.
Out-of-the-box, the printer was able to start up, calibrate itself and ended up printing its first model in just under 20 minutes – definitely the most plug-and-play printer that I’ve ever come across!
The first print went well and without a hitch. However, this initial promise faded after the first print due to bed adhesion and levelling issues caused by acknowledged firmware glitches by Elegoo. Even worse, a subsequent firmware update intended to address these issues left my printer totally bricked!
Enter Elegoo’s commendable customer support. Within a few days, they sent a replacement eMMC module free of charge, which resolved the issue entirely. I do really have to give props to their support teams, as everyone I spoke to was lovely and knew exactly what they were talking about and what to do – a true breath of fresh air from the usual support you get with tech nowadays!
Going back to the printer itself, the standout feature in my opinion is the integrated Klipper functionality, which enhances the printer’s capabilities through more than just a pretty web interface. I was able to setup Crowsnest (a webcam manager) and OctoEverywhere (a service that allows you to access the printer securely from anywhere), and before long I had the ultimate printing workhorse that I could use regardless of where I was!
The attached screen is a nice feature, and definitely gives the printer a more Marlin-style feel, though my preference leans towards the web interface since I’m always after the more advanced features and configuration. The bundled slicing software, Elegoo Cura, is serviceable but needs an update. I’ve since shifted to OrcaSlicer, which admittedly is tailored for professionals, and it works like a charm.
After all is said and done, this printer is definitely a recommendation of mine for makers with a basic understanding of 3D printing and who want to find a good, solid platform to start from. Despite the issues I’ve had with the unit, Elegoo’s outstanding customer support and the unparalleled potential for customization (especially for a printer at this price point!) make the Neptune 4 Pro a really appetising choice when it comes to 3D printers.
I’ve had this printer for over a month now and have loved having it, but that doesn’t mean it has been perfect. I have ran into lots of different issues that I’ve had to sort out, which for me has been lots of fun. This is only an issue when you wouldn’t find troubleshooting your problems and optimising your settings fun. When it works it does also produce an amazing print at a high speed. I recommend to anyone who wants to struggle and learn and also come out with good prints.
Pros: relatively easy to assemble, doesn’t get stuck filament, can print very well, very fast ! Great adhesion to the bed..
Cons: Z AXIS issues, when it starts building higher than 2 cm you have to raise the axis as it will start scratching and damaging the print, the bed tweaking is not great, the wheels are rubber and they wear out fast.. once every 5 prints it forgets the leveling and scratches the bed..
I bought nozzles from amazon cheap.. easy to change
Overall if you don’t mind the tweaking it’s better than 500+ printers..
For the price I would buy it again !!
It`s my second 3D printer. First I bought some years ago and had bad experience with getting good “first layer”. After couple months of troubles I finally disassemble it and put on it laser head.
This printer works like a charm. I have it only couple weeks but already print a lot of toys, animal models and so on.
Of course I spent some time to level the bed and, most important, to get correct Z axis offset using A4 paper sheet but its worth it.
I do not use flash drive to transfer gcode but connect LAN cable to home network switch. It has very good web UI, easy to understand, to use it and to upload and print gcode files.
I am happy! 🙂
Update with pictures.
Printing results in X, Y and Z axis are very accurate for straight lines/objects, but have inaccuracy for round objects. I am not sure is this because of slicer mistakes or some wrong printer configuration settings or printer hardware issues.
But I can repeat that this is perfect 3D printer for beginner for that price (less than 400). If you want really perfect prints then look for more professional, industrial printers. 🙂
I had some good results with this but it couldn’t hit the quality point out of the box I needed so I did send it back, that is not to say it is a bad printer as it is not, it is very good. It is amazing the speed these things can move when they have the right Klipper firmware, it makes such a difference. The annoying things were not being able to pause at height in Cura as the firmware did not allow it, no doubt there is already going to be a work around for it as they always do, but still at the time not for me.
Very good quality, very good speed, a little concerned about the wheels wearing out with all the speed but other than that, excellent, would probably recommend the Pro over the standard as that has metal guide wheels.
As my only printer so far my experience is limited, but from a simple to use point this is great. I did not want to spend more time working on the printer than printing so for me this has worked well. Yes you still need to go through basics such as levelling and work out the correct temperature for your filaments. The speed is one of the main benefits, especially at this price. Would recommend as a good starting printer if you are looking to begin 3d printing and it may well last you longer than you expect before you feel a need to spend more on a larger unit.
I’ve tried a Creality Ender 3 and a Geeetech Mizar M, and both went back with various problems (that’s why I love Amazon!), but this ELEGOO Neptune 4 is far superior to the other two, and even slightly cheaper.
So how does this do so well compared to the other two? Here are a few of the main ones.
– This prints at up to 500 — that’s 5 times faster although you’ll typically print at 250
– It has a removeable metal bed so no need to scrape off the prints
– It has a huge number of auto-levelling points that it records
– It takes a normal USB stick rather than the annoying mini-SD card
– It has lights above and at nozzle-level
– It has a useful filament unload and load facility
– The control pad is removable which really helps if the right side is against the wall
The only downside is the supplied software — anything sliced using it is rejected by the printer so it’s just as well I use the free Prusaslicer.
However, Prusaslicer doesn’t yet have the configuration for this printer but an .ini file (apparently from Elegoo) is available online and it works just fine.
The only slight niggles are that it is very difficult to feed the filament through the filament-out detector and after each print the print head remains low — making it a pain to get the magnetic bed off (but this is easily cured by using move to move it up).
It’s worth mentioning that when you come to take the print off the removable metal bed, it really helps to place the bed on something cold like a table, then only a slight bend is required.
17/11/23 getting more consistent results by following a routine – clean nozzle and build plate before each print – do an initial level to check the Z offset so that the same piece of paper used each time gets trapped – then back off slightly so it just moves with friction – SAVE on the LCD screen – when printing make tiny adjustments if needed using FLUIDD (0.005mm up or down) until layers are smooth and even
15/11/23 – Is there a way to use the onboard mesh sensor to measure the distance to the bed when doing auxiliary bed leveling – this would be accurate to 1/100th mm and would be more reliable than the random piece of paper method ?
latest update 03/11/23 – after a lot of stress I have discovered that the Z offset I get using a piece of paper causes problems, it is simply incorrect – eg. I got an offset of using a piece of A4 paper of -1.57 and had to adjust to -1.77 (0.2mm) to get prints to work – I am hoping this fixes my issues and will look at config files to see if I can set the adjustment there.
Latest update 24/10/23 – the Elegoo customer service has been excellent and they sent me details of updating firmware and UI – although not perfect in the sense of the Z offset is still a bit off each time, I have started using a wide brim on my designs to allow real time compensation before a print gets going.
Update I have reset my star rating to 4 and will POSSIBLY raise to 5 – Elegoo have contacted me proactively, which is very good, they gave me some info on how to solve my problems – there may have been a number of things affecting my Z offset issue – my bed plate screws were a bit slack- I tightened them – my PLA + filament requires higher temperatures than ordinary PLA so I have started using 230/65 – also when using PLA+ my nozzle needs to be slightly further away from the build plate – so when I was changing from PLA to PLA+ the nozzle was too low. I am currently running off a PLA+ print after doing the same print in PLA and so far all looks OK.
I have had the printer for a week now and as someone else pointed out leveling does appear to only last for one or two prints at most – to be fair, I have discovered that the level mesh created remains accurate however, the Z offset drifts a lot and requires resetting frequently – I have reduced my star rating to 3 stars and will keep an eye open for some sort of fix to this really annoying problem. Good prints when Z offset is good , frustration when Z offset drifts.
Arrived on a Sunday afternoon and being new to this 3D stuff assembly took me half an hour with the help t
he a video provided. First steps – Aux and Auto bed leveling.
My first print was the little buddah from the provided models and with the provided filament – this worked very well until I wiped the touch screen – did not notice an emergency STOP button on the screen – which shut down the printer immediately with only 75% of my print done – I believe it is not possible to resume from an emergency shut down – anyway the print quality apart from having no top to it was very good.
Software provided is Fluidd which when installed allows monitoring and control of printing and I even added a pizerow camera which allows me to monitor the print from another room – I could not get my USB camera to work with the software.
Printing from Fluidd directly to the printer – simply drag a gcode file into the jobs area, right click and select print.
Things to note –
Find a very stable place to stand the printer
Learn to level and do a few test leveling test prints before embarking on a large print
I was almost in despair at the failure rate until I learned how to do test leveling prints and Z offset.
Clean your build plate with isopropyl alcohol every time before a print.
Do a temperature tower for each new filament type.
YouTube is a good place to research problems.
To be honest I think that this printer, although fairly easy to set up , requires a slight level of OCD and willingness to research solutions to problems.
If you make a mistake , Z level offset adjustments can damage your nozzle and or print plate – I know this from experience.
Nozzle removal is a bit tricky – you have to pull off a silicone rubber nozzle guard and remove the nozzle while at working temperature – the tiny spanner provided is totally inadequate – you will get burned fingers quickly – I used a pair of grips with rubber handles – there are two spare nozzles supplied with the printer.
On balance, this printer is good but there are problems.
Attached photos of Yoda Soap dish and Silk PLA+ vase printed with this printer – also two test leveling pieces yellow and gray.
The yellow failed badly on second layer the gray is near perfect after 4 layers – the fix after leveling was to reduce 1st layer height in Cura to 0.2mm and first layer speed to 30mm/s then create a test model 80mm in diameter and 2mm thick – the 80mm allows you to see the model as the layers are being deposited and the slow speed gives you time to adjust your Z offset by 0.005 mm steps in Fluidd up or down as required – with my grey model the first layer indicated that the nozzle was too high so I lowered until the layer looked like the image show
The assembly process is super quick albeit a bit fiddly especially if doing it by yourself with putting the screws from underneath into the rails.
The screen is incredible, the Inbuilt lights and observation lights are so useful.
The first print blew my mind with how fast it went out of the box, coming from a 50mm/s average speed from the ender 3 v2, it was mind blowing, cutting print times down from 14 hours to 4 hours is so useful.
The PEI plate is amazing, adhesion is perfect but still takes off prints with 0 marks on the plate too and with no issues too.
Only issues I have had was the non native support for ultimaker cura as the Neptune 3,4 or the pro are down as a printer option and it forces you into the Neptune cura which is good but out of date, there are ways of sorting out Ultimaker cura with your printer however just takes some modification to the software files.
The printer is loud when printing at top speed due to the fans but that is the trade off for speed. You can slow the fans down easily on the inbuilt screen but it just slows the print dow
Saw this and was impressed by it’s up to 500mm per second speed. I have run it at 300mm per second so far with great results! Obviously helped by its four print cooling fans and pre installed Klipper.
It came well packed and mostly pre assembled – The only work was to bolt in the uprights with four screws, attach the spool holder, screen and connect the cables. I was up and running in under 30 mins (a world record for me!!)
It has excellent auto levelling and use 11×11 sensor leveling points – that’s a lot. The print surface is great and the printer came with an elegoo branded print stick (novel for me as I have not needed one of these since i had a cetus 3d printer a few years ago) and i do not need to use it now as the prints have bonded well.
The touch screen is excellent and large and is held to the machine with a magnetic dock. You can remove it from the printer and use it “in hand” so to make things easier.
You will need time to get those print temps homed in as the printer is so fast, you may have to run a little hotter than you may have done on slower models – but the fluidd interface that you can access through a web interface, gives you great control.
I have seen a lot of people on the web complain that is does not have wifi out of the box – now mine is connected via ethernet cable in the office, but you can attach a wifi dongle to the USB port – yes you can connect a USB hub into it. It does need some direct editing of the config file to enable, but there are a number of YouTube vids out there to help. But I would always recommend using a network cable connection if possible as it makes everything more stable and its there ready to use
Note, you can also add a webcam direct to it so you can monitor via the fluidd interface.
The printer is not absolutely perfect – you need to access the config files to get the most out of it, but once you get into the swing of it, it is not difficult.
Pros – Klipper is great. The web fluidd interface is fantastic – you even get a picture of how “flat” your print surface is. You can monitor all the stats such as layer timings, watch layers being printed, temperature flows etc. Its very comprehensive.
Cons – You may have to edit the config files to get the most out of the unit, and no onboard wifi could be a problem for some. Propriety print heads – but they can be bought “cheap” on AliExpress for example. The version of Cura that it is shipped with is 4.8 so is quite behind the current version – But there is a config file for Cura 5.4 out there from a third party, which i am using with no issues. It is also available on the Prusa3D Slicer though as well.
But these deficiencies, at this price point and the quality that this printer produces at the speed it does (eg. a print on the Neptune 2 was taking 12 hours, on the Neptune 4 4hrs 45mins!!!) This is a win win in my book, especially with the price of electricity these day in the UK
For the average user this is a superb printer at this price point.
It’s incredible that the printer comes set up to print perfectly straight out of the box. The factory had even levelled the print bed but I decided to run the levelling routine after I’d built it just to be absolutely sure it was spot-on, it only takes a few minutes to do, and then you’re good to go.
When I went to give this purchase a review after owning it for 3 weeks, during which it’s gobbled up a quarter of a reel of PLA+ filament and done about 17 hours of printing, I saw it only has one review… How is that possible? Must have been reset or something. Anyone getting one of these will just want to rant about how good it is! And no, I didn’t get it free or have anything to do with anyone or anything related to the product, I’m just an extremely happy buyer!
I went straight for PLA+ filaments for the extra strength over PLA, and the Elegoo own-brand ones are available on Amazon for an amazing price, just 14 a kilo and the print quality is superb. I wouldn’t mind paying a bit more for Overture or eSun etc but why do that when you can get it for Elegoo price? Well ok some of the colours are out of stock but if you want black or white to get going with then the Elegoo stuff is brilliant.
I used TinkerCAD (Autodesk) for my first few designs, and these came out perfectly using Elegoo’s supplied custom version of Cura slicer. I thought it would take me ages to learn how to use them but no, watch a few tutorials and you’re good to go. I’ve even started using the freebie “personal” version of Fusion360 which is extremely powerful and takes over from TinkerCAD which has quite a few limitations for more complicated models.
The original demo Buddha supplied was printed with the supplied PLA filament sample at the recommended 200C and that was perfect. When I put PLA+ into the printer, I notched up the temp to 205C which is the bottom end of the temp range for PLA+ and again it printed perfectly. Frankly I’m afraid to change the temps or mess with anything because I can’t see anything in my models which could possibly be improved, and if it ain’t broke, why fix it? Heheheh!
I bought a pack of eSun vacuum bags which come with spare valves and a pump, just to make sure that my filament doesn’t absorb too much moisture as I don’t print vast quantities of stuff and the filament that’s not on the machine is going to sit around for a while. PLA isn’t TOO bad on moisture absorption, but a long time could change that and it’s a pig to dry filament so just keep it dry :o)
What else can I add? Well one negative is that it’s quite tricky to change filament mid-print. With the current firmware and the included Elegoo Cura slicer, you’d have to mess with the gcode using scripts and I haven’t quite nailed that yet. It’s quite possible this will be addressed with future software/firmware updates as it’s mainly a procedural process rather than a hardware limitation, although it will still require manual changing of the filament at the appropriate time – if you’ve got the money for a Bambu then of course you can get a multi-filament unit for it which does it all for you, but that facility costs a lot more money!
So for anyone wondering whether or not to dabble in 3D printing, this is THE machine to start you on the road. The price is amazing, and the build and results are better than you could have hoped for at anywhere near that price. And if you get stuck, you can ask their tech support – the only question I needed to ask so far (can I use PLA+ as it’s not listed in the materials) was answered by a very friendly agent within one working day, you can’t ask for better than that!