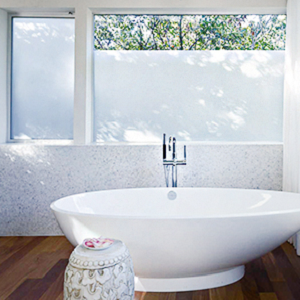
abbitgoo Self-Adhesive Frosted Glass Window Film Opaque Privacy Film Anti-UV Static for Office or Home Matt 44.5 x 200 cm White
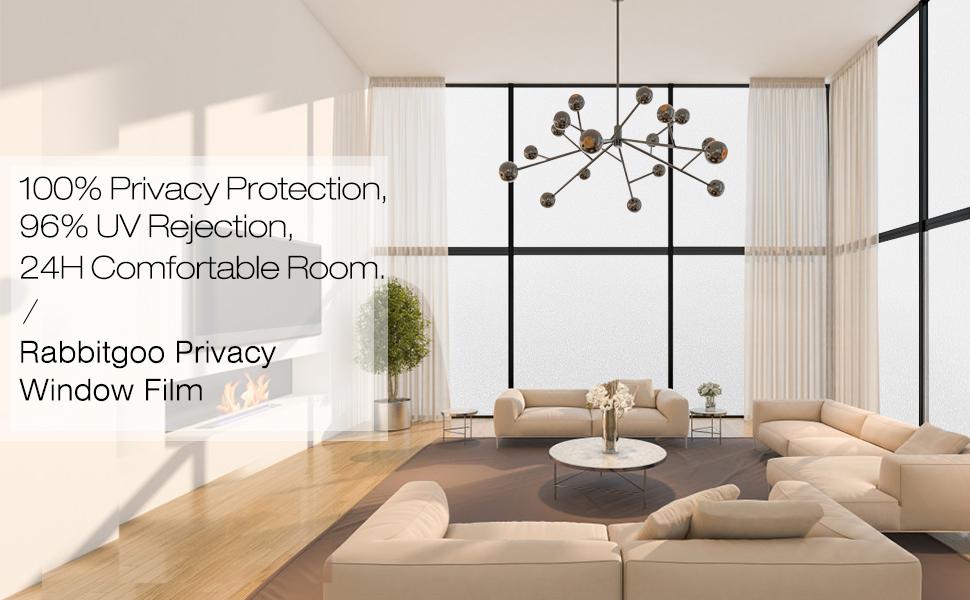
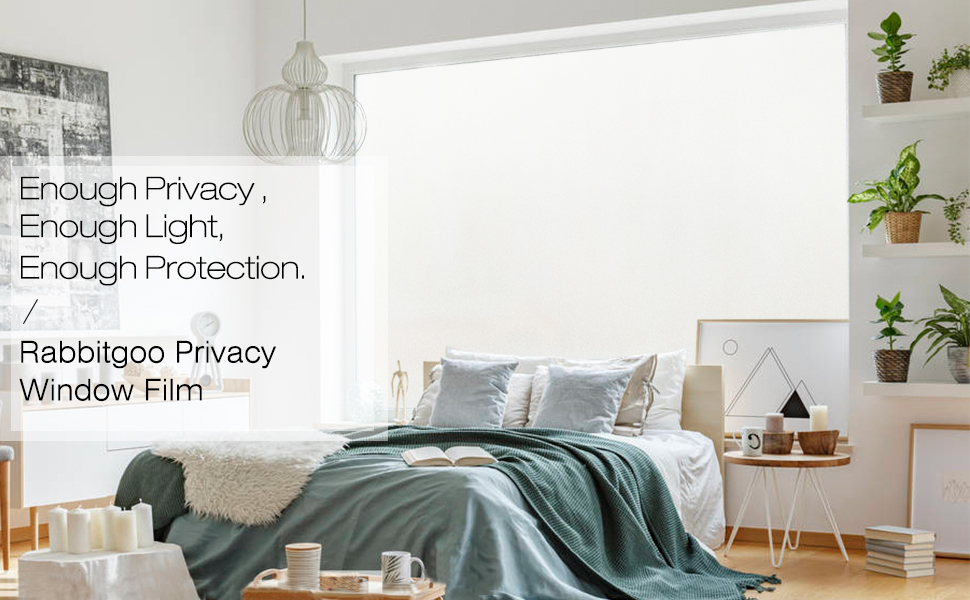
Brighten up your home with rabbitgoo Matte White Privacy Window Film: Nice privacy protection blurs unwanted views, simple matte white decorates your place, static cling to the surface without glue for extra safety and convenience, simple peel-and-stick installation, easy to remove and re-apply for multiple times.
Why us:
- Top Privacy Protection Level: it’s nice to feel safe at your own place
- User-Friendly: Hassle free peel-stick application in a breeze, easy removal leaving no damage or residue
- Glue Free: Simply use soapy water to install, no toxic glue required
- Reusable: Premium PVC material offers extra durability, can be re-positioned and reused repeatedly
- UV Protection: Say goodbye to 96% of UV rays that may hurt your skin
- Energy Saving: Control your energy costs by reducing the hot spots in summer and retaining the heat in winter
Package Included: 1 x rabbitgoo Privacy Window Film Roll
| | | |
|---|---|---|
Totally Reusable, Fantastic Eco ChoiceRemovable glass sticker leaves no residue on the glass. You can re-position reuse it after years, ideal for rental places! | Enjoy More Comfortable LightThis window privacy covering will diffuse direct sunlight to prevents glares, so that you can work, study, and play under softened sunshine. | Decorate Wherever You WantUse your frosting window cling in your living room, kitchen, office etc. Stick it to your sliding doors, kitchen cabinets, mirrors, and much more! |
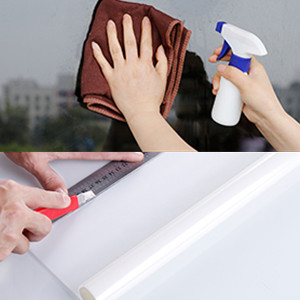
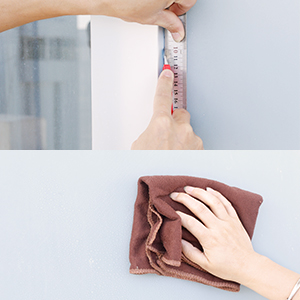
User Instructions: Clean the Surface and Get the Needed Film
1. Clean the window thoroughly. Make sure it is smooth and clean without any dust
2. Measure the window and trim the film to the required size. Leave an extra 1-2cm margin on each side for an easy adjustment. Please trim it carefully with your sharp knife cutter for it would tear if you use too much force.
 |  |  |  | |
|---|---|---|---|---|
| Privacy level | 3 Stars | 4 Stars | 4 Stars | 4 Stars |
| Glue Free? | ✓ | ✓ | ✓ | ✓ |
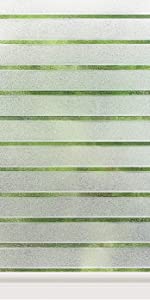
| Features | 3D window film which has more aesthetic effect than a frosted film. It usually be used to decorate your home and makes it more beautiful. When there is sunshine or light on it, it will show a primatic effect with rainbow-like colors. | This window film is stripe-patterned and can decorate your home perfectly. With the great privacy protection, it can blur figures inside and give you a private room. | As an alternative to net curtains, to enhance a period property or just as a decorative treatment for your windows and doors. | The special design with bamboo leaves and shoots makes a Zen decor for your living place |
| Weight: | 222 Grams |
| Dimensions: | 200 x 44.5 x 0.01 cm; 222 Grams |
| Model: | A023-45B |
| Pack Quantity: | 1 |
| Batteries Required: | No |
| Quantity: | 1 |
This is fairly awkward to put on as it is so sticky and tries to curl up on itself , if you remove only a little at a time it is easier to control, overall I was happy with the product and would buy again if needed as it looks great when applied
You need patience to install this, I used on my door which meant I couldn’t really cut it when In place so I had to cut to size. The soapy water adhesion technique works really well but I did find with one side especially there were lots of air bubbles appearing within 24 hrs when there were none after install really hard to notice though due to the frosted nature of the sticker.
Great product, (I’m not being sponsored to write this either!). Since moving my home office it became evident I needed to shield myself from the outside world a bit! Easy to install if care is taken and the results are great. As mentioned by others, absolutely clean the window and soak with soapy water. I put washing up liquid and water in a spray bottle. Cut the item too big, it moves around easily on the window so you can position it. When peeling the backing off, in found this easier to do with it laid flat on a hard surface. Then again. Soak the side of the film going onto the window. When putting on work from the top down, abs use a credit card to get the bubbles out. When in a good position and with most bubbles removed, I got a metal ruler and scalpel to go around and trim. When trimmed give it a final once over with the credit card to totally remove the bubbles. If you take care and don’t rush, it looks amazing.
I purchased this after moving home where the bedroom windows where facing into the ground floor of a street so as you could imagine I didn’t really fancy the neighbours having a nosey, so purchased 3 rolls and covered the windows up, they provide perfect lighting in the day time, doesn’t block it out at all so my room is still nice and well lit, I have actually stopped closing my curtains now as the light in the morning is waking me up naturally with out the stress of people looking in. I’ve never put anything up like this before and was my first time, was easy as pie, all you need is a tape measure and scissors to get it the perfect shape you need and then a bit of water and the jobs done within 20min.
We have two kitchen cabinets with a clear glass window in them, and the misses didn’t want to show off the clutter we keep in there (bar the photos part of this review). Not wanting to replace either the doors or the glass themselves, this frosted window film came to the rescue.
It was fairly straight forward to apply, although I did take off the cabinet doors so we could just lay it flat. Making sure the glass was plenty wet with a mixture of soap and water, we used an expired debit card to clear out the air bubbles through the sides, and that was it.
It looks as if cabinet windows were made like that, and you can’t really make out what clutter is hiding behind them unless it is literally against the glass. It is getting used to, though – we keep thinking the windows have steamed up from cooking.
So far no issues with bubbles appearing at corners or the sides, but will certainly update the review to reflect that if it happens.
I have a front window beside my front door, which allows a lot of light in but unfortunately limits privacy as anyone who rings the bell, automatically looks through the window too.
I saw this online and thought this would be absolutely perfect and it definitely does the job.
The idea is a simple and very affective one.
How ever it took a very long getting it to stay up!
Every time we stuck it to the window as per instructions, it would keep falling off.
The Self-Adhesive Frosted Glass Window Film would peal start to peal off from the top and the weight of it would then take the entire panel off.
Once we eventually got it to stick and stay put it looked great.
Unfortunately every morning we would come down stairs to find that it’s fallen off completely.
After a few days, I gave up and used ‘Glu Dots’ to keep the corners in place with out being visible. This was the perfect solution and as it’s invisible it keeps it all looking neat, smart and tidy.
Generally fine to apply with patience. OK on the long edges but curled up where cut off the roll. Maybe worth leaving flat for a few days before use. Only used on a garage window so taped it down.
I’ve tried a few of these products from various brands and this is the best one I’ve used.
Here’s a guide to help you:
1. If the product appears creased or dented, don’t bother, it will not work – send it back!
2. Make sure you handle the film really carefully, you don’t want to crease it. It will require some paperweights to hold it down while you cut.
3. The instructions say to cut it to size when it’s on the window, in situ, but I’d suggest measuring up the glass, cutting it on a cutting board with a sharp knife and ruler, then placing onto the window, already at the right size.
4. Ensure the window is nice and clean and free of any little specs of paint etc. We used standard glass cleaner and a lint cloth for this
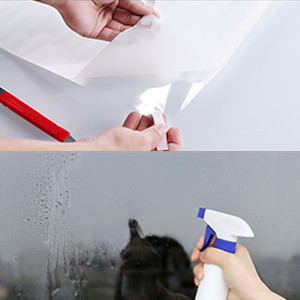
5. Using an empty bottle with a spray nozzle, mix some soapy water and lighly spray the window
6. Carefully remove the adhesive protective film from the vinyl and lightly spray with soap solution. This means that it’s much easier to place on the window and move around before it dries.
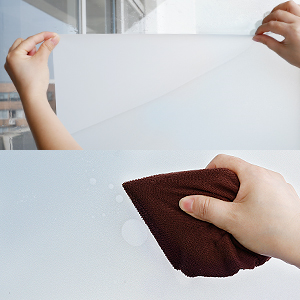
7. We used a decorators caulker / plastic finishing knife to push the bubbles and water in a downwards direction and had a bunch of paper towels on hand to dry up any water that leaks out. A credit card would suffice.
8. Don’t rush any of the above steps or it will probably go wrong
Once you get the hang of it, it’s really easy and quite satisfying. We left a 1cm border around the edge but if you measure and cut properly you don’t need to.
Hope that helps!
After looking at reviews I thought this was going to be really fiddly to apply – it was super easy. We are in the middle of installing a new bathroom and have a window fitter friend who tapped out the window for us so we could stretch over window so no gaps. It took 5 minutes, lots of soapy water, an old credit card and pop window beads back in. I’m truly amazed as I had a quote for sandblasting our windows (500!!!) This has totally transformed our bathroom window and you can’t see through it LOVE It thank you.
Bought this for my front living room. I was unsure when buying the products after looking through the reviews BUT thought I’ll give it a try anyway.
The Pros:
Overall I love it, it has such a stylish look on the windows and you can barely see anything inside or outside. So far it has stuck well to the windows.
The cons:
Instructions aren’t that brilliant, I did make sure I read the comments and added a few drops of washing liquid to the water and sprayed the window. Instructions say to cut inch to give wiggle room. I’m not sure if that was smaller or larger, I did cut to as precise as I could. Now I wished I cut larger because nearly all the pieces I cut curled up at the edges and I taped it down (wasn’t fussed about looks from inside just privacy). It was such a hassle to install too, maybe again to me not cutting larger than the measurements.
Other than that I love it, and buying more for my kitchen (and remembering to cut bigger).
I really like this product! It is a bit fiddly to install – just make sure you drench the window/glass you are putting it onto.
I would also recommend using a rubber squeegee and a brand new blade in an utility knife as it can easily tear. Combine the knife with a metal straightedge and you’ll get crisp edges.
My final recommendation would be to install in on the opposite side of the glass you will look at most frequently. The side it is installed on is a little messy at the edges – looks more white and has a few small bubbles, however looks perfect from the other side.
I would definitely use this product again should I feen the need to.
It’s easy to cut to size and once it’s on it stays on. I followed the instructions, but I still found a number of bubbles in the film and a couple of corners curl up a little. It’s doing what I need it to do, as it is only temporary the odd bubble doesn’t bother me too much.
Relatively easy to install though a bit tricky doing it by yourself and trimming the excess off in the corners. Patience is needed to avoid ripping the material in the corners. I bought some cheap squeegees were I would 100% recommend! I actually pulled one off and put it on again to test and it came off easily and went straight back on with another spray of water with no problems. Very pleased with the outcome. Less than 20 for all 4 window panels.
It is very easy to install, instructions and tools needed are clear. Just the roll was not big, but used a huge box for delivery which was kinda a waste. It works well in keeping privacy. Very satisfied purchase in general.
It was easy enough for my husband to install. We haven’t tried to take off so can not comment on this. You can still see through but it’s very blurred. Depending on your needs I would maybe take into consideration other products. Perfect for our upstairs bathroom but not sure if I would use it for a ground floor window.
We used the product on warehouse office windows that needed good privacy while allowing light through. The windows were old fashioned metal frames with uneven, insecure paintwork at the window-pane edges. The reason for 4 stars and not 5 is because (1) it was difficult to get the backing off, even with the tips provided in the instructions and (2) it was difficult to get a good edge on such uneven windowpane edges and there is some poor adhesion around the edges because of this. However, overall we are very pleased with the result and it has provided the privacy and light transfer we required.
This product was a quick and cheap fix for what we needed. It’s fairly easy to install just takes an good hour or so but well worth going slow with it. Watched a few YouTube videos on how to apply as the QR code on the box wouldn’t work for us.
Make sure you clean your window first. I washed the window with warm soapy water and then dried it off and went over with a clean cloth and a window cleaner product, worked fine. Then make sure you saturate the window with soapy water again as this easily allows you to slide the product into the correct place. This was important for us as we used two pieces side by side as it was a large window. Once in the correct spot start to remove the bubbles, we used a squeegee and a credit card covered with a clean micro cloth. It didn’t look great when we first finished the job but once dried we are really pleased with the look and privacy we’ve got in our conservatory now. HIGHLY RECOMMEND.
We have a large downstairs window with close street access so needed an easy to fit, right size solution.
After reading lots of reviews we went for this – absolutely the right choice.
As we had a large area to cover, we didn’t need to cut, but having soaked the film & window & following the instructions in adhered so easily with almost no bubbles (once its up & dry we couldn’t see them anyway).
Still lets 90% of the light through, completely blocks out passers by etc – 100% made the right choice.
Large sheets will need 2 people to fix to the window, and suggest one peels whilst one fixes. Was done in 10 minutes! Brilliant product.
Installation was a dream, really easy to do with a Stanley knife, credit card and spray bottle with water and washing up liquid. I made sure all air bubbles were removed and the effect is great but what I did notice is air bubbles appearing a couple of days later… it must retract in the cold somewhat and raise up to allow the bubbles. It can only really be seen in certain light but still, it’s a frustration. At least I can peel it off with no issue and reapply those areas.
This is the first time I’ve tried frosted window film. I spent no more than an hour part-covering 2 frames of secondary glazing behind a cottage sash window. Most of the time was the prep.
I used a wipeable pen, measure tape, water spray, paper wipes, store card, metal ruler, hobby knife and cutting mat – I had all these things at home already.
The most difficult part was all the work that went into the first window as I was constantly worried I’d get something wrong.
My secondary glazing windows are “new” and sit behind old cottage panes.
I was able to line the very straight sides up with the new window edge and get a total match. If I was working on the old window panes, I’d really have to use a paint scraper to do lots of prep to ensure the best and sharpest edge to push the film up against. Corners are the most difficult bit as I ideally they need to be sharp angles for the best finish. I used the pen from my magnetic fridge memo to put dots on the window to make sure I had a straight line and matched both panes at the top where I left clear glass.
The store card smoothed out all the bubbles, I used lots of water spray. The hobby knife and metal ruler were used before on the cutting mat and after to make sure all the edges lined up within the frame.
I really am pleased with the result and would recommend.
I work nights and sleep during the day, so was looking for a solution to keep the bedroom dark. I find blackout blinds still let a lot of light in around the edges, but this amazing window film let’s no light in at all! Really easy to apply – watch a few YouTube videos before you attempt this. I did both window panes in the photo in about 1 hour. The hardest part is cutting the edges – I tried a new blade in my Stanley knife but it was still not sharp enough. Next time I will buy a scalpel! I was worried about bodging it up and getting loads of air bubbles but this window film is very high quality and it it was easy to squeeze out the bubbles. Highly recommended. I have used cheaper film from ebay and it was a nightmare to apply, so for the sake of a few extra quid, buy some rabbitgoo!
Pros:
Looks great
If done properly will hold great as well
Was more or less easy to apply (more precise you want to be, harder it gets especially if you are perfectionist)
It cuts easy as well
Cons:
If you have bigger windows, the biggest size, you use it once and you got useless pieces left
It was hard to cut the corners on it as it piled up even with new blade for box cutter
Around the edges it already made small bubbles but it still holds – only some places has these imperfections and always only at the edge
This was a bit daunting to unwrap and then try to measure and cut to size on my dining table but I measured each window several times and wrote the measurements down for each before I started cutting.
The hardest part was actually separating the film from the backing sheet but I found that if you hold It just below one corner then using just one finger gently flick the corner towards you a few times the backing starts to lift away on its own and you can then peel it away.
I’m delighted with the effect as following the removal of a very large tree at the back of the house, suddenly my windows were more exposed to the neighbours behind and the existing glass in my bathroom window wasn’t quite as private as I’d hoped. The finished effect is very opaque.
I bought this film after we had the top windows changed to clear in our conservatory. Not realising that we should have gone for a pattern or frosted finish as our neighbour’s could now see in.
I bought the frosted, which does give an excellent level of privacy. In fact if the truth be told it is a bit too frosted for my needs but would suit a bathroom or an area where a high level of privacy is wanted or needed. This was my fault, not the products.
It was very easy to install. Read the instructions and make sure the window is clean, if you don’t you’ll see the imperfections. If you don’t mind that don’t clean it properly.
I used plenty of water which worked well, next time I might not use so much but it worked. Have a sharp blade, a good metal straight edge and if you have it a plastic flat bladed tool like used in vinyl wrapping. I bought mine of Amazon.
All in all I would recommend this film because if you follow a few simple steps and have a couple of basic tools anyone can fit this.
Arrived next day, packaging was slightly over the top which made me think i got all the measurements wrong, the instructions were right in the middle of the roll (but this was clearly stated on the box) I managed to put it up myself with ease in minutes (it is really easy!) And the product itself has done the job I needed it to! My shower is right next to my window and I was worried people could see in. This is perfect! Seems secure and blocks everything except the light!
Much better than expected – being totally honest, I was a bit dubious about how good these would be. I was pleasantly surprised and really happy with how the windows have turned out. They’ve not been on long enough to ascertain what they will be like in the long term but for the price, you can’t grumble.
It does say in the instructions to use a craft/Stanley knife to trim the sheets down once on the window – id avoid doing this as they just slide all over the place with the moisture. I cut them to size using fabric scissors before applying them to the windows. Use a spray bottle with a bit of water & washing up liquid in and generously spray the window before applying the sheets of frosted vinyl.
I then used a squeegee from the shower to remove the excess solution from behind the vinyl.
It has completely privatised our bay window, which normally people can walk past and peer straight through. Would recommend!
This was super easy to install. The hardest part was cleaning the window before I started.
It blocks most of the sunlight coming in but i was hoping to still see through the window.
If you want something which will block people seeing in or out but still want some light then this is the ticket.
My room is at the front of the house and exposed to a busy road.
Tools required: Stanley knife, measuring tape, any plastic card (loyalty, bank), spray bottle with water and shammy cloth.
1. Clean the windows thoroughly, make sure they are dry and dust/dirt free.
2. Measure and cut leaving 1-2cmon all sides.
3. Spray the whole window with water, the more the better.
4. Peel the protective film and spray water on the sticky side.
5. Apply and position to window.
6. Work from the middle to the sides to squeeze excess water and remove bubbles.
7. Leave to dry for a 4-5 hours.
8. Cut the excess film and wipe the remaining water.
I ordered the 90x200cm sheet and got all 3 bottom windows covered with some left over. I am so pleased with the finish. I wish I had done it sooner. It lets in huge amounts of light and you can not see anything from the outside in, complete privacy and still a bright room.
It is fab stuff, sticks well and does the job of obscuring.
The only downside is the installation and cutting it close to the edge of the window is so difficult to do that I have ended up slightly tearing it and results in a small gap between it and the end of the frame. If you don’t cut it too short and it laps over the glass seal then it will not stick fully and will create a bubble.
I shouldn’t fault the product as it is the installation part that I have failed at more than anything, but all the same…
One of my films has a darker shade on one patch visible from any angle but have contacted seller for advice/replacement otherwise great look.
Replacement received and all looking grea
Not tried to remove yet but there are bubbles forming behind the film. Other than that it gives very good frosting effect and it is possible there is a very slight wave in our glass or moisture getting in as it’s been very wet weather.
I first used the Rabbitgoo window film last year for the middle pane of my front bedroom window in order to get a little privacy without the need for blinds, and to have the option of opening my curtains all the way. A year later and they are still up. The adhesion is very good. The last pictures I put up are of a floral film I put up last year as my window looked right into my next door neighbour house. We wanted to keep the light but offer both some privacy. While I wouldn’t put it on all windows it is a lovely design and the rainbows it creates in the afternoon always cheers me up. The frosted film I have used for the front of the house offers great privacy while letting in a lot of light. I have now added film to the additional side windows and to my small bedroom as that is now an office. It also helps to diminish the glare from the super bright sunshine which is glaring in the AM.
My only note is make sure to measure all windows and be careful when cutting your pieces. When ordering I did not realise that one of the bedrooms in the small bedroom was bigger than the other. As you can see in the 3rd picture I have a gap And didn’t have enough film left to cover as I was being stingy. (What a doughnut!). It doesn’t bother me luckily as I can cover it with the curtain slightly, but do please check before you decide which sizes to buy. Make sure you have extra just in case. Don’t be stingy with this one!
Luckily you can also see, through my mistake, how good the privacy aspect of the film works as you can see nothing through the film. Just watch out when you’ve got your light on at night. I knocked one star off for easy to install. I did it myself so it’s not that hard but it can be a bit of a faff. Just make sure to get your measurements right, soak your windows so the film can be manipulated (use a spray bottle as you go), and remember to breathe, go slowly, and that you can always start over.
The end result with this film is quite good. Opacity is not bad either.. It does not have any adhesive so it’s easy to remove.. The downside is the removal of the backing film.. You will need a lot of patience, great eyesight and a very sharp blade to separate the film from the backing. Unlike many of the better films there is no easy way of separating the backing.. Frustrating if you have a lot of windows..
I have used quite a few films over the years and although this does the job I would only use in in a craft capacity or an area that does not need to be touched too often.. . In my opinion it’s not robust enough to use it on a door or in a bathroom..
I was a bit sceptical about this products ability to stick to my window without any glue etc but the water method actually works. I got the black one which looks kinda brown when the sun shines on it but i must say that it does a good job of blocking out the sun. It was a bit hard cutting the perfect square but it is better if you give yourself a little extra so that you don’t have cracks of light shining through. After two years the edges start to unstick but with a bit of water solves that.
Provides good level of privacy even when the lights are on in the room and it’s night time outside. Definitely recommend.
BUT I took the advise which suggested putting MORE soapy water than less. I had my carpet knife which made it easy to make the cuts.
Very happy with the outcome and very impressed with how well it stays on. Lovely bright room now! Thanks!
Love how easy the Rabbitgoo films are to put up and have the pebble pattern on my front door which I really really like. Needed a film for the garage windows and something a bit more subtle so chose the frosted and it is near impossible to get every mark and bubble mark out from underneath. From a distance it looks really good but up close you can see lots of little blobs under the film even though they have been wiped over and over and there is no water left. Definitely not bad enough to take down but it’s not the same as one that actually sticks to the window with adhesive.
We have used similar products around the House and have been transformative.
As usual lots of water on the cleaned window and lots on the sheet (after peeling the backing off). From experience if you let it start to dry out its a sod to move about. So keep spritzing!
The only thing I was disappointed with, other brands have had grids on the back to ensure you cut straight, not everyone has an big arse metal ruler and knife at home.
Overall, it looks great , I’ve included a picture from the afternoon and evening.
Nice frosty film, does the job and looks nice. Only thing I struggled with was cutting it in a straight line – it would be good to have a guidelines grid on the back side of it to help with the cutting. Overall, I’m pleased with the product.
Works well, we cut the piece to fit the window exactly and one person had to hold it in place. Depending on how large your window is I don’t believe one person can install this on their own. One piece was left with a lot of bubble marks but we don’t mind as it does the job of creating privacy in our bathroom. I wouldn’t recommend this if you are living alone and have a large window. Would work much better for smaller windows.
Used on windows that overlook my neighbours property and I must say, it’s worked really well!
Didnt realise the instructions were folded into the roll of film itself so I checked YouTube how to install before I read them. The YouTube video was helpful enough.
One of the windows has a few small air bubbles because it was behind the kitchen sink and tricky to install because of the window’s position but overall, I’m impressed.
I cant attest to how easy it is to remove as I haven’t tried (and don’t intend to for the foreseeable future) but it was pretty easy to peel off and reposition while installing.
It’s been in place roughly a week now and no issues as yet, so fingers crossed it holds up well.
Also, just thought I’d mention that the package arrived in good condition. I’d read a few reviews that it had arrived creased but fortunately this wasn’t the case for me.
Would definitely buy again & have already recommended to others.
The installation requires diligence and practise and it takes several attempts before one gets it right and it still may not look perfect… So be warned if you’re not got with DIY stuff. It is otherwise a great product. It sticks surprisingly well and is quite easy to clean and much better than curtains and blinders that will always act as dust catchers. It also diffuses much of the light without reflecting it back, allowing much of it to get into the rooms. So when looking at it from the outside does one not notice it immediately like one notices curtains and blinders, and it doesn’t block incoming light, which is great for keeping the electricity bill down.
I bought this product based on the many good reviews. It was a bit fiddly to apply and I’ve since noticed some areas where the film has come away from the edges, but to be fair, the price was very reasonable and if I’d had wanted a totally professional job done, I would have had to pay someone a heck of a lot more to do it. I’m not sure if it’ll stay up long term but overall, a good buy.
Got this to cover a bathroom window as the blind got broken and this was a much cheaper alternative,
The film is very easy to apply, but unfortunately the texture wasn’t smooth enough so had to return,
Would still recommend it,
4/5
( Click “Helpful” if this helped ^__^ )
This privacy film is perfect!! Easy to cut, super easy to install (and remove if you get it wrong!) no wrinkles or bubbles at all and fixes firmly once water is dry. Ours were like making pancakes – each window application got better as we went along so ended up re-doing the first but so quick to do. Looks fab and means we can have our blinds open and let in all the lovely sunshine! Purchased a second role to do the panels of a glazed door.
I had bought a nursery specific black-out blind which was ok but it had suckers around the edges and therefore the light could easily get in around those areas, especially as the suckers kept the blind about 3cm away from the window.
So…I made a decision to buy the Rabbitgoo Matte Blackout Privacy Window Film and I am OVERJOYED with my decision. It doesn’t matter what the time of day is or how hot it is outside, the film not only blocks out ALL of the light but it also reflects the heat.
To say I was completely satisfied is an understatement. This product is brilliant and I would highly recommend it to anyone.
Pro’s
– Arrived well packaged, with instructions & a QR code link to an instructional video.
– Seems to be of a good quality, & so far is doing a good job!
Con’s
– Not so much a con than a comment: The film is much more opaque than I thought. I would have preferred it to be a more see through than it is.
My partner says she feels like it’s now more of a wall than a window.
I like the privacy we have now though
The sunlight coming through the film is nicely filtered and the privacy it provides is excellent. The film is thick enough to stick well yet provide a very flat finish and getting all the air bubbles out during installation was easy. As the alternative was new double glazed panels with privacy glass, I’m very impressed with this for the price.
On a preglazed door between my kitchen and utility room this was perfect to retro fit. The film is easy to cut to size and apply. I measured accurately and pre-cut the panels rather than keeping an overlap and cutting away the surplus when in place. Although this is recommended in the instructions I thought it would be fiddly, could tear or dislodge the film and possibly scratch the glass or paint on the door. By the way the instructions are rolled up inside the roll of film rather than printed on the interior of the box. Once fitted the film obscures what’s on the other side well but lets in plenty of light. If it’s not possible or affordable to fit obscured glass this is a good alternative.
So armed with a bottle of washing up liquid in a bottle, and a scraper from Poundland (they do three sizes for a quid… highly recommend) I thought this would be a horrible job. The hardest part was removing the backing film from the actual plastic, but some highly sticky piece of adhesive tape was supplied, making it easier.
A generous amount of water/washing up liquid was applied to the window, and I was scared the plastic film would stick to itself and be unusable, like when you stick a ‘documents enclosed’ envelope to a package, but because the film isn’t actually sticky or adhesive, it was painless – in fact the plastic film could easily be moved around the window and positioned accurately.
This is where the ‘perfect planning’ comes in, as it helps to get the measurements right. Make sure the film is the right size (or slightly over) before starting.
I’ve attached a picture of three panes I needed covering, with the top pane on the right just to do – the larger two panes done in around ten minutes.
I’d highly recommend a scraper from Poundland. In fact, these have been useful for several DIY jobs around the house, and scraping nasty things off the rabbit litter trays. They made an easy job of ‘squeeging’ the water from the film and removing any bubbles. I was worried the plastic film would be quite thin, and rip or the metal scraper would tear the film, but its surprisingly thick. This is decent quality film.
Overall, I’m impressed with how easy this was and how good it looks. Its perfect for what I wanted.
The only downside is the limited number of sizes. Our kitchen door is 55cm, and you either get 45cm wide rolls or 90cm…. so too short or too long. Guess they can’t do every size going, but a 55cm wide door must be quite common… *mini rant over*
But if thats the only thing to moan about, then the product is great.
Very easy to cut to size and very easy to apply and is 100 percent light blocking..
Well worth the purchase and I totally recommend.
This was easy to install and looks good once dry. The online video and instructions (hidden rolled up in the roll of film that you don’t see it until you have already installed some ) were Ok but if you are working with small areas then cutting to size is possibly better than post-install trimming with a knife.
A tricky product to fit and you need to have all your tools set up before you start. Watch the video also before you start it is really helpful. Don’t recommend drinking alcohol before you start as you need your wits about you. However the finished job is brilliant and unfortunately I can’t see into the bedroom !
Make sure you get all the bubbles out with a squeegee and it looks great.
The neighbours have asked me which company I used to have the film installed, they were surprised it was a d.I. y. Job!
This stuff is very easy to apply to the glass but I found it a bit of a pain to trim neatly to size. I used a brand new stanley knife blade but this material is quite tough and this brand new blade did not glide easily through the material – maybe a scalpel type blade would be better or a razor blade.
Installation was easy enough, I gave it 4 stars for that just cause it’s quite fiddly, but there isn’t an easier to install alternative so that’s fine.
Definitely would buy again, great value for money.
This was very easy to install, looks great once it is up and didn’t take a lot of time to do. I have decreased by 1* because when it arrived, one of the rolls had a corner that was squished and now it is up that corner does not stick. I have OCD so although its a small corner that is ruined (around an inch), it bothers me that all of the rest is so neat and this one corner curls. It is a shame as it would have been perfect but for the delivery of the squished box. Would buy again though, it was only due to time constraints that I couldn’t return this one for a non-squished perfect product.
I rarely leave reviews unless I’m extra impressed, which I am today! I’m so bad at putting on phone screen protectors and assumed this would just be a huge version of that ordeal, but this was so easy.
I’m 9 months pregnant and put this up in about 20 minutes with my husband so that I don’t have to sit in darkness whenever the neighbours gather outside and set the dog off (who is the nosiest neighbour of all!) and it means I’ll be able to feed my baby in privacy whilst still letting the light in!
We got the larger size and it was enough for all 3 windows, so for just over 16 we’ve solved a major inconvenience in the home.
Just wish we’d bought it earlier!
I have never installed anything like this before, except screen covers on my phone (that I really can’t do well), so I was a little concerned that I was going to make a mess of it. But it was really easy to install, just make sure you cut it to the right size and use a lot of water!
I haven’t tried taking it off yet but based on others reviews that seems to be easy too!
Really opaque film so gives a good deal of privacy. Make sure you get a decent vinyl kits with proper squidgees and sharp knife as it makes all the difference! I used in flat and textured glass without a problem. Easy to remove as there’s no glue. If you find it’s not sticking it’ll just be because the water spray has evaporated so just spray the surface again. My main problem was separating the backing film from the product – that was a bit of a nightmare! I ordered a second pack to do the last bits and noticed that this pack had instructions included as a printed leaflet, where the previous product had instructions printed inside the box – this wasn’t the only difference however – when I applied the last door panel, it was noticeably different in opaqueness, colour and finish. Bit of a shame as overall the product was very good.
I wasn’t expecting a perfect job as it’s not flat glass but I’m really impressed. Garage door windows now don’t show what’s inside when I’m working inside with lights on in the evening
It’s worth the money to buy the kit that is made for applying this film to the window, it’s cheap and you get a lot for it and in my opinion to get a perfect fit and finish with not bubbles, you really need it. The link is here https://www.amazon.co.uk/gp/product/B07P6ZHZ5J/ref=ppx_yo_dt_b_asin_title_o00_s00?ie=UTF8&psc=1
It lets in a huge amount of light and you can not see anything from the outside in, complete privacy and still a bright room! Great product and easy to install and remove if you need to realign the film again.
I cut it to size with a craft knife and wet the window with the sponge side of a car windscreen squeegee. Apply the film and move it around till you are happy and then – this is the trick – use the squeegee to push all the bubbles and surplus water out. I only discovered this after lots of faffing around trying to push the bubbles out by hand using a cloth, but the film is much tougher than I thought so the squeegee doesn’t scratch or tear it. I took the film off each of my windows and put them back using the squeegee method in a quarter of the time and much better.
I used this for screening out the bottom two-thirds of my new single pane tilt-turn clear bathroom window so I can have privacy and still see outside.
I bought this as a punt because so many reviewers seem to have struggled to get it to adhere perfectly.
I cleaned the window flawlessly and followed the manufacturer’s instructions to the letter.
The installation was very simple and the results perfect.
And yes, it took the time it took (not short) to persistently push out all the moisture to the perimeter with a credit card.
One year on in a room that sometimes gets very steamy the privacy film remains perfect.
But it was easy for me on brand new glass and I am skilled at making stuff work with my hands and I am patient.
However, I can well imagine that on an ancient pane of not smooth Victorian sash window glass, the outcome might have been different.
And I would advise that cleaning and polishing the window glass scrupulously before installation is an important factor.
We live in a ground floor flat with a delightful view of our neighbours car park from our bedroom and in return the neighbours get to see me in my pants. It was either that or I just kept the curtains closed.
I like the light too much so I decided to give this a try.
These let in so much more light than my stupid voile! We decided to keep the top open rather than block out the whole window- I like to see the weather.
I needed a little more than one roll to do this. Mostly cause I messed it up once.
Really easy to do- just make sure you have lots of soapy water on the window and they are super clean.
I had a squeegee to hand so it wasnt too much effort to get the bubbles out. Make sure you have a sharp cutting knife- cutting it can be a bit fiddly and it’s really annoying if you ruck it up instead of cut.
As for durability these have been up for a few days and are doing great. A couple of little air bubbles in the corner as they dried appeared but nothing that ruins the look or adhesion.
I’m interested to see how they do in the long run and how theyll hold up in the winter when condensation hits the windows.
If I remember I’ll update this.
Overall I think for the price and the clean tidy look they give they were well worth it!
UPDATE 26/02/2021:
Still up and doing the job! Bloody good purchace! Tempted to do my front windows too.
We had new doors installed in the house, with glass at the top and to match we added the same door to the downstairs shower room but you could see through! So I bought this and wondered how well it would work. Yes there is some measuring involved and I recommend you have a loyalty card type thing near by as it will help with the adhesion process. What makes this so much easier to install than something with a sticky back is that you wet the area you are applying it to and then you have the chance to move the film around and ensure you’re happy with the fit. You can’t do that with an adhesive based backing paper. I would definitely use it again because now the windows are totally private but still light.
More than enough in the smallest size for us to do one full window (top and bottom glass) with spare.
Can’t fault the product at all, clear instructions, good quality and excellent price. Just make sure you take your time to install it!
I bought this in January and it’s taken me this long to fit it. Mostly that’s because I was worried about fitting it properly after reading the reviews. I now know I didn’t need to worry.
I bought for a lounge window (bottom pane) to give privacy as I hate having the voile curtains shut all the time. We have parking out the front and the main thoroughfare, so sat in the lounge, with low windows, means you can feel exposed. This stuff has solved the problem.
Alright it’s not perfect but you only see that close up. I got all the air bubbles out but the edges, up close, have bubbled up. They aren’t falling off though and it’s only because I like things to be super neat that it bothers me.
Easy to cut, saturated the windows with water and sprayed again after fitting, before removing the bubbles. Even if I had to do it again in a few years, it’s still cheaper than replacing the window panes 🙂 thanks rabbitgoo.
This is the best blackout product I’ve found – miles better than blackout curtains or blinds. It doesn’t give 100% blackout though. Although no light passes through the film, the biggest size available was still too small to cover my bedroom window pane in one piece, and my window isn’t unusually big (95x112cm). I had to use 2 pieces. At first I tried abutting 2 pre-cut edges but this resulted in an obvious line of light along the join. Then I tried overlapping the 2 pieces – the film doesn’t adhere to itself, so there is still a narrow line of light visible at the join, though less so than before. For the same reason, the film needs to overlap the rubber seal that goes around the edges of the window pane, but because the rubber seal is slightly curved the film can’t sit flat at each corner so there is a small amount of light visible at each corner. This isn’t the fault of the product, and once I close my blackout curtains I’m not aware of any light coming through the window pane even after my eyes have acclimatised to the dark, but it’s something to be aware of if you don’t have curtains or if you need 100% blackout. You could probably resolve this with gaffer tape, if you don’t need your window to look pretty.
It was slightly tricky to apply the film to the window. I used a sponge to apply the soapy water rather than a spray bottle, which worked fine, and a squeegee to get rid of the air bubbles. I thought I had done a good job until the next day when I saw the window from the outside and it was covered in a lot of very visible air bubbles (my window is on the 3rd floor and I could see it from ground level on the other side of the street). Even with the ceiling light on, the room had been too dim for me to see the bubbles from inside. I tried to squeegee them out but couldn’t. It doesn’t bother me enough that I want to take the film off and re-apply it, but it’s probably a good idea to have someone help you apply it and to look at it from the outside before you finish.
Finally a great product that let’s me have my blinds up! These were super easy and quick to fit – I think tidying my kitchen took longer. I am very impressed at the level of privacy these provide at night with the lights on (as you can see from the pictures) and hopefully they last a long time! The main reason I got these were because I severely need privacy and nets were just not giving me reassurance at all, which meant I had an open plan flat with 80% of the natural light blocked off permanently with blackout blinds, as it was the only way I could stop any beady eyes staring in. Where I live neighbours, visitors and postal people frequently need to walk mere inches past my front door/kitchen window on a daily basis and often I had found people having a curious peek into my home, which made me very uncomfortable. I find it very off putting having anyone able to look and see both me and my posessions clear as day. From both a personal preferance and a potential theft deterrent, I think these are brilliant, since they’re so frosty people outside cannot see in! Definitely reccomend and will update as necessary with how they do – if its not been updated, then they’re doing good!
Straight on my dads windows no problem, breaks the sun glare up and he seems overly happy with the final result, and without the huge cost of replcing the glass which becomes very expensive when your talking grade listed buildings.
My home is no longer a free view for passing cars and foot traffic, meaning we can eat a meal without people staring in at us.
Simple to install, instructions were easy to follow, and cheap enough we ordered 2 more rolls to do the whole downstairs for privacy as we don’t loose any light, which we found when we previously used a black out product.
We only installed from bottom of windows to half way up, but it looks professional and like it’s meant to be there. Wish I could add a photo but currently unable to do so.
I would recommend to anyone. (I actually have already to neighbours)
It takes some effort to install but results are amazing and it’s worth it.
1. Measure and cut.
2. Spray soapy water onto glass (1 part dishwashing liquid, 10 parts water) and make sure you use a lot of it, you can’t go wrong with more.
3. Apply film and use old credit card (membership card, loyalty…) to push bubbles out.
Done!
Durability wise, 2 months so far, looking good, as the first day I fit it.
Edit 10/01/2020
So it’s been more than a year and no signs of wear, nothing has peeled off, everything looks as new
At first I was ready to throw it away & write a scathing review as there are no guidelines on the backing paper to help you cut it straight (doesn’t sound much but was v frustrating) & once I had cut it then peeling the backing off was very tricky (it even said in the instructions that if you couldn’t peel it to get in touch with them so assume is a common issue. However, once I started to apply it to the window it was amazing ! It was the easiest one I have ever used. It went on easily & I could reposition it & with hardly any air bubbles. A quick once over with a squeegy & it was fab! It’s only been up a day but it looks good !
With some guidelines printed on the backing or just a plain backing so you can draw on it would make this 5 stars . However it’s 5 stars for ease of fitting once prep is done!
Will order more for other windows now I know how it looks and how easy it is to apply.
But it definitely provides privacy, it feels nice and thick and it’s been over a week since it’s been on and there’s no sign it’s going to fall off yet. The thickness and frosted pattern are good. It can matter because depending on how your squeegee the excess water out you could cause visual damage on some privacy film but and I did make some mistake on this one but it did not result in visual defects on the film so it’s nice and tough.
With any of these products if it doesn’t stick you need to ensure your window is flawlessly clean. So having done that they’re staying up nicely.
I followed the advice from one of the other reviews by using a vinegar-based window cleaner to prepare the window before application and then I applied a light, yet even coating of soapy water to the entire surface before placing my pre-cut square of window film over it. I didn’t order an applicator (not sure if the listing mentioned it!) but an old credit card worked fine.
I took my time and worked outward from the centre until all of the bubbles of liquid were removed (you can lift it and re-apply if it isn’t straight), and I used a towel to mop up the water droplets as they were squeezed out to avoid them seeping back under the film.
When I returned to the window the morning after, a few small bubbles had formed but a couple of minutes with the credit card got it completely smooth again. The film has been bubble-free ever since and looks fine from both sides. The privacy effect is consistent and easily matches that of frosted glass. Well worth the effort.
Otherwise very easy to use, I used my credit card to smooth on the film, it really did make difference to my downstairs toilet window. It gave the privacy needed, this was tested with my husband trying to looking in and myself looking out approx 50cm away- we couldn’t see each other clearly just a complete blur! Very happy with the product.
This film works fine letting in enough light but giving you privacy. I had measured the two bathroom windows and was cutting film to size. I did find it difficult to cut it straight as there are no markings to aid you. Even though I used a paper cutter (which cut easily through the film) it was hard to get it exactly straight. Having said that it was easy to put in place and move around to get it into exact position if the window is wet as mentioned in their guide. Does the job fine and we are happy with it.
This stuff is great! I was a bit hesitant as some reviews said it didn’t stick to the glass but in the end I decided to take the plunge. We live in a bungalow and our bathroom window faces onto a utility room. The glass is slightly obscured, but not enough to give total privacy and as the utility room is often used we have ended up closing the bathroom blind all the time which makes the room dark. Enter Rabbitgoo! I agree with other reviewers that it’s a stupid name, but then again it does stick in your mind (excuse the pun!).
You simply measure the window, cut the film to the same size, wipe with window with slightly soapy water, peel off the cling from the backing (it’s good to have someone helping you with this bit as there’s a lot of static as you peel off the film!) and apply the film to the window. I used a squeegee to get out the air bubbles, although in the end I found that my fingers did the job just as well, if not better. I have included before and after photos – my daughter is in both photos – to show how much the privacy is improved by the Rabbitgoo film.
The film has been up for four days so far with no sign of peeling. I will amend my review if anything changes, but so far I am very pleased with this product.
Things you need:
Tape measure, squeegee, spray bottle, sharp craft knife, sharp scissors, fairy liquid, water, kitchen roll and a stiff plastic card (like a national insurance number card… but maybe not actually your national insurance card!).
If you search for “silver reflective window film” on Amazon there’s one by a company called active film, they’ve got a great YouTube video showing you how to put up their film – this works the exact same way, there just isn’t an adhesive on it. Definitely recommended watching.
– [Delivery] This product arrived promptly.
– [Packaging] Nicely packaged. When I opened it, there was no instruction for use (this can easily be improved upon by the seller by adding a simple A5 or A4 piece of paper with instructions. I ended up finding a video on youtube
– [Ease of Application] This is fairly easy to apply once you remove the backing and measure it out. It sticks onto the window via static. However it is similar to sticking on a phone cover/film which can be a little frustrating at time (of course here, you do not worry about air bubbles as such). TIP: use the palms of your hands to stick it down to the window rather than a credit card as it makes it wrinkle!
– [Quality] – Seems reasonable and good
– [Price] – I feel this is slightly overpriced for the amount I got.
Overall 4*/5*.
Film roll arrived promptly and was easy to apply as per the instructions on the inside of the box it arrived in. My only gripe was – even though we tried using a sharp stanley knife blade, a swiss army blade and a graphic designers scalpel to cut the remaining film residue clean away, after fitting to the window, there was still a jagged edge left in places (hence the 4 star review). Otherwise, the film’s opaque, non-transparent quality has diffused the harsh south-facing sunlight to a more evenly based clear light that retains its clarity – an important factor for working in our design studio – and the blazing heat we used to suffer from is now muted and bearable, as well as affording us complete privacy from passers by walking outside of our window, so a good job done overall.
The reason for the purchase is that having recently had our hall re-decorated the contractors somehow managed to scratch the sprayed on frosting on every single pane of glass in both our door and two side windows. Unfortunately these are leaded so there’s 28 panes in total! So after order a nifty window scraper on Amazon I followed up with this film to replace the frosting that needed removing. I didn’t want to spend ages taping off and potentially making a mess with new spray frosting so opted for this sheet form based on the good reviews.
Now my one negative with this is purely personal – to me the graining/frosting pattern looks a little cheap in comparison to the very fine frosting of the spray. That said I didn’t really notice this once it was in place and it does mean that slightly more light comes through which is a good thing for brightening our north facing hallway.
I’m still not sure I would specifically recommend this my situation of a million panes of glass because of course every single one needs cutting out (and because its an older house all the panes are slightly different sizes!). I work as a designer and regularly have to trim things to size for mounting yet getting each part to fit perfectly is still tricky for me. I daresay with a larger square window it would be 100% easier!
The water application method is rather good though – makes it very straight forward to apply and means it can be removed and re-used multiple times as well as allowing for some sliding around to get it perfectly into position. Its nice and easy to cut but I would recommend a long ruler and scalpel with cutting surface over using scissors for accuracy.
Will try and remember to submit a photo when everything’s completely finished.
No glue. Sticks to glass with static and water.
Can be removed and re-adjusted or re-applied.
Comes in a nice neat box, which unfortunately has the instructions printed on the inside – which means that you have to cut (destroy) the box to read them. Shame if you want to keep the unused roll stored, but no big deal.
One tip to pass on : When trimming the excess around the glass, use a ruler or other flat straight edge with a stanley knife. The ruler is more for keeping the film flat as you cut and prevents it from dragging.
We may be thinking about getting some more and trying out some patterns!
5 stars for effectiveness and value.