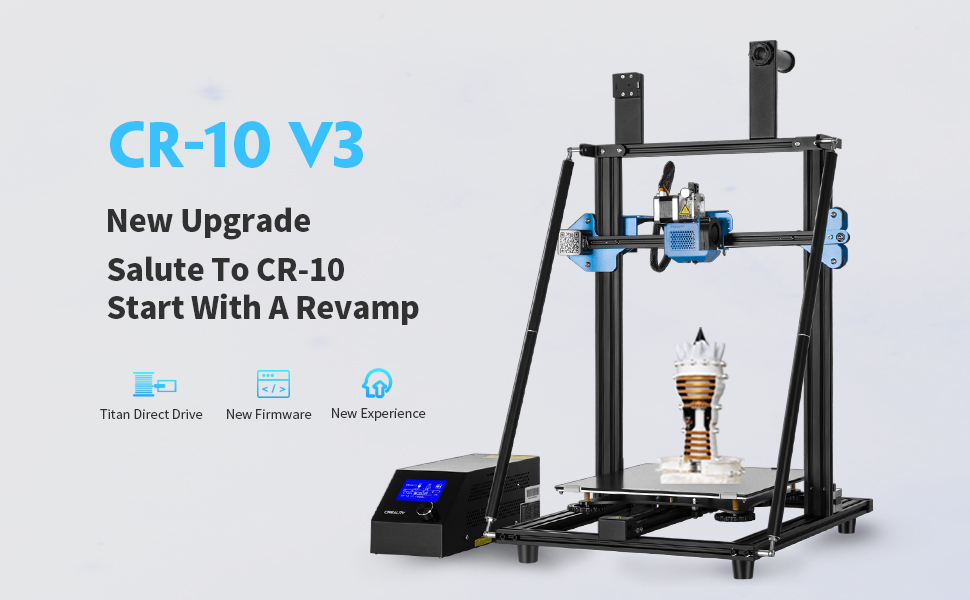
3D Printer Creality CR-10 V3 with Direct Titan Extruder, Silent Motherboard, Meanwell Power Supply, Filament Sensor and Print Size for 300 * 300 * 400mm

| Dimensions: | 56 x 65 x 50 cm; 14.54 Kilograms |
| Manufacture: | Creality 3D |
| Dimensions: | 56 x 65 x 50 cm; 14.54 Kilograms |
| Origin: | China |
| Reference: | 20050810v3 |
Great buy
Nice and easy to use,but the software for computer can cause you problems but not recognising the printer,in the end I used a different software,overall printer great to and easy to use worth buying
Good printer with plenty upgrades available
Perfect printer for the price, plenty upgrades available to increase user friendliness and print quality.
First upgrades that I did (totally worth it), installing a BL touch for auto bed levelling and a glass bed. I find that the original print surface that comes with the printer is damaged very quickly, this will give some trouble with the bed levelling.
Does what its supposed to...
If I was buying again I’d buy a resin printer as I’m looking to print dnd miniatures but you can do certain models in this printer, very good at what it does though, I use for terrain mostly right now. Would buy again.
Came with a warped bed ++
Bed was already warped. Plastic extruder didn’t last long, got around 4 ‘successful’ prints before it cracked and fell apart(common fault). Not a good starter printer if your looking for easy printing at a good price. Only worth it if your happy to upgrade parts then can be a good printer.
Very Good printer. Quite quiet.
Printer is very good value for money. Does very good prints that are smooth and look great if set up right. Although instructions were difficult to understand at points, it was relatively simple to set up. The computer it comes with saves prints if you run out of filament or have a power cut which is very useful. I’ve never heard other 3D printers but a friend said mine was very quiet for a 3D printer!
Damit haben sogar wir als Anfänger es geschafft.
Meine Shne und ich wollten schon lange einen 3D Drucker, aber es schien uns immer alles viel zu kompliziert. Dann, nach einiger Recherche, haben wir uns fr diesen Entschieden. Er wurde schnell geliefert, und lie sich auch leicht zusammenbauen. Alles hat beim ersten Versuch gleich gepasst. Dann mussten wir ihn nur noch kalibrieren, was mit einer YouTube Anleitung und einem Blatt Papier schnell erledigt war, und schon ging es los. Auf das erste Modell (am Foto) folgten viele weitere.
ber die Haltbarkeit kann ich noch nichts sagen, aber bisher druckt er brav und fleiig.
Large learning curve but worth the effort!
Large learning curve but worth the effort! I have mine connected to my Windows 10 PC to print from – so easy to use.
Good value for money
Really good value for money, fortunately have never needed to contact tech support. Bit of work to set up but not to difficult plenty of YouTube vids to help.
Muy fàcil de montar y poner a trabajar, gracias.
Todas las piezas en perfecto estado, fcil de montar y ya est imprimiendo. Todo muy bie
Yo la utilizo para fabricar figuras, y el detalle es magnífico con 0,10mm.
An y ser mi primera impresora 3D y tener que montarla yo mismo, el montaje ha sido bastante fcil y en una maana la he tenido lista para imprimir.
Solo le veo una cosa negativa, y es el ruido. Si eres de los que no se duerme si hay un mnimo ruido, como yo, y quieres dejarla trabajando por la noche, tendrs que cambiar al menos los ventiladores, y quizs silenciar un poco los motores.
Quitando todo eso, es una magnifica compra y la recomiendo a todos los que quieran empezar con este mundillo.
Très bonne première imprimante !!!
Trs bonne imprimante, c’est ma premire et nombreux sont les tutos pour apprendre. Trs bonne qualit d’impression, facile prendre en main, je recommande !!!
Gran producto
Es la mejor impresora 3D que he tenido. Silenciosa y fcil de manejar. Men en pantalla tctil y de color, fcil de comprender. Ninguna complicacin en el montaje. Carga del hilo sin dificultades. Hasta ahora ningn problema y ya hace unos meses que la tengo.
Bie
L’imprimante est bien le mode d’emploi est un peu dur construire mais il y a des tutoriels sur internet le plateau est magntique et il adhre bien l’impression est pas mal
Au delà de mes attente
Super imprimante 3D je suis ravie simple a mont prisse en main simple aussi je la recommande sans aucune Hsitatio
Presque parfai
J’ai achet cette imprimante cet t et pas du. La notice est clair et le montage est plutt facile (20min de montage). Les rglages se font rapidement et les premires impressions sont bonnes. Personnellement j’utilise Cura est c’est trs pratique les possibilits de rglage avec cette imprimante.
Mais :
-Lors de ses impressions, l’imprimante fait bcp de bruit
-Le timer de dure n’est pas vraiment fiable
-Et si vous en voulez une pour des objets qui ont besoin d’tre trs prcis (figurine) partez plus sur une imprimante rsine.
En bref c’est une trs bonne imprimante qui permet de raliser de grands objets avec une trs bonne qualit mais possde nanmoins quelques dsavantages.
Das Ding ist der Hammer!
Ich schreibe selten Produktbewertungen. Ehrlich gesagt: Eigentlich nie!
Aber ich muss sagen, dass mich dieses Gert wirklich umgehauen hat. Nachdem ich vor rund zwei Jahren das erste Mal Versuche Richtung 3D-Druck gemacht habe, war meine Begeisterung schnell abgekhlt. Verheddert im Chaos zwischen “Druckbettnivelierung”, “sinnvollen” Upgrades, etlichen Nachbestellungen und gefhlt 10.000 Foren und Webseiten mit Tipps hatte sich meine anfngliche Begeisterung schnell abgekhlt und das Ding wanderte halbzerlegt in die Ecke.
Eher aus Zufall bin ich beim Surfen auf die berschwnglichen Bewertungen des CR-6 SE gestossen. Angezogen wurde ich durch die angepriesene Anfngerfreundlichkeit und gute Druckqualitt. Doch der Reihe nach:
1. Bestellung, Verpackung und Lieferung
Das Gert wurde innehalb zwei Tagen geliefert. Es kam in einer sehr umfangreichen und stabilen Verpackung, die garantiert, dass die empfindlichen Teile den Kunden auch unbeschfigt erreichen. Aus kologischer Sicht mgen die nicht aus Papier/Pappe bestehenden Sicherungen sicher kritikwrdig sein. Allerdings habe ich selten ein besser gesichertes und verpacktes Paket erhalten.
2. Aufbau und Einrichtung
Und nun kommen wir zu eigentlichen Strke dieser Produktgeneration. Ich selbst bin ja nun durchaus handwerklich begabt. Das mag nun nicht fr Jede:n gelten. Kurz und gut: Es ghet letztlich darum, mit insgesamt vier Schrauben die Trgerkonstruktion fr den Druckkopf/Extruder an die “Basisplatte” anzubringen. Im zweiten Schritt wird das Display und der Trgergriff mit weiteren vier Schrauben angebracht. Das war es dann an mechanischen Arbeiten. Und die bentigten Schlssel liegen dem Gert bei…
Im weiteren Verlauf mssen einige Kabel mittels Pfostenstecker angeschlossen werden, was einerseits sehr gut in der beigelegten Printanleitung dokumentiert ist und auerdem ist aufgrund der Gre und Form der Stecker, sowie der Kabellngen kaum ein falscher Anschluss mglich.
Zu guter Letzt prft die/der Kund:in, ob die entsprechende Einstellung am Netzteil stimmt (230V – war bei mir bereits eingestellt) – und fertig ist der Lack!
Nun der Stecker eingesteckt und mit Spannung den Boot-Vorgang beobachtet. Ging ohne Probleme. Bm! Alles gut. Auf den nchsten Seiten wird dann die “Autonivellierung” beschrieben, die Garant fr vernnftige Druckergebnisse ist – und siehe da: Kein rumgestelle an Drehschrauben, kein “Papier unter Druckdsen”-Geschiebe. Innerhalb nicht einmal fnf Minuten ist das Druckbett ohne hndisches Eingreifen eingerichtet.
Es gibt lediglich zwei kleine “Kritikpunkte”, die aber wirklich “Meckern auf sehr hohen Niveau” sind: Zunchst die ausschlielich englischsprachige Anleitung. Das hat mir nun nichts ausgemacht, aber ich denke, selbst Menschen mit eingerosteten Schulenglisch sind an ein, zwei Stellen wirklich gefordert. Der zweite anzusprechende Faktor ist, dass die zugehrigen Abbildungen ledglich das CHINESISCHE Men zeigen. Das kriegt man durch die Position der jeweiligen Icons auch noch aufgelst. Aber beides zusammen KNNTE fr einige Einsteiger eine kleine Hrde sein.
3. Erste Drucke
Und da bin ich echt zusammengebrochen!!!! Ein bichen recherchieren zu Druckeinstellungen (ja, ohne geht es nicht. Wer glaubt, er kauft so ein Gert und benutzt es analog zu einem Papierdrucker liegt vllig falsch), ein bichen einarbeiten in die Software (Creality legt eine auf seine Marke gelabelte Version von “Cura” fr das “slicen” bei. Ich habe auf das Original zurckgegriffen) – und schon hat man vernnftige Ergebnisse. Ohne eine halbe Million Webseiten lesen zu mssen, ein halbes Dutzend Upgrades (sowohl hard- als softwareseitig) durchzufhren und ohne die eigentlich obligatorischen grauen Haare….es gibt sofort ansehnliche Ergebnisse!!! Ein Foto dieses ersten Druckes hab ich angefgt (wenn auch erst 12% abgeschlossen, sieht man die wohl schon hier, welche Qualitt erreicht wird..)
4. Sonstiges und Ausblick
Hinzuzufgen ist wohl noch, dass der “6er” im Vergleich zu Vorgngermodellen sehr, sehr leise arbeitet. Zwar nicht so, dass man das Ding im Wohnzimmer stehen haben will, aber erheblich geruchreduziert zu frheren Generationen. Auch das gesamte “Setting” und die Qualitt berzeugen zunchst voll. Ich werde einige der im Netz vorgeschlagenen Erweiterungen anbringen (der erste Druck ist bspw. das empfohlene Kabelmanagementsystem) und sicher in regelmigen Abstnden diesen Text erweiteren. Immerhin reden wir an dieser Stelle von ersten Eindrcken. SOLLTEN sich diese allerdings besttigen ist das Gert ein absoluter Preisbrecher und macht wesentlich hherpreisigen Lsungen Konkurrenz!
Soweit erstmal nach ca. 20 Stunden Einsatz!
Good
Changed bet to glass.
And beg wheel was overthithen and deformed, but after some time wheels restored shape and now its OK.
La migliore entry level ed anche qualcosa di più
Premetto che sono un principiante nel campo della stampa 3D, nonostante ci sono riuscito ad ottenere ottimi risultati.
Inoltre, online si trovano innumerevoli progettini per upgradarla.
Ottima
Piccola e versatile
Facile da montare e calibrare, pronta all’uso e funzionale alla causa se non di hanno esigenze di troppo alto livello
¿Qué se puede decir?
Se empieza a quedar anticuada y atrasada, por el mismo precio tienes la Biqu B1 mucho mejor, pero para novatos es la impresora por excelencia. Si la calibras bien te da una calidad perfecta. La calidad de impresin depender de la habilidad del que la maneje. Recomiendo cambiar la cama por una de cristal. Por lo dems las actualizaciones vendrn dadas por el desgaste de los componentes con el tiempo.
EndE
Bonne machine de dpart qui demande des amliorations dommage.
Prvoir ressort de plateau plateau en verre
Guide de vis Z et ventilons moins bruyants
Lovely machine
The print quality is amazing, but it do require a bit of tweaking like all 3D printers, the bed adheres very well, sometimes too good to be removed, highly recommend replacing it with a spring steel one. The auto level works perfectly but the built plate seems to out of alignment much quicker than the mechanical method.
Un bon joujou
l’imprimante est assez simple monter . Pour l’utilisation et les rglages il faut fouiller sur internet .
Il faut avoir quelque notion de programmation et de mcanique pour l’exploiter.
L’imprimante est trs bruyante .
Guter Ausgangspunk
Ich habe jede Schraube und fast jedes Teil ersetzt und auch nach 3 Monaten ist er immer noch eine Baustelle. Aber es ist eine spannende Reise. Die Konstruktion an sich ist ein sehr guter Ausgangspunkt und er bentigt viel Zeit und handwerkliches Geschick. Doch wenn man durchhlt, wird man reichlich belohnt.
Hinweis: einmal aufgepimpt ist er auch nicht billiger als ein Prusa. Wer vor allem drucken will, soll sich unbedingt so einen kaufen.
fantastico prodotto e fantastica assistenza tecnica
la stampante perfetta, molti upgrade disponibili ma specialmente stampabili.
3 settimane fa mi si era bruciato il driver delle ventole e contattando l’assistenza, me ne hanno subito spedita una nuova (ho chiamato l’assistenza di amazon e mi ha risposto di non provarci nemmeno a contattarli).
ieri dopo circa 2 settimane arrivata la scheda NUOVA senza spendere nemmeno 1 euro.
Assistenza molto competente e rapida nelle risposte.
consigliatissima!
gutes Einsteigermodell
die Tischplatte haftet nach ein paar Drucken nicht mehr richtig und man hat dann Kunststoffwolle , es empfiehlt sich die Platte oft zu reinigen. Der Spannung des Riemens fr die x-Bewegung sollte fters kontrolliert werden – runde Sachen sind dann eifrmig.
trotzdem zu empfehle
Ender pro muy buena calidad/precio
Impresora muy buena calidad/precio. Vienen varias partes montadas que facilitan el montaje. Tiene el problema de nivelar la cama donde se imprime, no se queda ajustada debes de estar muy pendiente. Voy a tener que comprar un nivelador electronico exacto para la ender pro y poder ajustarla electronicamente.
En general muy contento con la compra
Packaged well, was printing within an hour.
it arrived in a wet box, i was a bit worried.
Opend the box and all was well, it was well packaged with good instructions.
checked the parts, built it, conected octopi to it and was printing within the hour.
the sample cat was realy good quality (but it was slised on Simplify3D).
abbed a Bltouch and did firmware upgrade fron there website.
I am now using Cura 4.8.0 and its printing well.
Der Ender 3 Pro ist ein Drucker der fr Anfnger und Fortgeschrittene wunderbar geeignet ist.
Die Lieferung war wie immer sehr schnell und die Verpackung bei der Lieferung einwandfrei.
Der Drucker selbst ist im Karton sehr gut in Schaumstoff verpackt. Da wackelt nichts und kann auch nichts verkratzen. Da knnen sich andere Hndler eine groe Scheibe davon abschneiden.
Der Zusammenbau ging verhltnismig leicht dank einer guten Beschreibung. Sollte man mit Bildern nichts anfangen knnen liegt vom Hersteller ein Video bei bei dem der Aufbau schrittweise gezeigt wird.
Die Einzelteile sind gut beschriftet und die einzelnen Schrauben extra abgepackt und immer beschriftet. Es liegen auch mehr Schrauben bei als beim Aufbau bentigt werden. Ersatzteile sind auch dabei.
Nach knapp ner Stunde war der Drucker aufgebaut und ich konnte mit dem mitgelieferten Filmend loslegen.
Fr mich ist dieser Drucker definitiv eine Kaufempfehlung
Super Machine :)
Facile monter,
Excellente qualite pour le prix,
les impressions sont tres precises avec les reglages d’origine,
apres les avoirs paufiner pour le PLA utilis : en 0.12 parfaite
PETG : idem quallte en 0.12 excellente
cependant 2 bmol noter sur celle reue :
1.
la base de montage etait legerement vrill et donc la machine est bancale, le percage des filetages etant le probleme :
impossible de faire l’equerage correctement mais corrig facilement via des cales de compensassion sous les pieds.
2.
A force de decolement “a froid” des impressions le tapis d’impression gondole tres legerement et marque legerement et evidement mais ceci est courant le bed est legerement bomb au centre.
ce qui rend difficile les impressions qui necessite l ensemble des dimentions du plateau.
j’envisage l’aquisition d’un Bed en verre pour ce genre de pieces.
j’utilise cette machine depuis 1 mois (assez intensivement) et aucune trace d’usure constate, donc le produit semble bien supporter l’usure mecanique des pieces. (si la machine est bien rgle, shemat de montage papier, et un guide pour les reglage est dispo sur la SD fournie).
Globalement, tres bon produit 🙂
Very happy
Love it will buy another as I’m not so patient to wait so long, but after fiddling I get some great results with this printer, very happy.
Guter Drucker für Einsteige
Drucker wurde schnell geliefert. Zusammenbau hat ca 30 Minuten gedauert. Den ersten Druck konnte ich nach ca einer Stunde starten da der Drucker zuerst die Speicherkarte nicht erkannt hat. Dieses Problem ist seid dem nicht mehr aufgetreten.
Druckqualitt ist sehr gut und die Objekte haben eine gute Haftung auf der Heizplatte.
Einen Stromausfall habe ich simuliert und der Druck wurde ohne weiteres nach erneuten einschalten fortgesetzt.
Eine zu lange Pause sollte man nicht machen, da das Druckobjekt nach abkhlen die Haftung verliert und von der Dse herum geschoben wird. Das gilt allerdings du alle 3d Drucker.
Alles in allem bin ich sehr zufrieden mit der Handhabung und dem Aufbau sowie den bisherigen Ergebnissen.
Fr jemanden der in den 3D Druck Einsteigen will definitiv eine gute Wahl.
Bonjour, j’ai reu cette imprimante dans les temps, je voulais une nouvelle machine pour remplacer ma Vertex K8400 de 2016 avec toutes les options d’aujourd’hui (reprise aprs coupure secteur, fin de filament, plateau chauffant et en bonus l’auto nivellement).
Lors de ma rception le carton tait bien abim sur un coin, heureusement que l’imprimante est trs bien protge avec de la mousse paisse dans le carton (pas de dgts interne).
Le montage se fait rapidement environ 30 minutes, mais l o a coincer pour ma part c’est l’tape d’auto nivellement qui ne se faisait pas du tout ainsi l’origine de l’axe Z. Il m’a fallu 2h de recherche sur internet pour trouver une solution sans tre sr que ce soit la bonne car tout est en anglais ou chinois. L’imprimante m’a t livr avec le firmware V1.0.2, j’ai donc essayer de le changer par le V1.0.3.6. La mise jour c’est trs bien passe (une fois compris, c’est simple faire).
Donc une fois jour, l’origine du point Z fonctionne ainsi que l’auto nivellement.
Pour rsum cette imprimante fonctionne et est de trs bonne qualit sur les finitions, pour tester j’ai mme essay l’impression 200% et je suit toujours bluff par la qualit.
Je recommande mais faites attention au firmware (vous les trouverez sur le sur de creality, tout y est)
Amazing printer!!
I’ve had this for a few months now and it works great the set up isn’t to hard there were many of good videos to help you. They are some minor adjustments afterwards like moving the z axis slightly up ect. They magnetic built surface is amazing with great bed adhesion and even is you make some scuff marks over time you can easily buy a cheap replacement. The hot end is easy to access and you can easily replace the fans for silent ones. I believe this is a great printer and much better than other I’ve had
An excellent purchase! I’m new to 3D printing and thought I would launch in to it with this device. It is easy enough to assemble and set up – it needs a fairly large area to be placed in, as the flat bed moves backwards and forwards (the gantry moves along the x and z axis only).
I found some simple instructions online to level the bed, and it has not needed much adjustment since.
I’ve used the PLA that came with the machine – which worked very well. I then had some printing difficulties, which I put down to the replacement PLA that I bought, and it is now working perfectly again with some e-sun PLA+ filament.
Great 3D printer for the price!
Great upgrade! Very happy. Although it comes with a manual I followed instructions found Creality YouTube videos. Very easy to setup. Got it on Prime Day and saved quite a bit of money.
Great 3D printer for the price!
Great upgrade! Very happy. Although it comes with a manual I followed instructions found Creality YouTube videos. Very easy to setup. Got it on Prime Day and saved quite a bit of money.
Meilleur imprimante 3D dans cette gamme de prix.
Cette imprimante est parfaite pour un dbutant qui souhaite s’initier l’impression 3D. Elle est facile d’utilisation, et donne de trs bons rsultats sans tre trop demandeuse en rglages. L’adhrence facile procure par le bed flexible est trs agrable et vitera a certains un arrachage de cheveux! Pour le bruit, il ne faut pas rver pour ce prix l. L’imprimante se prte bien de nombreuses amliorations: j’y ai mont des ventilateurs Noctua (ultra silencieux), ainsi qu’une carte mre silencieuse Creality. Apres cela on ne l’entend plus (je dors cot la nuit pendant des impressions). Plus rcemment, j’ai fait acquisition d’une carte mre BigTreeTech V2.0 avec un cran tactile TFT, permettant l’ajout de LED NeoPixel par exemple, et bien plus encore.
So I’m not new to the 3d printing world. I have a youtube channel and an Instagram account where I print every week new projects I design called De4thDimebsion.
1st after opening the box it took about 1h30mins to build the machine and do a first test print.
During the unboxing I have noticed that there is something loose in the power/controller box which looks like a screw, I haven’t opened the box yet to investigate I’ll probably do it in the future though
2nd after the bed leveling I printed the first object! It turned out really good but when I printed the second object the nozzle touched the bed and got seriously damage causing print failures one after another.
3rd nozzle replaced with one provided by creality and bed leveled again but I kept failing to print the first layer, looks like the side of the heated bed where is connected to the cables gets hotter then the rest of the bed which causes bubbles over the first layer causing failures. The way to fix it is to set up the first layer to 0.3mm, inner and outer wall width 0.6mm with initial layer line width 150%.
4th I had a few successful prints and tried a few multilayer with multiple pla materials with different colors and it started failing again, the bigger issue is when you remove the filament from the sensor creality overwrite the cura command and set the bed temperature at 0deg this might cause the print to not remain stick to the bed so I suggest for this cases to always leave a filament inside the sensor and just hope that the filament won’t break! After this I got good multi layer prints.
5th it makes a lot of filament powder over the extruder so there is something that can be improved with the direct drive extruder but not a big deal.
I can’t wait to print TPU this week end and see how it performs. Overall it is good for the price and if the initial layer settings and the bed leveling are the right ones then it is great.
If you want to see my prints you can follow me on youtube, Instagram and TikTok at De4thDimension. I’ll do a full review on youtube during Christmas time so stay tuned!
Amazing
Amazing printer. Easy to build then after a quick level it has done some huge prints. The prints come off the bed easily leaving no marks quality is amazing I will definitely buy a second one soo
Amazing
Amazing printer. Easy to build then after a quick level it has done some huge prints. The prints come off the bed easily leaving no marks quality is amazing I will definitely buy a second one soo
Easy to set up and requires very little calibration , a few weeks in everything is still working great! The volume is a huge plus to print vases and so on.
Creakily doesn't fail to delive
Easy to set up and requires very little calibration , a few weeks in everything is still working great! The volume is a huge plus to print vases and so on.
Superb 3D Printe
Simply an amazing 3D Printer. Bought this back in January after seeing our 3D printer at school and thought I’d get into it myself. 3D printing is a huge learning experience so don’t give up if you ever face a problem. This printer is a great budget printer. The build and print quality is amazing. There are also so many upgrades available online: Glass bed, metal extruder, capricon bowden tubing, etc. Let alone all the 3D printable upgrades you can do (Yes thats right, you can 3D print parts for your 3D printer).
The internet is full of help and answers if you ever need it, the Ender 3 Reddit is full of helpful people. Thingiverse is the place to go full of 3D models. Once you get going, you’ll be able to produce some stunning 3D prints and show off your new knowledge and cool prints to your friends.
Setup vid – youtube.com/watch?v=ibsOYzXduYc
Ender 3 Reddit – reddit.com/r/ender3/
You’ll also need to use a slicer software to convert the 3D models into layers and gcode that the printer will need to know what to do. I use Cura. Also make sure the bed is fully levelled (watch some videos on it) and that you keep it all clean and the lead screw clean and greased (I use Super Lube). But also remember that googly eyes on your print head is a requirement and it will not work without. 😉
Good luck on your 3D printing journeys and don’t give up!
Ideal debuta
C’est ma premiere imprimante 3d so far Super premieres impressions , le manuel d’assemblage n’est pas evident sur toutes les etapes (pas assez de detail sur le manuel ) mais c’es gerable . Premiers tests sur les gcodes fournis par default sur la carte sd avec un niveau de detail bluffant . J’en ai profite pour ameliorer l’imprimante avec des ajouts surtout avec le raspberry pi qui permet de gerer les impressions depuis le reseau local ou bien meme depuis l’internet . J’ai achete le lit crealty et aussi une upgrade pour l’extrudeuse que je n’ai pas encore installe mais pas besoin je suis ravi de mon achat (IDEAL POUR LES DEBUTANTS) allez y les yeux ouverts .
Il montaggio mi ricorda molto l’assemblaggio del meccano. Le istruzioni sono cartacee, per per fortuna all’interno della SD presente un video con le videoistruzioni, molto chiare che permettono il montaggio spedito. Non molto semplice, ci vuole un’oretta buona per montarla.
All’interno della confezione presente un filamento di prova bianco per una prima stampa fugace, consiglio di comprare subito una bobina per cominciare a stampare in modo serio.
Una volta posizionata e accesa bisogna livellare il piatto di stampa (il bed), consiglio la tecnica del foglio di carta da passare sotto l’estrusore (youtube sar vostro amico in questo caso), ho montato subito il piatto in vetro in regalo, che in effetti permette di ovviare a dei problemi di livellamento del piano di stampa (per consentire il montaggio del piatto di vetro bisogna inalzare il limitatore dell’asse z.
Per stampare bisogna caricare sulla sd un file (modellato da voi o scaricato da thingiverse) con estensione .gcode non .stl (formato universale da cui scaricate le cose da thingiverse). se avete un file con estensione .ftl, per convertirlo in un formato potabile per la stampante dovete installare sul vostro pc il software gratuito Cura Slicer che dispone di un profilo per la creality ender 3 pro. Questo programma converte il file in un file con le informazioni di stampa per la nsotra stampante. Caricato il file .stl convertite e copiate il file sulla sd, dopodiche la date in pasto alla stampante e come per magia comincer a stampare. Per tutto quello che riguarda i possibili problemi di stampa vi consiglio di cercare su reddit. buone stampe!
Personnellement, je suis ravi de mon achat.
La ENDER 3 pro est une amlioration de la ENDER 3. Sur le papier elle est plus rigide, mieux alimente et plus silencieuse. Dans la ralit, il y a encore des dfauts et il faut changer beaucoup trop de choses pour les corrigs. C’est un peu la diffrence entre une Renault 4 et une Clio 4. Sur la ENDER il n’y a aucune aide, il faudra tout grer comme sur la 4L. Par contre une fois que vous avez enfin trouv les bons rglages et apporter une ou deux modifications les impressions seront l’auteur d’imprimante 3d 2 3 fois plus cher. Pour avancer vite, vous pouvez vous reposer sur une communaut impressionnante. Personnellement, je suis ravi de mon achat.
An excellent produc
A really impressive piece of equipment, easily put together and calibrated. I used the internet for videos and advice as the instructions could be better especially the calibration regime.
I would highly recommend this item.
Prima di tutto una bellissima stampante: me l’ha consigliata un amico e aveva ragione!
Senza particolari settaggi iniziali e, dopo averlo trovato su “thingverse”, ho stampato il modello dell’X-wing che venuto benisimo.
Se avete problemi a montare la stampate (come il sottoscritto che un neofita e ci ha messo un pomeriggio intero…! :D), guardate nella scheda SD inclusa e troverete un filmato di come si monta… Nessuno nelle istruzioni ve lo dice, ma c’ e vi risparmier un po’ di fatica!
Montata la stampante fate subito il test di stampa con uno dei modelli presenti nella scheda SD. Nella scheda troverete anche il programma per creare il file gcode che serve a stampare il modello da voi scelto.
Quando stampate, dite al programma di creare il letto su cui stampare il modello, userete un po’ di plastica in pi ma meglio.
Stampate subito qualcosa per controllare che tutto funzioni! Nel mio caso, lo switch dell’asse Z aveva un taglietto che faceva cortocircuito (foto) e non mi permetteva di inizializzare la posizione di stampa della testina col comando “autohome” (le posizioni X ed Y venivano impostate correttemente, ma la Z no).
Dovevo correggere manualmente la posizione sull’asse Z col comando “babystep Z” ad inizio stampa (lo shuttle l’ho stampato cos).
Capito il difetto ho scritto al venditore che mi ha risposto subito chiedendomi di fare un filmato di test di quello che succedeva. Dato che Amazon non permette, nelle email tra venditore e cliente, di caricare filmati e nemmeno link, mi hanno fornito la loro email in un modo molto originale! Dentro una immagine! 😀 Spedito il filmato alla loro email aziendale, hanno verificato che il difetto era davvero nello switch dell’asse Z e mi hanno spedito il pezzo dalla Cina (qualche settimana di tempo).
Ora tutto a posto.
Se volete stampare un modello preso in giro, controllate che la sua geometria sia “manifiold” altrimenti verr stampato male e poi privilegiate modelli che siano stati tagliati in parti in modo tale che il letto di stampa aderisca al taglio sul modello e non ad una superficie con dei particolari.
L’area di stampa circa 22 cm x 22 cm x 25 cm; questo significa che lo shuttle che ho stampato non dovrebbe entrarci; ma se vi organizzate il piatto di stampa orientando bene le fette del modello da stampare, avrete piacevoli sorpese!
Buona stampa!:)
Der Ender 3 Pro war fr mich ein echte Offenbarung !
Ich hatte meine ersten Erfahrungen im 3d Druck mit einem chinesischen Bausatzdrucker gesammelt, soweit , so gut, die Ausdrucke waren eher mssig, viel Nachbearbeitung ntig, um glatte Oberflchen hinzukriegen.
Den Ender3 Pro habe ich gekauft weil ich auf einer Convention einen bei der Arbeit gesehen hatte und die Qualitt der Drucke um Welten besser war als bei meinem Gert.
Ich benutze den Drucker hauptschlich um Gebude, Gelndeteile, Figuren und Fahrzeuge fr mein Tabletophobby herzustellen.
Die magnetische Druckbettauflage ist klasse, meine Druckobjekte haften gut und lassen sich nach Ende des Ausdrucks leicht von der OBerflche ablsen, einfach die Auflage anheben und biegen.
Die Arbeitsgeusche halten sich in Grenzen, ein bisschen l fr die Fhrungen sollte selbstverstndlich sein.
Die Ergebnisse mit Amazon Basic Filament knnen sich sehen lassen, mit hherwertigerem Filament wird es natrlich noch besser.
Die Grundeinstellungen in Cura brauchte ich nicht verndern.
Excellent, after looking on YouTube for reviews this printer seemed to be good for a first-time user, I was expecting to have some tweeking to do but I think I got lucky because it printed fantastic straight out of the box, I fully recommend this product.
Chouette machine, manque de quelques raffinements
En ce qui concerne la qualit d’impression, c’est une bonne machine, facile assembler et modifier.
Aprs ce premier constat, en mode stock, a reste potentiellement une machine capricieuse sur le niveau de la mise a niveau de la surface d’impression, le ventilateur qui est bruyant et les moteurs qui chantent cause des contrleurs qui ne datent pas d’hier:-(
Ce qui m’amne au rapport qualit/prix.
Moins cher que pas mal de modles comme Prusa par exemple, il faut, pour apprcier cette machine et ne pas la subir, remplacer quelques pices assez rapidement:
-Les ressorts de la base, trop souples.
-Pour les moteurs qui chantent, changer le contrleur soit 1.1.5 ou un 32 bit.
-Pour le ventilateur principal le remplacer par un Sunon 24v.
-l’extruder d’origine montre vite ses limites et ne serre pas bien tous les filaments.
-la ventilation du hot end demande de l’optimisation en imprimant des buses de ventilation.
En conlusion sur ce point: Pour un bricoleur, c’est un bonheur, mais le prix va facilement dcoller pour la mettre niveau.
Niveau support technique, j’ai eu une assez bonne exprience avec le support. Il manquait 2 vis et il y avait 3 crous en trop. Ce qui fait que a n’a pas t repr en usine (poids).
J’ai reu rapidemet les pices manquantes sans discussion.
It came with everything ready to be bolted together, no adjusting, no messing around with tightness and stuff just bolt, plug and play.
I did have some issues with the nozzle scratching the bed as the levelling springs are terrible for maintaining the level but these will be replaced with some stringer springs in the VERY near future. Other than that, it’s a work horse!
Display is great, dial-nav is as it should be.
For any first-time 3D printer enthusiasts this is the printer you want to buy first!!
Imprimante 3D ender Pro
S’agissant de ma premire imprimante 3D
Reue il y a 3 jours, montage facile, nanmoins privilgiez les Tutoriels Internet (sans cela j’avais une courroie mal monte) j’ai pu rectifier aprs visionnage des diffrents tutos.
Premire impression satisfaisante, j’utilise Cura pour la cration et j’ai lanc ma premire impression perso il y a quelques heures
Pour les dbutants comme moi, je recommande cette imprimante, elle fait son job, il faut pour cela bien paramtrer vos impressions.
Une bonne petite imprimante pour débuter ou si on manque de place
Voil une bonne petite imprimante si vous voulez vous lancez dans l’impression 3D ou que vous manquez de place. Le packaging est bien pens. Le guide d’assemblage tout en image est explicite mais n’aborde pas du tout la question cruciale des rglages, de l’entretien, du nettoyage de la machine ou de la scurit. Le buidltak fourni est de bonne qualit et offre une adhrence suffisante pour du PLA sans ajout d’autres produits. Le plateau magntique est pratique. On aurait aim un vrai tendeur pour les courroies et un rangement pour garder les outils sous la main. La navigation via les menus de l’cran prsente parfois des -coup.
Cette imprimante est customisable via des modules vendus par Creality ou crs par la communaut Ender 3. Il faut savoir qu’il vous faudra choisir entre la fonction redmarrage aprs une coupure d’lectricit (fct par dfaut) ou un nivellement automatique (module ajouter soi-mme) ou la dtection de fin de filament (module ajouter soi-mme). C’est l’une des 3 fonctions mais pas les 3 ensembles. La Creality Cr10s pro (c’est la gamme au dessus) offre ces 3 fonctions en natif, avec la double extrusion et un plateau plus grand… mais un prix logiquement plus lev.
Cette imprimante est compatible avec Marlin, Octoprint et des slicers comme Cura, Repetier ou Simplify 3D.
Great printer had issues with older model but customer service was great and sorted issue out straight away. 2nd one of these ive bought and for the price i would buy another no questions. 4th different model printer ive owned and you can get great results out of the box.
Superb Printe
Bought this as a second printer to print Face Shields for NHS , Care workers and front line during Covid-19. Once put together it has not missed a beat I am printing non stop 17hrs a day and it’s just perfect
As soon as I got this out the box the first thing I did was upgrade the springs right away to yellow ones ….
This is a perfect all round printer I totally give it 5***** Delivery was fast and arrived in perfect conditio
Excellente!
Pour une premire imprimante 3D, j’en suis rellement satisfait!
Facile prendre en main une fois monte (a vous prendra quelques heures) et une fois le bed leveling fait, elle tourne comme une montre!
Je recommande toutefois de faire quelques achats de confort, tel qu’une carte mre silencieuse (le rsultat est sans quivoque: 20dB en moins, merci pour les oreilles!) et de modifier le ventilateur frontal de la buse (pleins de vidos sont disponible pour y mettre un petit Noctua qui ne fait pas de bruit du tout)
great beginner printe
being a complete printer noob i brought this printer hoping the learning curve wont be too steep. i was amazed how well it printed out of the box, as well as a great pre existing community surrounding the printer. couldn’t recommend this product more 🙂
Es de sobra conocido que esta impresora es de la mejores calidad precio. En mi antiguo trabajo he manejado una impresora que costaba el triple (BQ Hephestos 2) y la Ender 3 Pro no tiene nada de que envidiarle. Es muy fcil de montar, trae todo tipo de herramientas necesarias. No suele descalibrarse y tiene una calidad de impresin sorprendente. Es apropiada para iniciarse en el mundo de la impresin 3d debido a su facilidad de manejo y toda la informacin que hay en internet sobre ella. La impresora lleg en la fecha indicada, a pesar de la situacin excepcional. Si tuviera que recalcar algo negativo sera la cama magntica, pero eso no ensombrece la gran mquina que es.
Prima cosa, acquistare un piano in vetro da sistemare sul piatto di stampa
Se riuscissero a risolvere il problema del piatto di stampa, concavo avrebbero creato una stampante meravigliosa, purtroppo il problemino indicato Crea non pochi problemi. Alle stampe Che si staccano. E si deformano ho risolto mettendo un piano in vetro e tanta lacca ma non dovrebbe essere gestita in questo modo. Per tutto il resto, ovviamente una stampante eccezionale.
Dlais de livraison respect, emballage parfait. Pour l’assemblage de la machine,c’est simple en respectant les photos du document fourni. Je regrette que le fabricant ne donne pas un petit manuel de prise en main, pour les dbutant en impression 3D , et oblige faire des recherches sur les sites appropris. Pour ma premire impression, pas mal, mais certains rglages ne sont pas au point et corriger. Je recommande cette machine, si vous voulez vous lancer dans la 3D
Reu dans les temps et trs bien emball. Carton abim dans un coin mais qui n’a aucune incidence sur la machine car elle est trs bien par de solide mousse. Montage facile avec le dpliant fourni.
Par contre le plateau a un gros creux au milieux e de grosses difficults a imprimer car l’accroche au milieu ne se fait pas. Le bultack magntique est trs pratique mais ne comble pas le creux du plateau.
Le seul dfaut est la planit du plateau .
Je possdais dj une CR10S en classe avec mes lves et j’avais envie d’avoir quelque chose de plus petit mon domicile…je suis donc pass sur une Ender 3 Pro…et aucun regrets !! Impressionnant de voir ce qu’on sait imprimer avec cette imprimante !
J’ai juste apport quelques petites modifications au niveau du ventilateur de l’alimentation que j’ai remplac par un plus grand pour faire un peu moins de bruit…la suite sera de changer sans doute la carte-mre pour rendre l’imprimante (au niveau des moteurs) plus silencieuse.
Le bed magntique est efficace, mais je l’ai malgr tout remplac par un bed en verre de 4mm pour obtenir une premire couche parfaitement lisse et surtout parfaitement plane (souci rcurent chez les imprimantes de chez Creality apparemment) .
Quoiqu’il en soit, le rapport qualit/prix est imbattable !!
Hello,
this was and still is my first printer as of writing this review.
The Ender 3 Pro was easy to get into. There is a large community on Youtube and elsewhere to learn tips and tricks.
My only problem was that my print ned was warped and thats not just a littlebit unfortunatly. BUT I contacted the Creality 3D support to get help. I got the probably best support I have ever gotten. They have a really nice problem solving crew! So now I am getting a new part for replacement.
I would recomend it because it can delive qualitys that are awesome! Especially if you get into the Youtube videos or read about some tips.
Anyways, I would buy it if you are willing to work a little bit to get the best outcome from your printer. If you don’t want to do anything it could be the wrong choice. In the end i belive every printer needs some care to get to the quality you want. A lot comes from your slicer settings which make the difference!
Have a good day.
Vorweg:
Das ist mein erster 3D Drucker und ich lerne noch. Ich hatte mich im Vorfeld informiert und habe mich dann fr den Creality Ender 3 Pro entschieden.
Fr den Preis bekommt man ein vernnftiges Einsteigermodell. Die Onlinecommunity ist riesig, zu jedem Problem das im Laufe der Nutzung auftritt gibt es online auch schon eine Lsung. (zumindest bein denen, die ich hatte) Es ist eine Speicherkarte dabei, auf der sich schon ein paar Testdrucke befinden, sowie ein wenig weies Filament. Man kann ihn also nach dem Aufbau sofort ausprobieren. Ich bin von der Qualitt der Drucke wirklich begeistert. Vorausgesetzt man benutzt eine ordentliche Slicer-Software. Momentan benutze ich Cura und damit klappt es ganz gut.
Leider muss ich trotzdem einen Stern abziehen, denn beim Zusammenbau habe ich festgestellt, dass eine der Rollen fr das Druckbett einen Lagerschaden hat und diese bei jeder Drehung kurz “hakt”. Das wrde einem jeden Druck versauen. Ich habe die Rolle dann mit einer der Z-Achse getauscht, da diese beim Drucken immer nur Minimal bewegt wird. Auerdem ist das Druckbett etwas versetzt, wenn man von oben auf den Drucker schaut, dann ist es nicht parallel mit den Auenprofilen und sieht etwas schief aus, das beeintrchtigt die Funktion aber nicht und mittlerweile strt es mich auch nicht mehr. Ich htte mir hier einfach eine bessere Qualittskontrolle gewnscht, da beides doch recht auffllige Fehler sind.
Der Zusammenbau verlief gut, es gibt allerhand Videos im Netz, die alles Schritt fr Schritt erklren. Man sollte aber auf jeden Fall alles berprfen und noch einmal selbst einstellen, denn einige der vormontierten Teile sind nur locker oder etwas Schief zusammengebaut. Das ist aber alles nicht weiter tragisch und lsst sich schnell beheben.
Alles in allem kann ich diesen Drucker nur weiterempfehlen, richtig eingestellt kann er durchaus mit wesentlich teureren Modellen mithalten.
Toller Drucker, super Suppo
Der Drucker druckt super, aber natrlich muss man sich damit vorher beschftigen, d.h. lesen oder Videos anschauen, damit man selbst die Auswirkungen der einzelnen Druckparameter versteht. Wer generell bei 3D Druck erwartet, dass alles von Anfang an perfekt funktioniert, wird schnell eines Besseren belehrt. 3D Druck sollte man als Hobby verstehen, welches auch Zeit erfordert, ganz unabhngig vom Drucker.
Der Ender 3 eignet sich dafr perfekt fr Anfnger und Fortgeschrittene.
Auch wirklich hervorragend ist der Service von Creality (Sprache Englisch) . Bei mir war Anfangs ein Limit Switch defekt. Creality meldete sich trotz Zeitverschiebung und Wochenende (China) innerhalb von 4 Std und schickte problemlos und schnell Ersatz. Grosses Lob dafr und der Grund warum man direkt beim Hersteller bestellen sollte. Natrlich dauert der Versand dann ein paar Tage, aber nahezu alle verbauten Teile gibt es fr kleines Geld auch bei Amazon oder anderen Plattformen schneller zu erwerben.
Fazit:
Hardware 5*
Software 5*
Service 5*+
Spassfaktor 4*, weil man auch Lernen und Erfahrungen sammeln muss
J’utilise cette imprimante 3D pour du modlisme, et bricolage. Bon produit Chinois. Facile mettre en uvre, 6 vis pour le montage et c’est parti….
Il faut quand mme bien maitriser les logiciels de modlisation 3d et le logiciel de dcoupage en couche. Il faut trouver les bons paramtres et bien positionner les pices pour bien imprimer.
Je suis trs satisfait de mon achat.
Comme pour tous les produits techniques, j’imagine que les nouvelles machines venir seront encore plus prcises et plus rapides.
L’imprimante est arrive dans les dlais prvus. l’emballage parfait avec de la mousse partout. Il y a deux parties trs simples assembler et elle se met en route trs facilement.
Assez vite, je remarque que le plateau d’impression n’est pas trs stable mais je me lance malgr tout et la premire pice que j’imprime (aprs un calibrage du plateau rapide) est trs bien (j’ai utilis un brim)
Sur ma lance, je tente d’imprimer des pices plus volumineuses et l’adhrence n’est pas correcte donc j’aborte l’impression…. plusieurs essais se succderont (avec des tempratures diffrentes) et au final, je me suis dcid resserrer les crous de fixation du plateau (il suffit de dmonter le plateau puis, de resserrer les crous avec des outils standards: cl pipe de 8 mm et cl allen plus courte que celle fournie)… Un rejeu de la procdure d’alignement du plateau puis quelques essais supplmentaires et au final, en utilisant un raft au lieu d’un brim, une temprature de 205 C pour du PLA, je peux imprimer sans problme plusieurs grosses pices la suite. Au cours de mes tentatives d’alignement du plateau, j’ai un peu endommag aux quatre coins la plaque d’adhrence mais, heureusement, le centre est intact. J’ai command (et reu) une plaque de verre mais je la testerai plus tard (j’ai des contraintes de livraisons de mes premiers exemplaires). J’utilise Openscad pour le design de mes pices, Cura pour gnrer les fichiers gcode et je suis trs content de cet achat… Pour l’instant, j’imprime des botiers pour des circuits lectroniques que je conois et fait fabriquer, et les deux parties du botier s’assemblent parfaitement. Mon prochain projet sera d’imprimer un plateau tournant avec des engrenages (et des moteurs) mais je suis confiant.
Da mein 3D-Druckverrckter Kollege eine Menge Drucker besitzt, kann ich das recht gut einschtzen, wenn ich sage das dieser 3D-Drucker hervorragend druckt. Und sogar viel besser als die viel teureren Drucker meines Kollegen 😉
Der Drucker kam sehr gut verpackt an und schneller als gedacht. Innen drinnen mit dichtem schwarzen Schaum ausgepolstert. Viel sichererer geht es nicht. Die Montage ging schnell – im Prinzip 4 Schrauben und es steht. Dann noch die gut beschrifteten Kabel einstecken und man kann drucken.
Ein Stecker ist jedoch in der (eher spartanischen) Anleitung nicht erwhnt. Wenn ihr also rtselt, wo der letzte Stecker hin soll – der gehrt zum Endschalter der Horizontalen Achse. Bei mir war auch die Beschriftung eines der Kabels in das Bodenloch gerutscht – schaut dort nach falls das bei euch auch passiert.
Die Lautstrke des Druckers liegt bei ca. 50-55 Db. Im Vergleich mit anderen Druckern also echt angenehm. Flsterleise ist das dann immer noch nicht, doch das habe ich auch nicht erwartet.
Ein Manko ist mir ganz am Anfang aufgefallen. Als ich den Druckkopf auf die Home-Position gefahren habe, hat die Dse den Clip vom Druckbett abgerissen! Boah, habe ich mich da erschreckt. Eigentlich sollte der noch ber dem Bett zum Stehen kommen. Aber keine Sorge, die Dse ist sehr stabil, da geht nichts kaputt. Es druckt auch, nur muss ich diesen Clip weg lassen. Vermutlich ist das eine Fehleinstellung in der Firmware. Der CR20 ist der nachfolger des CR10, der greren Druckvolumen hatte und offenbar hat da jemand die Einstellung einer Achse vergessen. Msste sich also mit neuer Firmware beheben lassen – oder man druckt sich einen mechanischen Stopper der den Schalter vorzeitig auslst. Dumm ist nur dass dadurch auch die Druckflche etwas versetzt ist. Nunja, muss mich noch darum kmmern.
Anbei gibt es einen USB-Stick der als Adapter fr die Micro-SD-Karte fungiert. Ein kleines aber feines Teil. Damit kann man die Druckdaten gut auf dem Computer aufspielen, um sie dann zum Drucker zu transferieren. Mit auf der Karte ist die Standart-Drucksoftware (Slicer) und zwar Cura 3.2. Man kann es aber leicht auf die neuester Version upgraden.
Nachdem ich das Druckbett mit einem Blatt Papier gelevelt habe und mir das Benchy in Cura auf den Stick geladen habe, konnte ich loslegen. Schon der erste Druck war supergeil. Besser gehts kaum! Inzwischen habe ich einige meiner eigenen Sachen gedruckt und immer noch top Ergebnisse. Damit bin ich sehr zufrieden.
Angeblich soll die abnehmbare Druckplatte durch Verbiegen leicht die Objekte davon lsen. Bei greren Objekten geht das schon. Bei Kleinkrams, wo man etwas Material um die Objekte herum zur besseren Haftung braucht (Brim), geht es ohne den beigelegten Spachtel nicht.
Mein Tipp: Elektronik Kontaktspray nehmen. Das kriecht unter das Material und lsst sich viel einfacher lsen. Hinterher muss man aber mit Alkohol durchputzen, damit die Haftung erhalten bleibt.
Warum ich mir keinen Ender oder CR-10 geholt habe ist einfach. Der CR-10 hat zwar einen greren Druckvolumen, ist jedoch ein lteres Gert das auch in einer Upgrade-Version verfgbar ist, weil das Orginalgert ein paar Mankos hatte. Bei dem ist auch die Stromversorgung separat und ist so richtig laut. Der CR-20 hat all die Upgrades und die Stromversorgung ist unter dem Gert integriert und auch deutlich leiser. Ist bei Ender 3 (pro) so hnlich. Der ist immerhin gleich Dimensioniert wie der cr-20 (yeah – die Thingverse Models vom Ender passen auf den CR-20!) doch auch der ist nicht so ausgereift. Man merkt dass der CR-20 danach kam und alles besser durchdacht und gut integriert ist. Es macht Sinn auf die neuesten Gerte zu setzen. Das Killerargument ist aber: nur 6 Schrauben und fertig! Cr-10 und Ender 3 sind Kits das heit man muss viel puzzeln bis man drucken kann. Also war klar dass der CR-20 gewinnt 😉
Die beigelegte Spule mit 250g Filament ist nett um zu starten. Es druckt sich gut. Die Farbe ist aber eher ein durscheinendes Wei. Da gibt’s bessere Filamente.
Auf Youtube findet ihr Reviews und Aufbauanleitungen dazu. Momentan leider wenige, doch es sollten mehr kommen.