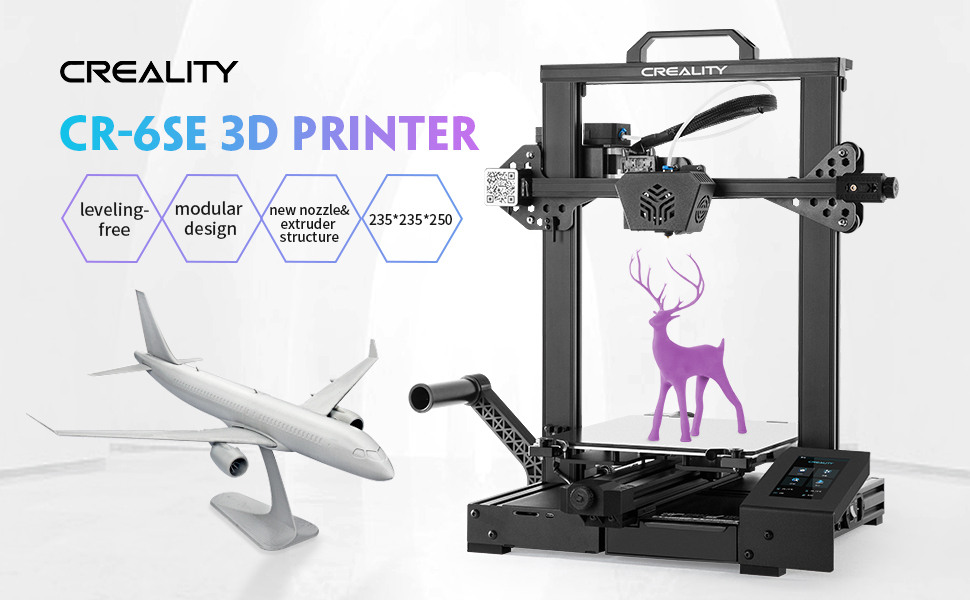
3D Printer Creality CR-6 SE, Upgraded Design with Silent Motherboard, New Nozzle and Extruder Structure, Resume Printing and HD Color Touch Screen

| | | |
|---|---|---|
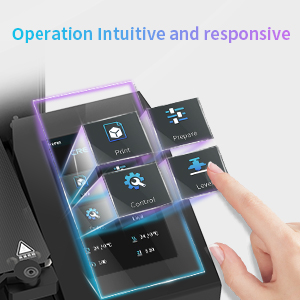
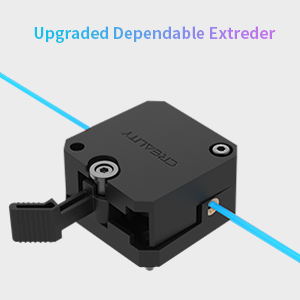
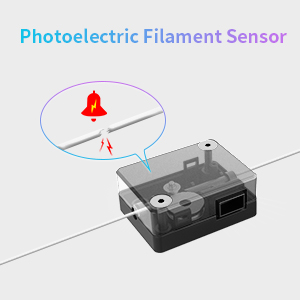
4.3 inch Touch Screen & Friendly UIWith a 4.3 inch full color touchscreen and an upgraded user interface that prioritize ease of use, the CR-6 SE is an ideal choice for beginners. | New Extruder DesignRedesigned for a smooth and straightforward filament feeding. | Photoelectric Filament SensorIf filament runs out or if the printer turns off sunddenly, the detector will instantly pick up that disruption and will stop printing. |
| Dimensions: | 46.2 x 54 x 44.2 cm; 9.5 Kilograms |
| Manufacture: | Creality 3D |
Great new hobby
I’m loving having this – but word or warning – its not ready to use out the box – it takes a fair bit of work to put it together properly and a fair bit of tinkering to get decent prints out. The community and YouTube videos will help a lot but prepare to have a good few days just tinkering and learning to be able to use it for the first time.
Great Beginner Printe
I think this is a great beginner printer. Its lightweight and easy to setup with a few tutorials. Customer Service is also fantastic. I broke a part accidentally and they shipped me a new one with the warranty no questions asked. Fantastic and i definitely recommend it.
Gran producto
Es la mejor impresora 3D que he tenido. Silenciosa y fcil de manejar. Men en pantalla tctil y de color, fcil de comprender. Ninguna complicacin en el montaje. Carga del hilo sin dificultades. Hasta ahora ningn problema y ya hace unos meses que la tengo.
Das Ding ist der Hammer!
Ich schreibe selten Produktbewertungen. Ehrlich gesagt: Eigentlich nie!
Aber ich muss sagen, dass mich dieses Gert wirklich umgehauen hat. Nachdem ich vor rund zwei Jahren das erste Mal Versuche Richtung 3D-Druck gemacht habe, war meine Begeisterung schnell abgekhlt. Verheddert im Chaos zwischen “Druckbettnivelierung”, “sinnvollen” Upgrades, etlichen Nachbestellungen und gefhlt 10.000 Foren und Webseiten mit Tipps hatte sich meine anfngliche Begeisterung schnell abgekhlt und das Ding wanderte halbzerlegt in die Ecke.
Eher aus Zufall bin ich beim Surfen auf die berschwnglichen Bewertungen des CR-6 SE gestossen. Angezogen wurde ich durch die angepriesene Anfngerfreundlichkeit und gute Druckqualitt. Doch der Reihe nach:
1. Bestellung, Verpackung und Lieferung
Das Gert wurde innehalb zwei Tagen geliefert. Es kam in einer sehr umfangreichen und stabilen Verpackung, die garantiert, dass die empfindlichen Teile den Kunden auch unbeschfigt erreichen. Aus kologischer Sicht mgen die nicht aus Papier/Pappe bestehenden Sicherungen sicher kritikwrdig sein. Allerdings habe ich selten ein besser gesichertes und verpacktes Paket erhalten.
2. Aufbau und Einrichtung
Und nun kommen wir zu eigentlichen Strke dieser Produktgeneration. Ich selbst bin ja nun durchaus handwerklich begabt. Das mag nun nicht fr Jede:n gelten. Kurz und gut: Es ghet letztlich darum, mit insgesamt vier Schrauben die Trgerkonstruktion fr den Druckkopf/Extruder an die “Basisplatte” anzubringen. Im zweiten Schritt wird das Display und der Trgergriff mit weiteren vier Schrauben angebracht. Das war es dann an mechanischen Arbeiten. Und die bentigten Schlssel liegen dem Gert bei…
Im weiteren Verlauf mssen einige Kabel mittels Pfostenstecker angeschlossen werden, was einerseits sehr gut in der beigelegten Printanleitung dokumentiert ist und auerdem ist aufgrund der Gre und Form der Stecker, sowie der Kabellngen kaum ein falscher Anschluss mglich.
Zu guter Letzt prft die/der Kund:in, ob die entsprechende Einstellung am Netzteil stimmt (230V – war bei mir bereits eingestellt) – und fertig ist der Lack!
Nun der Stecker eingesteckt und mit Spannung den Boot-Vorgang beobachtet. Ging ohne Probleme. Bm! Alles gut. Auf den nchsten Seiten wird dann die “Autonivellierung” beschrieben, die Garant fr vernnftige Druckergebnisse ist – und siehe da: Kein rumgestelle an Drehschrauben, kein “Papier unter Druckdsen”-Geschiebe. Innerhalb nicht einmal fnf Minuten ist das Druckbett ohne hndisches Eingreifen eingerichtet.
Es gibt lediglich zwei kleine “Kritikpunkte”, die aber wirklich “Meckern auf sehr hohen Niveau” sind: Zunchst die ausschlielich englischsprachige Anleitung. Das hat mir nun nichts ausgemacht, aber ich denke, selbst Menschen mit eingerosteten Schulenglisch sind an ein, zwei Stellen wirklich gefordert. Der zweite anzusprechende Faktor ist, dass die zugehrigen Abbildungen ledglich das CHINESISCHE Men zeigen. Das kriegt man durch die Position der jeweiligen Icons auch noch aufgelst. Aber beides zusammen KNNTE fr einige Einsteiger eine kleine Hrde sein.
3. Erste Drucke
Und da bin ich echt zusammengebrochen!!!! Ein bichen recherchieren zu Druckeinstellungen (ja, ohne geht es nicht. Wer glaubt, er kauft so ein Gert und benutzt es analog zu einem Papierdrucker liegt vllig falsch), ein bichen einarbeiten in die Software (Creality legt eine auf seine Marke gelabelte Version von “Cura” fr das “slicen” bei. Ich habe auf das Original zurckgegriffen) – und schon hat man vernnftige Ergebnisse. Ohne eine halbe Million Webseiten lesen zu mssen, ein halbes Dutzend Upgrades (sowohl hard- als softwareseitig) durchzufhren und ohne die eigentlich obligatorischen grauen Haare….es gibt sofort ansehnliche Ergebnisse!!! Ein Foto dieses ersten Druckes hab ich angefgt (wenn auch erst 12% abgeschlossen, sieht man die wohl schon hier, welche Qualitt erreicht wird..)
4. Sonstiges und Ausblick
Hinzuzufgen ist wohl noch, dass der “6er” im Vergleich zu Vorgngermodellen sehr, sehr leise arbeitet. Zwar nicht so, dass man das Ding im Wohnzimmer stehen haben will, aber erheblich geruchreduziert zu frheren Generationen. Auch das gesamte “Setting” und die Qualitt berzeugen zunchst voll. Ich werde einige der im Netz vorgeschlagenen Erweiterungen anbringen (der erste Druck ist bspw. das empfohlene Kabelmanagementsystem) und sicher in regelmigen Abstnden diesen Text erweiteren. Immerhin reden wir an dieser Stelle von ersten Eindrcken. SOLLTEN sich diese allerdings besttigen ist das Gert ein absoluter Preisbrecher und macht wesentlich hherpreisigen Lsungen Konkurrenz!
Soweit erstmal nach ca. 20 Stunden Einsatz!
Good printe
I have had it for about 3 weeks and was able to print almost out of the box. With in 14 hours of getting the printer I had my first print. It is worth updating the firmware, my printer came with the 4.2.2 32bit control board. it is simple to update by putting an SD card into the SD slot with just the new firmware. I have complied a copy of Marlin 2, I have done this as it has thermal runaway from the hot end.
It might be worth getting the 4.2.7 board upgrade as it does make the printer quieter. I have had success with PLA and ABS.
I’ve been wanting a 3DPrinter for quite a while and finally made the decision on this one after reading reviews online and comparing the various printers. This one has one of the largest print areas available at this level of machine and that was a major selling point for me as I have some fairly large things I want to print.
So, after parting with the money I confess I sat in dread waiting for it to arrive. No real clue what I was getting for the money or how complicated it would all be, and also trying to justify it to my wife. The printer arrived very quickly – which was a good thing as I did not manage to wind myself into a lather over it. It is very securely packaged in a good solid carboard box and surrounded by cut foam to protect it from the excesses of our delivery services. Unpacking was painless and easy, as was arranging the various parts for assembly.
-NOTE – No tools are supplied with this item. You will need a hex key set and a little patience to assemble this.
It took me about 30 minutes to put the thing together following the instructions. There’s not a lot to do to be honest, as it is mostly assembled already. All that is needed, is to fit the upright travel arm, connect some plugs to their relevant sockets, attach the touch screen control, add a handle and the PLA support arm. I took my time over it not wanting to get anything wrong and of course, I had to find the relevant tools to screw the thing together.
It is surprisingly light to be honest, though there is a bit of weight, so two hands to lift, carry and move it.
Setting the machine up again is relatively simple following the instructions. However, the recommended settings for this printer are no good. I tried a print with those settings and it was a mess. Had to cancel part way through. It was a simple model so not like a lot of filament was wasted. I highly recommend you choose a very simple small model as you first print as there will be some fiddling with settings to get it to work right. Creality provide software for setting up and cutting models. You can either use a 16gb (no larger) SD Card or connect the printer via USB to your laptop/computer. Honestly the USB works fine for me and is more convenient.
One thing to note, if using the SD card, it needs to be inserted into the printer with the connector teeth facing UP, pretty much the opposite of the way they are normally inserted. Do NOT use an SD card larger than 16gb as the printer will not be able to read it.
USB works fine, but if you are using Windows you will need to disable the sleep function on USB via the power options in settings.
Connecting the printer via USB is a bit of a fiddle, as Windows will not recognise the printer. However, if you are comfortable with using Windows, you can get around this by using the device manager and downloading the relevant driver from Creality. If you are not familiar with this, there is a lot of help on the internet and most of it easy to follow.
Another thing to note. The PLA supplied with the printer isn’t really very good. It doesn’t give a very satisfactory finish, or work too well. So if you order a printer, get a roll of PLA from one of the various companies who provide such things.
In regards to everything related to 3D Printing, the internet is your best friend. There is a huge amount of information and assistance available on the net to help you get started with this (and other) printers. Just make sure you type the name of the printer into the search with your query, or you may get results that are for a different printer and which won’t work.
Again, Creality has their own website and forum which contain a lot of very useful information. I would suggest these sources above others to start with. Don’t buy a book on 3D Printing, they are generic and won’t help you as much as specific information for the printer you buy.
The two software applications that are recommended are the Creality Slicer which is available on their website and one recommended by most people who print with these machines – Ultimaker Cura. I’ve tried both of these and Cura has more options and control, but the Creality Slicer is more than adequate and will do pretty much anything you require.
Printing with this machine is advertised as being faster than most other printers. Yes, this is probably true. However, print quality drops dramatically with speed. As such, one thing you are likely to do is slow down the print speed to get better quality, and less risk of ending up with blobs or a bird’s nest mess. As a result, printing a model will take time. My first successful print took 7 hours. A more complex print took 18 hours. One of the models my daughter wants to print is going to take several days.
Patience is not just a virtue, it is absolutely essential for 3D Printing.
If you have any skill modelling, there is a wide variety of software to help you make your own models. Either software you install on your computer or use online. I don’t personally like the online things myself as I like to walk away from something if it’s taking too long and have a break. With locally installed software and files this is a much easier thing to do. Learning to model in 3D is not simple. It is a complex and time consuming task. However, it is extremely satisfying and there are various places on the internet where you can read and watch tutorials on how to do this, and some of the software is free – such as Blender, which is a very popular application for 3D modelling and has a huge amount of support from the users. ZBrush is used mostly for complex figures. Again, lots of applications, many of which have free trials to let you play around and see if the software suits you. With this in your tool bag, you can start to design and make things around the house and office. The possibilities are virtually endless.
In Summary
The printer is excellent, the build quality is superb, it is surprisingly quiet the only real sound is from the cooling fan and the belt whine when the unit travels quickly to it’s next location. None of this is invasive or annoying. There are various housings (casings) available if you want it to be quieter still. I would suggest also that you set the printer up in a spacious area, as the heat and melting of the PLA does have a faint aroma indicating that there may be particulates in the air. So, good ventilation, and somewhere there is space for it.
Print speed is very good, although if you want quality, it is not that different to other printers and things will take time.
The learning curve is pretty steep to start with as there are a daunting amount of settings to learn and fiddle with. Each print is going to be slightly different so it is well worth paying attention to these settings and when purchasing a model, make sure you get a copy of the print instructions.
Do not expect to print amazing models straight out of the box if you are new to this. Take your time, learn what each setting does and read as much as you can if you don’t understand something. Also, when you do manage to get a good or excellent print – make a note of the settings used. Get yourself a journal or something to keep these notes together and in an easy to reach place.
Assembly is simple, nothing complex. But you need to be careful not to use too much strength screwing the thing together. The frame and mounts are light alloy and if you force it too tight, you might stripe the mount threads for the screws. Also, pay careful attention to the various connectors. They only connect one way, but you can force them in the wrong way, so take care.
Quality printing takes time, if you have no patience, maybe some other hobby would be a better choice. In this case, for most things, slower is better.
Check that the drive belts have a reasonable tension and are not loose. You can do this by the simple expedient of pressing lightly with a finger. If it moves easily it is loose. Use the tools provided to tighten the belts but do not over-tighten them. There must be some flexibility or you risk snapping the belts. So, a light resistance to finger pressure is good. Floppy is bad. Heavy resistance is also bad, so loosen the belts if you need to.
Personally I am extremely pleased with this purchase. It is pretty much everything I hoped for and as I have a history of modelling, I can get into making my own stuff as soon as I have learned what the machine expects from a model. In my opinion this is an excellent printer that – after you figure it out – produces extremely good quality prints.
Allowing that there are tens of thousands of models on the internet, a huge number of them completely free. I figure there’s something for everyone out there, somewhere. Finding it is the trick.
Users and fans of the Creality series of printers have made a huge variety of tools, bolt on parts and expansion pieces to help make your life easier when using these printers. So take a look around and see if any of it is useful to you. I won’t list what is out there, but I figure you can probably completely rebuild the printer if you feel so inclined.
This is, in my opinion, an excellent hobby level printer and offers a money saving option in being able to design and print things I need around the house without having to go out and pay premium prices in some chain store that is only interested in profit not quality. One thing that convinced me to get one of these was that so many things we have in our homes are plastic. With a 3D Printer, decent software and some skill modelling – pretty much all of it is replaceable and there are solutions to a great many problems. Just think, a guitar hanger costs anywhere up to around 50 quid. You can design and make your own for a fraction of that cost and make it precisely how you want it.
Above all though. Patience. It is essential for 3D Printing.
And lastly, in the end I didn’t have to justify the purchase to my wife. As soon as she saw it printing she was fascinated and is now looking at how it can make her life easier. The thing sold itself, to her. Who would have guessed?
My daughter is extremely excited, my wife is looking at how she can use it and I’m just very satisfied that it works as well as it does.
Just in time for Christmas too…. Or is that being “cheap?”
— Edit
Had a while to play around with this printer now, and I am more impressed with it the more I learn about it and how to make it work. The Creality Slicer software and Cura software are basically the same. Slicer has settings more oriented towards the Creality products but other than that and the UI colour there is little difference. Personally I find the Creality Slicer a bit more friendly but that’s just me.
Initially when you use the software the options seem to be rather limited. They aren’t, not by a long shot. There are four built in options for printing, and under the settings menu you can expose all of the controls available to you. This is where things get really daunting. However, the plugins section has a couple helper tools that tell you what each setting does and how to use it.
I also invested in some new extruder heads. The reason for this is that I have some fairly small game related things that I want to print and I figure I will need a smaller head for that. Trying a 0.2 at the moment, see how that comes out.
Cleaning tools are also essential. There is a PLA style roll you can buy here to clean out the extruder head – this should be done semi-regularly to make sure there are no particles or dust collecting in the head to block it. Extra heads are always useful as they do have a lifespan and it is worth having different sizes for different jobs. Large prints such as vases or household items will be considerably faster through a 0.8 or 1mm head. Anyway, right head for the job.
Don’t worry too much about the huge amount of stuff you can get to add on to the printer from various sites and other users. Chances are you won’t need most of that anyway. Upgrades to the machine are provided by Creality in the shape of software that you “flash” onto the system via an SD card. Just keep an eye on the Creality site every month or so to see if there is an update. I don’t know how frequently they modify their firmware but it’s worth keeping an eye on it.
Decent quality PLA is just as important as decent quality models to print from. So, be careful that you are buying your products from a reliable company. The cheaper it is, the higher the chances of impurities – which can cause blockages. Also, the most expensive is not necessarily the best. Just a thought.
I have managed to get several successful prints out of this tool now, and I’ve been playing with the smaller heads today. So far I’m very impressed with the level of detail and quality of the prints. It takes time to get them though. Time printing, and time learning the various parts of the tools available to you and how the settings influence the final print.
As I said above, steep learning curve. But, it is so very, very worth it.
(Edited to add)
So, I finally got around to painting the model that was the first successful print from this machine – and my sixth attempt at printing something. Finally managed to get the settings and various parameters sorted. No experimenting with different print heads to see whether the quality improves and by how much. The model is a critter called Duckpool, the references should be pretty obvious. The model is available on the internet via one of the many sites which supply models to print. I don’t think I can link to it from this review, but it’s easy enough to find. Just thought I’d share so readers can see at least one successful print.
Todo correcto menos cama magnética
Imprime muy bien!!!, pero la cama magnetica es muy rugos y al final acaba impregnandose de residuos de plstico de impresin, mejor es poner un vidrio o es su defecto ciinta de carrodero.
Fantastic produc
Great fun to use while more importantly providing the opportunity to learn an important skill, if your interested in 3D printing this is a great printer to start with.
La migliore entry level ed anche qualcosa di più
Premetto che sono un principiante nel campo della stampa 3D, nonostante ci sono riuscito ad ottenere ottimi risultati.
Inoltre, online si trovano innumerevoli progettini per upgradarla.
Ottima
Top come Entry-Level
Personalmente si tratta del primo approccio con una stampante 3D.
Tempo montaggio sotto le 3 ore (potrebbe tornarvi utile il video presente sulla SD).
In allegato video e foto della prima stampa (Benchy di prova) e foto seconda stampa (Gollum), con PLA comprato a parte (quello di prova poco e in giro consigliano di non utilizzarlo perch non in stato ottimale). Come software attualmente utilizzo Ultimaker Cura (con progetti esistenti scaricati da Thingiverse), poi passer a software pi evoluti. A tal proposito consiglio i tutorial su YouTube (mi hanno aiutato molto). Sperando che l’estrusore ed il tappetino non si usurino troppo in fretta, direi che si tratta di un ottimo acquisto.
Au top
Excellent rapport qualit prix, super petite imprimante pour dbuter et super facile monter ! Qualit d’impression au top
Ottima stampante entry level
Stampante in kit, facile da montare con un minimo di manualit, istruzioni migliorabili. Facile configurazione buona qualit di stampa.
Piccola e versatile
Facile da montare e calibrare, pronta all’uso e funzionale alla causa se non di hanno esigenze di troppo alto livello
Ottima stampante
Ottima stampante 3D, molto silenziosa e buona risoluzione di stampa.
¿Qué se puede decir?
Se empieza a quedar anticuada y atrasada, por el mismo precio tienes la Biqu B1 mucho mejor, pero para novatos es la impresora por excelencia. Si la calibras bien te da una calidad perfecta. La calidad de impresin depender de la habilidad del que la maneje. Recomiendo cambiar la cama por una de cristal. Por lo dems las actualizaciones vendrn dadas por el desgaste de los componentes con el tiempo.
CR6SE
Trs bon produit, tenue compte des amliorations apporter depuis ma CR10S galement achete sur Amazo
Rezensio
Im Grunde ein supertolles und zuverlssiges Gert…. wer seine kleinen Macken kennt. Auch fr Anfnger geeignet, hochwertige Verarbeitung, lautlos ja wenn man von den 3 Lftern absieht, Schublade mit ntigem Werkzeug, ich hab 2 davon, groe Community, empfehlenswert.
Great Printe
Loved this printer!
Pretty much build, plug in and play!
Self levelling is amazing
ENDER 3 PRO
J’ai chang d’imprimante car avec la Dagoma DISCOEASY 200 je n’arrivais pas imprimer correctement. L avec la Ender 3 PRO rien dire vraiment une imprimante au Top que je conseille. En plus trs silencieuse, je recommande
Lovely machine
The print quality is amazing, but it do require a bit of tweaking like all 3D printers, the bed adheres very well, sometimes too good to be removed, highly recommend replacing it with a spring steel one. The auto level works perfectly but the built plate seems to out of alignment much quicker than the mechanical method.
After my last Monoprice ended up in the bin after less than 4 months with more fails prints than successful ones. The Creality is perfection, with one failed print. Make sure you buy the upgraded version and print away. I’d marry it if I could. It’s quite apart from the fans, but not enough to annoy me. It produces effortless quality prints. The self leveling bed is brilliant and I can’t fault it. I’m trying to think of any bad points but can’t. one of the stickers is on wonky if that counts.
Guter Ausgangspunk
Ich habe jede Schraube und fast jedes Teil ersetzt und auch nach 3 Monaten ist er immer noch eine Baustelle. Aber es ist eine spannende Reise. Die Konstruktion an sich ist ein sehr guter Ausgangspunkt und er bentigt viel Zeit und handwerkliches Geschick. Doch wenn man durchhlt, wird man reichlich belohnt.
Hinweis: einmal aufgepimpt ist er auch nicht billiger als ein Prusa. Wer vor allem drucken will, soll sich unbedingt so einen kaufen.
Très bien pour débute
Aprs bientt 1 an d’utilisation et quelques kilos de pla je peux dire que je suis extrmement satisfait de cette imprimante la qualit d’impression est top l’adhrence du plateau magntique est excellente seul bmol le bruit mais j’ai une pice spare pour donc pas de nuisance
Great piece of ki
This item is exactly what it is as described by the seller. I had received the item before its’ delivery due date and it came well packaged. Once I opened the printer’s box, the components was packed within a foam and the critical parts was packed in an electrostatic bag. The hardware was packed in its’ own baggie with part numbers. The main parts was shrinked wrapped. The assembly was a little tricky as the instructions was not completely clear even though they gave a video and a basic guide on a TF Card. I also relied on YouTube to help me out. The TF card also contained a useful piece of software and print examples. I had spent a great deal of time to adjust the bed and now I am finding that I have to re-adjust the bed fewer times as I do more prints. It also came with the required tools and a handy cutter to cut the included filament. The only complaint that I have so far is that the filament did not come on a spool. As I was using the included filament, it had jammed and stopped the printer. The menu control on the printer is easy to use and allows you to adjust the many variables that goes into a print. It is a great piece of kit and I look forward to many more prints.
Vraiment une bonne imprimante 3d
J’ai longtemps hsit de passer de ma petite dagoma cette ender 3 pro.
Et bien je doit dire que je ne suis pas dus du tout.
Montage simple et rapide qui m pris 45 min, et, trs facile comprendre.
De plus de nombreux tuto et amlioration sont disponible.
Du tout bo
Tolles Spielzeug für Erwachsene
Der 3D Drucker lsst sich einfach durch den Zeichnungssoftware bedienen , wenn man vom technischen Zeichnen Kenntnisse hat. Je nach Projekte mssen die Einstellungen angepasst werden, was nicht immer einfach ist. Er druckt ziemlich leise. Und die Objekten sehen toll aus. Habe viel Spa.
Ender3 pro
Une imprimante que je recommande fortement, trs bonne qualit d’impression, et surtout un SAV trs professionnel
fantastico prodotto e fantastica assistenza tecnica
la stampante perfetta, molti upgrade disponibili ma specialmente stampabili.
3 settimane fa mi si era bruciato il driver delle ventole e contattando l’assistenza, me ne hanno subito spedita una nuova (ho chiamato l’assistenza di amazon e mi ha risposto di non provarci nemmeno a contattarli).
ieri dopo circa 2 settimane arrivata la scheda NUOVA senza spendere nemmeno 1 euro.
Assistenza molto competente e rapida nelle risposte.
consigliatissima!
Super Drucker!
Habe diesen als Einstiegsdrucker fr 180 im Sale gekauft (black Friday)
Mehr wrde ich dafr nicht ausgeben aber fr jeden der hiermit in die 3d Druck Welt startet eine Kaufempfehlung!
gutes Einsteigermodell
die Tischplatte haftet nach ein paar Drucken nicht mehr richtig und man hat dann Kunststoffwolle , es empfiehlt sich die Platte oft zu reinigen. Der Spannung des Riemens fr die x-Bewegung sollte fters kontrolliert werden – runde Sachen sind dann eifrmig.
trotzdem zu empfehle
Great middle of the road printer offering larger print volume.
After buying an Ender 3 V2 for Xmas 2020 I couldn’t resist a great deal on this CR10 V2. And what a great machine it is! Offering a larger bed size than the Ender 3 it’s letting me print multiple parts at the same time. Having dialled in the bed I’m finding it stay tuned in with just tweaks when I change filament. I’ve got a BLTouch to fit and I’ve had Octoprint working on it too.
In the pic you can see an updated base on the control box. This holds a single 120mm fan and let me remove the 3 in the control box. Great upgrade to get the noise down. I’ll do the print head at some point too.
Recommended printer. Only difference from the V3 is no direct drive or Marlin 2.0 firmware but that’s easy to add by fitting a better SKR1.4 or MKS Robin E3D motherboard in the future. That will also get the stepper motor noise down as its a chatty little printer and will benefit from better silent motor drivers.
Ender pro muy buena calidad/precio
Impresora muy buena calidad/precio. Vienen varias partes montadas que facilitan el montaje. Tiene el problema de nivelar la cama donde se imprime, no se queda ajustada debes de estar muy pendiente. Voy a tener que comprar un nivelador electronico exacto para la ender pro y poder ajustarla electronicamente.
En general muy contento con la compra
Packaged well, was printing within an hour.
it arrived in a wet box, i was a bit worried.
Opend the box and all was well, it was well packaged with good instructions.
checked the parts, built it, conected octopi to it and was printing within the hour.
the sample cat was realy good quality (but it was slised on Simplify3D).
abbed a Bltouch and did firmware upgrade fron there website.
I am now using Cura 4.8.0 and its printing well.
Je ne m'en lasse pas
Je fais souvent des montages lectronique base d’Arduino ou de Pycom. Le plus difficile jusqu’ le rception de cette imprimante c’tait de trouver le boitier adquate pour le montage. Maintenant, je le dessine et je l’imprime et c’est dans la boite. Bon, pour le montage, la premire chose faire est de rectifier la partie pr-monte car rien n’est d’querre… Sinon, nickel.
Smooth like butter!! Love it.
We bought the prusa MK3S a month before we got the Creality and compared the two. Creality is a lot quieter! The print quality is superb! And the overall experience is just smooth. We’re super happy with it. Not taking away from the features of the prusa. It’s definitely a serious machine and is a proper print farm piece of kit in terms of auto levelling and sensor ability but also comes at a premium.
Now that I have the two side by side I would have definitely got the Creality over the prusa but as this hobby is turning serious, buying a variety of printers to appreciate the tech out there isn’t far fetched. They’re are both special in their own way. The competitive field for personal 3D printers has only just started.
Der Ender 3 Pro ist ein Drucker der fr Anfnger und Fortgeschrittene wunderbar geeignet ist.
Die Lieferung war wie immer sehr schnell und die Verpackung bei der Lieferung einwandfrei.
Der Drucker selbst ist im Karton sehr gut in Schaumstoff verpackt. Da wackelt nichts und kann auch nichts verkratzen. Da knnen sich andere Hndler eine groe Scheibe davon abschneiden.
Der Zusammenbau ging verhltnismig leicht dank einer guten Beschreibung. Sollte man mit Bildern nichts anfangen knnen liegt vom Hersteller ein Video bei bei dem der Aufbau schrittweise gezeigt wird.
Die Einzelteile sind gut beschriftet und die einzelnen Schrauben extra abgepackt und immer beschriftet. Es liegen auch mehr Schrauben bei als beim Aufbau bentigt werden. Ersatzteile sind auch dabei.
Nach knapp ner Stunde war der Drucker aufgebaut und ich konnte mit dem mitgelieferten Filmend loslegen.
Fr mich ist dieser Drucker definitiv eine Kaufempfehlung
Guter Drucker für Einsteige
Drucker wurde schnell geliefert. Zusammenbau hat ca 30 Minuten gedauert. Den ersten Druck konnte ich nach ca einer Stunde starten da der Drucker zuerst die Speicherkarte nicht erkannt hat. Dieses Problem ist seid dem nicht mehr aufgetreten.
Druckqualitt ist sehr gut und die Objekte haben eine gute Haftung auf der Heizplatte.
Einen Stromausfall habe ich simuliert und der Druck wurde ohne weiteres nach erneuten einschalten fortgesetzt.
Eine zu lange Pause sollte man nicht machen, da das Druckobjekt nach abkhlen die Haftung verliert und von der Dse herum geschoben wird. Das gilt allerdings du alle 3d Drucker.
Alles in allem bin ich sehr zufrieden mit der Handhabung und dem Aufbau sowie den bisherigen Ergebnissen.
Fr jemanden der in den 3D Druck Einsteigen will definitiv eine gute Wahl.
Un régal!
Des impression d’une qualit excellente juste aprs montage, des rglages assez simples. Le plateau magntique est juste gnial, un trs bon achat!
Great printe
Awesome printer.
Great upgrade from ender 3. Easy set up. Comes with great instructions.
Top Gerät!!!
Schnell geliefert, gut verpackt, gleich aufgebaut, lief in 2Stunden ohne Probleme. SUPER gern wiede
Impresora 3D ideal para iniciarse
Es bastante estndar y hay muchsimos videos en youtube que te explican como funciona y sacarle partido.
Creality es una la mejor marca calidad/precio, de impresoras 3D, sin duda.
Buon Inizio
Buona base di partenza , prezzo accettabile , pur dovendoci spendere un po in miglioramenti.
Facile da Montare
Buona stampante di ottima qualit. Ottima per i primi approcci alla stampa 3d. Pochi pezzi da montare ed aggiungerei anche facile ed intuitiva. Tutto illustrato in un libricino che esce in dotazione.
This is my third 3D printer – the previous two have been passed on to friends to nurture their interest in 3D printing and this was bought as an “upgrade” over my last printer which was an Anet A8.
It was a doddle to build – results straight out of the box were fantastic compared to the Anet (lets face it – Anet aren’t exactly high quality). Printed off some of the demo models to check quality then ran off a print of a fantastic hot end cable strain relief and a filament guide for between the filament runout sensor and the extruder from Thingiverse
If you’ve been watching the reviews then you’ll probably have seen that it comes with a 1kg spool of filament but mine only came with a 200g mini-spool of filament.
The stepper drivers are much quieter than my old Anet but the printer itself is quite loud with its fans – I haven’t checked which fans it is that are generating the main noise but it’s not too bad. After a while I find I don’t really hear it unless I think about it.
This was a Black Friday special so 307 rather than the normal 385. I love the auto bed levelling – for me that makes it worth the money on its own. The old Anet was a complete pain to level and needed doing pretty much each time you did a print – I level this one most times before printing but more because it’s just so easy. Getting a perfect first layer is a breeze (again, something that was a fight on the Anet) and bed adhesion seems fine too.
If you have done research you’ll see a lot of noise about faulty power switches on these – not trying to say that’s not a bad thing but there are can always be bad components (I’ve worked for an electronics manufacturer for years and these things do occasionally happen) – a few bad power switches don’t make for a bad product and as long as the manufacturer sorts out any faulty units then that’s all you can hope for. Creality buy in components so if anyone should be getting grief for the power switches it should be the switch manufacturers – not Creality. My power switch is fine and the wiring behind it is good.
Absolutely no grumbles so far other than the fans are quite loud…
Amazing printer!!
I’ve had this for a few months now and it works great the set up isn’t to hard there were many of good videos to help you. They are some minor adjustments afterwards like moving the z axis slightly up ect. They magnetic built surface is amazing with great bed adhesion and even is you make some scuff marks over time you can easily buy a cheap replacement. The hot end is easy to access and you can easily replace the fans for silent ones. I believe this is a great printer and much better than other I’ve had
Assembled in 30 minutes, no issues with autoleveling and my first few prints turned out great.
The motors are WHISPER quiet but that is ruined by the insane volume of the fans.
Easily beats my 4 year old Wanhao i3, the filament sensor, tension belts and auto levelling are giving it a leg up over my trusty Day 1 CR-10, but that noise man…
Will update the review next week with more impressions.
Update:
I am going to leave this at 4 stars despite this being an absolutely AMAZING printer. The fan noise just tips it over the edge for me as someone who has to work in the same room as it all day.
This has so far been the best printer I’ve ever owned, I also have a CR-10 and Wanhao i3 plus. It gives consistant prints day in and day out, it’s been running nearly 24/7 since I got it.
It’s printed Ninjaflex TPU, PLA, ABS, Stone Filament, Glow in the Dark, PETG and TPC without any issue. The auto bed leveling just works, the filament sensor has saved me from a failed print twice now and the auto resume on a power cut even worked the one time I tested it.
Hands down the absolute best beginner printer you can buy today… if you can live with the loud fans or are willing to replace them.
Ottimo rapporto qualità e prezzo
Ottimo rapporto qualit e prezzo arriva preasemblato …..l’unica pecca che l’intruzione non e abbastanza facile da capire comunque tempo per assemblare serve circa 30-45 minuti ….consiglio comprare ugelli in pi quelli in dotazione si rovina subito se non c’ una minima esperienza di lavoro con stampante 3d
Excellent starters printe
A solid and well designed printer. With loads of YouTube videos to support you during building and setting up. Excellent starters printer.
Ender 3 Pro
After much research, I bought this as a highly recommend entry point machine. So far, it’s been pretty spot on. Not the easiest of learning curves but worth it.