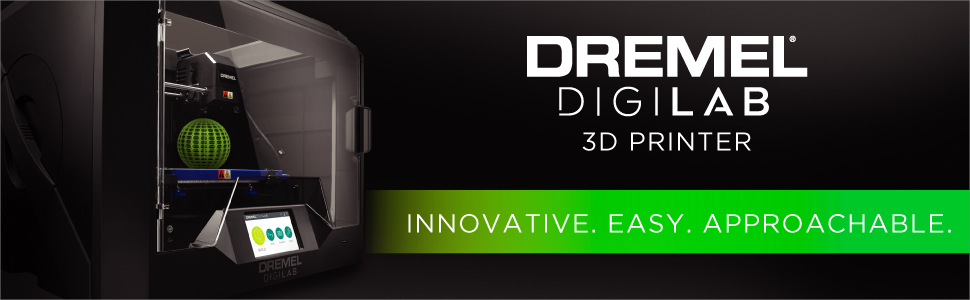
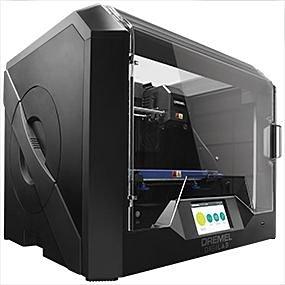
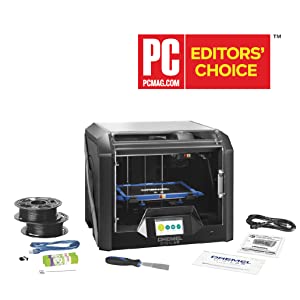
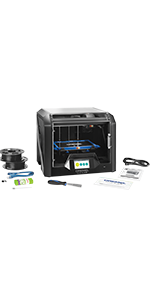
Dremel Digilab 3D45 Award Winning 3D Printer with Heated Build Plate, High Build Volume (254 x 152 x 170 mm) to print 1.75 mm PLA, Nylon, Eco ABS and PETG Filament at 50 Micron Resolutio
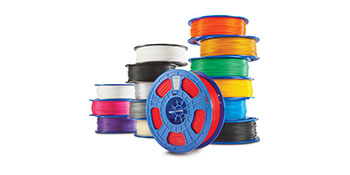
Wide colour range and variety of filament types
Dremel PLA filament comes in an array of 12 vibrant colours. No matter which colour you choose, you can make your 3D ideas a colourful reality.
Advanced materials like nylon, PETG and Eco-ABS can mimic the properties of functional injection-moulded parts. The 3D45 has a heated plate and an even more robust extruder to allow for printing these advanced materials.
The 3D Printer that brings professional 3D printing to a simple level for everyone
Bring your ideas to life with easy and reliable 3D printing. From creative experimentation and design, all the way to prototyping for beginners and experts alike. A variety of filament types, supported by filament detection, semi-automatic levelling and Wifi, open up countless 3D printing opportunities.
Additional Information
| | | |
|---|---|---|
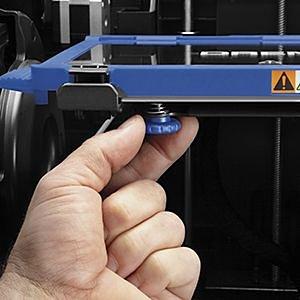
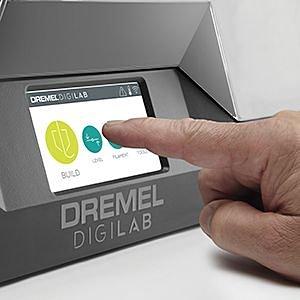
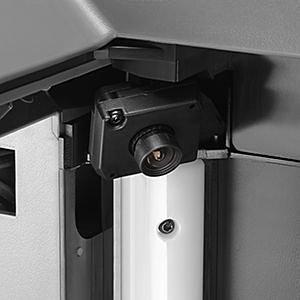
Semi-Automated LevellingThe Dremel DigiLab 3D45 uses smart sensor technology, which facilitates easy levelling and set-up. The innovative touchscreen provides you with real-time information on how to precisely level the printing plates in just a few steps. | Easy Printing Steps via Touch ScreenThe full colour touch screen allows you to approach your 3D printing project with ease and optimally preview your 3D object. | Camera MonitoringInside the 3D45 is a 640×480 pixels camera that can be used for monitoring the progress of your 3D print projects. |
Additional Information
| | | |
|---|---|---|
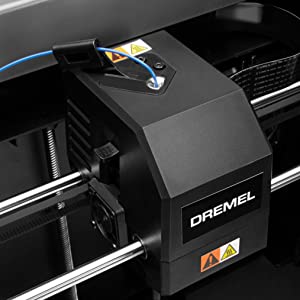
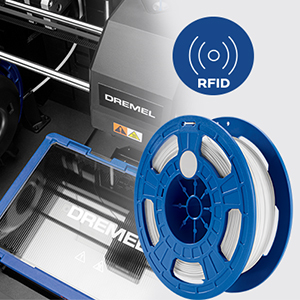
Highly reliable printing process and clean removal of printed objectsThe innovative extruder with active filament monitoring assures successful 3D prints. The extruder is also clog-free. Furthermore the heated printing plate is made of toughened glass and ensures optimum print results with all Dremel filament types. No printing mats are required. All you need to do is apply a standard commercial glue stick to the printing plates. Once the printing process is complete, you can simply remove the printed objects. | RFID Filament RecognitionThe Dremel DigiLab 3D45 is the only 3D printer that automatically and optimally adjusts the print settings via an integrated RFID chip in the respective filaments. The 3D45 detects the filament type inserted and suggests settings such as the print speed, which can then be manually accepted or altered via the touchscreen. | PC Mag Editor’s Choice 3D PrinterTrust the voice of others. The 3D45 has been reviewed by magazines with great results! The 3D printer even achieved the title of PC Mag Editor’s Choice. |
 |  |  | |
|---|---|---|---|
| Recommended Use | Beginner 3D Users in education institutions and for home use | Beginner 3D Users in education institutions and for home use | Advanced 3D Users in Industry, University and Schools |
| Build Volume | 25.5cm x 15.5cm x 17.0 cm | 25.5cm x 15.5cm x 17.0 cm | 25.5cm x 15.5cm x 17.0 cm |
| Wifi-Enabled | ✓ | ✓ | ✓ |
| Camera Integrated | – | – | ✓ |
| Filament Type(s) Used | PLA Filament | PLA Filament | Nylon, Eco-ABS, PETG, PLA Filament |
| Heated Build Plate | – | – | ✓ |
| Filament Spools Included | 1 x PLA | 1 x PLA | 1 x PETG, 1 x Eco-ABS |
| Operating Interface | 3.5″ Touchscreen | 3.5″ Touchscreen | 4.5″ Touchscreen |
| Max. Print Resolution | 100 microns | 50 microns | 50 microns |
| Internal Storage | 4 GB | 4 GB | 8 GB |
| Dimensions: | 58 x 47 x 47 cm; 19.4 Kilograms |
| Model: | 3D45 |
| Manufacture: | Bosch |
| Origin: | China |
TOP Preis/Leistung - Perfekt für Einsteiger/Fortgeschrittene
Da ich Einsteiger war im 3D-Druck-Bereich, ohne irgendwelche Vorkenntnisse, erlaube ich mir erst jetzt ein Urteil!
Fr mich war der “DigiLab 3D45” die PERFEKTE Wahl und Einstieg in dieses wahnsinnig komplexe und interessante Thema: Drucken in 3D!
Angefangen bei der Inbetriebnahme: – Gert auspacken
– Transportschutz entfernen
– einstecken und anschalten
– per Kurzanleitung Filament einlegen und Druckplatte kalibrieren
(alles nach Anweisung ber das sehr bersichtliche und beraus
bedienerfreundliche Touch-Bedienfeld.
– Eines der Beispielobjekte aus dem internen Speicher auswhlen und
der Spa kann losgehen. ….zurcklehnen und die Show genieen!
Dank der beheizten Druckplatte bin ich nicht auf das “Standard”-Filament PLA beschrnkt und habe die Mglichkeit andere Materialien mit anderen Eigenschaften auszuwhlen, was meinen Aktionsradius wesentlich vergrert!
Da einige andere Kunden anscheinend doch Probleme mit ihrem Gert hatten, mchte ich mich hier zu hufig bemngelten Punkten auch noch uern! Meine Fehldrucke konnte ich im Nachhinein immer als Bediener-Fehler oder mangelnde Basiskenntnisse identifizieren! Was keineswegs heien soll das Leute ein Fehlerhaftes Modell erhalten haben.
… jetzt kommt auch noch ein ABER: Auch ich hatte Probleme ohne Selbstverschulden mit einer Original Rolle Filament, die von der Qualitt so schlecht war (Querschnitt) das stndig meine Dse verstopfte! Was durchaus einige negative Flche zur Folge hatte ;o)
Trotzdem gilt: 3D-Druck ohne Rckschlge gibt es nicht!
Doch mein Gert ist jetzt seit 8 Monaten im Einsatz und davon mehrere Tage ununterbrochen am Stck! Dabei sind 90% meiner Drucke ber der erhofften Erwartung. Ich habe weder Probleme mit der Haftung auf der Druck-Plattform noch mit der Genauigkeit oder der Umsetzung komplizierter Formen (hufig sogar berhnge ohne Sttzstruktur) . Hier drften meine Bilder fr sich sprechen.
Verbesserungsmglichkeit gibt es dennoch immer! Da viele Leute, die doch oft sehr langen Druckzeiten fr komplexe Modelle im 3D-Druckbereich auf die Nacht oder Zeiten ausserhaus verschieben. Wrde ich vorschlagen das z.B. mehr Mglichkeiten der mobilen Steuerung ins Angebot aufgenommen werden. Derzeit ist, meines Wissens nach, nur mglich ber eine APP fr Gerte der Marke Apple, solche Funktionen zu nutzen. Mir ist momentan nur mglich die Live-bertragung, der verbauten Kamera von unterwegs aus einzusehen. Bei einer offensichtlichen Fehlfunktion wenigstens die Funktion stoppen zu knnen wrde bestimmt viele Leute begeistern!
…wer das Geld brig hat, dem empfehle ich zu 100% den “DigiLab 3D45 3D “! Ob es sich jetzt um einen Neuling ohne Vorkenntnisse handelt, oder um erfahrenere Anwender, denen der “bersichtliche” Druckbereich ausreicht und die die einfache Bedienung zu schtzen wissen.
Très bonne machine
Etant nophyte dans l’impression 3d, je trouve cette machine gniale, la dure de confection des pices est pas trop longue, silencieuse, facile mme pour un dbutant avec une facilit de prise en main et un joli rsulta
Sehr guter und praktischer drucker!
Sehr schner drucker. Einfach einzurichten und sehr schne Druckqualitt. Ich kann diesen 3D Drucker einfach nur weiterempfehlen.
pas trop de difficults installer mais nous avons rencontrs des difficults pour la mise en couches car pour un dbutant ce n’est pas vident.
Une fois pass ce problme trs satisfait du rsultat.
Des exemples seraient bien venus ainsi que des liens sur des tutos personnaliss (pour dbutants bien sr !).
pas trop de difficults installer mais nous avons rencontrs des difficults pour la mise en couches car pour un dbutant ce n’est pas vident.
Une fois pass ce problme trs satisfait du rsultat.
Des exemples seraient bien venus ainsi que des liens sur des tutos personnaliss (pour dbutants bien sr !).
Lieferung extrem schnell, leider war der erste Drucker nach ein paar Tagen defekt. Austausch ber Amazon reibungslos und schnell.
Der Drucker druckt gut, bin zufrieden. Klar gibt es bessere” aber fr den Anfang optimal.
Lieferung extrem schnell, leider war der erste Drucker nach ein paar Tagen defekt. Austausch ber Amazon reibungslos und schnell.
Der Drucker druckt gut, bin zufrieden. Klar gibt es bessere” aber fr den Anfang optimal.
Super Simple, and Accurate Prints
Having had an FDM machine 5 years ago, this update was a dream to set up. Super simple plug and play, simple bed leveling, and networked. Test cubes measured +/- 0.05 mm, providing printer is on a really sturdy table. The printer looks a bit cheep with the plastic housing, but cant fault it otherwise. IF your looking for a cheap, no fuss printer this would be a great product.
Top Gerä
Der Dremel 3d45 wurde sehr schnell geliefert und war super verpackt.
Der Drucker ist hervorragend fr Anfnger geeignet, das der Drucker automatisch das Filament erkennt. Ausgepackt und eingerichtet war der Drucker recht schnell. Problemlos verbindet er sich mit dem Wlan. Sehr schn ist auch die eingebaute Kamera, so kann man den Druck sehr schn verfolgen. Die Menfhrung ist bersichtlich und gut strukturiert.
Eingerichtet ist der Drucker sehr schnell und der Testdruck kann sich wirklich sehen lassen.
Fazit: Top Gert fr Anfnger und Fortgeschrittene.
Da ist Geduld gefragt!
Ich hatte noch nie zuvor einen 3D-Drucker, und war schon sehr gespannt, was da so auf mich zukommen wrde. Der Drucker sollte auf jeden Fall auf einer festen Unterlage stehen, die nicht wackelt, oder durch die Vibration des Druckers mit vibriert. Er sollte auch mglichst genau in der Waage stehen, da sonst der Druckvorgang beeinflusst werden knnte.
.
Ein kostenlose kann von der Homepage heruntergeladen werden, aber die Einrichtung nimmt dann doch einige Stunden in Anspruch. Man hat dann die Mglichkeit, vorgegebene Formen zu drucken, und wir haben bei der ersten Form vor dem Drucker gesessen wie bei einem spannenden Krimi, und ihm dabei zugesehen, wie er eine kleine Figur von unten nach oben in kreisenden Bewegungen dann entstehen lie. Nach dem Druck wurde dann die Druckplattform entnommen, etwas gebogen, und die Form lste sich sofort davon. Der Drucker ist komplett geschlossen, was die Temperatur konstant hlt, und das Eindringen von Staub verhindert.
.
Man sollte nur das PLA Filament von Dremel verwenden. Alle anderen Filamente wrden evtl. zu Strungen fhren, was man nun wirklich nicht haben muss. ABS Filament sollte NIE verwendet werden, weil dieses krebserregende Dmpfe freisetzt, die man dann einatmet.
.
Dieser Drucker verfgt ber einige verschiedene Anschlussmglichkeiten. Man kann Dateien ber einen USB-Stick einspeisen, oder einen Computer direkt mit dem Drucker verbinden, und so Dateien bermitteln. Um aber vernnftige Ergebnisse zu erzielen, muss man sich mit der CAD-Software ein wenig beschftigen, um druckfhige Modelle entwerfen zu knnen. Man sollte sich das nicht wie ein Kinderspiel vorstellen, und es gibt sehr viele Enttuschungen, bevor mal vernnftige Ergebnisse
Top Gerä
Der Dremel 3d45 wurde sehr schnell geliefert und war super verpackt.
Der Drucker ist hervorragend fr Anfnger geeignet, das der Drucker automatisch das Filament erkennt. Ausgepackt und eingerichtet war der Drucker recht schnell. Problemlos verbindet er sich mit dem Wlan. Sehr schn ist auch die eingebaute Kamera, so kann man den Druck sehr schn verfolgen. Die Menfhrung ist bersichtlich und gut strukturiert.
Eingerichtet ist der Drucker sehr schnell und der Testdruck kann sich wirklich sehen lassen.
Fazit: Top Gert fr Anfnger und Fortgeschrittene.
Ds que je l’ai reu, j’ai imprim un des modles fourni. Le rsultat est parfait. J’ai imprim par la suite un objet dessin par mes soins. Le logiciel Dremel Slicer, driv de Cura, est clair et relativement simple comprendre. Les rglages l’aide du menu tactile sont clairs, la reconnaissance du filament par RFID est trs pratique. Le nivellement semi-automatique du plateau chauffant fonctionne parfaitement. L’objet imprim est trs bonne qualit, aucun dfaut. Le temps d’impression a t un peu plus long que la dure calcule par le clicher (7h30 au lieu 6h42).
Ds que je l’ai reu, j’ai imprim un des modles fourni. Le rsultat est parfait. J’ai imprim par la suite un objet dessin par mes soins. Le logiciel Dremel Slicer, driv de Cura, est clair et relativement simple comprendre. Les rglages l’aide du menu tactile sont clairs, la reconnaissance du filament par RFID est trs pratique. Le nivellement semi-automatique du plateau chauffant fonctionne parfaitement. L’objet imprim est trs bonne qualit, aucun dfaut. Le temps d’impression a t un peu plus long que la dure calcule par le clicher (7h30 au lieu 6h42).
Easy for a novice
I’ve never done 3D printing before, but this comes with everything you need to get started. You can download templates online and get going straight away. Before you start it is worth thinking about where you want to put the printer – it is fairly noisy and smells of hot plastic so you don’t want it in a room you’re sitting in.
Une Imprimante 3D avec un trs bon rapport qualit/prix. L’interface et la machine sont trs simples d’utilisation. La qualit de l’impression est trs satisfaisante. ( DREMEL 3D45 achete sur AMAZON.FR )
noter :
Les +
– Packaging soign et robuste.
– Manuel de mise en service
– 2 bobines de filament fournies + spatule avec bords arrondis pour dcoller pices imprimes + cl USB Sandisk 16go + cable USB + outil de dsobstruction.
– Tout est protg car l’imprimante est entirement ferme, la bobine de filament se trouve galement l’intrieur de la machine.
– Trs peu d’odeurs lors de l’impression grce au systme de filtration.
– Design matriel et de l’interface soigns.
– Connectiques intressantes, WIFI et camra intgre pour surveiller l’impression en temps rel.
– Plateau facilement accessible et amovible.
– Systme de mise niveau du plateau trs simple et pratique.
– Trs bonne qualit d’impression ( mettre videmment en regard avec la qualit de la ralisation du modle 3D)
Axes d’amlioration :
– Gaine pour passer le filament depuis la bobine lgrement difficile d’accs.
– Machine bruyante (systme de ventilation/filtration).
– Dmarrage de l’interface un peu long.
– Niveau sonore.
Conseils utilisateurs :
– Installer l’imprimante sur un support trs stable, sinon les mouvements internes de la machine + les vibrations peuvent perturber le bon droulement de l’impression.
– Prendre garde lors du dballage de l’imprimante : les consignes indiquent qu’il faut lever le plateau manuellement pour extraire les cartons de protection, mais il n’est pas mentionn qu’il faut l’abaisser ensuite (risque de toucher la tte d’impression lorsque la machine se mettra en route).
oller Drucke
Ein sehr guter und einfacher Drucker. Auspacken, Stick einstecken, automatisch kalibrieren und schon kann der erste Druck starten. Die Qualitt des Druckbildes ist super. Der Wechsel der Filamentrollen ist ebenfalls sehr einfach. Durch den integrierten Chip bentigt man keine weiteren Einstellungen fr die verschiedenen Filamente. Ein sehr schnes und auch leises Gert.
Great 3D printe
I’m new to 3D printing, but not 3D modelling. I received my Dremel 3D45 last week and I’m pleasantly surprised how easy it was to get going. The printer arrived well packaged, and the setup didn’t take long at all. I spent quite a while researching 3D printers and what I could justify financially… I am pleased with my choice. IMO it’s priced reasonably at this time (although I suspect that in the future the price of 3D printers will come down). Anyhow it’s much cheaper than many of the alternatives.
I was able to print a model I build in blender (open source 3D modelling software). I measured the result with digital calipers and the model is within 0.05mm accuracy, which is ample for my needs.
I don’t have much experience with print quality but the result is perfect for my prototyping needs with a little sanding on some rough edges here and there… but I think this is normal.
The touch screen is a bit small for my hands, so typing in my wifi key wasn’t super easy, but this is probably a one time event so don’t see this as too bad. The software could do with a little refinement but these are minor gripes!
Personally I think this product is great buy, and I would recommend it. Loving it … Thanks Dremel!
Hoy os voy a contar cmo es esta impresora 3D que he recibido. Como me ha gustado, me he animado a comentaros mis impresiones. Espero que os sean de utilidad.
1.-EL CONTENIDO DE LA CAJA
Dentro de la caja viene lo siguiente:
–Impresora
–Rollo de PLA
–Cableado.
–Pendrive
–Instrucciones.
2.-LA IMPRESORA 3D
Si ests dudando comprar una impresora 3D, y no eres un experto. Te sentirs abrumado ante la gran variedad que puedes ver en Amazon. Si an no lo has probado, coge el buscador de Amazon, pon impresora 3D y vers todo lo que sale. Yo lo acabo de hacer, y poniendo slo los Prime, me salen ms de 7000 resultados. Entonces qu hago para escoger? Lo primero est claro, el presupuesto. Si no llegas a un precio determinado, de poco sirve que te recomiende una de precio superior. No obstante, voy a darte unos cuantos consejos para ayudarte a discriminar un poco esa bsqueda de 7000 resultados:
–Habrs visto que las hay desde 200 euros a todo lo que quieras gastarte. Un apunte sobre esas de 200 euros. Si te fijas, son abiertas. Es decir, la zona de impresin no est cerrada como sta. En casi todas ellas aparecern las siglas DIY, que es el acrnimo en ingls de hztelo t mismo. As que, si compras esas impresoras, ten en cuenta que te va a tocar montarlas t mismo. Esto tiene dos problemas fundamentales: la gran cantidad de tiempo que le vas a dedicar. En segundo lugar, que una vez montada, te puedes volver loco para ajustarla correctamente y que todo funcione como debera.
–Esta impresora est totalmente montada. Lo nico que tendrs que hacer es enchufarla y calibrar la cama de impresin. As que es evidente las ventajas frente a las primeras. Por un lado ahorras mucho tiempo, y slo tienes que ajustar la cama de impresin. Por otro lado, si hay nios cerca, es mucho ms seguro.
–Otra cosa que deberas echar un vistazo, es el material que usa la impresora para imprimir. Lo ms corriente es PLA, pero hay otros materiales. Quizs es el nico pero que le pongo a esta impresora. Slo se puede imprimir con PLA. No admite otros materiales.
–Conectividad: Unas las podrs usar slo por USB o con una tarjeta microSD. Otras las podrs usar conectadas por USB al ordenador, y otras por WiFi. Esta impresora soporta los tres mtodos. Lo que es otra ventaja a su favor. As podemos usar la que nos interese en cada momento.
–Soporte: Eso es una cosa que aprend hace muchos aos cuando era estudiante mi presupuesto era muy ajustado para comprarme cosas. Me compraba una placa base para el ordenador, pues elega la ms barata a igualdad de prestaciones. Qu pasa si haces eso? Sencillo. Cuando tengas problemas, no vas a encontrar nada para solucionarlo en internet, ni en la web de la casa porque lo mismo ni existe ya. En este caso est detrs Dremel. Te invito a que entres en su web y busques este modelo. Te podrs descargar manuales, hay videos explicativos para hacer las operaciones bsicas de la impresora, software relacionado, etc.
3.-CONCLUSIONES
Y qu nota le das? Me lo recomiendas?
Estas dos preguntas son las que todos nos hacemos cuando compramos cualquier dispositivo, y la respuesta es siempre la misma: DEPENDE DE PARA QU LO USES Y CULES SEAN TUS EXPECTATIVAS. Se trata de una impresora 3D interesante. Muy sencilla de poner en funcionamiento, muy buena conectividad, y un buen soporte detrs. Quizs los nicos peros que se le puede poner es por un lado el precio, por otro lado, que la caja no sea calefactable y por ltimo que slo imprima en PLA. Si estos tres inconvenientes son importantes para ti, tendrs que ir a por el modelo superior 3D45. Si te dan igual, esta es una muy buena opcin.
Podramos decir que es profesional en cuanto a la rapidez y facilidad con la que podemos usar esta impresora 3D.
He visto otras con 2 extrusores que nos da la posibilidad de imprimir en dos colores, en este caso, la Dremel no nos permite dicha impresin.
Podemos descargarnos desde varias pginas web algunas piezas que necesitemos sin ningn problema ya que incluye un programa compatible con Cura y podemos convertir cualquier archivo en el que necesitamos para su impresin.
Tarda pocos minutos en calentarse. Por ejemplo la rana que viene de ejemplo se termin en unas 3 horas con un rango de relleno del 80%.
A stylish printe
I highly recommend this printer. I read the reviews and I can see why someone with a lot of experience might get frustrated. for a new to 3d printing novice like me this machine provided me with the tools, designs and ability to produce good quality models with ease.
The touch screen is good. The camera hasn’t got the best quality but to quickly check the progress of your build it’s fairly suited. The designs that come with it are great but there are plenty of free 3d designs online.
The 2 free rolls of filament are great and enable you to get printing straight away. The builds take time but they are well worth the wait.
The printer itself is very stylish and I can’t wait to experiment more.
Una maravilla y con muy buena calidad precio
Sois principiantes y estis buscando una impresora 3D FDM que sea lo ms fcil de usar posible, que no os de quebraderos de cabeza, que puedas usar sin necesidad de conexin a un ordenador, y que no tengas que andar montando apenas piezas? Pues esta Dremel es tu solucin. Por algo la misma marca ofrece esta impresora a los centros de educacin primaria para la educacin de los ms pequeos, por lo sencillo que es de utilizar.
Si os soy sincero no estoy muy metido en el mundo de la impresin 3D, es muy probable que otros os sepan guiar mejor que yo, sobretodo en caractersticas tcnicas de esta impresora, pero intentar haceros una idea de lo que ha sido mi experiencia con esta impresora.
Ventajas:
Para empezar me ha llegado la impresora totalmente embalada y protegida, como no me esperaba menos por su precio. Tiene proteccin (En forma de cartn) incluso en el interior de la propia 3D40, as que sin miedo alguno a los golpes en el transporte.
Todos los componentes estn dentro de la “caja”, es decir nada sobresale ni tiene peligro de romperse. Adems de que tiene dos tapas de plstico transparente que se cierran con imanes y te permite acceder al interior sin problema, tanto por arriba como por abajo.
Hace muy poco ruido, he odo trabajar a otras impresoras 3D que hacen mucho ms ruido, esta apenas se nota. Hace algo ms de ruido que una nevera.
Todo es sumamente sencillo de instalar, slo debes poner la bandeja en su sitio y colocar el filamento en el lateral con la punta en el extrusor. Nivelas la bandeja de forma semiautomtica (La mquina te indica si qu tuerca debes girar y hacia donde), calienta el filamento y ya est lista para la impresin.
Buen tiempo de impresin. Para la rana que hice de ejemplo, no estoy seguro a qu resolucin se hizo, es probable que se hiciera en baja resolucin (300 micras), pero no estoy seguro. En total le llev a la mquina 2 horas exactas hacerlo, creo que est muy en la media y el resultado aunque no es profesional, no est nada mal. Adems puedes imprimir an ms rpido gracias a sus 340 micras, siendo un 30% ms rpido que la versin de baja resolucin.
En hacer la rana no gast mucho filamento, esperaba que gastase la mitad del rollo, pero creo que me gast aproximadamente entre un cuarto y un tercio de este. Siendo filamento Dremel pues s que sale cara la rana, pero si compris filamento de 1 kilo de otras marcas por unos 15 euros, es probable que la rana te salga entre 2 y 3 euros aproximadamente.
Tiene mucho volumen de impresin. Ya he visto otras impresoras 3D cerradas que daban bastante menos volumen que esta, la mitad o incluso un tercio. Como contraparte por supuesto es el tamao y el peso total de la impresora, mucho mayor que otras que he visto.
Desventajas:
En cuanto a los materiales que incluye aparte de la impresora es una esptula, un USB de 16Gb para introducir los modelos 3D que descarguemos, un rollo de filamento blanco PLA, un recambio de la base de impresin de Dremel y una varilla para desatascar la boquilla y el extrusor. No es que traiga muchos materiales en comparacin a otras impresoras ya que habra pedido que trajera al menos otro rollo de filamento.
No tiene bandeja calefactora, en su lugar trae una bandeja flexible.
Su nivel de detalle en la impresin de forma automtica no es tan precisa como otras (Segn creo lo hace con baja resolucin a 300 micras), puedes notar en la rana que he hecho que se notan bastante los bordes y las capas. Por suerte tiene un modo de alta resolucin de 50 micras, aunque probablemente con el triple o cudruple de tiempo.
Slo usa PLA. Si necesitas que la impresora use ms materiales aparte de este, tendras que irte a su versin superior, la 3D45.
Como es de esperar el filamento de PLA oficial de Dremel es bastante ms caro que el de otras marca, adems de que pesa la mitad que otros rollos. Os dejo el link al filamento oficial: https://www.amazon.es/Dremel-DF01-accesorios-3d40-3d45-blanco/dp/B077TQCSSM
Y creo que eso es todo, como he dicho soy principante y no he podido probarla a fondo ni dar ms datos tcnicos, como impresora para alguien nuevo me parece perfecta. Si buscis algo ms profesional quiz mirara la 3D45, pero creo que esta 3D40 Flex puede dar alegras a casi cualquier persona. Sinceramente la recomiendo mucho.
Nota calidad-precio: 9
Espero que este anlisis os haya servido. Un saludo!
Hatte bisher den Dremel IdeaBuilder. War gut zufrieden, allerdings lie nach und nach die Przision zu wnschen brig. Hat aber auch mehrere Kilo PLA in 3 Jahren durch die Dsen gejagt.
Also musste der neueste her.
Lieferung: Schneller als angekndigt, super verpackt, nichts kaputt.
Aufbau: Problemlos, da alles schon fertig. Nur noch Filament einlegen und Druckbett ausrichten. Das geht dank Halbautomatik wesentlich schneller und genauer als mit der alten Technik. Top!
Software: Bei Dremel herunterzuladen, etwas gewhnungsbedrftig. Aber brauchbar. Ansteuerung des Druckers ber WLAN problemlos. Gutes Feature: die eingebaute Kamera. Damit hat man nicht alles aber das wichtigste im Blick.
Noch eine Verbesserung zum vorhergehenden Slicer: Sttzkonstruktionen knnen automatisch hinzugefgt werden. Ebenso eine vergrerte Auflageflche bei kleinen Bauteilen. Gute Idee.
Druck: Wesentlich leiser als der IdeaBuilder (mag aber auch an den ausgeleierten Lagern gelegen haben). 4 Qualittsstufen. Erstes Bauteil in “High Quality” und aus ABS kann sich sehen lassen. Dauert zwar, aber wegen der geringen Lautstrke kann das Gert problemlos auch nachts drucken. Durch die RFID-Erkennung des Materials (leider nur von Dremel und damit etwas teurer) keine weiteren Einstellungen ntig.
Fazit: Teuer aber gut. Mal sehen, wie es in einem Monat und mehreren Stunden Dauerdruck aussieht.
Una delicia, no sabra expresarlo mejor Este es el comentario ms largo que he escrito en Amazon, pero sinceramente creo que es necesario ante herramienta que abre nuevas posibilidades en la impresin 3D.
REALIDAD: Mis necesidades diarias pasan por evaluar necesidades, estudiar materiales, lograr rendimientos y disear soluciones. Despus de dcadas trabajando con tecnologa, en realidad no necesito comprar pieza a pieza una impresora para hipotticamente sacarle mayor rendimiento o abaratar costes, objetivamente necesito herramientas integrales que me faciliten lograr mis objetivos Pues bien, para cualquiera en una situacin similar, le ruego lea este comentario, y descubrir que esta impresora DREMEL 3D40 Flex es una solucin completa y una experiencia de trabajo fluida y eficaz
CONTENIDO: En la caja tenemos todo lo necesario para empezar a trabajar. Adems de la impresora completamente montada, tenemos un rollo de filamento de cortesa, tres cables de alimentacin, un cable USB, una memoria USB, una esptula y un manual completo en varios idiomas incluyendo el castellano. Tengo que mencionar lo perfectamente embalado y protegido que esta todo, mi caja me lleg completamente rascada y desgastada por el transportista, sin embargo, por dentro ni un “pelo” fuera de su sitio, comprueben en las fotos
INSTALACIN: Est todo tan estudiado, que todo el proceso de instalacin, configuracin e impresin de tu primer objeto puede estar listo en muy poco tiempo, en mi caso y parando para sacar las fotos, 1 hora y 15 minutos
1.- Desembalar y colocarla en su lugar de trabajo. Conectar el cable de corriente y el cable de red (en su defecto, se podr configurar posteriormente una conexin WIFI)
2.- Encender la impresora. La primera vez, har una pequea comprobacin y nos solicitar que seleccionemos el pas y el idioma, donde tenemos en otras opciones Espaa y espaol, obviamente. Al modificar el idioma, se reiniciar automticamente.
3.- La siguiente vez que arranque puede detectar una actualizacin de Firmware. En mi caso lo hizo, he aceptado y ha tardado 8 minutos en instalar y reiniciar.
4.- A continuacin cargar el filamento, que lo haremos siguiendo las instrucciones en pantalla al pulsar en la opcin “Filamento”.
5.- Instalar la base flexible, toda una novedad de este modelo que permitir sacar los modelos con ms facilidad y sin utilizacin de otros consumibles como cintas, pinturas
6.- Nivelar la base, una de las ventajas ms competitivas de este modelo. En el compartimiento del extrusor est integrado un sistema que nos indicar paso a paso si debemos ajustar dos pomos, que dejarn perfectamente nivelada la placa de construccin.
AVISO: Para asegurar la calidad de impresin, es primordial que la impresora este sobre un soporte estable, firme y completamente nivelado.
7.- Y ya est, s, ya podemos imprimir. Personalmente aconsejo imprimir uno de los modelos de ejemplo, que estn grabados en la impresora y en la memoria USB suministrada, ya que as tendremos la seguridad que esta todo configurado y la impresora funciona correctamente Podemos escoger entre algunas figuras, piezas de ajedrez y un dado gigante.
INSTALACIN USB: Encender la impresora, conectar el cable USB y mi sistema operativo, Windows 10 Professional, la ha detectado e instalado los drivers automticamente como cualquier impresora lser o de chorro Y adems, tiene una opcin para “imprimir un objeto de prueba” que automticamente abre la app de Windows “Print 3D” y en segundos puedes mandar algo a la impresora
INSTALACIN ETHERNET: En mi caso la vamos a utilizar con la conexin Ethernet y es igual de sencillo, solo hay que indicar el puerto IP. Adems desde cualquier programa de diseo puede detectar directamente la impresora y solo tengo que indicar el puerto IP As todos podemos compartir la impresora sin desplazarla y comprobando el estado de impresin desde cualquier equipo en red
VENTAJAS: Para una compra de este calibre, evidentemente hay que sopesar muchas variables, por lo que aconsejo comprobar todas las caractersticas indicadas en el anuncio y en la web del fabricante. Pero yo voy a destacar cuales son las ms importantes bajo mis necesidades:
1.- Precisin. Puede imprimir a una resolucin de 50 micras.
2.- Totalmente cerrada. Para entornos educativos es obligatorio mantener la seguridad en todo momento, as que en nuestro caso, esto no es una opcin sino una exigencia. Adems evita la entrada de polvo o sustancias voltiles que pueden perjudicar el modelo o la impresora.
3.- Instalacin. Adems de una puesta en marcha inmediata, es completamente compatible con varios de los sistemas operativos actuales.
4.- Compatibilidad. Desde “Autodesk Inventor” y “AutoCAD” puedo imprimir directamente en la impresora. Si instalamos el programa “Autodesk Print Studio”, creado conjuntamente entre Dremel y Autodesk, obtendremos control total sobre la impresin. Por si fuera poco, esta impresora est integrada en “TinkerCAD”, con todo un universo de informacin y soporte para escuelas, incluyendo un espacio exclusivo para gestionar las clases, visualizar el trabajo de alumnos, etc
5.- Software y Firmware. Tanto el firmware como el software interno son muy fciles de actualizar y manejar. Tambin podremos instalar “Dremel DigiLab 3D Slicer” lo que permitir controlar todo el proceso como definicin, relleno, calidad, material, etc
6.- Cama flexible. En principio puedes pensar que es una opcin como otra cualquiera, no no, dejas enfriar totalmente y sacas el objeto, he probado con un colgante hueco de apenas 0,5 mm. de grosor y salta solo
7.- Garanta y soporte del fabricante, adems de una comunidad enorme y muy activa, donde puedes intercambiar informacin, compartir modelos y obtener mucha seguridad
En resumen, y omitiendo muchas otras caractersticas de la impresora, este es un producto sobresaliente, dentro de la gama de impresoras 3D de Dremel, un modelo ideal y completamente recomendado para entornos de aprendizaje, creadores de prototipos, calculistas de moldes, arquitectos y un largo etctera de personas innovadoras y creativas, como diseadores, mecnicos, maquetistas, estudiantes, manitas, curiosos, etc que sabrn exprimir todas sus ventajas.
Muchas gracias por la paciencia en la lectura y buena suerte con sus diseos Saludos!!!
Facil de usar en todos los aspectos, software y pantalla geniales, pero precio algo elevado.
DREMEL 3D40 FLEX.
Impresora 3D de DREMEL, voy a dar mis impresiones, tambin decir que es la primera impresora 3D que tengo, pero ya eh visto en funcionamiento otras impresoras de amigos, sin mas intentare explicar las bondades y los aspectos que puedan parecer negativos.
El montaje > La verdad ms fcil imposible, es desmontar la caja, desembalar el producto y los accesorios, montar el rollo de filamento PLA, configurar la red, en mi caso por WIFI, calibrar el nivel, hay que decir que la maquina en la pantalla te indica que parte calibrar, una vez ajustada te pita y te indica que ya est, bueno la configuracin la verdad mas sencilla no puede ser, en comparacin con algunas otras que he visto, me han llegado a comentar que hasta que no esta lista para su uso son unas 4 o 5 horas en total, esto es totalmente un punto a favor para gente que no quiera o que no sea tan maosa en estas cosas.
El software que incluye, la verdad que es tambin muy simple de usar, se carga el proyecto y se ajusta a la medida que necesitemos, la verdad es que es muy intuitivo, no hace falta ni mirar ningn tutorial, esta todo bien expuesto, la conexin con la impresora ha sido casi instantnea, la ha encontrado y en nada ya estaba enlazada, lo dicho un programa muy llano y simple, ideal para al que no le guste cacharrear.
Dentro del mismo software una vez preparado el proyecto te indica exactamente el tiempo que necesita para ejecutarlo y la cantidad tanto lineal como en peso del filamento, la verdad que es de agradecer por que siempre sabremos cuanta cantidad de material se necesita, tambin se puede ajustar la calidad de impresin y de material, desde impresin pues algo burda hasta slida.
La pieza que he imprimido es con calidad del 50% que es un relleno denso y la verdad no esta para nada mal la calidad, solo falta pulir un poco la pieza y ya est.
El men mediante la pantalla > ms de lo mismo, todo est muy bien especificado, te indica paso a paso, si la puerta se abre se para el trabajo y lo indica, te indica la temperatura en todo momento, la verdad que un programa as y mas para una persona iniciada es una gozada, es que no he encontrado ni un mnimo resquicio de algo malo en el men que incorpora la pantalla de la impresora 3D.
La cama puede llegar a albergar impresiones de con un volumen mximo de 254 x 152 x 170mm, la primera pieza realizada no es muy grande, pero me ha parecido que iba bastante deprisa.
La impresora 3D como tal, la calidad de construccin y las piezas pues la verdad que es excelente, un punto a favor es que es toda cerrada y mantiene la temperatura ideal dentro, las puertas de apertura tanto frontal como superior son de metacrilato transparente por lo que se puede ver todo el interior, la cama se puede retirar y luego doblar dado que esta en una base de acero flexible, por lo que no hace falta si no se quiere de tirar laca, solo doblando y pasando la esptula pues ya se saca la pieza.
En cuanto accesorios, pues la verdad que viene muy pelada, es un aspecto que me ha desencantado un poco y mas con el precio que tiene, podra incluir algunos recambios ms, en total vienen, una cinta para la cama de recambio, una varilla para desembozar la boquilla de la impresora, un USB de 16bg, un cable para la conexin directa con la impresora USB y un rollo de PLA de color blanco, creo que con el precio seria mas acertado haber puesto un par de rollos ms, un par de cintas para la cama y unas cuantas boquillas de recambio.
Otro punto negativo es que solamente se puede utilizar material PLA, no se puede utilizar ni NAILON, ABS O PETG, para depende de quien esto puede ser un problema si necesita de esos materiales para convencerse de comprar esta impresora 3D.
En resumen esta impresora 3D tiene cosas muy buenas que son las siguientes, configuracin facilsima al alcance de cualquier usuario que tenga conocimientos amplios como nulos, todo perfectamente explicado y sin ninguna complicacin, la puesta en marcha es muy rpida y el mantenimiento pues es sencillo y la calidad en general es sobresaliente, que tenga conectividad wifi y que se puedan cargar los proyectos mediante USB es todo un plus, la pantalla que incorpora pues la verdad que es una gozada y que la cama se pueda doblar para sacar las piezas hechas pues la verdad que es de agradecer por que facilitara muchsimo las cosas, por el contra solo se puede imprimir con PLA, es precio la verdad que es muy alto en comparacin con otros modelos, pero no ofrece complicacin alguna esto tambin es cierto y en el apartado de accesorios, creo sinceramente que tendra que incluir algunos ms, lo dicho la veo una impresora 3D ideal para aquella gente que no tenga conocimientos o que no quiera complicaciones y que el precio no sea una contrapartida.
facile a utilisé
mes premier impression 3D mon laiss bouche B.
en revanche le temp impression est long quand les pieces sont compliqus
Le prix de la qualité
Aprs 6 mois d’utilisation et de comparaison avec d’autres imprimantes 3D que j’utilise dans un FabLab, je peux enfin faire un retour sur cette imprimante 3D Dremel et affirmer que oui, elle est chre, mais elle a des atouts majeurs, dont celui d’une trs bonne qualit d’impression.
Ses atouts :
+ Connectivit : avec de l’USB, de l’Ethernet et mme du WiFi, on peut s’y connecter facilement et par exemple la mettre sur un rseau. Ce qui donne alors tout son sens la camra HD qui permet de suivre l’avance de l’impression distance.
+ Camra HD : permettant de suivre l’impression distance et en cas de problme d’interrompre l’impression. Mais il n’y a pas de dtection automatique en cas de problme.
+ Silencieuse : on n’entend pas grand chose lors de l’impression, d’autant que les capots limitent bien le bruit. Et comme on peut la commander distance, l’idal sera de la mettre dans un local technique.
+ Polyvalente : on peut utiliser toute une gamme de fils de qualits diffrentes (nylon, ABS, PLA et PETG), mais surtout on peut changer de fils (pour changer de couleur par exemple) pendant l’impression, ce que ne permettent gnralement pas les imprimantes d’entre de gamme.
+ Finesse : les pices sont imprimes avec une finesse de l’ordre de 50 microns. On ne voit presque pas les couches, et si on utilise du nylon qui est plus souple, elles disparaissent. Et la plupart du temps, les pices sont imprimes sans avoir besoin de support.
+ Drouleur de fil automatique : le fil est guid et se droule tout seul, ce qui n’est pas le cas sur les imprimantes d’entre de gamme.
+ Le logiciel Dremel accepte les formats 3D les plus rpandus.
Ses dfauts :
– Le logiciel propritaire Dremel a une prise en main pas trs intuitive de prime abord. Il faut s’accrocher un peu avant de le matriser et de comprendre comment imprimer autre chose que les exemples fournis.
– Lourde et encombrante. Forcment, avec un tel quipement, on est loin d’une imprimante d’entre de gamme bien plus lgre, mais c’est normal. Donc, moins pratique dplacer.
Pour les photos, j’ai imprim un des modles fournis : le requin qui jaillit de l’eau. On voit sur la vido la structure alvolaire l’intrieur du modle.
Et sur les photos, on voit que l’ensemble est trs fin. Au toucher, on distingue peine les couches.
J’ai imprim d’autre objets par la suite sans problme, en ABS et en nylon, le nylon tant plutt utilis pour les pices qui demandent de la prcision et qui ne sont pas trop complexes (pas un personnage par exemple, sinon il faut prvoir des supports). Attention, avec le nylon qui est difficile utiliser pour les dbutants (ce qui n’est pas propre cette imprimante).
Cette imprimante 3D Dremel est chre, mais c’est le prix de la qualit. Si vous avez les moyens d’y mettre ce prix, c’est vraiment un outil performant, une fois la prise en main du logiciel passe.
Impression de qualité et facile
Grce cette imprimante 3D on peut crer des objets ayant un volume maximal de 25,4 cm X 15,2 cm X 17 cm, ce qui laisse pas mal de possibilits en termes d’objets crer.
Cette imprimante est l’volution d’un modle prcdent. Le nouveau modle possde un plateau flexible, d’o le terme “FLEX” dans son nom.
Le plateau flexible permet de retirer plus facilement l’objet imprim, cela tait parfois problmatique avec l’ancien modle.
C’est ma premire imprimante 3D donc je ne pourrai pas la comparer moi-mme avec un autre modle.
L’installation est facile, il y a juste brancher l’imprimante, charger un modle 3D, mettre le fil de plastique et c’est bon !
L’utilisation de l’imprimante se fait via un cran LCD propre l’imprimante, soit depuis un PC, via WIFI. On peut donc utiliser le rseau sans fil pour envoyer le modle imprimer ou passer par une cl USB.
La qualit d’impression est trs bonne je trouve. Et le temps d’impression est acceptable.
3D printing... simplified
There are definitely cheaper 3D printers available but if you are looking for one that just works straight out of the box, produces great results, is well-designed, and safe to use for a variety of ages, then a Dremel model is right for you. I have this model, the 3D45, and the slightly cheaper 3D40 Flex.
Both are very similar but the 3D45 can print in a wider array of materials (PLA, ABS, nylon) and has a heated glass print bed. It also recognises automatically what filament you are using (provided that you have bought the Dremel accessories range with the built in rfid tag).
I attach a picture of a test print Voronoi Dachshund which shows the great kind of details these printers can achieve.
Muy fácil de usa
Nunca haba usado hasta ahora una impresora 3D. As es que vaya por delante que mi opinin no es la de un experto, sino la de alguien que justo est empezando a familiarizarse con esta tecnologa. Seguramente por eso, me ha gustado su facilidad de manejo. Una vez que la hemos desembalado, slo hay que poner la bobina en su depsito, insertar el filamento en el extrusor, conectarnos a nuestra red wifi, nivelar la bandeja y prepararla con adhesivo, elegir el diseo que queremos imprimir, configurar los parmetros de impresin y darle al botn de empezar. Es realmente sencillo.
Otra cosa que me ha gustado es el volumen interior. Tiene unas dimensiones aproximadas de 26 x 15 x 17 cm. Me parece que son unas dimensiones que permiten imprimir objetos de respetable tamao. Por ahora, no me he planteado imprimir objetos tan grandes pero, si me lo planteo en el futuro, no tendr que cambiar de impresora.
Al ser una impresora “de cama caliente”, puede imprimir tanto con PLA como con ABS y con otros materiales.
La impresora funciona en un compartimento cerrado, lo que reduce el ruido y ayuda a mantener estable la temperatura.
La bandeja se puede quitar y poner, lo que facilita su limpieza.
Tiene una cmara en el interior que nos permite grabar el proceso de impresin. No le veo a esto mucha utilidad por ahora, pero es algo que puede ser muy til a quien quiera ilustrar sus procesos de impresin (para hacer tutoriales, por ejemplo, o para canales de Youtube).
Los filamentos originales vienen con un identificador (RFID) que ajusta automticamente los valores ptimos de impresin. Podemos usar bobinas genricas, que son ms baratas, pero tendremos que ajustar manualmente los parmetros de impresin. Si no somos expertos, mejor no aventurarse.
Como aspectos negativos, nicamente el elevado precio de las bobinas originales con respecto a las genricas (unos 32 euros la bobina original frente a los 15-25 de las genricas).
No conozco otras impresoras 3D para poder comparar pero, en mi opinin, me ha sorprendido su facilidad de manejo, por lo que la veo especialmente apropiada para principiantes.
Solidly built - tips for new users in review
First of all this is a Dremel which means that it is made by Bosch and all the usual Bosch quality is there. It is well made, very easy to set up and easy to print your first demo item.
A few more details about the printer, then I will cover off the tips for new users.
The initial setup was done via a series of picture in the quick reference guide and instructions on the touch screen. |Installation of of the required PC software was provided both on an included USB stick, a very small one both in size and in capacity). the only issue that I have is that I don’t seem to be able to print from my PC despite everything saying that the printer is connected and working; I can even view the real time web cam within the printer to check on status of printing. I haven’t managed to fix this, however the work around is to save the required file onto the USB stick and then print from the stick (it plugs into the front of the printer).
So, what can you do with this???
Well, I suspect the first thing that anyone does is to print off one of the demon items on the provided USB stick. I printed the lion’s head and, in as little as 9 hours, it had printed successfully (to a very high standard).
I have also downloaded models of satellites from the NASA website and these also print well.
But, you are going to want to design and print things of your own design. If you can already do this, then skip the rest of this review. For other starters (like I was a few weeks ago), here is my suggestion. Assuming you are using a standard Windows PC, you can download the free Microsoft 3D Builder software. Fairly simple, but adequate for initial use. To help you use it, Microsoft have helpfully provided a tutorial for it (just search on line for it). I found the best way was to watch it all the way through first and then, a second time, do a step at a time with me using the 3D software to achieve the same results. At the end of this, Microsoft want you to send off your file for printing by them, however you have a shiny new Dremel printer, so let’s use that instead. So save the file in .STL format somewhere on your C: drive. Now exit the 3D Builder software. Now fire up the Dremel software and read in the .STL file. You can now play with quality and things like that. For your first attempt, try something small; print at lowest resolution; and don’t mess with colours. Once you’ve done that, save to the USB stick. Unplug the USB stick from your PC and plug into your Dremel printer. Go through the instructions on the touch screen of the printer and all should be well.
I hope this helps.
BTW – the printer is highly recommended.
Guter Drucker für Anfänger und alle, die es möglichst einfach haben wollen.
Dies ist mein zweiter 3D-Drucker. Ich habe bereits ein gnstiges Modell, bei dem man noch ein bisschen schrauben musste, dafr war er auch deutlich gnstiger. Im direkten Vergleich ist der Dremel alleine schon deswegen praktischer, weil man ihn gleich aufstellen kann und nichts mehr dran machen muss. Nach einigen Testdrucken fllt aber auch gleich der Groe Vorteil des selbst schraubens auf. Man wei besser, wo sich welche Teile befinden und traut sich schneller mal, was an seinem Drucker zu verndern. Und ja, das muss man auch beim Dremel. Den 3D-Drucker, den man nur hinstellt und dann nie wieder was einstellen muss, gibt es vermutlich noch nicht. Dabei geht Dremel schon deutlich in die Richtung. Man kann zum Beispiel von Haus aus nur PLA-Filament verwenden und das Gert ist darauf ausgelegt, dass man die Herstellereigenen Rollen verwendet, was anderes passt nicht. Will man anderes Druckmaterial nutzen, muss man es neben die Halterung stellen oder auf der beiliegenden Spule aufwickeln.
Einige Einstellungen nimmt der Drucker automatisiert vor, was das immer wieder prfen und anpassen angeht, ist der Dremel meinem anderen Druck durchaus voraus. Dafr ist man dann eben bei anderen Sachen etwas eingeschrnkter.
Gut fr die Anwendung zuhause ist, dass der Drucker rundum abgedeckt ist. Durch die transparenten Fenster kann man aber immer sehen, was im Inneren passiert. Gerade fr Haustierbesitzer oder Kinder im Haushalt, die schonmal anfassen wollen” eine groe Hilfe.
Was er vielen anderen Druckern voraus hat, ist die Anbindung ans Netz via WLAN. So lassen sich Projekte ganz einfach an den Drucker senden, ohne dass man mit USB-Sticks arbeiten muss, was aber natrlich auch mglich ist.
Trotzdem kann ich den Drucker fr alle empfehlen, die auf minimale Betreuung Wert legen. Nur ganz ohne geht es eben doch nicht und da darf man nicht schchtern sein. Es lohnt sich auch an den Einstellungen rumzutfteln, schon minimale Vernderungen knnen zu anderen Ergebnissen fhren.
Die schnelle Druckoption ist ganz gut zum einrichten und testen, zum eigentlich Drucken finde ich sie nicht geeignet, die Ergebnisse sahen auf der Oberflche sehr rau und ungleichmig aus.
Was ich super praktisch finde, ist der flexible Untergrund. Er lsst sich leicht biegen, was es deutlich einfacher macht, die Werkstcke von der Platte zu lsen. Wer mag, kann zustzlich noch ein bisschen Kreppband draufkleben, dann geht es noch leichter und es bleiben keine Rckstnde an der Platte kleben, die sich nur schwer bis gar nicht entfernen lassen.
Allen, die erstmal rumprobieren wollen, kann ich die Webseite thingiverse[dot]com empfehlen, dort ldt die Community jede Menge Projekte hoch, die fast alle kostenfrei privat genutzt werden drfen, viele sogar kommerziell.
La primera impresión es buena.
Dremel Impresora 3D 3D45
Yo soy muy aficionado a las herramientas y materiales para el bricolaje y el trabajo, tambin tengo cierto nivel en informtica as como en fotografa y video, pero en esta nueva tecnologa, al menos para m, de la impresin 3D soy un completo nefito. Conozco este tema de las impresoras 3D solo por lo que he odo hablar de ello y por haber visto algunos videos y poco ms.
Como aqu de lo que se trata es de opinar sobre los productos que recibo con la mxima objetividad y el necesario rigor no voy a valorar (de momento) el funcionamiento de esta impresora por falta de conocimiento suficiente para ello. Necesito un tiempo para informarme y formarme en el funcionamiento y proceso de impresin 3D.
Lo que si he hecho es un pequeo video para que podis ver cmo llega la impresora Dremel a vuestra casa y los principales accesorios que la componen, embalada como pocos productos he visto con multitud de protecciones, bolsas de plstico y mucha cinta adhesiva para un ms que perfecto embalaje.
Sobre el precio y por las mismas razones que ya he expuesto me veo incapaz de opinar de si es cara o tiene un precio justo, Las hay ms baratas? Si muchas, Hacen lo mismo y de la misma manera? No lo s pero lo dudo, soy de la creencia que la calidad tiene un precio.
La primera impresin es la de un producto extraordinario en el que se aprecia el buen diseo y los muy cuidados detalles tcnicos. Cuando tenga el conocimiento mnimo necesario de esta impresora me comprometo a editar esta opinin de forma extensa y explcita.
Le Deutsche Qualität existe encore
Ma premire imprimante 3D, mais, mme si je n’ai pas de base de comparaison, il n’en demeure pas moins que la qualit est bien l :
Emballage impeccable, avec la buse parfaitement cale
Ensemble ferm pour protger de la poussire, et des manations (la porte vitre du dessus permet d’accder la tte sans problme)
Possibilit de connexion wifi, ethernet, mais peu bosser hors connexion via l’interface USB (installe dans le garage)
Ecran tactile facile utiliser
Silencieuse.
Tous les accessoires sont fournis
La plaque flexible permet de dcoller facilement la cration
Bien sr, l’impression 3D dbute, un peu comme la micro informatique dans les annes 80… Donc l’intrt est avant tout ludique et ducatif (c’est d’ailleurs le premier march de Dremel). Mais je suis convaincu que l’impression 3D sera la prochaine rvolution industrielle (et mdicale), donc autant apprendre tout de suite (aprs tout, ma carrire professionnelle a dmarre par des lignes en Basic sur un ZX81 et ne se porte pas si mal…)
Novato en este mundo
Siempre he visto a gente crear sus propios diseos con este tipo de impresora y ver todo lo que se puede hacer con ellas, pues ahora he podido probarlo yo.
Tengo que decir que soy muy pero que muy novato en este mundo y quizs esta impresora sea para gente con conocimientos en l pero la verdad es que dremel lo ha puesto muy fcil gracias a sus instrucciones por pantalla, ya que nos hace un paso a paso para todo, desde ajustar el idioma como conectarlo al WiFi como tambin graduar la bandeja mediante palometas y decirnos cul tenemos que girar para que se quede perfecta.
Respecto a sus conexiones podemos meterle un pendrive para imprimir nuestros diseos, conectarlo por cable ethernet o crearlos mediante su software para PC, incluye algunos de muestra.
He de decir que me he tenido que ver varios vdeos para usarla correctamente ya que dependiendo del hilo que le metamos los parmetros cambian aunque con los hilos de la marca no tenemos ese problema porque mediante una etiqueta RFID que se incluye la reconoce y los ajusta automticamente.
Es muy completa y til como para casa u oficinas e incluye una cmara para poder grabar toda la realizacin del proyecto y poder luego crear un time lapse y flipar de ver cmo trabaja.
Mis hijas no paran de pedirme cosas para que les intente hacer aunque tengo mucho que practicar pero con dedicacin y paciencia al final me har menos novato en esto
Für schulische Zwecke bestens geeigne
Als Gymnasium in SH nutzen wir den Drucker ab sofort fr Unterrichtsprojekte und bieten die Vermittlung des 3D-Druck als eine Schlsseltechnologie der Zukunft im Informatikunterricht an.
Zum Dremel 3D45:
Unboxing: war unproblematisch, Styropor wird weitestgehend durch Pappverpackungen ersetzt. Daumen hoch!!!
Inbetriebnahme: Einfach, Kalibrieren und Filamentwechsel sind einfachst, als erstes Druckprojekt gehen die Bauteile eines 3D-Scanners in Produktion. Die Qualitt ist in Verarbeitung und Handhabung sehr gut, die HD-Kamera ermglicht den Schlern den Druckvorgang von Zuhause aus zu verfolgen. Genial. Auch bei Unterricht im Computerraum ist das Druckgerusch akzeptabel.
Wir sind rundherum zufrieden und konnten mit den 3 Filament-Trommeln gleich loslegen.
My First 3D Printe
I have been thinking about 3D printing for quite some time especially after seeing some of the interesting brackets that can be made to aid mounting mobile phones to drone controllers and I had bought such a mount that had been printed on such a device.
What I did not realise is that to make your own creations you have to master 3D CAD Modelling software (none of which is provided).
The last time I used CAD was Autocad 13 and we only used that to create 2D projects and electrical drawings.
So you may wish to dabble with 3D Cad before you buy a printer (unless you just want to print existing designs).
Now the printer.
It can connect to your network by WiFi or direct ethernet which is what I went for.
However, the setup wizard does not seem to know about the ethernet connection and still wants you to setup to WiFi. I know the connection was working as it updated the firmware.
So I never did run the wizard and the component parts of that can be run separately anyway.
The touch screen is not the best and trying to select the “United Kingdom” twice I got Finland and no option to navigate back. Fortunately it lets you pick English language under Finland.
This was all in vain as for the “Cloud” print options are only present if you set the country to “United States”.
The printer needs to be on a nice firm table so table wobble does not interfere with print quality.
Also even with its charcoal filtered fan some filaments seem to smell, contains VOC’s so good room ventilation is a good idea.
Applying just the right amount of glue stick (provided) to the glass table is another skill and needed to stop the print job moving during printing and reduce it curling up (warping) and the material contracts.
Getting the finished product off the glass with the provided scraper is also a challenge and the glue cleans off with warm water and a microfibre cloth works well to dry/clean the glass for the next project.
If the filament runs out mid job it does let you load a new roll and I also ran out of one colour so you can get an interesting colour change in your project.
Some prints I have done can take over 20 hours….
On the very first thing I wanted to make from scratch I met one of the printers first limitations wanting to make a tray to go on the bottom of a bird feeder to catch the seed.
I used Tinkercad to create it but the printer limits the diameter of a round tray to 154mm (object limits are 254x154x70) and so lots of bird seed still ends up on the lawn (but it helps).
Assuming you told the printer you are American you can use the dremel print cloud which I used to check and slice the job before it sends it to the printer also allowing you to view the job printing with the built in camera.
The printer comes with two rolls of filament and have managed to spend three figures buying some more (all PLA green, red, orange, blue and pink).
You can even 3D print a spindle so you can use other vendors larger rolls of filament with the printer.
Check on youtube and I found Adam Savage “Tested: Dremel 3D45 3D Printer!” a good place to start.
You may also get some filament bargains from a UK high street catalogue stores online clearance outlet site.
Some of my filament was designed for the previous model so no auto RFID filament type identification but it is easy to set and is saved even when you turn the printer off (it uses 16 watts when idle).
Most of the items I have tried have turned out pretty good but with some warping (in the corners) and a flowerpot which I had to scale down to print had issues breaking off the support parts (supports are needed print in which on the finished item would be in mid air) but I then realised when scaling down it would reduce the gaps for the supporting items thus they would not break off cleanly.
At the moment I am printing a TARDIS (in pink) from the design linked to on the YouTube video I mentioned.
Version 2 of the Tardis will be in blue.
Some sample jobs are stored in the printers internal memory and on the 16Gb USB stick provided (also has their slicing software on it for Windows and MAC).
Any problems with it? Well yes, the first roll of filament must of got tangled so make sure the filament is not crossed on the roll.
I am generally impressed and it being in a cabinet does have advantages but an open one can cost less and print larger items.
Llevo en el mundillo de las impresoras 3D desde el ao 2013, as que intentar hacer un comentario lo ms objetivo posible basado en mi experiencia.
Si no me equivoco, es la primera impresora de Dremel con cama caliente, y por lo tanto, compatible con filamento ABS y Nylon. Tambin es compatible con filamento flexible, ya que tiene un extrusor directo (nada de sistema Bowden), aunque no estoy seguro si Dremel lo comercializa.
La impresora est pensada para utilizar principalmente filamento de la misma marca, ya que las bobinas entran perfectas en el hueco destinado a ellas y son identificadas automticamente por la impresora a travs de una etiqueta RFID, ajustando la impresin a los parmetros exactos para que salga con la mejor calidad posible. No obstante, es posible utilizar filamento de 1.75mm de cualquier otra marca, siempre y cuando se ajusten las propiedades de impresin al filamento utilizado. En este caso es probable que la bobina no entre en la impresora, pero buscando un poco por Internet puedes encontrar adaptadores imprimibles para que quede lo mejor posible.
Algo que me encanta de este modelo es que est perfectamente documentada en la web de Dremel, incluso tiene vdeos explicativos de cmo realizar algunos pasos (reemplazo de componentes, solucin a atasco del extrusor o utilizacin del software).
La calidad de construccin es muy correcta, los acabados me parecen mejor ejecutados que en el modelo 3D20 que tambin he podido probar. El cable del extrusor es un cable flexible que no entorpece para nada la impresin, y el de la cama caliente se queda siempre por debajo, por lo que tampoco va a impedir el paso del extrusor.
La nivelacin de la base es semiautomtica, ya que el extrusor integra un servo con final de carrera para detectar automticamente la base. La misma pantalla de la impresora va indicando hacia dnde girar las ruletas de las esquinas para que quede completamente nivelada.
La conectividad de la impresora es genial, dispone de conexin USB para conectarla al PC o para conectar pendrives, lector USB para pendrives y conexin Ethernet. Tambin se puede conectar a travs de WiFi. No dispone de lector de tarjetas SD o micro SD como otros modelos, pero la verdad, no creo que sea necesario. El software para imprimir es oficialmente el de Dremel (est en su web), aunque tambin es compatible con otros como Cura y Repetier-Host.
Uno de los problemas tpicos que he tenido con impresoras como sta de solo dos varillas para el eje Z ha sido el “Z-wobble” (en espaol, el ondulado de la pieza a lo largo del eje Z). En esta impresora no he notado ese problema, ya que el eje Z es lo suficientemente rgido como para no flexar.
Me ha parecido un detalle curioso que la impresora integre una cmara en una de las esquinas, con ella se puede grabar todo el proceso de impresin para tener un vdeo.
No es una impresora barata, pero es una alternativa real a otros modelos del mercado, que funciona bien nada ms sacarla de la caja y con muy buen soporte para que nunca te deje tirado. Quiz no sea la impresora ideal para gente que imprime una vez a las mil, pero para quien la utilice en el da a da (incluso en pequeas oficinas), es una apuesta segura.
Actualizacin 29/06: Aado algunas fotos y un vdeo. Ya he realizado bastantes impresiones y no he encontrado un solo problema, increble. Hasta he conseguido imprimir plstico ABS antiguo que tena en casa sin un solo problema de warping (con hotend a 230C y cama a 100C), algo que hasta ahora no haba conseguido con ninguna otra impresora (varias Prusa i3, una CoreXY casera y una delta). El nico “defecto” es que la bobina que tengo no cabe dentro del alojamiento de la impresora (el cual es demasiado pequeo, probablemente hecho a propsito para intentar vender ms filamento de Dremel), pero con la tapa semicerrada y la bobina colocada en un soporte externo las piezas salen igual de bien. En serio, si ests harto de resultados mediocres (especialmente con ABS y el tpico warping) y tienes dinero ahorrado como para hacerte con ella, ni lo dudes.
Pour s'initier très simpleme
Dremel est reconnu pour la simplicit d’utilisation de ses produits bien finis et robustes.
La 3D40 ne fait pas exception.
La mise en route est simplifie, l’imprimante cherche se mettre jour ds quelle est relie internet.
Ce que nous aimons ce sont les fichiers de projets disponibles en tlchargement, le plateau acier d’impression qui permet de dtacher la pice sans soucis.
Le logiciel Digital 3D est agrable prendre en main pour crer ses propres projets. Mon fils progresse bien plus vite que moi. Il aime pouvoir imprimer en mode brouillon pour tester ses pices.
L’imprimante utilise des fils en PLA: tants encore novice cela nous convient parfaitement.
La fte des pres approchant, ce cadeau high tech est idal pour runir les gnrations autour d’un projet commun.
Solidly constructed and easy to get started with
The printer came very well packed with everything well protected. This is a big printer and has an opening lid section as well as a front door. Once assembled, which is very easy, there’s a short delay after switch on and the printer bursts into life. The printer has USB and Ethernet ports as well as WiFi. I used the LCD touchscreen to connect to my WiFi, the printer then downloaded a software update. The building platform clips into the printer and this can be levelled from the touchscreen. Magnetically attached on top of the building platform is the Flex plate which can be removed and then flexed to remove the printed object, it’s really easy to do. The supplied USB stick, which plugs into the front of the printer has some designs on it, the printer also has some designs built in, and these can be selected and the printer set to print. During the printing process there is a slight smell of melting plastic. The usb stick also has the Dremel slicing software, this can also be downloaded from the Dremel site; this is based on the common Cura program and runs on 64-bit machines only; it allows conversion of various formats to run on the 3D printer. Although very easy to get up and running the printer is very well constructed; this is a versatile machine with lots of potential and I will enjoy exploring its capabilities.
Ich besitze den Drucker jetzt einen Monat und bin sehr zufrieden mit dem Produkt. Ich finde das die RFID Funktion gerade am Anfang, vieles Leichter macht und man sich Step by Step” sein Wissen ber Temperaturen und Druckgeschwindigkeiten erarbeiten kann. Mittlerweile Drucke ich jetzt auch schon mit anderen Einstellungen und Filamenten, als den Vorgegebenen und habe dabei sehr gute Ergebnisse. Auch die Filamente bei Dremel sind sehr gut und bringen krftige Farben. Bis jetzt hatte ich nur mit einer Rolle von Dremel Probleme (PLA rosa), was aber vielleicht auch schon mit dem Alter des Filaments zu tun haben knnte.
Die Kamera Integration ist nett, aber ich finde diese knnte man noch ausbauen. Da der Drucker am WLAN hngt knnte ich mir z.B. eine kleine Handy App vorstellen, um den Druck aus einem anderen Zimmer zu berwachen. Aber der Drucker verfgt ber einen Webserver welche es erlaubt die Bilder per URL aufzurufen.
Die Slicer Software von Dremel untersttz unerfahrene 3D Druck Neulinge sehr gut, mittlerweile habe ich auf Simplify3d und andere Programme gewechselt, da wie gesagt die Lernkurve beim Drucken steigt.
Da ich es hier fters gelesen habe, das Display Flackern sehe ich ebenfalls auf meinem Drucker jedoch so schwach das es nicht weiter strend ist.
Mittlerweile habe ich ca. 400m Filament gedruckt (30% ABS, 70%PLA) und kann noch keine Ermdungserscheinungen an der Dse erkennen.
Fazit: Ich bin derzeit noch sehr zufrieden mit dem Drucker. Mittlerweile habe ich auch vergleiche zu anderen 3D Druckern in meinem Umfeld und kann daher sagen das das Gert sehr przise arbeitet. Auch die geschlossene Bauweise ist ein groer Pluspunkt, gerade wenn man mit ABS arbeitet. Ich wrde mir aber wschen das Dremel seine Filament Palette aber weiter ausbaut.
Tout simplement épatante, y compris pour novice
Mme si vous tes totalement novice dans l’exprience imprimante 3 D, cette machine saura vous prendre par la main.
Tout est simple, intuitif, abordable. Il suffit de se laisser guider !
Elle est livre avec ABSOLUMENT TOUT le ncessaire : plaque et films de construction, bobine de filament de 500 grammes, un cble USB, une spatule, une cl USB 16 Go, un outil de dsobstruction et son mode d’emploi.
Branche en wifi sur mon PC, on peut immdiatement lancer un projet (pas mal de sites proposent des projets divers et varis).
J’ai t surprise du peu de bruit mis et de la vitesse d’excution (dpendra videmment du projet choisi).
A noter qu’elle est bien moins encombrante que suppose (un gros four micro-ondes pour vous situer).
En rsum, je ne lui trouve que des qualits. Si ce n’est videmment son prix, mais c’est une Rolls qu’on s’offre.
Ich besitze den Drucker jetzt einen Monat und bin sehr zufrieden mit dem Produkt. Ich finde das die RFID Funktion gerade am Anfang, vieles Leichter macht und man sich Step by Step” sein Wissen ber Temperaturen und Druckgeschwindigkeiten erarbeiten kann. Mittlerweile Drucke ich jetzt auch schon mit anderen Einstellungen und Filamenten, als den Vorgegebenen und habe dabei sehr gute Ergebnisse. Auch die Filamente bei Dremel sind sehr gut und bringen krftige Farben. Bis jetzt hatte ich nur mit einer Rolle von Dremel Probleme (PLA rosa), was aber vielleicht auch schon mit dem Alter des Filaments zu tun haben knnte.
Die Kamera Integration ist nett, aber ich finde diese knnte man noch ausbauen. Da der Drucker am WLAN hngt knnte ich mir z.B. eine kleine Handy App vorstellen, um den Druck aus einem anderen Zimmer zu berwachen. Aber der Drucker verfgt ber einen Webserver welche es erlaubt die Bilder per URL aufzurufen.
Die Slicer Software von Dremel untersttz unerfahrene 3D Druck Neulinge sehr gut, mittlerweile habe ich auf Simplify3d und andere Programme gewechselt, da wie gesagt die Lernkurve beim Drucken steigt.
Da ich es hier fters gelesen habe, das Display Flackern sehe ich ebenfalls auf meinem Drucker jedoch so schwach das es nicht weiter strend ist.
Mittlerweile habe ich ca. 400m Filament gedruckt (30% ABS, 70%PLA) und kann noch keine Ermdungserscheinungen an der Dse erkennen.
Fazit: Ich bin derzeit noch sehr zufrieden mit dem Drucker. Mittlerweile habe ich auch vergleiche zu anderen 3D Druckern in meinem Umfeld und kann daher sagen das das Gert sehr przise arbeitet. Auch die geschlossene Bauweise ist ein groer Pluspunkt, gerade wenn man mit ABS arbeitet. Ich wrde mir aber wschen das Dremel seine Filament Palette aber weiter ausbaut.
Depuis le temps que l’achat d’une imprimante 3D tait dans un coin de ma tte, j’ai enfin pu concrtiser cette envie.
Premirement, je suis un total dbutant dans la matire, heureusement j’ai des amis qui sont expert, c’est sur eux que je me suis repos pour commencer crer et imprimer mes premires crations.
Au dballage, l’imprimante est plus lgre que ce que je pensais, Dremel fait le choix du PLA pour sont imprimante, un bon choix puisque ce matriaux d’origine vgtale et respectueux de l’environnement.
L’enceinte confine permet de garder la pice en fabrication au chaud et ainsi rendre une impression bien meilleurs.
Le plateau flexible est quand lui extrmement pratique pour dcoller la pice, mme si sur conseil de mes amis, j’imprime sur une couche de scotch de peintre bleu pour garder le plus longtemps possible le plateau intact et facilit le dmoulage.
Le logiciel de cration est trs simple d’utilisation et il convient parfaitement mon niveau, j’ai dj cr 5 pices, toutes en vu d’tre mont ou de confirmer la future fabrication de pices usin partir de ces bauche en PLA pour une customisation de moto.
Le seul petit point ngatif que je trouve c’est l’obligation d’utiliser des bobines propritaire Dremel, mais cette obligation et contournable avec la fabrication d’un dvidoir externe, donc je ne vais pas enlever d’toiles pour a, surtout que le choix de couleurs chez Dremel est assez important et que la qualit du PLA est au rendez-vous.
Pour finir, bien que le prix soit important, on une machine complte, trs facile mettre en uvre (tout les rglages sont indiqus) avec une facilit d’apprentissage et de ralisation au top et surtout une qualit d’impression excellente, c’est vraiment une machine excellente pour apprendre l’impression 3D et raliser normment de projet, moi en tout cas j’en suis totalement fan, sans compter que selon l’avis de mes amis habitu diffrente machine, la qualit et la vitesse d’impression sont exceptionnelles, j’en ai deux ou trois qui commence regarder pour vendre leur modle actuel afin de prendre celui-ci.
Hsitant depuis plusieurs annes franchir le pas de l’impression 3D, la premire exprience avec ce modle Dremel 3D40 Flex Digilab est une russite. L’expertise de la marque se voit au site dremel3d qui propose des Fichiers 3D, des vidos, des projet et le tlchargement des logiciels maison.
L’imprimante arrive dans son carton d’origine trs bien emballe. La mise en route prend une dizaine de minutes. Au dballage, avec l’imprimante, on trouve 1 plaques de construction, 2 films de construction, une bobine de filament Dremel PLA blanc de 1,75 mm de diamtre et 500 g au total, un cble USB, une spatule pour nettoyer la plaque d’impression, un mode d’emploi, une cl USB 16 Go et un outil de dsobstruction.
Branche en ethernet, l’imprimante peut aussi se connecter en Wifi. Ds la mise en route, la mise jour du Firmware s’applique. Ensuite, le chargement de la bobine dans l’imprimante et l’admission du filament dans l’extrudeuse sont enfantins. Toute seule, la machine ralise la fonction de mise niveau assiste en 2 points pour le calibrage.
L’cran couleur de la machine donne accs toutes les informations de rglages et de construction. Ainsi, il est possible de produire des objets prenregistrs dans la mmoire pour un premier essai. On peut aussi trouver partout sur internet des projets que l’on enregistre vers la cl USB fournie depuis l’application Dremel DigiLab 3D Slicer. L’imprimante dispose d’un port USB en faade. Le site dremel3d permet de charger des dizaines de projet vers la cl puis la mmoire de la machine ou directement d’un Mac ou d’un PC vers l’imprimante.
En fonctionnement, l’imprimante s’illumine et avec les deux portes fermes, elle reste trs silencieuse. Il est important de regarder la dure d’impression annonce pour chaque objet car certains peuvent videmment tre trs longs.
Bien sr, la qualit des objets dpend bien videmment de la qualit du projet.
Au final, une machine simple utiliser, qui se rgle seule et dispose du soutien de la marque et de sites internet pour fournir des projets utilisables directement. Pour les plus dcids, il est aussi possible de raliser ses propres projets avec des logiciels de CAO. Les recharges de filament Dremel se situent autour de 20-30
Good 3d printe
This printer is very easy to use and setup. I’ve had a previous 3d printer by Dremel, and they’ve really aimed to improve the usability. In particular, changing the spool (which is a lot more accessible) is easier, and changing/levelling the platform is more straightforward.
On the downside it wasn’t obvious how I could convert some previous 3d models – the literature seemed to suggest I could move my existing files across – however, I couldn’t get these to appear unless I ran them through the new software on my mac or PC.
I also had a couple of models fail as I tried to keep them too small, but they still looked well within spec tolerance, so that was slightly disappointing.
However, all in all it’s a very good printer, and easy to get going with.
Pretty dece
The item is very well packed; there is ample protection.
No assembly is required. You just take it out the box and unpeel the plastic wrapping and tape.
It is a PLA only machine because it does not have a heated bed.
You HAVE TO use the Dremel filament else it will void the warranty.
It has a decent IPS colour touchscreen. It is very responsive.
The interface is very intuitive.
It’s a single extruder BUT it’s very advanced.
It is comparable with Autodesk print studio software.
You can only “print” one colour at a time.
It comes with a flash drive. (You can plug this in instead of having to use a computer.) (The printer has its own internal memory so you can load items on to it and put the flash drive away.)
The print quality is CONSISTENTLY very good. I have had zero fails.
There seems to more emphasis on printing models created by others than on creating your own models.
This is a reliable, dependable 3D printer. I recommend it to schools due to its ease-of-use and auto calibration.
Wahnsinn, was 3D Druck möglich mach
Der Dremel 3D Drucker 3D40 FLE kommt mit etwas Zubehr einher: PLA-Filament (wei), USB-Kabel, USB-Flash-Laufwerk mit Slicing-Software, Objektentfernungswerkzeug, 2x Druckmatte, 1x Entstopfungsdorn, 1x Anleitung, 1x Kurzanleitung im Karton. Das Auspacken und Aufbauen hat gut eine halbe Stunde in Anspruch genommen. Mittels des beigelegten USB-Sticks wre man sofort und autark einsatzbereit gewesen. Ich habe ihn jedoch an das Internet angeschlossen und somit gleich eine neue Firmware aufgespielt (man wei ja nie, wie alt die ist, die beigelegt wurde). Das hat nochmal gute 10 Minuten in Anspruch genommen. Bis dann alles fertig und kalibriert war, vergingen nochmals 15 Minuten. Vom ersten Aufheizen bis Druckanfang sind lediglich 2 Minuten vergangen. Vor dem Druck wird ein Rahmen um die zu druckenden Teile gelegt und dann mit dem eigentlichen 3D Druck begonnen. Die Ausrichtung und Nivellierung erledigt der Drucker von ganz alleine.
Der erste Versuch war bei uns ein Sparschwein, welches 6 Stunden bis zur Fertigstellung gebraucht hat. Das Schweinchen ist sehr stabil und sieht toll aus. Um an das angesparte Geld zu kommen, muss man tatschlich einen Hammer benutzen. Denn durch runterfallen oder umher werfen ist nichts kaputt gegangen. Etwas abgeschliffen kann man es noch toll und individuell bemalen. Beim ersten Druck entstanden dann leider noch kleine Fden, die vom Drucker zum Schweinchen hingen.
Der zweite Versuch war dann eine etwas kleinere Fingerpuppe, die noch gut 2 Stunden gedruckt hat. Dieser Druck lief gut, am Ende hing dann nur noch ein etwas lngerer Faden vom Drucker herunter, der leicht entfernt werden konnte.
Der dritte Druck hat nochmal 6 Stunden bentigt. Ein Gecko mit flexiblen Elementen. Da waren wir besonders gespannt, ob der Drucker genau genug arbeitet, damit die ineinander greifenden Teile auch wirklich beweglich sind. Wir wurden nicht enttuscht. Der Druck war sehr genau und die einzelnen Teile voll beweglich. Wie aber immer bei 3D Drucken muss man am Ende ein paar kleinere Fden beseitigen, die zwischen den Teilen hngen. Mit etwas Schmirgelpapier oder einer Feile sind die Sachen aber schnell einsatzbereit.
Der Gecko ist mittlerweile ein Spielzeug fr meinen Sohn (2,5 Jahre). Das Teil hat er noch nicht kaputt bekommen, obwohl er durchaus versucht hat, die Teile voneinander zu trennen. Also sind die Drucke sehr stabil und halten auch einiges aus.
Nach jedem Druck muss die Druckplatte entnommen und gereinigt werden. Ein kleiner Spachtel hilft dabei. Leider lassen sich die Druckplatten nicht vollstndig reinigen, man sieht immer noch die Reste von vorherigen Drucken, aber es lsst sich trotzdem schon etwas neues darauf fertigen. Ich vermute, dass man ab und an auch neue Druckmatten kaufen muss. Nach den 3 Drucken ist die Filamentrolle ca. zur Hlfte geleert. Der nchste Kauf von uns wird ein wenig farbliches Filament sein, um da auch einmal zu sehen, was das Gert so kann. Weiterhin ist gerade ein 13-stndiger Druck im Gange, der ein kleines Spielzeugauto mit beweglichen Teilen produzieren soll. Ich bin sehr gespannt.
Insgesamt Wahnsinn, was mit der heutigen Technik schon alles mglich ist. Es gibt schon viele, viele kostenfreie Vorlagen fr den 3D Drucker und noch mehr kostenpflichtige Vorlagen. Auch kann man mittels eines Programmes auch 3D Drucke selbst erstellen. Dafr braucht es dann allerdings schon etwas mehr Fachwissen.
Da wir Neulinge auf dem Gebiet sind, knnen wir leider keinen Vergleich zu anderen 3D Druckern ziehen. Insgesamt sieht die Verarbeitung aber sauber aus und die Drucke werden recht schnell produziert. Wer sich den 3D Druck als Hobby auserkoren hat, dem stehen viele Welten offen. Wir sind begeistert und vergeben die vollen 5 Sterne.
Sollten sich noch neue Erkenntnisse ergeben, werde ich die Rezension selbstverstndlich noch ergnzen.
The future
Well what a gadget. It was straightforward to set up but you do need to have space to put it, it is about the size of a large microwave. You feed it plastic filament rather than paper, tell it via the computer what you want and off it goes. My main issue for us as a family is that we really don’t need one and having agreed to test drive this one I thought I might change my mind, but I didn’t. My 15 year old is doing art for GCSE and she felt she could get use of it for her projects but I would not spend the hundreds of pounds just for that purpose. I can see how an engineer might make great use of it but as a family ink remains our most common type of printing.
Dremel Printer 3D40 FLEX (230 V, Flexible Build Plate, 1 PLA Filament, 3.5 Inch LCD Touchscreen)
As fans of all things gadgety, we were thrilled to be given the opportunity to test this ‘Dremel Printer 3D40 FLEX (230 V, Flexible Build Plate, 1 PLA Filament, 3.5 Inch LCD Touchscreen, Slicing Software)’. It is a sizeable beast – almost 20kg in the box, and does require a rather large amount of desk space, so be warned! As I’m certain is the case with all 3D printers, there is a significant learning curve if you haven’t used one before – while the product description does say it is user-friendly, and indeed it is, this is relative, and you do need to be technologically competent to be able to use the machine. To put this in context, my tester lectures in computing at an FE college and still had to teach himself about the processes etc.
The machine itself is well-constructed – it survived despite damage to the external box from the courier – and has good access and visibility, with both top and front openings and internal lighting. Initial set up and calibration was easy, and it comes with clear documentation – both a quick guide for those first impatient moments and a full manual are included. There are some built-in designs but there are also lots available on the internet, and my tester made a Thunderbird 1 model (see attached photo). As the full-size template would have used the entire reel of filament, he scaled it down to half size which worked well. Printing this 7cm tall version took 75 minutes – 3D printing is a relatively slow process, this is apparently a decent speed – whereas the full-size 14cm version (obviously larger all over, not just taller) would have taken nearly five hours. The control software gives accurate guidance as to how long your design will take to print, and also how much filament it will require. We were pleased to note that the printing process is both quiet and there was no smell from it at all (however one should still make sure that the printer is used in a reasonably well-ventilated area, as obviously plastic chemicals aren’t the best to breathe in).
This printer only uses PLA filament – apparently others can use different materials – and one reel of white PLA filament is included in the box. As I said, half of a reel was required to make the 7cm tall Thunderbird model, so please do bear in mind the ongoing costs of filament before purchase.
Overall we are very pleased with this device, and excited to see what else we can make (I’ve found a template to make Groot once he gets good at it!). It is well-designed, sturdy, and relatively user-friendly. Great introduction to the world of 3D printing.
The future
Well what a gadget. It was straightforward to set up but you do need to have space to put it, it is about the size of a large microwave. You feed it plastic filament rather than paper, tell it via the computer what you want and off it goes. My main issue for us as a family is that we really don’t need one and having agreed to test drive this one I thought I might change my mind, but I didn’t. My 15 year old is doing art for GCSE and she felt she could get use of it for her projects but I would not spend the hundreds of pounds just for that purpose. I can see how an engineer might make great use of it but as a family ink remains our most common type of printing.
Simple and clear, newbie up operating within 5 mins
First 3d printer I’ve owned and I literally have it unpacked and printing within 5 minutes. So simple and straight forward and comes with some designs on a flash drive so literally off to a flying start. AAAAA*
Solid consistent prints
Although expensive this is a great printer that produces consistent quality prints. It’s super easy to use and nicely self contained. It’s quiet, much quieter that open bed style printers. The smells are kept to a minimum with its inbuilt filter and fan. Fits nicely on a worktop. Only downside is the print bed is a bit small.
Januar 2019 hab ich mir einen Dremel 3D40 gegnnt und recht zgig in das Thema eingearbeitet.
Es war eine spontane Entscheidung, weil ich selbst drucken wollte und nicht immer wieder “doch recht hohe Betrge” fr externe Dienstleistungen bezahlen mchte.
Ein grundsolides Gert und insbesonder mit PLA luft der Drucker “out of the box”. Mit der Zeit werden die Ziele / Aufgaben und Anforderungen komplexer und natrlich informiert man sich auf dem Markt, was es sonst noch so an Druckern gibt. Eine gewisse Zeit hat sich eine kleine Enttuschung breit gemacht, ob der Wahl fr den 3D40, weil ich mich nicht ausschlielich auf Standard-PLA der Marke Dremel beschrnken wollte.
Dann kam die Experimentierphase und mit ein paar kleinen Manahmen (externer Spulenhalter, MicroSwiss Dsen 0,2 bis 0,6 oder BuildTak Druckauflage…) kann ich besttigen, dass man nicht unbedingt ein Heizbett fr andere Filamentsorten bentigt. Natrlich kommt man ohne Heizbett an seine Grenzen und htte ich geahnt, wie sehr es mir Spa macht, ich htte zumindest auf den 3D45 gesetzt.
Aber es geht auch so!!!! Ich verabreite mit guten Ergebnissen PLA (inkl. Wood oder Flax), PETG, TPU und die Teile sind mit der Zeit immer komplexer geworden. Zum grten Teil handelt es sich um Funktionsteile, welche ich mit Fusion 360 selbst zweichne und als Slicer setze ich Simpflify3D (kostenpflichtig) ein.
In den gut 4 Monaten habe ich efektive Druckstunden von 655 Stunden und keine nennenswerten Probleme.
Ein grundsolide aufgebautes Gert und mit dem geschlossenen Bauraum auch einen nicht zu verachtenden Vorteil.
Warum nicht 5 Sterne?
– Die Druckauflagen von Dremel (die Blauen) sind aus meiner Sicht nicht wirklich zu gebrauchen.
– Ich drucke nur ber den USB Stick, da der Drucker unter Windows 7 zwar erkannt wird, jedoch kein Treiber gefunden werden kann. Auch nicht nach intensiver Suche im Internet und ich scheine auch nicht der einzige Problemfall diesbezglich zu sein.
Wenn ich eine positive Nachricht bzw. Lsung vom Kundenservice erhalte, sei es ein Link zu einem passenden Treiber oder Aufklrung woran es liegt, dann gibt’s mit Recht den fnften Stern.
Qualitativ ein sehr solider 3D Drucker, der zwar preislich etwas hher ausfllt, aber vielfach unterschtzt wird. Mit dem Drucker kann man viel und ohne groe Experimente Kunststoffteile produzieren. Die Grenzen wurden wohl aus Marketinggrnden (eigener Filamentverkauf etc.) enger gesetzt, als das Leistungsvermgen des Druckers.
Was mir noch fehlt, ist ein zweiter Drucker! Aber das ist eine ganz andere Geschichte 😉
Tolles Gerät für Hobbynutze
Ich bin ein absoluter Neuling auf dem Gebiet des 3D-Druckens. Begeistert habe ich also Kollegen und Freunden, die schon lnger dabei sind, meine neuste Errungenschaft gezeigt. Zu klein sei der Bauraum, bekam ich da meistens zu hren. Fr mich als Anfnger und Hobby-Tftler kann ich das allerdings nicht besttigen. Man kann auf mit einem Druckvolumen von 25,5 x 15,5 x 17,0 cm tolle Ideen umsetzen.
Etwas aufgeregt war ich, ob man mit der Bedienung eines doch komplex erscheinenden Gertes berhaupt auf Anhieb klarkommt. Beigelegt ist eine Anleitung, die sicher durch die Prozesse fhrt. Auch der LCD-Touchscreen ist bersichtlich gestaltet. Ein weies Filament ist im Lieferumfang enthalten, so dass man erstmal direkt nach dem Auspacken gleich loslegen kann. Man braucht einen standfesten, vibrationsfreien Untergrund, der exakt gerade ist. Einen solchen Platz musste ich eine Weile suchen, dann konnte es auch schon losgehen. Das Gert ist bei der Suche sozusagen behilflich, denn es nivelliert die Druckplattform vor jedem Druck.
Die Software muss noch heruntergeladen werden, dann mssen die ersten Einrichtungen am Gert vorgenommen werden. Man kann den Computer mit dem Gert ber WLAN oder LAN verbinden, auch ein USB-Anschluss ist mglich. Man darf hier keine Plug-and-Play-Qualitt erwarten. Ich denke, dass auch diejenigen Nutzer, die nicht vllig neu auf dem Gebiet anfangen, sich mit dem 3D-Drucker auseinandersetzen mssen. Ich habe einige Stunden gebraucht, bis alles optimal lief – die Zeit hat sich allerdings gelohnt und die Ergebnisse sind schon verdammt cool, auch wenn sie natrlich noch in den Kinderschuhen stecken. Hilfreich als Neuling empfand ich die zahlreichen Tipps und Tricks, die man in Internetforen und auf Homepages findet, zum Beispiel auch komplette Vorlagen, die man dann ber den Drucker ausdrucken kann! Ich werde noch einige Druckvorgnge brauchen, bis ich die Qualitt der Ergebnisse so weit optimiert habe, dass man damit vollkommen zufrieden sein kann. Fr Anfngermodelle sehen die Ergebnisse aber schon ganz passabel aus.
Also keine Angst vor dem neuen Gert, es ist kein Kinderspiel, aber auch nicht hohe Physik, man fuchst sich mit der Zeit schon rein!
Le futu
Prise en main un peu longue. Tlcharg fichier sur le web, mon Os a eu du mal mais a marche bien et c’est tout fait fascina
Für Anfänger nur bedingt geeigne
Ein 3D-Drucker – das wollte ich nun auch endlich ausprobieren… konkret hatte ich 2 Projekte im Sinn:
Die Umsetzung eines kleinen Geschenkartikels – eine kleine Statue, die ein paar liebe Menschen an etwas wichtiges erinnern sollte und die “Nachproduktion” eines Aufsatzes fr den Staubsauger, die so nicht mehr erhltlich ist. Wie toll, dachte ich mir, ist es doch, wenn ich Sachen nicht mehr wegschmeissen muss, weil ein Kunststoffteil irgendwann mal gerissen oder gebrochen ist.
Leider allerdings ist das doch deutlich schwieriger, als ich es mir vorgestellt habe.
Doch der Reihe nach:
Der Dremel 3D Druckers 3D40 Flex kommt mit USB-Kabel und -Stick, natrlich Netzstecker, zwei Klebestiften, einem Spatel und ein Dorn, mit dem man den Druckkopf reinigen kann, sowie einer Spule PLA Filament Wei. Es gibt auerdem eine ausfhrliche Bedienungsanleitung sowie einen “Kurzberblick”.
Der Drucker macht einen guten Eindruck und ist ziemlich schwer: Ca. 16 kg. Er ist etwas ber 50 cm breit und ungefhr 40 cm hoch und tief.
Der Start ist noch einfach: Einrichtung ist unkompliziert und auf fr Anfnger verstndlich – die Gebrauchsanweisung verstndlich und das (farbige) Touchscreen eindeutig.
Der Hersteller bietet auf seiner Homepage eine kostenlose Software an: DigiLab 3D Slice – die ist schon ein bisschen schwieriger zu verstehen und zu nutzen. Inzwischen habe ich in anderen Rezensionen von anderen Softwares gelesen… auch von Methoden, wie man bestimmte “unschne Nebenwirkungen” vermeidet. Ich muss allerdings ehrlich gestehen: Ich fand es ganz schn “anstrengend” und berlege mir, ob ich das Projekt “3D-Druck-Selbstgemacht” doch fallen lasse und mich Dingen widme, die ich besser verstehe.
Der Drucker selbst funktioniert – doch ich habe mir das Ganze wesentlich einfacher vorgesgellt. Auch die kleinen Fehler, die verstopfte Dse (Druckkopf…) – puh, damit habe ich nicht gerechnet. Ich wrde sagen als FAzit: Das Gert ist okay – aber fr Anfnger vielleicht nicht das Optimale.
__________________________________________
VEREINFACHUNG DES 3D-DRUCKVORGANGS
Dieser Drucker ist so einfach, dass er in einer Unterrichtsumgebung verwendet werden kann, sodass auf viele der etwas fummeligeren Aufgaben achtgegeben wurde. Zum Beispiel,
1. Er verfgt ber einen automatisierten Plattformnivellierungsmechanismus, der vor jedem Druck ausgefhrt wird, und ber ein sehr einfaches Verfahren fr eine grobkrnigere Nivellierung des Typs, das Sie nur nach dem Umstellen des Gerts tun mssen.
2. Der 3D40 Flex unterscheidet sich hauptschlich vom 3D40 durch die Hinzufgung einer flexiblen Druckplattform, die das Entfernen von Modellen nach dem Drucken erleichtert. Grere Modelle springen ab, wenn Sie die Platte biegen.
3. Es wird nur eine Art von Filament verwendet, Dremels eigene Marke fr PLA. Dies bedeutet, dass bei den Druckeinstellungen weniger Sorgfalt erforderlich ist, als wenn Sie zwischen verschiedenen Filamenttypen oder zwischen denselben Filamententypen verschiedener Hersteller gewechselt htten. Es ist auch viel sicherer fr zu Hause oder in der Schule als ein Filament wie ABS, das beim Schmelzen krebserregende Dmpfe abgibt.
4. Der Drucker verfgt ber viele verschiedene Anschlussmglichkeiten. Sie knnen einen Computer direkt ber ein USB-Kabel oder ber ein Netzwerk mittels WLAN- oder Ethernet-Kabel an den Computer anschlieen. Zudem verfgt er ber einen USB-Anschluss, wenn Sie eine Datei von einem USB-Stick aus drucken mchten.
5. Die Druckerbauflche ist vollstndig geschlossen, wodurch die Lufttemperatur um das Modell herum konstant bleibt und das Eindringen von Staub in den Druckmechanismus verhindert wird.
Aber selbst bei einer Maschine, die viele Aufgaben vereinfacht, mssen Sie noch viel wissen, bevor Sie wirklich mit dem 3D-Druck beginnen knnen. Sie mssen nicht nur den Drucker selbst bedienen, sondern auch wissen, wie Sie mit der CAD-Software die zu druckenden Objekte entwerfen und die Art von Designs erstellen, die tatschlich gut gedruckt werden. (Die CAD-Software, die ich verwendet habe, ist Autodesk Fusion 360, die fr nichtkommerzielle Zwecke frei erhltlich ist). Sie mssen auch wissen, wie Sie die Slicer-Software verwenden, um Ihre Entwrfe in ein Format zu konvertieren, das ein 3D-Drucker versteht, und Ihre Entwrfe mit abnehmbaren Untersttzungsstrukturen vorbereiten, damit berhngende Teile whrend des Druckvorgangs nicht zusammenfallen. Glcklicherweise gibt es viele Online-Quellen (insbesondere auf Youtube), die einem Anfnger wie mir helfen, ein grundlegendes Verstndnis dieser Dinge zu erlangen. Der Rest, denke ich, funktioniert durch Versuch und Irrtum.
__________________________________________
GUTE ERGEBNISSE MIT DEM 3D40 FLEX ERHALTEN
Meine ersten Drucke mit diesem Drucker waren sehr enttuschend, aber nach vielen Anpassungen an den Einstellungen bin ich mit den Ergebnissen sehr zufrieden.
Eines der Hauptprobleme wurde durch einen dnnen Filamentstrom verursacht, der immer aus der Druckkopfdse austritt, whrend diese noch erhitzt wird. Dieser rollt sich zusammen und bleibt an der Dse haften, wodurch ein spaghettihnliches Durcheinander entsteht, und dieses verhedderte sich fast immer in der ersten Schicht eines Ausdrucks und ruinierte ihn. Dies scheint auch bei anderen Druckern ein hufiges Problem zu sein, und es scheint, dass eine Lsung darin besteht, dass der Drucker die Dse auf der Druckplattform wegwischt, wo der Druck zu Beginn des Erstellungsprozesses aufgebaut wird. Ich habe in der DigiLab 3D Slicer-Software von Dremel (ein kostenloser Download) keine explizite Option dafr gefunden, aber Sie knnen den gleichen Effekt erzielen, wenn Sie die Option Skirt’ missbrauchen. Verwenden Sie ein benutzerdefiniertes Druckersetup und setzen Sie Build Plate Adhesion Type’ auf Skirt’ und Skirt Distance’ auf 10 mm. (Wenn Sie die Option ‘Skirt Distance’ nicht sehen knnen, mssen Sie sie sichtbar machen, indem Sie ins Settings’-Men gehen und ‘Configure setting visibility’ auswhlen.) Dadurch wird in einem Abstand von 10 mm eine kleine Umrandung um die Basis des Druckbereichs gezogen, bevor mit dem Aufbau begonnen wird, und die unordentlichen Spaghettis auf der Dse werden in der Regel dort abgelagert. Wenn dies nicht weit genug ist, erhhen Sie den Abstandswert. Wenn jemand anderes eine bessere Lsung hat, wrde ich es sehr schtzen, wenn Sie einen Kommentar unter dieser Rezension hinterlassen wrden.
Ich bekomme auch sauberere Drucke mit glatterer Oberflche, nachdem ich die Drucktemperatur von 220 C auf 210 C gesenkt habe.
__________________________________________
EINSCHRNKUNGEN
************************
Nur PLA-Filamente
Eine der Haupteinschrnkungen dieses Gerts besteht darin, dass es nur zum Drucken mit PLA-Filamenten von Dremel vorgesehen ist, die in einer nicht standardmigen Spulengre geliefert werden, die in ein seitliches Fach passt. Es gibt mehrere Grnde, warum er angeblich nicht mit etwas anderem als PLA drucken kann. Einer davon ist die Messingdse, die nicht schwer genug fr alle Filamenttypen ist. Ein anderer Grund ist, dass er keine beheizte Druckplattform hat, die Sie fr Filamente wie ABS bentigen, um zu verhindern, dass Modelle whrend des Druckvorgangs schrumpfen und sich von der Bauplatte lsen. Schlielich kann nur bis zu 230 C gedruckt werden, und viele Filamente erfordern eine heiere Dsentemperatur.
Viele Menschen online berichten, dass PLA-Filamente anderer Marken problemlos mit dem 3D40 verwendet werden knnen. Dies kann viel Geld sparen, da die Marke von Dremel erheblich teurer ist. Dies bedeutet nur, dass Sie Ihren eigenen Spulenhalter neben der Maschine aufstellen mssen, der Filamentspulen der herkmmlichen Gre aufnehmen kann. Sie knnten sich einen in 3D ausdrucken!
Beachten Sie, dass der 3D45-Drucker von Dremel andere Filamenttypen als PLA akzeptieren kann und ber eine beheizte Druckplattform verfgt. Dieses Modell ist jedoch teurer.
************************
Kleines Druckvolumen
Der 3D40 kann nur Objekte drucken, die zu einem 255 x 155 x 170 mm groen Druckvolumen passen, was ich ziemlich klein finde. Grundstzlich knnen Sie Objekte jedoch in mehreren Teilen drucken und sie miteinander verkleben, um etwas Greres herzustellen.
__________________________________________
ZUSAMMENFASSUNG
Mit dem 3D40 habe ich groartige Ergebnisse erzielt. Er ist eine Herausforderung, die ich aber bisher geniee. Ich wrde ihn auf jeden Fall fr jemanden empfehlen, der sich ernsthaft mit dem 3D-Druck beschftigen mchte.
Ich hatte bisher noch keine Verwendung fr eine 3D-Drucker im privaten Bereich. So dachte ich.
Jetzt kam ich in den Genuss, einen testen zu drfen.
So ganz einfach, wie bei einem Drucker zum Beispiel, luft die Einrichtung nicht. Man muss eine feste und stabile Unterlage haben, die mglichst nicht anfngt mit vibrieren oder wackeln. Auerdem sollte der Drucker, mit einer Wasserwaage ausgerichtet werden. So da nachher beim Druckvorgang keine Abweichungen entstehen.
Die kostenlose Software kann man sich von der Homepage direkt runterladen und die Einrichtung kann beginnen. Ich muss zugeben, alles in allem hat das bestimmt 2 – 3 Stunden gedauert. Aber es luft jetzt!
Es gibt wahnsinnig viele und tolle Mglichkeiten den Drucker fr sich arbeiten zu lassen. Auch sinnvolle Dinge knnen damit sehr einfach und unproblematisch erstellt werden. In Foren bzw. auf Hompages findet man tolle Vorlagen die man sich dann ausdrucken kann. Es fngt an bei Deckeln z.B. fr einen Thermomix und geht weiter ber Blumenkbel, Spielfiguren (Schach), etc.
Kurzum, ich bin begeistert. Es fhrt einen hervorragend in eine neue Welt, mit mannigfaltigen Mglichkeiten. Es macht unfassbar Spa, es auszuprobieren. Die Mglichkeit nicht nur spielerisch damit zu arbeiten, sondern auch wirklich Teile selbst herzustellen, die man im Alltag verwenden kann, ist genial. Ich bin uerst Dankbar dafr und empfehle es ambitionierten Hobby 3D-Druckern gerne weiter.
Habe den Drucker nun seit zwei Monaten in Betrieb und bislang haben mich die Ergebnisse immer sehr zufrieden gestellt. Lediglich bei dem Stoppen nach der Bearbeitung einer bestimmten Ebene (Layer) hatte der Drucker nicht das gemacht, was ich mir gewnscht htte. Da ich seit dem ersten “Fail” aber keinen Druck mehr gestartet habe, der diese Funktion gebraucht htte und es zwischenzeitlich zwei Firmeware Updates gab, mchte ich fr diese Sache nicht voreilig einen Stern abziehen.
(Bilder und ein Update der Rezenssion nach erneutem Test folgen)
Ansonsten bin ich sehr zufrieden mit dem Drucker!!
(Kamera und WLAN habe ich bislang nicht bentigt – von daher kann ich dazu nichts sagen)
Not knowing anything about 3D printing and after doing a lot of research . I decided to purchase the Dremel 3D45 . I am developing a product and I needed to protype parts . I have to say this machine worked like a dream . The prints far exceeded my expectation . Because I was designing the product myself and I am not an engineer it was great to print the parts and see how they all assembled .I needed a reliable printer that would just print with no delays .
I would highly recommend this printer .
There was only one problem I incurred that produced failed prints . The glue stick I was using had left residue on the auto bed leveling micro switch. This would give a wrong reading and upset the machine .
So if you get a failed print the fix is to clean the auto levelling micro switch . Otherwise no other issues .
Enfin une machine prête à l'emploi
La machine arrive dans un carton assez volumineux et lourd, le dballage n’est pas ais, mais une fois sorti on se rend compte de la “bte”. Elle est livre prte l’emploi avec tout ce qu’il faut pour commencer. la notice rapide est courte mais suffisante pour faire les premiers essais. Reste trouver des modles intressants autres que ceux fournis sur la cl usb.
Les plus:
Facile prendre en mains livre avec tous les consommables pour dbuter.
Le logiciel dremel, adapt de cura pour crer le programme envoyer la machine est bien calibr et tant driv d’un soft largement rpandu, on trouve de nombreux autos pour l’apprivoiser
La surface de travail est bien protge dans une enceinte ferme et avec l’air filtr, ce qui vite le contact avec l’utilisateur.
Menus de l’cran tactile clairs et simples, manque un peu de ractivit quelquefois.
Rglages automatiques satisfaisants pour la plupart des bobines de filament testes.
Le volume d’impression satisfaisant pour la plupart des objets courants que l’on souhaite crer, la surface chauffante, le rglage semi automatique du niveau de la plaque d’impression sont vraiment apprciables.
La connexion rseau possible de la machine avec une vue via la camra intgre qui permet de dporter la machine pas forcment cot de l’utilisateur et surtout de pour partager la machine avec plusieurs postes.
Les moins:
Commun toutes les machines de ce genre, le temps d’impression peut tre relativement long pour des objets complexes et / ou grands (jusqu’a 24h), ainsi que le nettoyage du modle imprim, entre les bavures et les supports de construction retirer suivant la matire de filament employe.
La version franaise ne prend pas en charge l’impression via le cloud dremel comme la version internationale, pour lier la machine au cloud il faut un token fourni par le firmware de la machine qui n’est pas disponible en franais. Dommage car via l’interface web, on peux stocker les modles et profiter de la puissance de calcul du cloud pour dcomposer les modles 3D en tranches et les envoyer l’imprimante de n’importe quel ordinateur connect internet.
Il est prfrable et plus simple d’utiliser les bobines ddies cette machine qui coutent le double que celles que l’on peut trouver ailleurs.
Lors des premires utilisations, la mise en place de la plaque en verre sur son support d’axe vertical est trs difficile, j’ai eu peur de la casser tellement c’tait dur. Aprs quelques montage dmontage, la rsistance chauffante du support se tasse un peu et c’est beaucoup plus souple pour la clipser.
De mme qu’au dbut, pour dcoller les modles imprims, cela rclame beaucoup de patience et de force mme avec la spatule fournie, car la colle est vraiment forte.
La connexion en wifi est possible mais uniquement sur un rseau non cach, et pas moyen de le faire reconnaitre autrement… de plus il demande un rseau lors du premier dmarrage.
La mcanique tant quand mme sollicite de longues heures, quid des pices d’usure? La machine est rcente, mais aucune pice ni mme aucun plan avec des rfrences ne sont disponibles. Aprs quelques mois / annes comment fait on pour entretenir / rparer la machine?
Pour conclure, la partie logicielle et firmware doit tre peaufine pour exploiter tout le potentiel de la machine. A l’utilisation, ce qui manque le plus c’est un logiciel simple de modlisation pour crer sois mme ses objets, il y en a quelques un gratuits mais trop orient 3D mcanique (freecad) ou alors l’extrme trop organique et complexe (blender). Je cherche encore une alternative accessible mi chemin entre les deux. Pour l’instant je me contente de trouver des modles tous faits :-/
Impresionante
perfecta, funciona a la primera, el nivelado guiado va genial. He tenido experiencia con otras impresoras y esta sin duda es la mejor.
Trs belle machine, je viens de changer ma dremel 3D20 contre la 3D45.
Bien pens et trs fonctionnelle, un lit chauffant de qualit, bien quip, Wi-Fi, camra pour suivre sur le rseau et mmoriser vos prints, dj les premier filamant de Dremel sont de bonne qualit les nouveaux sont encore mieux et surtout la prise en main et facile d’utilisation et un logiciel trs fonctionnel
Cela fait plus d’1 an que j’utilise des imprimantes 3D.
J’ai achet la Dremel 3D40 l’an dernier (voir mon commentaire sur amazon). J’utilise ponctuellement une Zortrax M200 mon travail, et j’ai aussi utilis des Dagoma DiscoEasy200.
Ce sont toutes d’excellentes machines mais avec des rserves : la 3D40 pour sa facilit d’utilisation mais rserve au PLA, la Zortrax pour ses performances mais un manque d’ergonomie, et la Dagoma pour son accessibilit mais quelques limites.
Et puis est arrive la 3D45 ! Elle ressemble beaucoup la 3D40 mais avec plusieurs amliorations :
Nouvelles possibilits de matriaux (ECO-ABS, NYLON, PETG)
Extrudeuse plus prcise (0,05 mm) allant jusqu’ 280C.
Plateaux chauffant jusqu’ 100C
Impression directement sur du verre (pas d’de film d’impression adhsif et donc pas de consommable hormis un peu de colle)
Lecteur RFID dans le support bobine (permet de reconnatre le cas chant le type de matriaux de la bobine).
Camra Wifi 720p (on peut voir l’impression en direct, via internet)
Ecran tactile plus grand
Meilleure interface avec apparition d’effets sonores.
Ventilateur de boitier avec filtre
J’ai ralis un premier test d’impression avec un fichier tout fait au format .g3drem, tlcharg sur le site Dremel. J’ai pu raliser un essai comparatif avec ma 3D40 en PLA, et la 3D45 en Eco-ABS.
Les temps d’impression ont t les mmes et la diffrence qui parait le plus est que le PLA est noir brillant alors que l’Eco ABS est plutt anthracite et moins brillant. Au niveau qualit, il y a moins de bavures avec la 3D45.
Je n’ai pas trouv d’informations sur la nature de l’co-ABS, un thermoplastique naturel . Il semble plus robuste que le PLA mais il l’est peut-tre moins que du vrai ABS. En tout cas il semble moins toxique que le vrai et dgage moins d’odeurs.
J’ai ensuite imprim la mme pice en PLA avec la 3D45, en utilisant ma bobine sans puce RFID. a fonctionne parfaitement, il faut simplement spcifier la machine le type de matriau, puis on peut ventuellement ajuster les tempratures et le facteur de vitesse du programme.
Les rsultats d’impression avec le mme filament sont trs proches entre les 2 machines. Il y a toujours moins de bavures sur la 3D45, mais peut-tre parce que la buse est neuve et toute propre !
Je n’ai pas encore exploit la deuxime bobine fournie, du Nylon, et la finesse 50 microns.
En tout cas les premires expriences avec l’Eco ABS et le PLA sont excellentes.
L’ergonomie et la facilit d’utilisation sont remarquables. On est vritablement accompagn pour mettre niveau le plateau, ou pour changer le filament.
Il y a moins de risque d’erreurs de paramtrage, grce la reconnaissance de la bobine.
La camra est un srieux atout. Une impression dure trs facilement plus d’une heure et il est bon de garder un il dessus.
Ich besitze den Drucker nun fast 1 Jahr und hatte ursprnglich den Dremel3d20. Viele Kinderkrankheiten wurden schon da behoben. Insgesamt war ich schon ziemlich zufrieden, da bspw. auto leveling vom Printbed ein deutliche Verbesserung war und die gesamte Haptik einfach eine Stufe weiter war.
Ich drucke mit verschiedenen PLA Materialien, Dremel und 3rd Party PLA und hatte noch NIE einen Stau oder Zufhrungsprobleme, wie hier so oft von anderen Nutzern beschrieben. Ich kmmere mich allerdings auch um eine wirklich saubere PLA Zufhrung auf Kugellagern, da ich von der internen Rollenaufhngung nicht berzeugt bin.
Hier und da mal Verbindungsprobleme mit WiFi, welches ich aber auch auf unser Heimnetzwerk geschoben habe. Insgesamt ein ordentliches Produkt, welches ich jederzeit wieder kaufen wrde.
Dann kam allerdings der Quantensprung: Als ich letztlich fr den Druck eines Modellsportflugzeuges “Simplify3d” als Printsoftware installiert habe (und die Suite von Dremel komplett deinstalliert habe), hat sich die Druckbildleistung quasi von Nacht zu Tag verbessert. Ich bin mittlerweile fest davon berzeugt, dass die minderwertige Standardsoftware eine gehrige Verantwortung fr viele Kritikpunkte hat. Seitdem drucke ich mit Raft OHNE warping, habe auf Scotchblue Abklebeband eine irre Haftung, und ein sehr przises Druckbild schon bei Standard Auflsung. KEIN Druck geht schief und die gedruckten Gegenstnde sind DEUTLICH besser als vorher. Von daher gebe ich hier 4 Punkte.
Keine 5, da die Software tatschlich im Vergleich zu der jetzigen einfach nicht gut genug ist und man hier nicht htte sparen drfen. Ich kann diesen Printer fr Anfnger UND auch fr den fortgeschrittenen User im tglichen Bedarf absolut empfehlen. (Photos sind von unbearbeiteten Objekten!)
Fabuleuse
J’ai toujours eu peur de m’quiper en imprimante 3D. Mon geek de fils avait surf sur plein de forums et autres sites spcialiss et il en tait ressorti que c tait compliqu rgler paramtrer et du coup nous avions abandonn.
Cette Dremel 3D45 nous comble par sa simplicit de mise en service et d’utilisation.
Nous avons nous aussi imprim notre grenouille et nous nous sommes mis chercher des fichiers prts l’emploi ainsi qu’un logiciel permettant d’obtenir ces fichiers.
Revenons l’imprimante.
Elle est imposante il faut lui prvoir une vraie place. tout est assez intuitif.
Nous avons rencontr aucun problme de buses bouches ou de bugs diverses.
Cette imprimante est onreuse mais sa conception le vaut largement.
Bravo DREMEL pour ce bel outil trs bien pens.
Une imprimante 3D, a fait un peu rver, non ?
Alors quand j’ai eu l’occasion de tester, videmment,je me suis prcipit !
Et je suis trs trs loin d’avoir t du…
Cette machine est magnifique, les rsultats sont superbes, enfin, peuvent l’tre en tous cas, condition d’avoir quelque chose de bien “imprimer”…
Quelques surprises d’abord :
– Livraison : Si vous voulez de la discrtion, vous repasserez : le cartond’emballage de l’imprimante, avec descriptif du contenu, rfrences etc est bien identifiable. Je crois qu’amazon propose un double emballage en option ( vrifier toutefois), alors pensez-y si ncessaire.
Le carton est volumineux ( peu prs 40x50x50 cm) et bien lourd !
L’imprimante elle-mme, et ses accessoires, sont parfaitement emballs, a priori risque trs fable d’tre endommag pendant le transport.
Une fois dball, ou mme avant, il faut bien penser l’endroit o on va installer l’imprimante : volumineuse et lourde, on ne la changera pas d’endroit facilement, et il faut aussi anticiper le fait que son fonctionnement est assez bruyant. Surtout qu’une impression peut prendre de nombreuses heures, alors ne pas installer, si possible, prs d’un endroit o l’on dort !
L’installation est vraiment trs simple, qu’on l’utilise, comme moi au dbut, via la cl USB (fournie) ou en rseau (j’ai fini par y venir). Les pilotes sont simples trouver, le mode d’emploi est trs (trop) impressionnant, mais on arrive assez vite s’y retrouver.
Il y a quelques modles fournis pour essayer la machine, ils sont mignons mais bon, rien de bien passionnant. Ensuite, il est trs facile de trouver des modles sur internet (a fourmille, vraiment on peut tout faire)…
Mais le vrai truc gnial a sera de crer soi mme les objets “imprimer”… En ce qui me concerne, tant donne ma crativit graphique fort rduite, ce n’est pas pour demain…. mais mes ados se sont tout de suite passionns pour la machine, qui tourne un peu beaucoup ces derniers jours !
Un dernier dtail qui va demander un peu de temps tre valu : la consommation. Concernant les “fils” (matire premire), a semble trs raisonnable : le niveau baisse, bien sur, mais finalement trs lentement, la gestion du matriau semble trs bien tudie. En revanche, je suis nettement plus mfiant quant la consommation lectrique : la machine chauffe beaucoup (c’est comme a que a marche, on ne peut pas s’en plaindre), mais surtout trs longtemps. J’ai donc peur que le cot de fonctionnement sur le moyen et long terme finisse par tre trs lev. Mais c’est la loi du genre, et je ne vois pas pourquoi ce modle prcis ferait mieux, ou moins bien, que n’importe quel autre.
Maintenant, la vraie question est… Une imprimante 3D pour faire quoi ? Question laquelle il faut bien rflchir, mais si vous avez une bonne raison, alors n’hsitez pas, vous allez nager dans le bonheur, et ce modle me semble parfaitement adapt des personnes franchement exigeantes, pour un budget finalement relativement modr…
A maîtriser pour en tirer vraiment parti
Il est un peu dlicat de prtendre valuer rellement un appareil de ce genre au bout de quelques heures d’utilisation, surtout quand on n’a aucune exprience du domaine. Dans ce cas prcis, la tche est d’autant plus complexe que l’exploitation relle d’une imprimante 3D exige de choisir et d’apprendre utiliser un logiciel de cration de modles.
Pour l’instant, je me contenterai donc de confirmer ce que d’autres ont dj trs bien dit :
– l’appareil est assez encombrant (nettement plus qu’une imprimante laser A4 actuelle)
– son installation et sa mise en uvre ne sont pas plus difficiles que celles d’une imprimante “normale” et, s’il s’agit simplement de fabriquer de petits objets (genre figurines, par exemple) partir de fichiers disponibles sur Internet, il n’y a vraiment aucun problme ( part, videmment, celui de “rentabiliser” le cot de l’appareil et la place que celui-ci occupe…).
poustoufl par DREMEL TECHNOLOGIEet Son IMPRIMANTE 3D !
La marque DREMEL et SES ingnieurs viennent de mettre sur le march un des fleurons en matire d’imprimante 3DRien que a.
C’est vraiment une technologie novatrice qui est ici matrise de main de matre par la marque et ses collaborateurs.
Et pour combler le tout.Cette imprimante 3D de chez DREMEL.
Est d’une simplicit dconcertante installer ( 10 mn maxi ) Et encore plus dconcertanteSi, si faire fonctionnerUn jeu d’enfant ( enfin presquepar ce que la temprature de la buse plus de 250 , faut juste ne pas laisser porte des enfants, d’abord c’est pas fait pour ! ) .
Livre avec 2 gros rouleaux de fil.
Une spatule,
Deux btons de colle spciale pour faire tenir sur le plateau, les ralisations en fin de cration
Une cl USBcharge de quelques modles 3D pour essais .Et de quelque chose qui se perd beaucoup de nos jours , un livret complet pour la faire fonctionner
Une faade et un haut qui s’ouvrent, et qui de toute faon, sont transparents pour regarder ce qui se crer Et en plus c’est vraiment trs mouvant voirA regarder !!!
En faade une entre USB pour une cl .Un GRAND ECRAN TACTILE trs didactique , en plusieurs langues , qu’il suffit de slectionner pour avoir le franaisEt surtout pour savoir quoi faire pour lancer une crationEt connatre tout sur ce qui se fabrique sous vos yeux.
Etat de la mise en route en temps rel et ventuel talonnage (rapide)
Affichage du model slectionn
Le temps de cration
Le temps restant
Instruction pour retirer la cration ralise
Et le plateau support de cration se nettoie UNE FOIS FROID, d’un simple petit coup d’ponge savonneuse douce
DCONCERTANTBOULEVERSANTET SIMPLE .
Le summum de la technologie du bout des doigts pour cette imprimante 3D ..Aucun souci
UN PUR BONHEUR POUR CETTE MACHINE CRATIVE de la marque DREMEL.
BRAVO A TOUS SES CONCEPTEURS !
( ci-dessus quelques petites crations pour illustrer les premiers rsultats …Le choix des couleur se faisant soit par la couleur de la bobine…ici une bobine de fil noir….Les modles dors , ont t peints par mes soins…)
Rception du colis, c’est lourd, trs lourd. Je rassemble mes forces et transporte le paquet jusqu’au bureau pour dballage. Entre un carton, du polystyrne, et de la bande adhsive partout partout.
Je me dbarrasse de tout a et pose dlicatement la bte sur un petit meuble. Un carton bloque le plateau et il faut forcer pour le retirer, a fait un peu peur.
Bon, j’y suis. Je fais l’inventaire. l’imprimante, on la voit bien, pas de problme. Deux btons de colle, une spatule, deux rouleaux de fils, un nylon et un eco ABS, une minuscule cl USB et un truc trange qui je le verrai par la suite sert a dboucher la buse. Puis un annuaire en guise de mode d’emploi. Et une fiche de prise en main rapide (heureusement!).
Je procde aux branchements, secteur, rseau et cble imprimante sur l’ordi. Petite mise a jour logicielle rapide et hop, on tente l’aventure avec une norme A.
Aprs avoir entr les donnes grce au petit cran tactile, calage et rglage du plateau et l’imprimante est prte a svir.
Introduction de la mini cl USB dans la prise prvue a cet effet sur la bte et je choisis la grenouille.
Ben oui, je n’avais pas encore prpar de fichier 3D imprimer alors on fait avec ce qu’on a.
Lecture du fichier, copiage dans la mmoire du monstre, et affichage de la suite du programme.
Il va me falloir 1H40 pour avoir le rsultat. Mais avant, il faut passer un peu de colle sur le plateau, et attendre que la buse et le plateau montent en temprature.La buse a 253 et le plateau 80.
Et quand la temprature est atteinte , a part tout seul.
Un dcompte du temps restant s’affiche pour faire patienter les plus presss.
Une heure et 40 minutes plus tard, miracle, ma grenouille a pris forme et presque vie. J’attends quelques minu…secondes, et je sors la plaque encore tide. puis a l’aide la spatule je dcolle dlicatement mon bb. Je file nettoyer aussitt la plaque sous l’eau chaude et reviens dorloter mon ttard. Je retire les quelques “bavures” a l’aide d’un scalpel et a l’heure ou je vous cris, j’ai dj envoy une photo de ma cration tous mes contacts.
Voil, l’aventure s’est bien passe.
Une exprience incroyable que de voir un objet prendre forme devant nos yeux d’enfants que nous resterons tous.
Plus srieusement, cette imprimante, hormis un prix relativement consquent, est une pure merveille. Pas trs bruyante, assez rapide et trs prcise, elle s’adresse aux plus exigeants et permet des reproductions fidles.
Il ne me reste plus qu’a trouver comment faire fonctionner cette foutue camra cache dans le coin qui permet de filmer le processus de cration du dbut a la fin.
Attention a la facture d’lectricit, certain objets complexes peuvent prendre plusieurs dizaines d’heures pour tre totalement termins.
Il est vrai que le plus dur du travail restent cependant la cration en 3D, les logiciels pour y parvenir tant assez lourds et complexes a utiliser. Mais quelle satisfaction de voir un objet sur l’cran se transformer en un volume bien rel.
Prvoir de faire de la place, c’est un appareil assez volumineux.
Fantastic. Really. Absolutely fantastic and utterly absorbing.
I’m sure that we are all aware of 3D printers and of course if you are looking at this one then clearly the idea is of interest. And I’m sure that many will have seen things made on YouTube where a 3D printer is used for a casting object or to act as a test product.
It really is the start of the next thing in industrial engineering. You can literally make things that a few years ago would have been the remit of large industrial factories but now available in your home.
Of course, industry does use 3D printers which probably cost millions and make things like turbine blades which clearly this home gamer isn’t capable of.
But…what it is, is the bestest educational tool that I’ve ever seen.
Now, I’m an engineer. Old school learning my trade back in the 80’s as a marine engineer. I’m therefor old. A dinosaur. However I retain an inquiring mind and I can understand that the engineering of the future will not be what I learned which was probably more in tune with Victorian standards than what is in place today.
And on top of that despite the fact that the UK almost forgot that engineering and manufacturing counted it rather seems that our leaders have worked out that the future lies not with services which are fairly easily turned into webpages but instead in engineering and technology.
This means that rather than push ones children into trying to become a banker or lawyer, instead many understand that their small people will have to look to another direction because this is the future.
Which is where this 3D printer comes in. Dremmel have made this as a learning tool primarily. And a wonderful job they have done of it too. The basic idea is that you can use this to learn skills needed to create objects which inevitably if progressed will mean learning some quite tough things. Mainly CAD as well as the slicing programs that are used to take that CAD drawing and turn it into a real thing. This process is where an interested child will gain huge steps forward and learn what will be absolutely essential skills for their career.
As part of that Dremmel have created a specific website that caters for differing ages/groups. Elementary, middle, higher and industry. The idea being that for each level you learn new and of course progressively more difficult things.
Of course, on line you can find printable files and use them. For the likes of model makers this might be enough as they can perhaps create their own parts for train layouts etc.
However, for those who wish to learn the Dremmel site is a great place to start. Free software that gets you up and started of course. Lots of examples of finished work and a community of like minded people.
Then…you need to start the hard slog. No getting away from it, if you want to use this as a tool to learn, you gotta put the leg work in. And that means not only learning the 3D solfware, but more importantly CAD software. Which isn’t all that easy. I use TurboCAD as I’m learning the new skill of not using a drawing board but instead a PC to make engineering drawings.
So, use this as a tool for your future or hobby, but accept that you really will have to learn some fairly hard stuff. As a grandparent my target is to become proficient enough to teach my grandchildren these skills. I reckon I have about three years grace before I need to start the imprinting..
Now, onto the machine.
Its not small and its not light despite being primarily a plastic case. I’d say about 1.5x the size of a typical microwave so factor in the space needed to place this.
Well made but of course the fairly eye watering price mainly goes into the design and support not the materials I guess.
Setting up is easy. Find a solid base somewhere – bear in mind that the printer will move rapidly and back and forth enough to shake the unit if not solidly placed.
Fit the plastic ‘wire’ into the holder and feed into the printing head. Art this point the quick start instructions don’t mention that on the left hand side as you look at it there is a small tab you gently press down in order to feed the wire into place.
Once done, start up and then follow the on screen instructions. Which also don’t quite match the quick start in that they ask that you cut the wire and allow the head to purge. I did this and to be honest it was a bit of a mistake. Simply do as the quickstart says and fit the wire and then purge but don’t cut.
Then level the base. This is also done via the menu and needs to be done in order to ensure the printing head aligns with the base. Its easy and very self explanatory.
I then signed this into my WiFi connection and updated the firmware.
And then picked out of the menu the reindeer that I’ve photographed to see if it worked. Which it did in the most fascinating way.
Now, make sure that you put the sticky non stick base covers on as well. I did make the mistake of thinking the black plastic one was the only one needed,m but in fact you stick this into the glass base then the blue non-stick one on top of that. The instructions are not clear but take it from me, printing onto the black base directly means a shed load of scraping.
So, for me the long uphill learning curve has started. And I’m really looking forward to it. I’ve downloaded the Dremmel software and I have TurboCAD so here I go on another engineering trip of discovery. And I’m really hoping to drag my grandkids with me too.
Eingentlich selbstverstndlich: Das Auspacken sollte vorsichtig unter Zuhilfenahme der Kurzanleitung erfolgen damit nichts beschdigt wird.
Nach dem ersten Einschalten, erscheint auf dem Display ein Setup, das den Benutzer durch die einzelnen Schritte , wie Sprachauswahl, Netzwerkeinrichtung, Einfhren des Filamentes und Einsetzen bzw. Ausrichten der Druckplattform bis zur Druckbereitschaft, fhrt. Neu war fr mich der Einsatz eines Klebers zur Fixierung des Modells auf der Druckplattform.
Vor dem Ersten erfolgreichen Druck musste ich allerdings noch den Druckkopf mit dem mitgelieferten Werkzeug reinigen, was mich ewas erstaunt hat. Es kann jedoch sein, dass ich das Filament nicht richtig eingefhrt und dadurch den Druckkopf etwas verstopft habe.
Bis zum ersten Druck kann also etwas Zeit vergehen!
Im internen Druckerspeicher befinden sich einige druckfertige Modelle. Mein erster Test-Druck war hier der Fidge Spinner, der sauber produziert wurde.
Fr nicht schon entsprechend vorbereitete druckfertige Modelle habe ich mir den Dremel Digilab 3D Slicer installiert, der es erlaubt, 3D Modelldateien verschiedenener Formate zu importieren und z. B. zu skalieren, um danach ein fr den Dremel druckfertiges Format zu produzieren. Die Installation der Sotware und das Verbinden des Druckers war problemlos. Die bertragung der Daten an den Drucker kann direkt ber das Netzwerk erfolgen oder ber eine, auf dem mitgelieferten USB-Stick, abgespeicherte Druck-Datei.
Mein Zweites Projekt, ein zweiteiliges Flugzeug ber das Netzwerk zu drucken, schlug zunchst fehl. Der Druck brach in der Mitte des ersten Bauteils ab und der Drucker lie sich danach auch nicht mehr steuern, so dass ich ihn ausschalten musste. Ich vermute hier eine Netzwerkunterbrechung in meinem WLAN. Statt eines ggf. stranflligen WLANs sollte, wenn mglich, besser eine kabelgebundene Verbindung gewhlt werden. Die Verfolgung des Drucks ber die eingbaute Kamera ist hier ein schnes Feature, wenn man mal nicht direkt neben dem Gert sitzt. Der nchste Versuch erfolgte per USB-Stick und war dann erfolgreich. Das 2. Bauteil lste sich beim Drucken von der Plattform, so dass ich nur empfehlen kann, die Plattform nach jedem Druck ordentlich zu reinigen und den Kleber neu aufzubringen. Die Bauteile wurden im Endeffekt sauber gefertigt. Ein wenig Schliff und die Entfernung einiger Grate; und fertig!
An filigraneren Stellen variiert das Ergebnis der Druckstcke immer etwas, so dass der Druck an kleineren Schnittstellen nicht immer 100%-ig passgenau ist. GGf. muss dann der Druck dieses Teils wiederholt werden, um ein besseres Ergebnis zu erzielen. Im Rahmen eines 3D-Druckers kann sich das Ergebnis meiner Meinung aber durchaus sehen lassen, da die Genauigkeit natrlich auch von anderen Faktoren, wie Umgebung oder Bedienung des Gertes bzw. Druckkonfiguration, z. B. die Wahl der Filamentstrke oder der Skalierung, abhngt.
Die zu produzierenden Modelle sollten also vorher auf ihre Drucktauglichkeit geprft und z. B. entsprechend, wenn ntig, korrigiert werden. Sofern man noch kein routinierter Anwender ist, wird man nicht immer umhin kommen, etwas zu experimentieren oder neu zu drucken. Die Bedienoberflche, die geschlossene Produktionsumgebung und die anwenderfreundliche Slicer-Software erleichtern aber den Einstieg in die Materie.
Wenn Ihnen diese Rezension geholfen hat, wrde ich mich ber einen Klick auf JA sehr freuen. Vielen Dank!
Also zunchst einmal, bisher habe ich mit 3D Druck wenig am Hut gehabt – aber schnell werden die Vorteile fr den Nutzer klar.
Ich musste mich also erst einmal in aller Ruhe in die Bedienungsanleitung vertiefen – die Firma hat hier allerdings auch sehr viel Zeit hineingesteckt um es dem Neueinsteiger so leicht wie nur irgend mglich zu machen.
Schnell verliert man seine Anfnger-ngste und kann loslegen.
Die Installation ist recht einfach, wenn man einmal durchgestiegen ist. Der Touchscreen am Drucker erlaubt eine intuitive Bedienung und fhrt seinen Nutzer sehr hilfreich durch das Programm.
Die Herstellung der Gegenstnde erfolgt berraschenderweise recht still und geruchsarm. Vorprogrammierte Gegenstnde lassen sich leicht drucken, wenn man selbst designt wird es leider etwas schwieriger. Da bin ich bis jetzt nicht ganz durchgestiegen, wie das funktioniert. Ich melde mich wieder, wenn es hier etwas Neues gibt. ^^
Alles in Allem bin ich mit dem Drucker sehr zufrieden und ich kann mir vorstellen, dass es von groem Nutzen fr Geschftsleute und Erfinder ist, mit dem Ding zu arbeiten. Der Preis ist allerdings haarig und die Herstellung eigener Gegenstnde gestaltet sich (zumindest fr mich Technik-Dussel…^^) recht schwierig.
Ich wrde meine Erfahrungen wie folgt zusammenfassen
Positiv:
– gute wertige Verarbeitung
– schneller Aufbau und Inbetriebnahme
– Alle erforderlichen Einstellungen lassen sich einfach und intuitiv ber das Men/Farb-Touchscreen vornehmen
– geschlossenes Gehuse mit Aktivkohlefilter, d.h. es gelangen keine potentiell giftige Dmpfe in den Raum
– UL-Zertifizierung (geprfte Sicherheit)
– gehobene Ausstattung (z.B. Touchscreen, Webcam)
– einfache Ausrichtung der Druckplatte (beheizte Glasplatte) ber automatischen Fhler
Neutral
– solide Bedienungsanleitung
– Es kann zwar auch Filament (Kunstoff) von anderen Herstellern als Dremel verwendet werden, dann mssen jedoch alle Einstellungen selbst
vorgenommen werden
– Der Druck eines Objekt kann je nach Qualittsstufe mehrere Stunden dauern
Negativ:
– ggf. der hohe Preis
Insbesondere fr Personen, die den erstmaligen Erwerb eines 3D Druckers in Erwgung ziehen,folgender Hinweise. Die Einrichtung dieses Druckers ist wirklich einfach und fertige bzw. vorgegebene Objekte lassen sich ganz einfach drucken. Kompliziert wird es jedoch, sobald man versucht eigene Objekte zu entwerfen und zu drucken, wobei ein solcher Drucker natrlich genau dafr eigentlich gedacht ist. Dafr braucht man nmlich ein vom Drucker unabhngiges 3D-Programm. Es gibt zwar eine Vielzahl solcher Programme, allerdings oft kostenpflichtig und/oder nur in englischer Sprache. Meine bisherigen Erfahrungen mit den (kostenlosen) Programmen waren da leider bisher etwas frustrierend, denn trotz intensiver Beschftigung mit den entsprechenden Anleitungen und einiges an Erfahrungen im Grafikbereich war es sehr mhselig und zeitintensiv ein eigenstndiges Objekt zu entwerfen. Sofern man denn dann ein Objekt mit einem 3D-Programm selbst entworfen hat, kann man es ber die mitgelieferte Slicer-Software des Herstellers ausdrucken.
Fazit:
Qualitativ ist es aus meiner Sicht ein solider und hochwertiger 3D-Drucker. Ob der 3-4 hherer Preis zu einem Gert der Einsteigerklasse gerechtfertigt ist, muss jeder selbst in Abhngigkeit von der beabsichtigten Anwendung entscheiden.
Usiamo questa stampante 3D ormai da anni e anche con molte stampe alle spalle continua ad essere affidabile, sicuramente una marcia in pi rispetto alle canoniche stampanti 3D basate su firmware Arduino che si trovano un po’ ovunque…
Abbiamo preso anche la stampante successiva, la 3D45 con webcam, stampa di ABS e Nylon e la qualit ulteriormente migliorata!
Gateway To A Whole New Creative World
SUMMARY
A well made 3D printer with a decent print size capacity. The fully cased design makes it safer to use and increases print reliability. It’s easy to set up and get going quickly so ideal for first time users, and Dremel have excellent product support too, making this as pain free as possible. This machine would be ideal for hobby or educational use.
THE POSITIVES
Fully Cased — protects your fingers and your print.
Easy print base leveling
Print spools can be replaced mid-print (unlike some machines)
Fully cooled work space
100 micron resolution (0.1mm)
Multiple connection options — can be used stand alone or networked.
On-board software and colour touch screen control.
Good value for money given the capabilities and design.
THE NEGATIVES
Touch screen sometimes a little laggy
Print quality a little prone to being affected by vibration ( common to all 3D printers)
Warranty is invalidated if you don’t stick to Dremel filament
The printer arrives in a large and heavy box, and well packaged inside it sits a substantial printer. I’m not one to complain about this being a big tool, because the physical size of a 3D printer has a direct bearing on the size objects it can print for you. So the fact that it resembles a bloated microwave allows it a respectable print volume of 255 mm x 155 mm x 170 mm. The machine itself is 514mm high x 406w x 403d and weighs 16kg without the spool of filament.
The instructions provided are simple and easy to understand, helping you get up and running quickly and painlessly. I do like the inclusion of a USB stick containing sample files that you can print off immediately, once you’ve set the machine up and installed the roll of white filament provided. The thing that took longest for me was using the slightly clunky scroll system of the front mounted touch screen to input my wifi details!
One thing that is very important with any 3D printer is setting it up accurately. A level print base is essential so that the print head can lay down a solid and well attached foundation to the print. The 3D40 has an easy to operate leveling system that helps tremendously. I can envisage a time in future when leveling function will be entirely automatic, but until that becomes the norm, the Dremel system works well. By the way, you’ll need to re-level the base after every print, because the output (if done correctly) is pretty solidly glued to the base, which needs to be removed from the printer each time a print is finished and prised off from it. I strongly recommend you position this device of the most stable platform possible by the way. Doing so will help prevent those birds nest print failures. Ideally a heavy solid bench on a concrete floor would be best – in other words, in a workshop or garage rather than sitting on a wobbly Ikea table in a bedroom with bouncy timber floors!
Some 3D printers — especially the cheaper ones – are in the form of open gantry structures, with no casing. The Dremel scores here in my view because the cover improves both print reliability and user safety. Depending on your output settings a largish high resolution print could take four to six hours to complete. People brushing past, inquisitive pets, insects, the breeze from a window — all manner of things could ruin a print if it wasn’t being produced in a protected environment. The case is fan cooled and the machine runs quietly, with the occasional beep and boop sound, and with a similar noiise level of a 2D bubblejet.
There are certain similarities when using a 3D printer, to using a standard 2D version: You get the same options to vary print quality for example. Just like the saturation control of a 2D printer, the infill control of a 3D will affect how much print medium gets squirted out the nozzle. In other words, the finer the detail you desire, the more ink / filament you will use up, and the longer the finished article will take. For instance, if you print a vase at 20% infill it will be created quickly but it will leak! A Higher infill will cure that. Resolution controls the dot size obviously, so the higher that is set the less surface banding you’ll notice. Personally I think the visible banding of lower resolutions can be incorporated as a pleasing visual element, especially for sculptural pieces. And of course output colour can be altered by loading different colour spools, even mid-print.
Why do we need 3D printers? Personally I think they’re incredibly useful tools. I wouldn’t bother printing simple things like toy frogs myself, but to get kids started and engage their interest that’s fine. For me, the real utility of these devices is in the ability they give to create complex objects that would just be impossible to produce any other way. One example are the acoustically neutral complex lattice covers on my Audioquest Nighthawk headphones. I also love being able to think outside the box with complex sculptural shapes that I could never turn, sculpt or craft if it wasn’t for the Dremel. Other users find them invaluable for modelling prototypes of new products, before sending them off for production. Given the ubiquitous nature of CAD and the scalability of the digital files, it makes it simple.
This is altogether an excellent printer, and the sculptural forms I have managed to create with it are very pleasing. There’s an entire sub-culture out there, of 3D print modelers; connecting with it is proving fascinating, and rather rewarding. I recommend you take a look at the Thingiverse web site to begin with. It’s just one of the many resources.
High quality 3D prints - low noise.
Works great! Very high quality printing and so easy to use with its built-in touch screen. I love that it can be used without needing to connect it to a computer. The leveling sensor works well and makes a big difference to the 3D print quality. The enclosure effectively cuts down the overall sound of the machine to managable levels. It can literally take hours to print anything decent so you really need a lot of patience. Although it takes time, the end result is always great – I haven’t had any serious problems with the 3D prints. I recommend that you start off printing the supplied 3D models if this is your first attempt at 3D printing. This is a great Dremel product – everything you need comes inside the box.
HIGHLY RECOMMENDED! AAA+++
Easy to Use 3d Printer; straight from the box
The Dremel 3D40 was my first exposure at 3D printing; and Dremel made the experience from Box to Model Frog nice and simple. The packaging takes you on a short journey to set the printer up; moving the print base to remove the cables and manuals. The most important thing in the box is the USB thumb drive that had the software and some sample models on it. The theme of easy to get going carried through; and Dremel offers amazing support – though I haven’t needed to call. The printer is controlled by a responsive color touchscreen – though infuriatingly entering a wifi password required scrolling through the letters of the alphabet which for my long password took far too long; and was made worse that they hide the letters so you cant spot a mistake. There is also an ethernet socket so you can connect it to a local network.
By comparison to my color laser print the Dremel 3D40 is enormous – old school CR TV enormous; but the capacious cabinet results in what seems a large printable volume – 255 mm x 155 mm x 170 mm and its lit up like a Hollywood studio with LED lights so you can see whats going on. Dremel provide a copy of AutoDesk Print Studio for Windows on the drive; the Mac version was available for download from the Dremel website. In use the printer sounds like an older bubblejet printer gentle whirring as it moves the head about the print. You can print from the USB drive; wifi or directly plugging the print.
Out of the box to a print starting took about 20 minutes. The color screen helps in levelling the print bed; and two thumbscrews seemingly keep the print bed level. They haven’t put levelling into the select -print routine so its worth levelling every time you remove the print bed and put It back. The prints take a lot longer than getting the printer out of the box; the Alien model I printed from Thingieverse too about 3 hours – not including the multiple print failures (also pictured) that occurred due to a lack of supports. There is some trial and error with the printer and various prints; my early days were full of frustration; but a bit of online reading and trial and error with the software and adding more supports / orienting models to increase the footprint resulted in better prints. Early prints with a small base and tall structure failed repeatedly – adhesion with the base being an especial issue – the base isn’t heated -; though after 10-15 prints I have stumbled onto a strategy using blue tape in a criss cross pattern that seems to work well. Its worth noting you need to put it on a sturdy surface as vibration results in some surface inconsistency.
My Nieces have all been grateful for the models printed in testing the printer – and the PVA plastic seems to take paint well; a few pictures are below. I have also found some useful models for myself – a 6 card SD card holder that is about 3 credit cards thick is a great way to tidy them in my bag. Though they did reveal some interesting issues in the software – you open Print studio from the print file the scale isn’t loaded correctly; clicking the import button if it isn’t sure it asks – the first SD card holder was fractionally too big for the cards.
In the box was a roll of plastic that I have used about 1/3 -1/2 of on about 10 prints so they last quite well; and amazon has a goodly supply.Replacement rolls on amazon aren’t especially expensive. Dremel also include a metal spatula to remove the models from the base (here the tape feels like a better solution as you can remove the strips to release the model.) A tool to push plastic through the print head if it gets jammed. They don’t include some pliers to remove plastic up through the head which I have had to do when the plastic got tangled at the start.
Overall I have enjoyed the printer; and the availability of models online to get you started before you design your own models makes starting nice and simple. The space it takes up is significant. Overall it does remind me of the first HP bubble just printer I had; the quality is nice the noise is quiet but you can feel its a strarting point. I cant help but wonder when we will get 3 head prints that do variable color.
Brillia
This thing is brilliant, I could bang on about it for hours.
Not only is it a fantastic toy, but with 3D printing technology really coming of age in the last few years, I’m convinced that this is going to be an important tool in our future and being able to introduce our kids to the idea of 3D design and useful making goes well beyond the initial novelty of ‘print your own toys’ and gives us something genuinely worthwhile as well.
As well as the dozen or so generic models included on the machine already, there are thousands and thousands of free 3D models on the internet, ready to download and in many cases print straight away (though in some cases you need to give some thought to supports or splitting the model into smaller printable parts). Have a browse of a site like Thingiverse and you’ll see all sorts of things that are possible.
As a random example, of a very minor and admittedly third-world problem, I have a Renault Zoe which is a lovely car but the microSD card slot is in a daft place where the card is always getting knocked out of the slot by accident. I thought, “I wonder if I could design a 3D cover for it that would stop that from happening?”. I went onto the aforementioned site to discover that there was a Zoe owner who’d already had exactly the same thought and who’d already designed a cover and shared it online. A few seconds’ download and about 5 minutes’ printing later, hey presto! I’ve now got a very effective SD card cover. Amazing. OK so that particular example’s hardly going to revolutionise the world but you can see the potential.
I’d used a Dremel Idea Builder before, the lower model that isn’t the 3D40, which at the time of writing is about two thirds of the asking price of the 3D40 on this site. The 3D40 is a definite step up with some distinct advantages and I’d definitely say it’s worth the extra. Conveniences like the transparent lid (making it easier to see how it’s going) and the pull-out spool holder, which lifts out from the side of the machine, are coupled with genuine practicalities such as the fact that (unlike the lesser model) if you run out of filament part-way through a build, you can load a new spool in and it’s capable of continuing the print.
The 3D40 is also decidedly quieter- yes it’s still got a whirring fan and motors, but the overall noise output is lower. The sound of the motors whirring has clearly been dampened, to an impressive extent. It’s less noisy than an old-fashioned dot matrix printer, which the other one wasn’t, and depending on how easily distracted you are, you could have this one running in your office and still be able to work. I’ll also be able to run this printer in the evenings when my kids are asleep- the other one would have woken them up. In addition, if you leave this printer on after a print has finished (for example it finishes while you’re out or asleep), this printer will automatically turn the fan off when the extruder’s cool enough, which the cheaper model doesn’t.
The WiFi works really well and is really convenient too. Instead of fiddling about with putting .g3drem files onto a microSD card and then going over to the printer, inserting the card and selecting the file, never being quite sure if it’ll work or not, you can now connect your PC directly to the printer (analogous to connecting it to a 2D network printer), and once your model’s ready, it’ll print directly- and warn you straight away if anything’s unprintable. If you don’t want to go down that route, you’ve got plenty of other options- an ethernet socket on the side of the printer, a USB socket on the front, a microSD slot somewhere (haven’t found that yet as I haven’t needed to use it!), and a more old-fashioned USB-A cable so you can plug the printer directly into your PC’s USB socket.
It’s worth mentioning that 3D printing at this kind of level is not wholly reliable. There’s a failure rate involved in domestic-level 3D printing, I don’t know what figure other people would put on it but I’d put it at around 10%. That sounds quite high on paper but when you think about the complexity (and the stickiness!) involved, I err on the side of “well it’s amazing that it works at all”. It can be a little disappointing to start a three-hour print and to go back two hours later to find that the base didn’t ‘take’ and all the printer’s been doing for two hours is spilling filament clumps into ugly blobs. But the joy of all the models that work definitely outweighs the disappointments, especially if you’re patient.
Also, be prepared for a bit of elbow work when it comes to prising the models off the platform when they’re done. It’s great in printing terms that they stick so firmly, but if you’ve printed something with quite a broad base, when you come to lifting it off it can often be very firmly attached indeed. The scraper that’s included helps a bit (and the fact it’s metal is an improvement on the plastic one included in the lesser model), but even so it can be quite tricky to lift the models off sometimes. And be *very* careful with your hands, especially if you decide to use a sharp knife- I’m speaking from painful experience there.
The PLA filament from Dremel is either average-price or marginally above average compared to other brands, but it’s not extortionate. I haven’t tried using other non-Dremel filament in the printer, for various reasons- I don’t want to invalidate anything, obviously, plus I haven’t found any filament that’s cheaper than Dremel’s own that would make it worth trying. Depending on the colour you’re after, twenty quid or a little bit more is a typical and reasonable price. If you do the maths on how many things you can print from that filament then- as another random example- it works out a little bit more expensive to print your own Trackmaster-compatible train track or Lego-compatible bricks than it is to buy the branded stuff. But that’s not really the point- you wouldn’t use this printer to print a plain boring bit of Trackmaster you could buy in a shop. You’d use it to print the interesting complicated junction or turntable pieces that you can’t buy in a shop, but which somebody online has designed and already shared with you!
At first even the Quick Start Guide looks like it’s rather daunting, but then you see that it’s the same instructions in no fewer than 10 different languages and there really isn’t all that much to read before you can get started. The same is true for the larger user guide (11 languages this time), 32 pages per language, most of which is clear pictures and diagrams, nicely laid out and handy for reference.
A SanDisk USB stick is included. 8GB may not sound generous by 2018 standards but 3D print vector files are very small indeed so you’ll be able to fit hundreds of models onto an 8GB stick ready for them to be printed and re-printed on demand without any computer connection being required.
I use a PC not a Mac, so fortunately for me the installer for Autodesk Print Studio was already included on the USB stick- there didn’t seem to be a Mac version on there, not that I could see. However the software is also downloadable from Dremel’s website so if you’re a Mac user you ought to check there first to ensure there is a Mac version (I expect there is but I’m not sure). The version on the USB stick was slightly out-of-date when I installed it, but it offers automatic updates so after a few minutes’ waiting for a download and a second install, it became bang up to date.
Print Studio is from Autodesk, the same company behind Meshmixer which I’d already used to do a bit of primitive 3D modelling. Print Studio is the best bits of Dremel’s own 3D software, upgraded with a handful of the features from Meshmixer- for example the ability to automatically calculate where supports are going to be needed, which is an ideal place for that feature as it means you can design shapes to your heart’s content and then fix all the support issues just prior to printing rather than having to work it out as you go.
Print Studio isn’t a 3D design tool in its own right, so when you want to go beyond pre-existing models, you’ll need some other software. Meshmixer is free and I’d certainly recommend that, but 3D model file formats like STL are fairly open and interchangeable, which is great, and that means you can use things like SketchUp. If you’ve got Photoshop you can even use that to design a 2D shape and then extrude it to make a 3D stand-up version of it.
I really want to develop my own 3D design skills and be more ambitious with what I can accomplish with this machine, and this machine gives me the reason to work harder towards that. In the meantime, even just with downloading existing models off the internet or printing basic shape stuff, it’s still a very satisfying thing to have.
I can’t recommend this printer highly enough. Yes it’s not cheap but as long as you’re going to spend the time experimenting and investigating with it, it’s an investment that’s both fun and worthwhile.
Easy to use and impressive results
This is the first time I have tried out a 3D printer so I can’t really compare this model to other available options. I was a bit worried that it would be too complicated for me to set up but I found this set up to be quite straightforward and the instructions clear. It has an easy to use touch screen which guides you through the steps very well. It is quite a big bit of kit so you do need to have somewhere to store it when you are not using it. You can download some models which have already been built from the Dremel website to get you started. The length of time is takes to build your model obviously depends on how big and complex you want it to be. It doesn’t smell or make a lot of noise either so it quite discrete. The results are quite astonishing and I’m sure I’ll get much better and more ambitious as I learn to master this new skill.
This is a large and impressive looking machine, with a volume that’s somewhere between a large microwave and an oven. It’s my first time using a 3D printer, so I was very excited to get started. In use, the printer does have something of an oven quality about it, thanks to the visibility of models as they’re ‘cooking’. The machine I received was supplied with a choice of 3 different region power cables. The UK one was faulty, with the metal inside the pin holes being incorrectly shaped, and could not be used – it would only fit about 1/3 of the way it should have done. The cable is a standard power cable and I happened to have a spare, so with a quick swap of fuses into my old cable, I had this up and running. Both of the other region power cables this was supplied with fit the pins without problem, so it did just seem to be the one faulty cable. That said, this fault with a really basic component is not something you would expect to find on a printer with an RRP that’s just a hair’s breadth below 1000.
The printer was fairly easy to set up, although I thought it definitely helped that I had watched a couple of videos before I started trying to use it rather than just going from the quick start guide or instruction manual. Dremel themselves have promotional videos that can be watched on YouTube. Most aspects of setup are relatively uncomplicated. Power up is a little on the slow side, and the touch screen interface isn’t the most sensitive I have encountered and has a quite retro look. The machine makes a fair bit of noise, including a jaunty little tune when it’s switched on, and there is a bright white LED light that comes on and remains on whilst the printer is awake. I found the build plate slightly tricky to fit the first couple of times I did it. The instructions simply say to fit it onto the clips on the bed – you need to thread it over the top of a pair of tabs at the back, and then slide it backwards once it’s on these until it’s back far enough that it will fit behind the two prongs at the front.
Even on first use there was a small amount of filament inside the extruder head that came out as the machine heated up, so it would appear that this is factory tested with filament. I decided to test this first for myself using a couple of the pre-installed designs and made a teddy bear finger puppet and a chess pawn (each of which took tens of minutes to complete). I made these from files in the machine’s memory and without connecting it to my wireless network or my computer. Although the quick start guide and instructions indicated that this would look to connect to a network as part of initial setup, this didn’t happen for me. I set my region/language and the machine then went straight to the main menu.
The machine starts by heating up to temperature, which takes about a minute, and then begins the time consuming task of constructing models with the heated filament. The printer makes an unexpected amount of noise when it’s working – not simply the whirring of the arm moving but beeps and boops that wouldn’t be out of place in a mad scientist’s laboratory in a 1950s B movie. I have added a short video to demonstrate this, as I think it’s something to bear in mind when choosing where to locate this, and before starting a larger print. The large, clear access doors at the top and front of the machine provide a fascinating view of 3D construction at work. The process is quite slow going, building just fractions of a millimetre at a time but after a few minutes you can see some kind of progress. Once a job is completed, the build platform is lowered, the extruder moves to the side and the machine plays a little tune to alert you that it’s finished working. The small number of pre-programmed projects generally have an eye to youngster/school/educational use, but those aside there’s nothing restrictive feeling about this.
The smaller projects I opted to make first are on the poorer quality side, having a lower quality profile programmed that results in quite a ridged appearance. There’s no indication of quality on screen, so you take a bit of pot luck when printing these pre-programmed builds. The bear finger puppet has ridges in it that resemble the grooves on a record. Once printed, items have to be removed from the build base. This is not easy. They stick tightly. The removal tool works after a fashion, but requires patience. The metal-ended tool is not structured in the same way as the one shown in the manual illustrations – the tool I received has texturing on the tip, whilst the one depicted has a textured edge on the side. It takes a good few tries before any kind of separation of object and base is achieved, but once the build does start to come away from the platform it becomes fairly easy to prise off. The difficult part is getting the initial separation, once you have a start on that, it’s reasonably easy to work the tool round the base of your build.
After these first couple of projects, I was ready to pick something a bit different – and started work on an open source case for a Raspberry Pi 3 that my brother had asked me to make. This is giving me a chance to learn to use the Dremel software (a Dremel DigiLab product based on Cura open source slicing software for CAD), and to learn to work through larger, multi-part builds based on open-sourced software. I’m a Mac user, and needed to go to the Dremel website to download the software. Although I’ve not used CAD files before, I have used CorelDraw, and a couple of different Movie editing programmes. I found the software fairly intuitive, though on my first component I did not realise that I needed to switch off a default that added 20% fill (internal honeycomb structuring that strengthens a build) which resulted in a much longer than anticipated build time that took more than 9 hours and didn’t complete until 2am!
The print files generated by Dremel’s DigiLab software and saved to the supplied flash drive from the open source .stl files were not recognised until I had networked the printer and updated its firmware. I have so far completed the two sections needed to make up the base of the Raspberry Pi case, and whilst still a little bit lined in texture the quality is obviously better than that of the two preset jobs I have completed – (profile set to 0.2mm medium quality) the finely textured effect gives the plastic a satin-like look and feel. For the pre-installed item designs, the touch screen menu shows amount of print job completed and time left to go in the build as both a countdown and a graphic highlighting the completed parts on a drawing of the item. For open sourced files sliced using the Dremel software, the display shows time taken on the print so far and a brand logo bubble image. For these, the logo image is highlighted in orange as the build completes – and is almost done when the top frame of the bubble turns from grey to orange.
On this printer you can pause a build if you need to make the background noises stop temporarily, but the machine remains on. There’s no way to suspend a build, switch off the machine, turn it back on again and resume printing. This is a bit of a shame, as anything beyond the simplest of jobs, takes several hours and can result in the machine being left on unnecessarily long – especially if an unattended job starts going wrong. It also means that if your power is interrupted, any in-progress build will be written off.
I think my class and after school club kids will have a lot of fun and enjoy learning with resources we have made ourselves. And whilst there is an initial excitement phase that will probably result in some really unnecessary projects being built, I saw the most amazing project on the ‘Shed of the Year’ programme last year – where a couple of guys working in a shed are manufacturing prosthetics using 3D printers, and have designed an open source template for the creation of prosthetic arms. I’m hoping to ultimately be able to help the truly amazing work that is being done by the Team Unlimbited charity in generating funky, colourful prosthetics.
======
30/06/18
UPDATE:
I have now finished printing my brother’s Raspberry Pi case. I have had one print fail. As indicated in the manual, this was in the first few minutes and seemed to be caused by the first layers of filament for my build failing to stick to the build base mat. The resulting misprint – stopped after about 20 minutes – created a fairly impressive bird’s nest of tangled filament. I couldn’t see any reason for that particular print not to have taken, so it seems that keeping a eye on progress in the first few minutes is worth while to avoid the risk of wasting several hours of printing.
I’ve bought my first filament colours, opting to use the manufacturer’s filament after spotting some rather dire warnings in the instruction manual suggesting that other brands could damage the machine. At the time of writing, there are eleven filament colours available: red, orange, green, blue, purple, pink, gold, silver, black, white and translucent. I’ve bought the first five of these plus the translucent. With the obvious exception of the latter, the colours are all nicely vivid and changing the filament spool is very easy.
I have upgraded my star rating from an initially slightly grumpy four stars to five. The out of the box problem I had with a faulty power cable was a minor annoyance that shouldn’t have affected an item at this level but was relatively easy to resolve and has paled in comparison to how exciting it is to use this, and the useful, unusual things that can be made.
Positiv fiel auf:
+ alles was man fr den Druck braucht im Paket enthalten, den passenden Slicer kann man sich kostenlos runterladen von der Herstellerseite
+ einfacher Aufbau: Im Grunde braucht man nur das Filament in den Druckkopf einzufhren. Beim ersten Versuch hatte ich nicht tief genug eingefgt und nichts tat sich beim Druckversuch. Einfach immer Einfhren bis es unten wieder herauskommt, dann passt es
+ gute Menfhrung durch groen Display beim Druck, Installation und Einstellungen
+ berzeugende Ausdrucke: Ich habe zwei von Dremel vorgeschlagenen Blumenvasen gedruckt, sehr schne Ergebnisse.
Ich habe einen Star Wars Jabba nach Vorlagedatei aus dem Internet gedruckt. Diese SLT Datei muss in der Slicersoftware (mit einem Klick und superschnell) umgewandelt werden und wird dann vom Drucker erkannt. Das Ergebnis war zwar nicht schlecht, aber hier muss man mit speziellem Werkzeug noch nacharbeiten. An schwierigen Stellen war das Objekt wie mit einem Spinnennetz von Kunststoff bedeckt, da muss also noch was tun fr ein optimales Ergebnis. Werkzeug fr Nachbearbeitung ist im Paket nicht enthalten.
Die kleinen Vasen dauerten 3- 4 h im Ausdruck, der komplexe Jabba 14 h!
+ 2 groe Filamentspulen im Lieferpaket, da kann man schon einiges fr drucken. Nach meinen ersten Ausdrucken ist immer noch jede Menge Filament auf der 1. eingesetzten Spule.
+ keine Geruchsbildung
+ kompaktes Gert, kommt noch gut in einer Ecke in meiner Kche unter
+ Oben und an der Seite einsehbar, sowohl Oben als auch an der Seite ffenbar.
+ Die Unterlage muss vorher selbstverstndlich mit mitgeliefertem Klebestoff bestrichen werden, damit das Objekt fixiert bleibt, mit der beiliegenden Spachtel lsst sich das Objekt dann aber auch problemlos entfernen, wenn es fertig gedruckt ist
+ kinderleichte, displaygesttzte Kalibrierung der Unterlage
+ nicht zu laut
+ vor Druck Einschtzung der Bearbeitungszeit
+ Wlan und USB
+ erkennt Dremel Filament automatisch und nimmt selbststndig die ntigen Einstellung nach Erkennung vor.
Neutral:
0 etwa 20 kg Gewicht
0 nicht mehr gnstig
Nicht getestet (brauche ich nicht): Fernwartung und Gertekamera.
After experience with cheaper printers and all the hassle of tweaking and adjusting, I went for this unit. I have only so far printed the demo frog but it came out perfectly with no trouble at all. Hopefully it continues to be hassle free like this as I use it. The fan has a carbon filter on it so when running I have so far noticed no smell (using ECO ABS).
There are a couple of reasons I only give 4 stars however;
It looks good, but the doors and overall build feel a little more flimsy than I expected for the price (1,500) so I would imagine there would soon be something broken in a busy school environment or similar. However the extruder and mechanical parts seem quite good.
One important note for UK/EU buyers is that the cloud services are not yet GDPR compliant and therefore will not be available in the menu options unless you chose United States in the menu when setting up. Dremel told me there is no estimated date for fixing this yet, though the simple workaround of setting the machine to United States seems to work. So if you can’t find the needed token to register your printer with Dremel, try setting it up as United States
What an amazing machine, I’ve had this for a few weeks now and failed prints due to machine errors are non existent. My errors have only caused 1 fail too, so incredibly forgiving.
My first prints in pla worked like a dream, nylon and abs were effortless.
Tolerances are good given the cost of the machine. Printing at .05mm is amazing quality when using G Code.
The only snag is I had to set it up as if I was in the USA to use the cloud print service which isn’t documented.
The downside.
Filament tracking is a little pointless at the moment as the stocks of dremel filament on the market don’t have the RFID in the real.
So far it seems if it comes in a white box means no rfid. Brown box and your in luck.
This means that the printer won’t track the amount left on the roll of you swap them.
However the cloud software does seem accurate when tracking use.
I’d happily buy another one and this machine is a definite an alternative to the makerbot replicator which is getting mixed reviews.
Das Gert an sich tut alles was ich mir wnsche!
Wlan funktioniert aber nur manchmal.
Der Support von Dremel hat nicht auf meine Fragen geantwortet.
Es wurde eine andere Software empfohlen. Dremel Digi Lab 3D Slicer 1.0.0.
Eher eine Beta Version mit tausenden Parametern – eher unpraktisch. Diese Software untersttzt aber Wlan gar nicht.
Meine Frage an den Support was das soll ist bis heute unbeantwortet geblieben.
Also weiter mit USB Stick – hin und her. Was mich daran so strt?
Das Display am Gert kann nicht mehr als die ersten Buchstaben des Dateinamen anzeigen.
Dadurch muss man die Dateien vorher umbenennen sonst kann man sie nicht unterscheiden.
So und jetzt kommt bei mir der gesamte Workflow durcheinander …
Schade, weil sonst ist der Drucker ein echter Segen … wie gesag
I bought this after looking at the previous idea builder the 3D20, I bought the 3D40 because it’s suppose to be as easy to setup and has a couple of nice features that the 3D20 doesn’t have. such as larger print area and if you run out of filament halfway though a job it will pause and allow you to load more filament before continuing which is such a great feature assisted bed levelling.
I got the delivery, unboxed it and set it up and printed my first item within about 15 minutes, it was one of the saved items on the printer it self.
I like the fact that its easy to setup and just works right out the box, i have had other 3D printers and have struggled with getting the bed level, printing and getting the print to stay stuck to the bed. I don’t have any issues with the print staying stuck to the bed, in fact its very much the opposite problem it sticks really really well to the point it can be hard to remove the object but I have found that if I use a blade to slide under the edge just to get it started then used the supplied scrapper to remove the item this seems to work. the supplied scrapper is a little crap as its made of thin soft plastic.
over all its a good 3D printer you are limited to printing in PLA only as there is no heated bed and you have to use Dremels filament otherwise the warranty will be voided but if you just want a 3D printer that just works and is somewhat hassle free then look no further.
Cette machine est ma premire imprimante 3D.
J’avais fait le tour des diffrentes solutions existantes : PLA et/ou ABS (voir plus) ; simple ou double extrudeur ; machine ouverte ou ferme ; monter soi-mme ou plug and play,.
Je me suis arrt sur la 3D40 suite une promotion, et pour les raisons suivantes :
– La machine peut faire uniquement du PLA (polymre biosourc et biodgradable), ce qui me convient car je ne voulais pas faire d’ABS dans un environnement domestique (= manations beaucoup plus toxiques que le PLA).
– L’imprimante est ferme ce qui limite considrablement la poussire et surtout, stabilise l’environnement d’impression (temprature et humidit).
– Les rglages et l’utilisation sont simplifis (automatisme, cran tactile intuitif).
– Le matriel parait robuste (produit plutt destin l’ducation).
– Bonne performance vis–vis d’autres imprimantes de prcision 100 microns.
– Plutt rassur vis–vis de la marque Dremel et du groupe Bosch.
L’imprimante est livre dans un sur-carton neutre (seule la rfrence produit apparait).
A l’intrieur on a donc le vrai packaging avec tout ceci :
– L’imprimante avec films de protection et calages intrieurs + extrieurs en cartons recycls (cologique mais laisse quelques particules ; une soufflette est bien pratique dans ce cas).
A noter qu’il faudra soulever le plateau d’impression manuellement pour dgager les calages intrieurs.
– Le plateau d’impression amovible, avec sa plaque en verre trempe.
– 3 films d’impression coller sur la plaque en verre (1 noir pais + 2 bleus plus fins).
– 1 cl USB Sandisk de 8Go, avec quelques fichiers prts imprimer et le logiciel installer Autodesk PrintStudio (Windows mais normalement tlchargeable pour Mac) permettant de crer les fichiers d’impression.
– 1 tige pour dboucher l’extrudeur si besoin.
– 1 cble USB (on peut se brancher en direct, en Ethernet, ou en Wifi).
– 3 modles de cble d’alimentation (pour les diffrents pays europens).
– 1 spatule pour dcoller les objets du plateau d’impression.
– 1 Bobine de 162m de filament Dremel blanc (filme sous vide).
– De la documentation (Guides de dmarrage rapide, manuel complet).
Pour commencer imprimer, il ne reste plus qu’ charger le filament et prparer le plateau :
– La bobine s’installe sur le ct gauche de l’appareil par une trappe d’accs. Il faut l’orienter de manire faire passer le filament dans un tuyau blanc. Une fois le filament visible au bout du tuyau, il faut le faire passer dans un guide et dans le trou de l’extrudeur. Il ne reste plus qu’ suivre les indications sur l’cran tactile pour chargement/changement de filament (l’extrudeur chauffe, expulse l’ancien fil puis tire le nouveau et nous demande de valider).
– Le plateau amovible doit tre recouvert d’un film d’impression pour faire accrocher la premire couche de PLA. Il peut ensuite tre clipp sur le socle d’impression. Il ne reste plus qu’ faire contrler le niveau du plateau depuis l’cran tactile (un capteur sous l’extrudeur vient mesurer le niveau sur 3 points du plateau ; si un point doit tre ajust en hauteur, l’cran nous indique de tourner une vis de rglage-sous le point en question- dans un sens ou dans l’autre).
Ces 2 tapes sont donc simples et assez rapides. On peut dj imprimer un objet prsent dans la mmoire de la machine (4Go) ou dans la cl USB (8Go).
Durant l’impression, il est possible de mettre en pause la machine et de changer de couleur de filament (suivre les instructions sur l’cran, comme prcdemment).
A la fin du cycle, une petite musique retentit (idem lorsqu’on allume l’appareil). Ce son est desactivable.
Les 2 portes en plastiques transparents sont vraiment utiles pour l’accs, la visibilit, et la scurit (des capteurs indiquent lorsqu’une porte s’ouvre).
3 grandes rglettes LEDs clairent en permanence l’intrieur.
Au niveau du bruit, a reste modeste. Outre le bruit du dplacement de l’extrudeur, on entend le ventilateur situ au fond de la machine.
Les premiers objets imprims sont russis et correspondent mes attentes.
Les temps de cycles ne me paraissent pas trop longs vis–vis du procd (les dplacements de la tte me paraissent personnellement trs rapides).
La consommation de fil est beaucoup plus faible que j’imaginais. Le manuel demande d’utiliser des bobines Dremel originales. Je recommande de comparer les prix avec les autres sites Amazon des pays limitrophes (notamment l’Allemagne).
Le logiciel fourni est facile utiliser et permet de crer des programmes partir de modlisations aux formats .stl, .obj, ou .3mf. Il y a galement de nombreux fichiers tlchargeables sur internet (souvent en stl).
Globalement, je suis donc trs satisfait de la 3D40. C’est un produit abouti et particulirement agrable utiliser.
Le fait d’tre dsormais quip de cette technologie me donne beaucoup d’ides de crations (bricolage, gadget, pour les enfants)
Le principal dfaut est sans doute le tarif vis–vis d’autres imprimantes 3D uniquement PLA. Concernant le PLA en lui-mme, il faut prendre en compte qu’il est moins robuste que l’ABS et qu’il peut se dgrader dans un environnement chaud et humide.
Wie man im Folgenden auch sieht, ist es durchaus praktisch so einen 3D Drucker zu haben.
Fr Modellbau, wie weiter unten im praktischen Beispiel beschrieben, aber auch fr Ersatzteile oder, oder, oder,….
So ziemlich alles kann machen, wobei grere Objekte aufgrund der max. Druckflche eben gut geplant und in Teilen gedruckt werden mssen.
Das Auspacken geht gut und schnell von der Hand. Nur die Stromkabel lassen sich schwer aus der Filamenthalterung holen, die wren in den Transportpappen besser aufgehoben. Alles was zum ersten Druck gebraucht wird ist mit in der Verpackung.
Der Aufbau des Druckers gestaltet sich recht einfach. So ist er schnell einsatzbereit und auch das Einlegen des Filaments gelingt problemlos.
Die Funktionen, die man ber das Touch-Display aufrufen kann sind logisch und intuitiv bedienbar.
So ist z.B. das Ausrichten der Druckplatte schnell und einfach ausgefhrt.
Das Druckvolumen von 170 x 225 x 155 mm sollte man dabei dringend im Hinterkopf haben, um seine Projekte und Modelle dahingehend vorauszuplanen.
Die Software PrintStudio von Autodesk lie sich ohne Probleme vom USB-Stick installieren.
Was nicht so schn gelungen erscheint, ist das Wechselspiel von Drucksoftware und Browser.
Ein direktes Ansteuern aus der Software ohne Umweg ber den Browser wre besser. Vielleicht wird das ja noch einmal berdacht.
Gespeichert sind auch verschiedene Beispiele, die auch teilweise ausprobiert wurden.
Diese Beispielfiguren wurden schnell und sauber gedruckt. Manchmal ist ein wenig Nacharbeit mit Schleifpapier ntig.
Generell ist das Druckergebnis aber sauber” und kann auch ohne Probleme gestoppt und pausiert werden.
Eine ausfhrliche Beschreibung fr die Software und die dort einstellbaren Parameter wre allerdings noch wnschenswert.
Z.B. werden die Parameter in den Druckvoreinstellungen (siehe Screenshot mit einigen Beispielen) gar nicht nher erklrt.
Die dt. Hilfe auf der Dremel Webseite fllt da sehr allgemein und wenig hilfreich aus.
Hier empfiehlt es sich dann ber weitere Lektre (z.B. FAQ Seiten zu 3D Druck) ber ggf. auftretenden Problemstellungen, welche sich durch diese Einstellungen ergeben knnen, im Netz zu informieren.
Der Druckkopf ist bis zu einer Betriebstemperatur von 230angegeben.
Einige Filamentsorten, wie z.B. ABS (bis zu 250) oder Polycarbonat (bis zu 285) knnen daher ggf. nicht gedruckt werden oder sind nicht geeignet.
Fr die Testdrucke wurde nur das mitgelieferte PLA Filament genutzt.
Das Druckbett ist nicht beheizbar und eine Nachrstung vom Hersteller bislang wohl nicht vorgesehen.
Fr ein anderes Dremel-Modell (3D20) gibt es ein Nachrst-Set von einem Drittanbieter. Ggf. kommt fr diesen ebenfalls auf kurz oder lang eines heraus.
Anderenfalls bleibt fr Bastler die Mglichkeit das im Selbstbau zu erledigen.
Gedruckt wurde ber die LAN-Schnittstelle, W-LAN und drucken ber den USB-Stick wurde nicht ausprobiert.
Fr den Praxistest mit einem eigenen Objekt soll hier ein Beispiel aus dem Modellbau dienen.
Anlass gibt ein 1:6 120mm Granatwerfer Modell, welches Out of the Box nicht so authentische Granaten anbietet.
Beim Erstellen eigener Modelle fr den Drucker ist man auf sich gestellt und muss probieren (z.B. hinsichtlich der o.g. Druckparameter und wie diese sich auf den Druck auswirken).
Als Beispiel zeigen z.B. die Bilder die Probedrucke fr die Flgelsektion, wie das auch daneben gehen kann.
Besonders zu beachten die Flgel mit Maen 10mm x 6,5mm x 0,5mm (min. Materialstrke des Druckers)
Das Endformat hat eine Gesamtlnge von 110mm.
Die Vorarbeit passiert zwar im CAD-Programm, aber auch der Drucker leistet ganze Arbeit, wie der Direktvergleich zeigt.
Die Bewertung gestaltet sich insgesamt knifflig.
Die Hardware selber ist grundstzlich gut durchdacht und praktisch zu bedienen und so auch Einsteigerfreundlich.
Die Dokumentation und Hilfestellung, sowie Handling der Software sind verbesserungswrdig; gerade wenn es ans Eingemachte geht.
Wie o. angesprochen knnen einigen spezifischen Anforderungen fr bestimmte Projekte hinsichtlich Material und Ausstattung zunchst einmal Grenzen gesetzt sein.
Hier muss man auch schauen, welches Konzept dem Idea-Builder (Laut Imagematerial: Education/Creativity) zugrunde liegt und dafr ist es ein durchaus berzeugendes und gut ausgefhrtes Gert.