Flymo EasiLife 250 GO Robotic Lawn Mower – Cuts Up to 250 sq m, Ultra Quiet Mowing, Manicured Lawn, Bluetooth Application Control, Safety Sensors, Hose Washable, Lifestyle Functions

Flymo – The Lawn Care Experts
Flymo EasiLife GO 250 Robotic Lawn Mower
Our smallest robotic lawnmower yet with a simple Push & Go interface and advanced smartphone control. Designed for gardens up to 250m2 the Flymo EasiLife Go 250 is a fully automatic robotic lawnmower that gives you a tidy lawn with zero effort. Set a schedule in seconds and it automatically cuts the lawn returning to the charge station when needed.
- Streamlined Push & Go interface for instant scheduling & control
- Tilt, Lift and Collision sensors for your safety.
- Hose washable for your convenience.
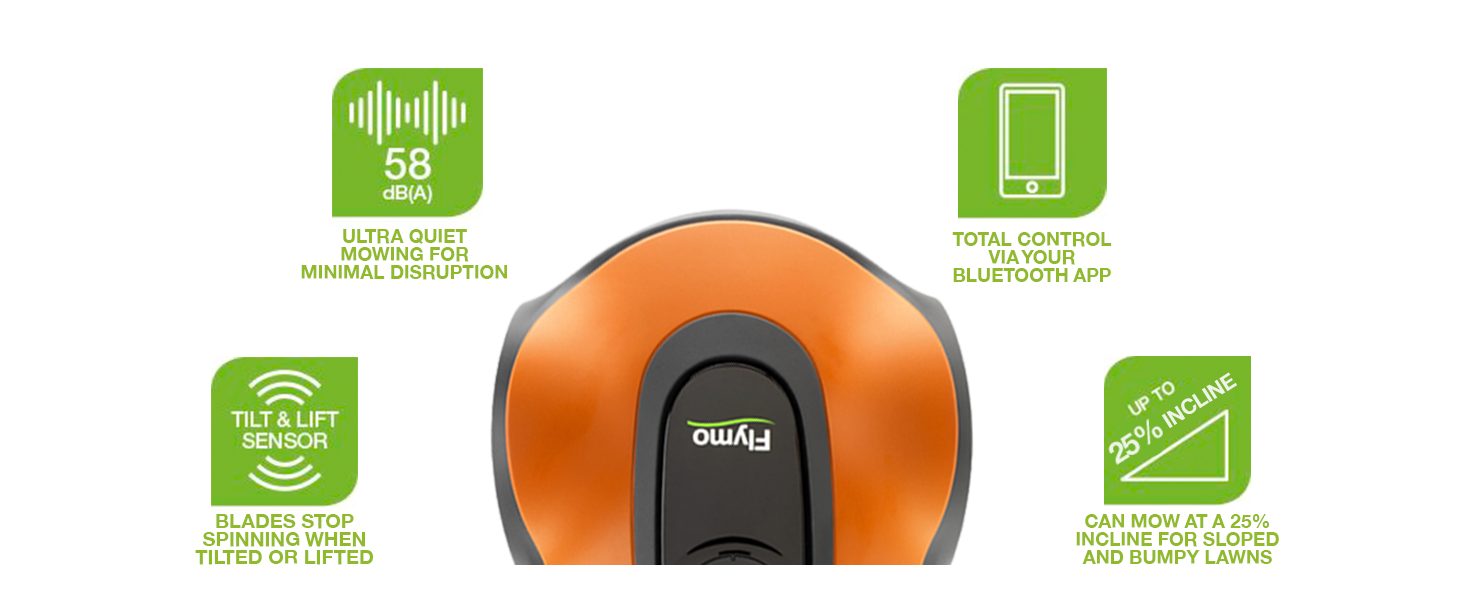
No screen or complex programming. LED indicators guide you for quick and easy control
-
Where do the grass clippings go?
A Healthier, Greener Lawn
No need to empty a grassbox or dispose of grass clippings, its regular cutting technique returns fine grass clippings back into the lawn which acts as a natural fertilizer and improves grass quality.
-
Does it have extra functions?
Extra Mowing Flexibility
It’s functions are designed to fit around your life: Spot Cut, Override, Park or Second Area – which can all be controlled from your EasiLife App!
Why Choose a Robotic Lawn Mower?
Why Flymo?
Finding the right robotic mower for your lawn can be daunting, and it’s important for you to find a lawn mower that fits your lifestyle. Robotic lawn mowers are ideal for those of us that want to spend less time mowing our lawn, and more time relaxing and doing the things we love…


What robot best suits me?
Push & GO | Interface | Assist-U LCD Screen |
25% | Slope Performance | 35% |
150m2 | Working Area | 800m2 |
16cm | Cutting Width | 16cm |
20-50mm | Cutting Height | 20-50mm |
| | Smartphone App | |
| | Lifestyle Features | |
Push & GO | Interface | Push & GO |
25% | Slope Performance | 25% |
150m2 | Working Area | 500m2 |
16cm | Cutting Width | 16cm |
20-50mm | Cutting Height | 20-50mm |
| | Smartphone App | |
| | Lifestyle Features | |
- Flymo Easilife 800

- Flymo Easilife GO 500


| Weight: | 6.1 g |
| Size: | 250 m² Cutting Area |
| Dimensions: | 51.8 x 33.7 x 21.5 cm; 6.1 Grams |
| Model: | 9704904-01 |
| Colour: | Orange and Grey |
| Manufacture: | Husqvarna UK |
| Colour: | Orange and Grey |
| Size: | 250 m² Cutting Area |
I purchased this back in March of 2022 when it was on offer. I was slightly concerned as 1, this is the first robot mower and 2, we do have an incline half way down our lawn. So I was unsure if it would cope.
Initially I thought once it had arrived to just pop Larry the lawn (named the mower) out on the garden and test if it can go up the slope, but you have to set everything up before Larry was even able to switch on.
Set up did take a while, around an hour. Our garden measures around 30 metres long and 10 mtrs wide, and there are a couple of areas I wanted to stop Larry from venturing. Once the boundary wire was down it was a case of getting Larry ready to go, my advice is RTFM (read the F Manual) it isn’t something you can guess your way through.
Any once all set up, the app for the phone is pretty good and does what it needs, we set Larry off and luckily he dealt with the incline really well so no issues there. Larry goes out twice a day and easily covers all of the lawn, rain or shine he is out there.
This is by far the best money I have spent, no more hefting the large petrol mower onto the lawn, Larry is almost silent too, so can go out at any time of the day or night.
And 4 months in, the lawn is looking better than ever, the moss which has always been a huge issue is disappearing, this could be down to the regular mowing or the grass clippings mulching back into the lawn. Our garden is set up in such a way that Larry gets pretty close to the edges so I have no need to go out and strim after. The only slight issue we have had is where Larry has gone through the wire a few times, so make sure you leave some slack near the base station. It is easy to re-connect using the spare wire connectors that come with it.
So all in all a great purchase. I would highly recommend.
Probably one of the best things I've ever bough
Life changing – never have to cut the grass now, just strim the edges every few weeks. Garden is always ready for use. Also use the ‘secondary area’ function to do our front garden too where you manually lift it into the second area and then move it back to main area after its done – really not a big hassle. Have not given 5 stars because mine curves to the right and tech support said it shouldn’t do that – so I am in the process of having it looked at by one of their service agents. But I don’t think it actually affects it’s cutting ability anyway because the grass looks fine enough to me. Took about 5 hours to set it up but once that was done, there’s little else to do. I also had to set up an outdoor plug socket which is a necessity – you can’t charge it in doors and then take it outside.
Great bit of kit but ensure you pick the right size for your law
Takes a while to initially set up, I chose to bury the boundary cable which does take time but worth it as there is no danger of cutting it later.
The only thing I find a little frustrating, I would like to set a schedule for a couple of hours in the morning then the same later in the evening. Once the mower has done the first two hours it returns to its docking station and cannot be used again that day, App says it’s reached it’s daily limit, this situation is not mentioned in the manual. I emailed technical support but not heard anything back 3 weeks later. I presume it is factory set to ensure they can have different size mowers and can charge more for longer running units.
The App is a little clunky and could be very much better but without it, setting schedules etc would be very difficult. This only works via Bluetooth so if your docking station is at the bottom of the garden you will need to get in range to change any settings or schedules.
Also you will need an outside electrical socket, depending where you want to put the docking station so this could add to the initial cost.
Watch the price too, back in April this was 375.00 and now in June it’s 200.00 more. I guess, out of the mowing season they reduce the price to continue to move them.
Saying all this, the lawn is in the best condition it’s ever been, lush and green and no cuttings to get rid of. The unit is also good fun and my grandson loves it!
If you can get this at the right price, have the time and effort to set it up and have an electric socket where you want to position the docking station, I would recommend.
Update 29/6/22
Flymo support have finally got back to me and all they say is this model will mow for 2 hours a day, maximum. This means it is more important to get the correct unit for your lawn size.
Money well spe
Could I live without this little guy? Absolutely not.
The mower is fantastic, goes out twice a day and maintains the grass. We have dogs and our grass has been in terrible condition for years, since getting this mower the grass quality is certainly improving!
Setting up with the wiring was a little tricky at first but honestly nothing too complex. No problems with him so far!
Meet Unicorn, the barber of the Law
I’ve had this Robot for just over a week so it’s a little early for a review of longevity or lawn quality but I will edit it in future months.
First off, the instructions and installation details were very simple to follow. Out of the box you have everything you need. Plenty of boundary and guide wire and more than enough pegs should you use them.
My lawn is very small, probably about 40msq so the Easylife Go 150 is perfect. I needed a solution to losing space for a petrol mower and this seemed the logical step. As you can see by the video, the lawn is flat to a paved pathway, so digging a small trench around the boundary allows the robot to move effortlessly over the edging. I now only need to trim when the edge creeps onto the path. I would’ve had to do that with a traditional mower anyway so no issues there.
As for the docking station, I didn want it on the lawn as it would be a trip hazard for little ones. The solution was to take out the mortar in the path and lay the guide/boundary wire accordingly. As you can see in the picture (where the mortar is darker) I have repointed the path and the robot has no issues detecting it and stopping. It finds the docking station every time and doesn’t ever collide with the garage wall.
Securing it to the floor, I have used the plastic pegs it came with but drilled into the slabs, then using a rubber mallet, gently hammered them in. They are firm enough to keep the docking station in place, but loose enough for me to take them out for winter.
So far so good. It’s only been a week but I am very impressed with Unicorn (named by a little one). They cut tirelessly and seem to get the job done. I’m not entirely convinced the blades which came with it are the best, there are more than a handle of uprooted grass roots which it appears to have torn out rather than cut. I may pay for higher quality blades when then need replacing just to see if the cut is better or whether it’s just the robot itself.
I will review this again after the summer to see if I’m still as happy with it then.
*Edit 25/5/22
I’ve added an additional photo to show a bumper I have added to Unicorn. This is to prevent further scratching when it collides with our plant bed sleepers which run down one side of the garden. It was only causing minor damage to the front, but this prevents it complete without hindering the mower at all.
If you have any raised areas which the mower will impact with, I would suggest adding a similar bumper to prevent scratching.
A great source of satisfaction after hours of installatio
I come from the throw away the instructions and get the thing going school.Sadly no good for this.
Laying the perimeter wire took a while but i used a kitchen knife to cut the turf and slip it inside,all i thought was good.
I got the tree obstacles all wrong and ended up just taking it out – it happily bumps into them and moves elsewhere,not sure its worth the effort of avoiding them.To be honest i’d probably have let it just hit my fences and dwarf walls and reduced the strimming with hindsight but i’ll know for next time.
My biggest mistake was not emptying the box properly – didn’t realise there was a great big plastic sheet that attaches to the charging station stopping the mower knocking the charger over every time.
After a week of correcting my mistakes its now out every day for an hour or so at 4pm prompt (remember to set date/time properly-mine was in 2002).
Like others have said,it’s very satisfying to watch it on it’s travels while avoiding the hard work.
I’m 8 stone heavier and have a gin and tonic addiction.
Time saver extraordinaire
Awesome bit of kit that is saving me hours a week . Hate mowing so boring. Set up was easy. Just follow the ruler for the boundary. Guide wire was easy too . Just make sure you push down fully on the coupler. I also buried it so as not to have the mower chop it to pieces.
App is easy to use and install. The mower is scheduled to go out and mow on the highest setting until either the boundary wire gets grown over or I decide to bury it. Can’t fault the little thing. Watching it do its work in the sun with a pop is weirdly satisfying too.
Efficient mowe
Super quite efficient machine which does an excellent job. Difficult to get to grip with the app though Man manual instructions were easy to do
As a long time robot hoover user I’ve had my eye on one of these for a long time. I finally bought one and so far am glad that I did.
Overall i am extremely impressed, I can now go away and not worry about coming home to an overgrown lawn. I also don’t need to worry about collecting and dealing with grass clippings because it all gets mulched as it goes. I’d recommend this to anyone.
Initial setup, lessons learned… so unlike my robot hoover, this lawnmower requires you to install a boundary wire around the perimeter of the garden and around any obstacles you don’t want it to run into. You can either cut a groove in the lawn and place it in that, or use the supplied stakes to hold it down while you wait a few weeks for the grass to grow over it and pull it down. I opted for a groove which i thought might take me a couple of hours maximum to create. Over a day later and with some help I completed the wire lay! A couple of weeks later I needed to adjust parts and add a guide wire and do opted this time to just stake it down – this was much much easier! if you take this option, leave the cutting height at its highest to avoid risking cutting the wire while it beds in.
Wire placement – the boundary wire needs to be a set distance away from the edge. The distance is adjustable between 20cm to 30cm in the app, but has to be the same everywhere. If you have any cut borders you’ll want it to stop before it drops its wheel into it because it will struggle to get back out of anything more than a 2cm drop. Obstacles over 2cm in height don’t need the wire if you don’t mind the lawnmower colliding gently with them and changing course (small trees are fine).
Guide wire – I thought this might be optional, but the mower is not very clever and really struggles to find its dock without it. Again this is nothing like my hoovers which easily dock. You will need to install the guide wire which also helps guide it to other parts of the lawn if like me you have a side section.
Noise – it is fairly quiet. I can hear it from inside if it is quiet inside, but nothing that bothers me at all.
Coverage – on my first few cuts I let it run 6 hours a day. It will cut for about 1 hour, charge for an hour and then come back out. Mine is the 500 model and I suspect the only difference is the amount of boundary wire you get in the pack and not the battery size. I now cut for about 2 hours a day (which means setting it for 4 hours to allow for charging) and it seems to cover it very well.
Dog poo – I have a Labrador so I try to pick up daily if he has poo’d on the lawn. I have missed a poo a couple of times now and the mower just drives through it. The blades on these are small almost razor blades, so it doesn’t explode the dog poo everywhere, it just gets smeared about a bit and dragged over the wheels. You can hose the machine down so its easy to clear up.
A great bit of kit and means I can spend my garden time doing other things.
Far better than I expected
I like gadgets
But they’re often more fun than useful
This little beastie is both. I have an acre of garden, mostly lawn. Far bigger than the 500m2 it’s designed for. I also set it up in April with long, wet grass. I was totally unfair.
But he just trundles on and on and with each cut makes his life easier, so each time he can trundle further and do more
The grass is a lovely length and evenly cut. It’s actually better than the results from my ride on, as the 500 copes with all the little undulations and hills without beaching or bottoming
Setting up the wire was two days work and I did bury it using an edging spade. But not one problem since. And I sit here with a nice cold Sauvignon and a warm glow as I watch my lawn being beautifully cut
Thoroughly recommend
It only took a couple of hours to get the robot mower up and running, at least in our small back garden. I pinned down the wire initially, just to make sure everything worked and I had the distance from the edge correct. All seemed well so tomorrow I will bury the cables. One criticism of the installation was to do with the power cable, it comes with the terminators fixed and they are quite large (relative to the cable size). If like me you want to connect the power to an inside plug socket, you have to drill a huge hole through a brick wall to be able to pass the tiny cable through. If the terminator on the end that connects to the power adapter were not fixed and could be removed and reconnected, it would make that job much easier. Probably it would be better to install an external socket, I assume the power adapter is waterproof, at least it looks that way.
In the Amazon comparison with alternative products, it states that the cut width is 60cm. When I saw it I did think it was dubious and sure enough I was correct. If you choose this product because of the cutting width please be aware that the figure of 60cm is incorrect, it is more like 20cm (similar to its competitors). I was pleased to note that machine is actually made by Husqvarna. I believe that Flymo is a subsidiary of Husqvarna. Husqvarna were early into the robot mower scene and my hope is that they have been able to produce a reliable machine.
After completing the installation, I was all set to give it a test run. I went on to the app, set it to overide the preset schedule, told it to run for an hour and pressed Start. Nothing happened, it told me that it was scheduled to start at a later time. I tried a number of other times to get it to run manually but to no avail. I sat down, about 2 metres away from the charging station, to read more of the instruction manual. Stood up to look at the machine and to my surprise it was off at the other end of the garden and had started to do its stuff. That’s how quiet the machine is! My guess is that the machine had to be charged to a minimum of 80% before it would set off but I couldn’t find anything about that in the manual.
Watching the little machine go about its business was quite comical and fun. The boundary wire which I had placed at about 20cm from the edges of the grass appeared to work well. I hadn’t realised that the machine stops to turn once the machine was half way across the wire so you might end up with the wheels ending up in your flower beds. It seemed to be able to climb out easily enough though.
I had the machine on its highest cut height of 50mm (factory setting) and it was quite a dry day so none of the grass was especially taxing for the machine. How it will work in the damp with slightly thicker grass remains to be seen. The blades on these machines are tiny so I would suggest getting some spare replacements especially if you have and stones or worm-casts. After it completed its first outing, it had cut most of the grass, just a few areas of uncut grass. My guess is that if the grass is being cut every day then the randomness of the movement of the mower will likely get all the bits it missed before and so will become unnoticeable. The machine does have a tendency to cut over areas that have already been cut but I’m guessing the software isn’t that sophisticated to map the lawn and know where it has been!
Next I intend to lay the boundary wire for our front garden and add it into the back garden loop. This will be a secondary area and my understanding is that I should be able to set the machine to secondary setting, move the machine to the secondary area and hit Start, it will carry on cutting the front grass until the battery runs out or I stop it.
All in all my first impressions are good for our small, not so lush, grassed areas.
Far better than I expected
I like gadgets
But they’re often more fun than useful
This little beastie is both. I have an acre of garden, mostly lawn. Far bigger than the 500m2 it’s designed for. I also set it up in April with long, wet grass. I was totally unfair.
But he just trundles on and on and with each cut makes his life easier, so each time he can trundle further and do more
The grass is a lovely length and evenly cut. It’s actually better than the results from my ride on, as the 500 copes with all the little undulations and hills without beaching or bottoming
Setting up the wire was two days work and I did bury it using an edging spade. But not one problem since. And I sit here with a nice cold Sauvignon and a warm glow as I watch my lawn being beautifully cut
Thoroughly recommend
Brilliant piece of ki
Extremely good and a likeable little robot. Happily roams around cutting the grass. Put the boundary cable in on the grass with no issues.
Love it.
Saving time & a talking point!
Robbie (as we’ve called him) has been with us a few weeks now, and we love him! He potters around & keeps the lawn (and the dog) in check, making sure i don’t have to get the big mower out, sort out the extension leads, ensure there is room in the bin for grass cuttings, and generally wasting an afternoon!
Got my kids to help with burying the guide wire, and connecting up, so it was an easy job for them whilst i supervised with a cuppa from the comfort of my garden sofa!
Since then he’s been doing his thing, and the children think he’s brill (the kids are 20 & 22) and video him for their social media, prompting lots of ‘you are so posh’ responses apparently. No, not posh, just lazy! Friends think he is great & are looking for their own robot mower now.
I’ve started building him a little wooden garage for far less money than the moulded plastic cover that flymo suggest, so i’ve had fun doing that instead of mowing the lawn!
Great purchase, would recommend to anyone who is very busy, or lazy!
Any misgivings? No. Although i think he secretly fancies the barbeque – he seems to be down in that area of the lawn quite a bit!
A great purchase
I never expected to be so impressed by such a useful gadget.
First off, I bought this from Amazon Warehouse and it was slightly used and repacked, but was near enough half price so a bargain.
Set up is a little involved and please read the instructions, as some thought is needed re the layout and cables need to be laid carefully and ideally buried as there is risk the blades will cut through as the mower goes 20+cm over the boundary. Setting up and connecting to the app is a bit fiddly but logical once you follow it through.
Results are amazing, in less than a week grass is looking better with a daily trim. It’s also somewhat therapeutic to watch the new house pet quietly meander around the garden.
One point that needs making is that these devices aren’t hedgehog friendly so please do not set them to run at night as some reviews have recommended.
This is an update to my original review after receiving a replacement for my first purchase. The original review is left as is below.
Replacement Review
==================
Following a return of my first unit after just under a year, I’ve now had the replacement for 3 months. The replacement was an advanced exchange from Amazon direct. Very simple, easy and a free process. The replacement was brand new.
I changed everything except the by then buried wires in the ground.
The replacement unit has been fault less and I really do mean that. I plugged it in and charged it on the day it arrived and set it on a daily schedule. It has cut the grass every day since. It has never got stuck, lost or failed to return to the charge base ever. I’ve not touched it at all. It is exactly what it should be. The lawn looks immaculate 24/7. What more can you say.
In summarise my experience with these points:
1. The setup does take time and is a lot of effort but is neccesary. You must make sure you do this right. As with most things bad prep = bad results.
2. If you get a good unit its brilliant and based on other reviews I think I was unlucky the first time.
3. Amazon’s return service (I have prime if that makes a difference) with the 2 year warranty took any risk away (within warranty).
4. Flymo support is shockingly awful and for that reason I can’t revise my score back to five stars. They have to sort this out. If it fails outside of warranty I know its probably just going in the bin and its a bit expensive for that level of after sales service.
Original Review
===============
I have had this product for just over one year.
The product worked well for around 2 months and during that time I would have given it a 5 star review. However after that point it started to develop problems. Initially the mower would return to its base and charge but it would not cut the grass again based on the schedule. You would realise after a week or so and when you connected to it via the app it would be showing an error that wasn’t possible. If you acknowledged the error it would clear and work again.
After a further two months it developed a more serious fault. It would return to the charger but refuse to charge. No option from the app could get it to do anything. If you physically picked it up and moved it off the charger it would then return itself but still refuse to do anything. The only way to get it to work again, with the abscense of any physical or software based reboot option, was to disconnect the charger and let the battery drain completely which would take several days. Once flat you could switch the power back on and it would then fully charge and it would work again. However when it returned to its base you would have to go through the cycle again which gets to the point where the machine is more work than it was saving and only cutting the grass twice a month.
After contacting Flymo support I was asked to take it for repair which I did in February in anticipation of starting to use the device again this spring. It took around 6 weeks for it to be ready to collect which I wasn’t that impressed with. When I got it back it worked perfectly again for around 10 days before the app displayed a message this Monday stating cutting limit had been reached after not doing anything since the previous Friday. I left the unit until this morning when it still did not start again. I manually used the app to start a cut which it did but after leaving it for some time I came out to the garden to find it motinless in the middle of the lawn. When connecting to the device it says it has been lifted.
That’s enough for me I’ve lost confidence in the unit and I’ve now contacted Amazon who inside 10 minutes have arranged a replacement which is brilliant. I will give it a second chance because when it works it does the job very well but reliability could be a concern.
I would also like to add that the Flymo support is very poor. When I chased them after the device has been in for repair for four weeks without any communication it took 15 days for them to reply. Thankfully by then the repair company had contacted me directly to tell me it should be done by the end of the week which it was.
I will update this review after I get my replacement.
Connection problem
Some times there’s problem with connection with app.
Mower Its very quiet I love to.
The Best Thing I’ve Bought From Amazo
The Flymo EasiLife Robot Mower is genuinely the best thing I’ve bought in years! I’d learnt about robot mowers a good while ago but at that time the price associated with them made purchasing one a dream. I was able to get this little gem delivered last week at a relatively excellent price thanks to Amazon’s Warehouse promotion (20% off). The initial set up involves laying the boundary wire etc (if you’re reading this, I’m assuming you’ve done some research and know all about this). I’ve read this is a pain point and I won’t deny it was. It took me around 2 hours to lay the wire and then daily checks for a few days after the mower had run to make sure it was in tact. Over the first few days after the mower had run I’d find areas where the mower had pulled the boundary wire up slightly so I would add further ground pegs. On that point, the mower came supplied with approximately 100 ground pegs but I needed more; no issue at all as I found B&M sell packs of 25 for next to nothing. The next challenge I had was the mower kept beaching itself over the legs of a trampoline I have in the garden for my little boy. This was easily overcome by adding some cheap wooden boards in between the legs of the trampoline secured by zip ties. The mower can’t now travel over the legs of the trampoline and uses the anti collision sensors to back away when it encounters the trampoline. The full set up only takes a couple of days as you may need to adapt the set up to suit your individual garden but once done I guarantee you will be as happy as I am right now. My robot mower has been running for days, cutting the lawn at 3cm (just as I like it) and has not gotten stuck or caused any other issues. I’ll need to strim the edges every now and then but that is no bother at all when compared to the prospect of pulling out my overly heavy petrol lawnmower out every weekend! My final piece of advice is if you’re considering purchasing this is do it, put in some effort on the initial setup then enjoy the rest of the season 🙂
I have had a Flymo 1200r for some time and it is good enough to convince me that robomowers are definitely a Good Thing.
I have several lawns that I can’t connect together so of necessity I’m establishing something of a fleet…
I’ve tried the EasiLife and EasiLife Go in various sizes, the difference between the sizes, as far as I can tell, is simply a software limit on the length of time it will operate each day – the hardware is identical except you (usually…) get more pegs and cables with the ‘bigger’ models.
I havent tried other makes (to be fair the Flymos appear have it sewn up on cost, but the prices do fluctuate wildly)) the Gardena in particular looks identical to me bar the colour and rather more expensive, the price for almost any of the models seems to change radically- in some cases from below 300 to above 1000 for the same model, so pick your moment to buy.
I’d say the 1200r is better built mechanically but the later EasiLife/Go versions have more software options and more flexibility in locating the base station, which is good.
Incidentally some bright spark decided that they would save cost by providing a low voltage lead of inadequate length- the 1200R was fine, but the EasiLife is pathetically short and the aftermarket leads are not cheap.
The perimeter wire supplied is on the mean side too so you may have to buy some aftermarket extras but they at least are readily available.
One thing I was unable to find out before spending my money was the differences between the EasiLife and EasiLife Go, pages of marketing nonsense about how your friends will envy your astuteness in buying a Flymo robot and having more free time and a better lawn than any of them, but a dearth of actual information.
So, here it is, some actual information:
There are only two significant differences: the cutting height adjustment, and an LCD screen on the mower itself.
The more expensive EasiLife version has a large knob to adjust the cutting height to pretty well any level you like but the Go has just three settings that you set by unscrewing the blade carrier and locating it in one of three positions. Probably fine, but a bit disappointingly cheap.
The Go version has 5 LEDs to tell you what is happening but they light or flash in a completely unintuitive pattern to indicate things such as such as charging or wrong pin code – I haven’t managed to do anything without the guidebook yet. A simple row of leds each with a single function and a label such as ‘charge’ or ‘spot cutting’ would be a huge improvement. The EasiLife version has a screen to help here.
Both versions have a bluetooth app which in the case of the Go is pretty well essential to make any sense of it, but the app itself is less than wonderful – it is grumpy about (unnecessary) email addresses and I have had to reinstall it and start again as the ‘help’ service is non-existent.
That said, once you have set up your mower then I don’t see the need to fiddle with it.
For that reason (well, because of the price difference really) I’m standardising on the Go version but it is slightly more frustrating to set up.
A couple of tips:
The time spent burying the wires with a lawn edger is well spent but if you are new to this try pegging out a trial area first so you can see how much border to allow (I reckon 25cm is a good balance – there is some adjustment on the App if you have got it slightly tight)
If it appears not to function it may just not be fully charged- until it is it just sulks in it’s charger and reuses to come out to play- but this is not obvious from the instructions, the panel or the app.
Oh, and you can’t get two of them to share the same lawn, they won’t play together – I had to try!
So Far So Very Good (Easilife Go 150)
This is a review of the Easilife Go 150
I’m writing this review a week after purchase (7th April 2022) and will update at regular intervals.
First thing to note is that there is no real difference in new Easilife Go 150 / 250 / 500 range of lawnmowers. The only difference is the length of boundary wire and pegs you are given. My garden is around 100m squared and the amount of boundary wire provided by the Easilife Go 150 was more than enough. This was an impulse buy for me after receiving a notification on my Amazon app. I had been looking for a new lawnmower but hadn’t considered a robotic lawnmower as I was under the impression they didn’t really work properly. However, after reading the reviews and looking up reviews on YouTube I was convinced that they work well and that the price at the time was a cheap as they ever have been on a deal (I paid 372.99 for the 150 model, the 500 model was available for 409.99).
Set Up
After reading the reviews I expected the set up to me much more difficult and time consuming than it was. I have a relatively simple rectangular shape garden and I managed the set up in under an hour. It is much easier to follow the official Flymo set up video on YouTube (just search for it) than to follow the instructions provided. I am not a very practical person or a major DIYer but I managed it with ease. Also managed to connect it to my Android phone (Google Pixel 4a) with ease first time. By the way, you don’t need to use a phone app to for the lawnmower, it can be used standalone without the phone, it just makes life easier.
First Start
I was a little perplexed at first that the lawnmower was sitting in it’s charging dock and not moving despite me telling it to start both manually on the lawnmower and on the phone app. However, when I moved it from the charging dock to the grass it started working. I later realised that it will not move from the charging dock at first until it reaches 100% charge. So if you wonder why it will not move from the charging dock on its first use, this will be why. It worked its way around the garden and found its way home to charge when the battery it went down to around 20%. Then it moved back out again when it was fully charged. I have set it to mow for 4 hours a day but I will adjust as time goes on. I expect it will only need to be on duty 3-4 times a week.
Cutting and Performance
It did a very good job cutting the grass down. It makes very small cuts and does not collect the grass but leaves it on the lawn. I thought this would be an issue but it wasn’t. You don’t notice any of the cuttings on the lawn unless you look very closely. I have found that the cuttings have increased the quality of lawn already, as the cuttings naturally fertilises it. I started at the highest cutting height (3) and the reduced it to the middle cutting height (2) which is perfect for me. The advice is to gradually reduce the cutting height. I didn’t take any notice of this, and sure enough, I paid the price – it cut through a part of the boundary wire that was a little high. However, this was easily fixed (2 minute job) by using one of the spare electrical wire connectors provided. After this I also bought an extra pack of 20 wire connectors from Amazon for 7.99 for potential future use. Well worth an investment. Lot’s of people recommend burying the boundary wire when first setting it up, but if you do this it will be difficult to find any wire breaks in the early weeks when potential problems are likely to arise. As the weeks go by the wire will gradually sink into the lawn and get overgrown by grass anyway. I main problem is that people ignore the advice to put the boundary wire at least 10cm away from the edge in the hope of a closer cut of the edge of the grass, but if you have a weeds, clumps, dips or bumpy ground beyond the wire the lawnmower will lift or fall and in doing so change the angle of the cutting blades and potentially cut the boundary wire. I find that it edges the lawn perfectly with the boundary wire set 10cm away.
A Note on Changing the Cutting Height
At first I just couldn’t work out how to change the cutting height and the advice on Amazon Questions seemed different from different people. A lot of people told me I just had to turn a knob that didn’t exist on my model. I have since discovered that there have been subtle changes to the models over the years. My current 150 model is the latest model and was released in February 2021. On these newer models you have to take the small top cover off (the black plastic bit, not the main orange cover) and there you will find a hex key. You then flip the mower on it’s back and unscrew the blade mechanism and place it back on the mower on a different setting that is outlined. Easy when you know how but this took me ages to work out.
Neighbour’s and Dog’s Best Friend
A big bonus is that it is very very quiet, unbelievably quiet. You will be able to set it off to cut the grass at any time without disturbing the neighbours. Indeed it is very relaxing and meditative to watch. Also, my dog used to go absolutely mental when I used my hover mower to cut the grass and I was worried he would also bark at the robot mower. Praise the Lord, he takes no notice of it at all and this has saved me a lot of stress as no more unhappy spouse and children as the dog no longer bounces up and down at the patio doors like a demented banshie for an hour or so while I cut the grass.
Final Words
In short, if you’re tempted to buy this but not sure. Take the plunge and go for it. It is my favourite buy of the year so far. I love it. Easy to set up and works brilliantly.
Impressed, so far.
Very impressed. Had a couple of weeks now. Took a couple of hours to carefully put the wire around the garden. Since then I have had it running as per instructions in highest cut, then amended to the lowest cut. Now my lawn has never looked so good compared with a petrol mower. Cuts closer and looks fabulous. Convenience was the reason it was bought but the lawn looking so marvellous is an added benefit.
Fabulous piece of ki
Installed three weeks ago running very well. Decided to lay the wire with the stakes into the lawn, easy to instal and working very well.
The Easilife GO 250 is exactly the same as the Easilife Go 500 but has a different chip, that limits its operation to 180 minutes rather than 310 minutes. The battery, cable length, number of pegs etc is otherwise identical. I chose the Easilife GO 250 because it was considerably cheaper at the time and my lawn was OK with the lower capacity (I hope- its early days). I was tempted by the Worx Landroid s300 based on looks and the wifi controlled app but reviews seemed to suggest the Flymo coped better with undulating grass and was less likely to get stuck (perhaps due to the large wheels at the front). I thought a non-stuck mower was more likely to be important than the lack of wifi (fun for the first few days but then likely forgotten). The Flymo has a bluetooth based app that works fine over a short range and is intuitive once connection is successful. So far, it works fine.
I decided to install the boundary wire by burying it from the outset. It was a brave decision but I decided that I’d prefer to have it done at the outset than have constant problems with a cut wire- as others have reported. So far I think it was a good decision. The installation of the wire took a couple of hours but was tolerable on a nice day when the ground was soft and so the cuts were easy- it would be a different story on a rainy day or with rock hard ground. I laid out the boundary wire, included loops at the corners and where the guide wire was going to attach, and then buried the wire after cutting a slit with an edge cutter- with the wire being pushed down in the slit with a mallet and inverted peg. I set up a small connected secondary lawn area immediately adjacent to the main area too.
I then laid out the guide wire, attached it to the boundary wire and checked the connections via the lights on the charger. Initially I panicked- it was flashing blue (no connection)- but then realised I hadn’t pushed the connector parts together firmly enough when attaching the guidewire. Once squeezed some more, the light went green and bingo- all was good!
I’ve run it a couple of days now (already moving to a shorter cut height of level 2 since the wire is buried). So far its great- it trundles about the garden, doesn’t knock into things, stops the right distance after passing the boundary wire and there’s been no glitch. It got stuck once near the charging station but I think I didn’t put the boundary wire behind the changing station as required (the instructions aren’t totally clear on this) but I think I’ve sorted it now. I would say that the dog definitely wasn’t keen on it and made a bolt for the front of the house when it started up!
I contacted flymo in advance of purchase to ask about the difference between the Easilife GO 250 and 500 and they responded by email and phone- though clearly support was based in Europe. But it was helpful for the simple question- I’m not sure how it would be for a more complex query.
I would note that the low voltage power cable is very short- only about 3 metres long. I bought a weatherproof extension cable and box from Argos that allowed me to run the cable to where required. Otherwise all was good. There was enough boundary cable and guide wire for my 120m2 area (including the secondary area) and enough pegs because I buried most of the cable- more would be used perhaps if on the surface only.
I’ll see how things progress over the coming weeks but so far I’m very pleased. It’s not quick to set up but the instructions are clear if you take time to read and digest them.
Update after 12 months of use. Works brilliantly. It stayed out all winter – I built a small house for it to hide in- and it’s been great, with frost sense keeping it parked during snow for a couple of weeks. I kept it mowing once a week throughout winter and it keeps the lawn looking neat. Really I just forget about it and it does its thing without hassle. Had a loop signal fault once which was where the guide wire connected but it was easy to fix with a new connector- there’s even a Facebook page which has some useful advice from other users. App got updated last spring too and is better than before though still Bluetooth of course. Overall delighted – wouldn’t go back- it really is a time saver.
Allow time to set up then forget about the lawn, I just strim round the edges , saves me hours in garden maintenance
Disappointed
Performed great first year but can’t get it to start this year.
The mower keeps shutting down, it maybe the batteries but need advice as I don’t want to spend 100 if I don’t need to. Advice please
Disappointed
Performed great first year but can’t get it to start this year.
The mower keeps shutting down, it maybe the batteries but need advice as I don’t want to spend 100 if I don’t need to. Advice please
Absolutely brillia
Really easy to set up I watched the video on flymo website , didn’t take me long . Larry has made such a difference to the lawn and gives me more time for other things . So glad I brought one
Fantastic little machine..
So maybe I got a good one but I have to say I wish I’d bought this months ago.
First try was in my little 3.5×1.4m patch of grass in front of our flat.
Ignoring the instructions I set the wire inside the edge of the pavers and 10cm from the walls and hedge. And a short guide wire across the rectangle. Not hoping for much little Flymo smashed it. I set the drive past at 15cm and he run about and and trimmed the lawn nicely. Photos above are the new garden it was purchased for. And see the results. On highest setting he trimmed the long grass down until I put it on the middle and he trimmed the lot.
Again same settings and set up. Wire pushed down between grass edge and pavers. 10cm from everything else. Drive past set between 25/30cm for good edging. Lawn sense off for first weeks.
Guide wire is across the long length with a short stagger. Handles the trees and the other obstacles easily. Only fault is the daily limit. Will do about 2-3hrs then wants to stay at home for some reason. Other models appear to have bigger batteries and some other minor functions otherwise the 150 is perfect for any small garden up to 50m2
Enjoy and be brave and patient will be delighted.
Works well but takes a while to set up
Upon set up, you really have to examine the instructions carefully before doing anything! Took me about 3-4 hours to set this up, including the boundary wire, for around a 120m2 garden with odd-shaped edges. You need to place the boundary wire at different distances to the edge depending on whether the edge is a wall, flat path or obstacle, but the cardboard guide helps with that.
After 1 week of use, the mower worked as expected in terms of schedule, but got caught/stuck on the boundary wire twice and also completely cut through it. (It is worth noting I had the mower on the shortest setting). I laid the boundary wire again, but this time buried it in the lawn. It’s not in use over winter but I’ve read it still works when buried (and in fact it’s actually recommended!).
It’s worth noting that you still need to manually cut some grass with certain edges (such a walls), as the mower doesn’t cut right up to the edge.
Overall, I’ve given this a 4/5; it’s overpriced, and fiddly to set up, involving some trial and error.. but once it’s configured properly it works well.
Once set up it works like a charm. The top cover will not lift off.
Amazing grass now
Was unsure if it was worth the money before buying, we have a robot hover which we love but this was more than double.
After installing which took a little longer than expected it’s great. I’ve never had such good looking grass!
Only wish is it had Wi-fi not Bluetooth
I’ve had this mower a few montha now and what a treasure it’s proved itself to be – I wish I could have afforded the one that goes right to the edge but hey ho – 20 minutes going round with the strimmer once a fortnight is no great hardship.
This brilliant machine takes away all the hassle of lawn mowing. Most of which is knowing that the grass needs cutting and you really can’t be bothered, but if you don’t do it in the next couple of days it’s going to rain – be too warm – or it will be twice as long! Well none of that with this baby in your garden. You set it up to cut as often as you want – I do twice a week on high, and leave to get on with the job. Which is does without any hassle and no complaining!
The initial setup was a bit of a pain. I laid the boundary wire down on top of the lawn, pinning down as per instruction, mainly to judge how near to the fence I could get (cuts down on the strimming) – After a couple of cuts I reckoned I could move the boudary wire closer to the fence by about 3 cms. Well every little helps. Once satified with that, I used a lawn edge trimmer spade thing to make a shallow trough round the cutting area and. using one of the pegs with the pointed end cut off, I pressed the wire into the trough nipping the soil back together as I went along. The mower needs a guide wire to take it back to base. I chose the furthest point from the base for the straight line so that it could pick up the route to base easier. After a couple of weeks you couldn’t see where I had planted the wires.
If you have OCD about straight mowing, cricket pitch lines in your grass – which I admit I did have before I got this mower, then I’m afraid you’re going to have to get over that, but if you want to take the pain from mowing your lawn this is the one.
We had a previous generation Flymo before, which eventually creased working. Upon replacing we got tempted by the Landroid Worx, and it’s well marketed Cut To Edge technology. Over promised and under delivered, to a point we had to return it within a few months. Since bought this one, and we’re not looking back. So much easier to set up and operate, no need for expensive add ons to make it work, and the app is really straightforward to use. But mostly: it works as intended, and the smooth motors navigate the lawn well even when the grass is wet. It is gentle around obstacles, and the algorithms are a marked improvement to the previous generation Flymo we had. Definitely the best option out there in this price range.
We had a previous generation Flymo before, which eventually creased working. Upon replacing we got tempted by the Landroid Worx, and it’s well marketed Cut To Edge technology. Over promised and under delivered, to a point we had to return it within a few months. Since bought this one, and we’re not looking back. So much easier to set up and operate, no need for expensive add ons to make it work, and the app is really straightforward to use. But mostly: it works as intended, and the smooth motors navigate the lawn well even when the grass is wet. It is gentle around obstacles, and the algorithms are a marked improvement to the previous generation Flymo we had. Definitely the best option out there in this price range.
Great product but hard set up
Very good product once set up but instructions complicated and tech support all via e mail which takes too long. Had to go to Amazon support (which was excellent) as Flymo customer care was bad.
Had to rely on YouTube videos as much easier installation guidance than flymos ow
Bought this for my grandparents who were starting to struggle to cut the lawn regularly. This robot mower really does help and actually does quite a good job. I was very optimistic at the start as it started to go in all directions once the boundary wire was installed. Once it got itself worked out, it cuts as you might hope it will. Don’t get me wrong, it will never be as good as you cutting it yourself, in that it can’t get in the edges and tighter spaces (rightly so). Not a problem for us as we were looking to reduce the work, not replace it.
In terms of technical setup, the initial wizard is OK, but it’s worth checking out the advance scheduler afterwards. This is so you can set times and days more gradually, rather than the ‘which of the 7 days do you not want to cut’ option the wizard gives you. The cutting length is easy to set for my grandparents. No need to go in to the settings for that, just adjust the knob on top.
The model we bought didn’t include Bluetooth as far as I could tell. I looked up the manual and the settings tree which does show the option, though nothing on the device itself. I think it would be nice to have some kind of interaction with the app, so you can more easily adjust the settings etc.
Since using, the lawn has been healthier. The mulch that gets created by the mower appears to be feeding the lawn. So that’s a plus.
Would we recommend it? – yes if it is on sale. We paid 529 for the 500 option.
Love it!
We’ve had this 3 weeks now & very happy with the purchase. Took a couple of hours to set up, we pegged the boundary wire down and it can’t be seen now it’s settled. It’s currently set for 1 1/2 hours a day and that does the job perfectly.
Great little robot but....
So far so good. I was hoping to consign the old lawn mower to history.
But not so because although it cuts very well it does not pick up any thing. I knew this and didn’t think it would be an issue, until leaves were blown from trees.
So lawn mower is still needed to pick up leaf debris.
Fred the shred
Once set up, he just goes out and nibbles the lawn. I think what I like best is you don’t get that awful job of mowing an unruly lawn if you miss cutting for a week. Not had any issues with broken wires. A quick zip around the edges with a battery strimmer once a week takes a minute. Lawn always looks ‘acceptable’ or better. If you have an uncomplicated lawn, it does a good job.
I'm glad I made the choice and bought one.
Having spent considerable time landscaping my garden and returfing, I realised I has created the perfect opportunity to look at robot mowers. I knew nothing about them but realised that the edges of the lawn being either flush patios or brick bedding borders was an ideal start…and I could easily relocate other obstructions creating a clear mowing area.
I had two initial concerns….would it mow to the edge and can I locate the charging station on a flower bed or similar….and the answer to both was yes. Mowing to the flush edge requires locating the edging wires about 2″ in and i fixed the charging station to a patio slab on a flower bed flush with the lawn.
So…any problems? So long as you read the instructions or watch a YouTube installation video then it’s not too difficult. Luckily I had new turf so could carefully lift to hide the guide wires underneath. Over the next week or so you’ll find a few adjustments will be needed so it never gets stuck.
The mower does not collect the grass cuttings, but mulches them….so I did find initially we brought grass cuttings into the house on our feet…but I seem to have resolved this by buying some new outdoor mats and mow frequently (presently 3 times a week)….
I’ve had the mower now for a couple of months and hopefully the lawn will always look neat and the chore of lawnmowing is past and replaced by the pleasure of sipping on a glass of wine as we watch the mower pottering about!
your Lawn shape and type
This Mower is very good better than I had expected. I can sit and watch while it does all the work , My Lawn is just over 78m2 but I bought the 250 unit mainly because I think Batteries would last longer after a few weeks of mowing it does cut nearly the whole Lawn on one charge ( 2 hours) .It does take time to set up and you do have to modify the Boundary wire to suit. My Lawn has a short slope that the mower tried to negotiate, though not steep because the Mower has to turn, it digs in when trying to climb the slope made worse because the front of the Mower is too light ,I did test this by adding a small weight (2.5kg) to the front and this does work up to a point. So I did have to compromise and move the boundary wire to a suitable height from the slope. Meaning I do have a wee bit more personal mowing and edge trimming (only because of the obstacles in my garden). Setting the cutting height is also trial and error because of high and low spots on my Lawn. but it does a very good job provided you set it to work regularly. Flymo recommend every day but I set mine to three times a week setup via the App. you cannot program this Mower via the onboard keyboard. The App is very easy besides. the only time I over ride the schedule is if it has been Raining a lot (Scotland). My last point is for placing the charging station and weather proof cover ( bought separately), Again because of the shape of my Garden and the different walls and stairs ,I just had to allow the Mower to bump in to it because your boundary wire has to run behind regardless. All in all a great wee project anyone could handle provided you can have a nearby power source.
Brilliant, but takes a while to setup
As a robotic lawnmower the Flymo is brilliant. It is let down a little bit by the instructions that come with it though. They aren’t very clear and seem to contradict themselves in places.
Go on the website and watch the video it will save you time reading and rereading the poor instruction guide!
The only real gripe is that the power lead it comes with is very short, seems a little bit of an oversight.
A robot mower that actually works unlike some others
We have only had the mower for two weeks but it was relatively easy to install and works perfectly after a bit of tweaking and using the trouble shooting section in the instructions. I can definately recommend this mower after having had a very disappointing experience with another brand which we had to return. So far we are very happy with the performance of the mower and the lawn is now well groomed a week after it had been deployed.
I purchased the EasiLife 150 GO. The setup was easy as my garden is pretty square with straight lines. I haven’t had any issues with the boundary wire being cut as I pegged the wire down with many more pegs than suggested in the manual. This helped keep the wire tight and within a couple of weeks the wire has pretty much disapeared into the ground so I don’t see any point in me taking the time to bury it as its not visible anyway.
There are 3 cutting heights which you can adjust by unscrewing the cutting base and rotating it onto another height. Level 3 cuts the grass at its highest level and level one at its lowest.
One small issue I found is that level 2 was a little bit too high for me while level one was too short. I was able to easily overcome this by adding a small spacer and getting some slightly longer M5 stainless steel screws which adjusted the cutting height between level 1 and 2. This for me cut the grass to a perfect level!
Its fasinating to watch it navigate the lawn and it really does do a good job in keeping your grass looking good.
Fantastic investment!
This is a fantastic little device. Saves so much work.
This is one of the best things I have bought for quite a while.
My advice to any buyers. When is talking a guide wire the clamp needs to go all the way down. Not just a little bit.
It’s also advised to cover it for rain so bear that in mind when buying.
Best thing for the lawn.
OMG I love my lawn but through the summer cutting a 400m2 lawn every week does need dedication. I have named my EasiLife Lawna. Bit of a to do laying the wire but follow the instructions then it’s fine. You really won’t regret it. Lawna cuts 5 days a week 5 hours a day on the highest cut, 2 days off. Lawn looks as good as ever. If you want strips then just run the mower over it but it looks great without it.
Great new member of the family.
“Clippy” has been excellent and much better than I had expected. I laid the boundary wire on top of the lawn and now, two months later, it has completely disappeared.
Heed the warnings about not lowering the cut to the minimum height too soon. I did this within a couple of days and had several incidents where the boundary wire got severed. However, after running on the medium cut for 6 weeks I can run at the lowest cut without problems.
Our lawn is only about 120m2 so I can’t vouch for the performance on larger lawns. Clippy goes out for about 3hrs a day and is maintaining a close even cut.
Watching the mower trundle are puns the lawn is actually quite relaxing.
On several occasions (4) he has failed to make it back to the charging station. Not sure why but a simple restart takes him home. I guess this means it is not completely suitable for unattended operation, but it is not a problem for us.
Best gardening product I've ever bought!!
Simple instructions and easy to set-up. I made a mistake and laid the boundary wire and docking station in a small enclosed area, this seemed to confuse it and it managed to kill itself by cutting its own wires!! I was warned a bout this in my instructions…..be we know better don’t we!
Love the product and my wife and I like to watch It roam around the garden each day keeping the lawn tidy!
By the way we called him REX!!
Amazing!
This product is worth every penny! I didn’t realise they were so affordable and we have a large garden so wasn’t really sure if it would work, it does brilliantly.
Next to the central heating this is the next best product we have ever bought. Saves us so much time, not just cutting the grass but taking it to the top. 5 stars all the way!!!
A pet with no attitude
I was apprehensive to start with due to the price tag but in the end the result is worth all the money.
Setup can be a faff especially if one of the guiding cable connections wasn’t properly done ! The app is not very user friendly and took few tries to get it working. Once all is setup it was very easy to schedule your cuts. Very satisfied with the end results.
keeping it short and sweet. Use the ruler provided and get the wires as tight as possible. Ideally put a lit into the lawn and bury to cable, as you won’t be able to scarify your lawn if you don’t. 2 hour install on 90 sq m of lawn. First two weeks run it on cutting level 3, to build a mulch over the cables. Don’t do this, you tend to cut your boundary lines, unless you over peg it down. The shelter Flymo offer is a rip off. Mo sits under a 65ltr really useful container, with the front cut off, sprayed white on the inside and with a off cut bit of ply/ off cut shed felt roofing, Total 7 – Flymo version 100
Lessons learnt, Bluetooth – connect the phone to the lawnmower first before opening the app. You’ll thank me later. We have dogs, so we run this between 20:00 – 22:30, enough time to poo pick, kids are out the way and it’s adult time. But It’s so quiet you don’t know it’s on and you become addicted to watching it. Would I buy again – yes, it’s small, quiet and other than not cutting the edges, does a good job.
Love i
Fitted it after a few hours of messing about. Had to alter it now and then over the next few weeks. That was two years ago. I just forget about my lawn. At one point I started to believe my lawn had stopped growing. I agonised over the purchase, because it is easy to buy a useless gimmic, and they are not cheap. Bought another for my elderly father for fathers day, but decided to give it to him early. His lawn was a mess, but the mower sorted that out. The only problem with his, is that he has alzheimers, and keeps ripping the base station out to protect the lawn underneath, despite us telling him not to. Can’t blame the mower for that.
We named our's Bertie
Bertie is great. We only have a smallish garden but I thought i would get a robotic lawnmower. Relatively easy to set up (do read the instructions). I purchased some thin garden rods (which would normally be used to hold down weed sheets/membrane) rather than use the larger chunky plastic rods which were included – and i use more of them, but the wire is now invisible after 3 weeks. If you can afford one then I would highly recommend it. Seller was very good as well.
All weather mowing.
Comes out every morning rain or shine and keeps the lawn looking in tip-top condition despite a pretty uneven surface. Set to level 2 seems to be ideal for our garden. Did cut through the boundary wire, but this was due to the initial set-up when one of the wheels slipped over the lawn edge and it couldn’t continue, but it was easily repairable using the genuine cable connectors and when reconnected carried on using the same set-up when power was restored. Seems to charge up OK for 2 hours each day. Awkward corners and some edges do still need strimming to preserve uniformity, but this is a small price to pay for all weather lawn maintenance. Read the instructions and it’s reasonably easy to set up and test in 1-2 hours, but you do need the app. for timing. Only time will tell how long the battery life lasts.
Great. Wish I had one years ago.
I have a large garden with many flower beds and islands. I first used it on a third and an awkward area and was very impressed. It took on this easily and the next third after I expanded the boundary. I then increased the boundary to the whole garden, and even then, cutting back the hours of usage. I had some problems, but only because I did not always follow the clearance measurements! On two occasions, having to solve extra cable to allow the clearance. This was because the mower’s wheel or wheels were caught in the edge of the flower bed and unable to pull itself out. The cable does tend to hide in the grass, but can be buried. Do this after the lawn is very damp making it much easier to trench. I used a grass edge cutter then pegged as necessary. You can be generous with the clearance, as the mower has an adjustable overrun setting. Use this first if you have flowerbed sticking (as above). I’ve had it October to May so far. You will need to clear fallen twigs from trees. Also take into consideration fallen apples etc. Something I have yet to experience. You will never have a roller type manicured lawn, but you will only have to use your normal mower around the boundary, where the robot has not reached. I am saving two hours a week. If it should break, I will fix/replace it. It works for me!
This looks surprisingly small on my large lawn but it’s doing the job brilliantly. Copes with all the lumps and bumps with ease and even the lawn edges aren’t bad. Not quite enough pegs in the bag, so I had to bury some of the cable but I will end up burying it all when I’m convinced that no adjustments are necessary. Overall, very pleased.
This looks surprisingly small on my large lawn but it’s doing the job brilliantly. Copes with all the lumps and bumps with ease and even the lawn edges aren’t bad. Not quite enough pegs in the bag, so I had to bury some of the cable but I will end up burying it all when I’m convinced that no adjustments are necessary. Overall, very pleased.
Spot on Great bit of kit.
It is very easy to use as it can be programmed to mow via Bluetooth App. Be sure to follow the instructions for the guide wires and bury them .But if for any reason you want to stop and restart that’s not a problem.Wheels can get clogged and cause it to falter ,no problem just clear them and restart via 4 number code( you will have set whilst installing)
Time saving
Once you have set up the perimeter wires the mower works well. Keeps lawn tidy and allows you to get on with other jobs in the garden.
Great mower that saves me time and keeps the lawn sho
Set up was a PITA as the software needed updating and it uses an old fashioned cable.
Once that was done it is pretty straight forward, peg out the boundary of the lawn, find a corner for the base and off it goes. Start off with the lawn short and it will keep on top of it. App is easy to use.
It has got stuck a few times but that is due to a large hole in the ground and now I’ve filled it in no probs.
Apart from the set up I did drop the height too quickly which caused it to cut the boundary wire but that was also more to me not having it pegged down all around and so something to be aware of
As a disabled woman with a huge, odd shaped lumpy, bumpy garden, I spend hundreds each year on gardeners. Not any more!!
It took 4 hours to fit the wire’s, and a couple of attempts to get it to calibrate and it was trundling around the garden. My dog and kittens just ignore it and move out of the way when needed. It moves slowly enough to prevent any accidents.
From the house it can’t be heard at all, I let it run over night without issue, or sound, (I live in a bungalow with bedroom at back) and woke to a nicely mown lawn. It was first cut of year and long and thick in places, I thought it might need one last cut from gardener, I was wrong, this little bot coped with it brilliantly.
As lawn is so bumpy, I had to put the pegs in very close together in some places, which meant that the 150 supplied weren’t enough and had to buy more. Thats the only downside I have so far.
My big tip is, set it at highest cut to start, and you shouldn’t have any issues if have laid the wire tight and level to ground.
If your still on the fence, trust me this little robot really is as good as the reviews suggest.
Great mower, very simple to set up. I am very handy around the house however when I read instructions in advance I thought this sounds complicated. I never read instructions. Bottom line it is very simple.
1 cable goes out from the back of the base, around the edge of your grass and the reconnects so you have a loop, 1 more cable goes straight out from base to furthest point and joins to the loop around the grass you just made. That’s it.
Leaving 6 inches at furtherest point a little loose and not pinned will let you join the cable at the furthest point. Base needs constant power supply if you want the mower to work automatically. Once you receive the mower look at the electric connectors and then buy a few extra for repairs if the outer loop gets damaged, I say after so the you can familiarise yourself and buy them as general connectors and not under manufactures name so much cheaper.
Mower works a treat – almost 12 months old now so had plenty of use. Had two previous robot mowers. Mowbot and Robomow. This one is the best yet. Handles my lumpy lawn well! Blades easy to change and not costly. Has only crashed a couple of times in the first year – otherwise set and forget. Well featured and recommended.
BUT the app is a another story. Initially the app was rather basic but functional. Couldn’t alter many settings – meaning getting on hands and knees to do it manually – rather defeating the object of an app!
Last few days, a much needed update to the app appeared. Many more setting options available. I was pleased. Only to discover that the Bluetooth pairing is not remembered between app restarts. So every single time you want to use the app, you have to get on hands and knees again to do the pairing, re-enter all the info, only for it to be promptly forgotten as soon as the app is closed!! Useless.
So if you want a properly featured app, you will need to avoid this mower until some future date, assuming the app is updated and fixed.
But as a manually set auto mower it works well.
Brillia
I love my robot lawn mower. It’s a bit of a faff to install the boundary wire (buried), but once done, you can just sit back and watch it mow. The only downside it that you have to take it and the base station inside during the winter, but it’s not a big deal. It does a great job of cutting the lawn, and saves the issue of having lots of grass cutting to deal with.
Moved into a more suburban house last year so this is the first time we’ve had a garden to look after. Instead of buying a conventional mower, I decided to spend the extra cash and buy a robot mower instead. The price of this mower does vary a little bit, so it’s worth keeping an eye on the price. I bought the Flymo 1200 R model (400m2) in April 2019 for about 460.
I’ve used this now for 2 seasons (summer/autumn 2019 and spring/summer/autumn 2020) and I’m not regretting the decision at all.
In general it’s a great bit of kit and once you’ve gone through the initial pain points of setting it up it really is a very low maintenance worker, considering it goes out (in our garden) 3 times a week.
A few points to note are:
1. the initial setup
Putting a guide wire around the area you want cutting takes a little while (a good afternoon’s work). We decided to just peg it in rather than dig a trench and have had no problems with the guide wire being cut. We started out with the cutting blade on it’s maximum height and slowly reduced it over the course of a month. The guide wire is now barely visible at all. In most places it’s completely invisible.
The manual recommends putting the base station out in the open, but I ignored this and shoved it in a corner. This doesn’t seem to be much of an issue, except that the mowbot can’t get to the spots in and around the base station to cut them. I just break out the strimmer once in a while to take care of this.
2. Including a separate garden area.
This is a little tracker to do, but not impossible. We have a very small front garden which needs mowing, didn’t want to have to buy a mower just for this, so instead we ran the guide wire from the back garden, through the garage and into the front garden. Looped the guide wire around the front garden and then back through the garage to the base station. This ensures the guide wire is one continuous loop. There’s a few places where the guide wire is plainly visible, but I’m willing to accept this as a compromise.
To cut the front garden I have to carry the mowbot through the garage, place it on the front garden and switch it to a ‘manual’ mode. It then bounces around the front garden until it’s battery runs out. Occasionally a passer by will stop to take pictures of it, it’s become quite the celebrity…
3 general maintenance
The main thing to do is to replace the cutting blades now and again. I’m particularly lazy with this and have used 2 sets of cutting blades per season. I think the manual advises to change them more often, but I’ve not had any issues yet. You get some spare blades in the box, but there are plenty of extra blades on amazon for a good price. I don’t think I’ve used all the original blades yet, but I have bought an extra pack (not flymo originals) which I haven’t opened.
The wheels sometimes get a bit muddy, especially during autumn months, so you might find you need to scrape mud off the wheel treads to make sure it doesn’t stop the wheels slipping or rotating. You could always stop it from mowing until it’s sunny again.
Otherwise, there’s very little to worry about. It’s very easy to get caught up watching it working to be honest. I’ve spent far too long staring at the thing.
4. Husqvarna
Husqvarna seem to be the industry standard and leader in robotic mowers. It’s interesting to note that some of the parts of the Flymo 1200 R are branded Husqvarna – I think this particular model is an older Husqvarna model rebranded with the flymo badge, which gives some confidence in build quality. (This is just my speculation, I’ve not researched this!)
In Summary there’s some pro’s and con’s to this mower;
Pro’s
– Never needing to mow your lawn again
– No clippings to take care of as the they are so small they’re basically invisible
– It lives outside so no storage space required inside until the winter months, but then it doesn’t take up much room.
– Seems to run pretty smoothly with very little maintenance required
– Works any hour of the day you want it to – rain or shine!
Con’s
– Initial setup takes some time
– If you have a separate front garden that you also want mowing, it’s a bit of a faff (but not impossible)
– It occasionally gets stuck either when it’s cutting blade is blocked (rogue palm leaves that it can’t cut through are a pain in our garden) or if it goes over a nasty pothole (we have a regular fox that visits our garden who digs holes for a laugh)
– It’s minimum operating temperature is 4 degrees (i think?) so it has to be put away for the winter (I also clean it off and shove it back in it’s box for the winter months.. this can take an hour or two)
– Doesn’t do the edges very well – especially where the edge of the lawn comes up against a wall or fence and it can’t get right up against the edge to cut. You may need to break out a strimmer or edging tool now and again.
I'm not lazy really, honest.
Takes a while to install the cabling, I elected to bury it to avoid having pegs everywhere. Took over an hour and I only have a small lawn, far to small for an automatic mower you’d think, but all I can say is no lawn is too small.
Once installed its switch on and forget it and admire your perfectly trimmed lawn all year.
Probably only saves me half an hour a week but its far more thorough than I am and keeps it at the perfect height all the time.
I have a pond which I’ve buried the guide wire around, it was a bit heart in mouth the first few hundred times it approached the water and stopped just before falling in, but I’ve come to trust it now.
I was a bit worried about leaving a 500 mover in my garden but apparently thieves dont go for them as they’re unusable without knowing the PIN number. I just hope I dont get any stupid thieves, I have built a little brick garage type thing for it to hide in but being bright orange it does stand out a bit.
All in all, if your thinking about buying one, dont hesitate, you won’t regret not having to get the mower out every week no matter how small a lawn you have.
Fantastic robot lawnmowe
I needed help from a neighbour to set up the boundary wire etc. but after it was installed I never looked back. I love this robot mower it is brilliant and it is so easy to use. It mows the lawn and there are no clippings as they go back into the soil. When it needs recharged it goes back to the charging station itself. My neighbour has one and his lawn is amazing and looks like a carpet. Hopefully mine will look like his in a while.
Spend time setting up and never mow again!
After initial concerns and misgivings, I’m now loving this device. Setup is tricky and takes time – leave yourself flex when laying the boundary wire, put little loops in every few m so that you can shift it out or in without having to relay the whole perimiter. Also tweak the ‘drive over wire’ setting to check results. Have done all that and am about to Bury the wire as am pleased with results. I spent time making obstacles robot friendly (see pics) but didn’t bother wiring around them or trees and just let him crash into them and carry on which he does no bother at all – see pics for results around trees etc, it’s really quite good about getting around them and cutting well. Also don’t lower the cutting height too soon as you may find it snips the wire. Start it high and lower it over the course of a few days – patience will be rewarded! I did have a snipped cable that I left too loose and got caught in the cutter, but simple fix with spare boundary wire and couplings (all from amazon!) and no problems since.
Grass finish is really super with no intervention beyond setup above. Really mesmerising to watch in action. Very very pleased, and my wife, who thought this was a terrific waste of money, is now very happy with the results!
Really pleased with the mower with reservations. It’s really important to get the boundary wire installed as per the instructions! I’m probably going to do it all again now that I’ve learnt a lot from watching what the mower does and where. If you have solid boundaries like railway sleepers etc then you will end up with a distinct uncut amount next to the sleepers as the mower doesn’t cut close to the outside of the body. If you have uneven pathways don’t be surprised if the mower gets stuck or keeps going outside the boundary wire and then stopping.
Really pleased with the mower with reservations. It’s really important to get the boundary wire installed as per the instructions! I’m probably going to do it all again now that I’ve learnt a lot from watching what the mower does and where. If you have solid boundaries like railway sleepers etc then you will end up with a distinct uncut amount next to the sleepers as the mower doesn’t cut close to the outside of the body. If you have uneven pathways don’t be surprised if the mower gets stuck or keeps going outside the boundary wire and then stopping.
Read lots of reviews before buying, chose to go for mid-range price (this was on offer at time so less than 500). Installation looked simple enough, choose suitable place for charging point, then lay guide cable around the edge of the lawn. This, and quite a few other robot mowers, has an extra cable laid for returning to its charger. It took a couple of hours. Next is setting the mower up, this took a little longer. It didn’t like that I want the charging point off the lawn. I ended up setting up a temporary home near the off-lawn location, got the mower to understand this, then moved the charge point off the lawn as I wanted! The mower is excellent, lawn is 150 square metres and it keeps it trimmed really well in around 3 hours per day – the mower or app works this out. The app it comes with is ok, it is bluetooth only so you have to be nearby to make changes. Had one mis-hap when one of the edge cables was cut by the mower. I decided not to bury the cable, the grass was beginning to grow over it, but we have a visiting hedgehog who thought it was a worm and pulled the cable above the grass! Realised this when I spotted similar happenings the next morning. Easy repair completed using spare jointing blocks. After a few weeks 90% of cable cannot be seen.
What do I like about this mower? Lawn is kept short, even after rainy days. Weeds are disappearing – I remove the odd dandelion flower but prior to the robot mower it was a mess. No grass cuttings to dispose of.
What could be improved? Control via wi-fi. A more random return to base as you can generally see the tracks left with daily cuttings. Easier set-up allowing the charging point to be placed off the lawn.
What you should know before buying – you are told to unplug the charger and edge cables if there is a thunderstorm!
Would I buy this one again if I had to replace it? Yes, unless I had the money to go for a top-end mower!
I bought this (350m2) on sale on amazon when it was 366 and it has proven to be a real godsend. I’d read other reviews saying that installation was overly complicated and that the included instructions were not fit for purpose. I’d agree with the latter, however, a quick YouTube search gives an easy video guide.
As the product description says, it does mulch the cut grass into the soil. To the naked eye, I wasn’t sure there was any grass cutting at all, however it clearly it is cutting and the lawn is looking in great shape. It is barely audible and I’ve set it to cut in the early hours.
Just a few notes that I made having owned it now for a month. I would lay the wire at the recommended 20cm from walls and other hard surfaces and 10cm from otherwise free borders. I say this as I’d left it at 10cm from a wall border, in the hope to get a clean cut close the the edges, however this has left the lawnmower with scuff marks on the front and sides.
Some people have advocated burying the wires into the soil, but I found that after a few weeks, the wires have sunken down, to the point that I can no longer see the central guidewire, which was fairly prominent at the start. However, I would recommend leaving the cutting height to 5mm in the first few weeks, as I set it to 3mm after a couple of days, and it cut the central guidewire.
The downsides are that you won’t get a striped pattern in the lawn, as the cutting route is random. Furthermore, you will still need to strim around the edges by walls. Nevertheless it is amazingly convenient and reduces garden waste no end. Obviously it does need to be plugged into the mains, so would be of little use if you have no outside socket.
Best thing for the garden - EVER.
After a few read throughs of the manual I was still slightly confused about the installation. However after couple of questions direct to Flymo support about the installation of the boundary and guide wire all was sorted. I did not place the charging garage in the most ideal position as I need to buy a 25m charging cable. I started with just pegging the wires around the lawn. Most were fine as ‘Mower’ cut close enough to the edges, but as always a few tweaks were needed. A week or so later I buried The cable only taking a few hours. All seems to be working well and the lawn is looking really good. The lawn mower is so quiet and we have it scheduled to run first thing and last thing each day now. One thing to note is to make sure you really push the connectors on to the charging station. I didn’t realise when I first installed it, and had a couple of errors with boundary wire. Then found the connectors were not all the way in. Press them in hard.
Just built ‘Mo’ a summer house to keep dry and out of the sun during our lovely summer
I’d recommend the Easilife mower to any one.
Only thing I found out today that I will share, if you want to integrate an Easilife with google/Alexa assistant or SmartThings then currently buy a Gardena Sileno City mower as this used WiFi not Bluetooth to connect.
Love this little guy
Come on Amazon, what did i use this product for, really? Its a lawn mower.
My lawnmower currently deputises for most of the cast of the Royal Shakespeare company. Of course, due to COVID his chances of treading the boards are limited.
When he is not touring the country he can be found trimming my lawn in the back garden.
He’s been running about a month now with only a few mishaps, once he was beached due to a hole my dog dug in the lawn. Not his fault to be fair. But, twice he has botched his parking and become stuck, at least thats what i think has happened, it maybe he hit a wire turned and became beached on his own hub. Wither way not great.
When he is working properly things are great. Its a little annoying to have to cut the edges but great to watch him trundle around doing his thing. Presumably practicing his lines for his big break in Hamlet.
A note about delivery, my first one of these went missing in the post. To their credit Amazon sorted it, but it did take a few days. It did amuse me the lady in the contact centre did say have i looked wverywhere for it? It might be in a bush. For the record it comes in a pretty substantial box which has areas in bright orange.
Takes time to install but brilliant once in place
There is no denying that this is fiddly to get installed. Getting the wires in the right place and connecting up the guide wire will take you some time. Once it is in situ though, it will do you proud. The app isn’t particularly in depth, but it does what you would want it to in setting up a schedule and sending the mower out or bringing it in.
When setting up, it’s a really good idea to plan out exactly what you are going to do with the wire. Lay out the wire and adjust it. Only cut the wire when absolutely ready and don’t be tempted to do a small test area first and then expand it (from experience I can tell you that makes it worse!) The connection where the guide wire joins the perimeter has been a bit temperamental for us, with the wire ‘falling out’ of the connector on a regular basis. When we get round to burying the wire, we will twist the ends of the three wires together to make the connection and seal them together. The connectors are not necessarily needed, but are merely there to make things simpler… we just found them fiddly.
I’ll definitely be continuing to use these in the future and as and when this one needs replacing, will be getting the next model up probably just to have those extra few settings. For now this does exactly what we need it to do.
Don’t think this will run perfect first go, it won’t. It’ll take a few days to tweak the perimeter wire. Start the cutting height at the highest or you WILL cut the wire and wait a few days until the wire sinks in… or bury it, then lower the height gradually.
Once it’s set up it’s so relaxing to watch with a beer knowing you don’t have to walk backwards and forwards anymore with a lawnmower. Love it.
(Had to make it a house)
Never mow the lawn agai
Having broken at least 3 lawnmowers on long grass over the years I decided to invest a little more and purchase a robot mower. My choices were the Flymo easilife or the Worx at the same price point. I decided on the Flymo as it is owned by Husqvarna who make several lawnmower makes including Gardena and McCulloch. The Flymo appears to be exactly the same as the Gardena with a different colour and significant cheaper. Hence parts will be easier to come by. The setup is a little time consuming. This requires a perimeter wire being laid down aswell as a guidewire for returning to base. Several videos YouTube avaliable to help with the procedure. These wires can be buried or tacked down which is what I have done however I will be burying the wire when time permits as the wire can become pronounced when grass grows. Mower itself is very good, sturdy, weather resistant and quiet. I’ve scheduled a daily cut so the grass is maintained and the very small cuttings are mulched and absorbed into the soil. Cutting height is manually adjusted by control on the mower. Schedule can be adjusted by using the menu on the mower or via the app. Note the app is quite basic i.e. change schedule, check error messages, check status of mower and connects via Bluetooth. Therefore you can only adjust settings for the mower when in close proximity of the mower so no WiFi access without some kind of bridge. The limited Bluetooth app and the onerous manual setup is the reason I’ve given 4 stars. Overall very happy as I don’t need to mow the lawn anymore.
I thought long and hard about whether it was worthwhile to get this robot. It doesn’t take all that long to mow my lawn. It does, however, take time and effort I can’t really spare right now. Do I pay someone to do the job: or buy this, and never mow or pay again? Decision made.
I already knew set up would be time consuming, so I did ask for help with that.
However, once we were up and running, it was sheer delight. The bug putters around the lawn quietly shaving it, and I don’t have to do a thing. Not even empty a grass box. And there is no noise to disturb anyone.
My tips for new buyers:
1 – You don’t HAVE to sink the boundary and guide wire. You can just peg it down. We had to do that, as the ground was rock hard.
Just peg it firmly down to the ground, and maybe use more pegs than suggested. We didn’t experience any problems.
2- Pay attention to the recommended wire distances from paths, gravel and borders. There is a guide ruler in the box – we didn’t find it till the end, because it is embedded in the box itself (gah).
3 – Raise the cutting height up to max to start with, to help prevent issues with wire cutting or overlong grass
4- Don’t lose the Allen key, or you will kick yourself. Also make sure you have decent pliers. I had to adjust the wiring after my helper had left, so you can guess I learned this the hard way.
Special note: It is assumed that you will run the mower automatically on a timer, but you don’t have to do this. You can run it on an ad hoc basis. Set the mower to MAN (manual) and it will not operate until you start it. Be aware that there is a timer which is factory set to run from 7am if it is on AUTO, unless you instruct differently.
In summary: if you’re thinking of buying it, stop thinking and click buy now. If you have a higher budget you might enjoy one with app connectivity, but if you want your lawn mown with no effort and a non stratospheric cost, this one is perfect.
Have fun.
I bought this on a whim, having just redone all our garden.
The install as detailed in other reviews is a faff yes but it needs to be done.
I buried my wire all round the garden using a half moon edge cutter and just making a gap big enough for the wire then pressing the gap back together.
You will end up naming it, it’s just something that has to be done, I called ours Harry, because it potters round the garden.
The googly eyes I put on because, well it entertains me immensely.
It’s hypnotic to watch whilst having a beer and sitting back, couple this with a cordless strimmer and it’s effortless gardening.
Highly recommend if you love gadgets and have mowing the lawn.
Works amazingly well! 10 stars!!
I must admit that I was a little skeptical when a friend gave this product rave reviews one night at a dinner party. He just would not stop talking about it, but his lawn looked like a professionally kept cricket pitch so I thought I would give it ago. I have been using it for 6 months now and am quite literally stunned by the results. My lawn looks like it is professionally kept. It always looks like it was just mowed. Which it was! The robot covers every inch of my large back garden and never, ever, misses even one inch of it. I thought it would leave cuttings everywhere, but they are literally invisible because it is cutting every day and is therefore only taking off a minute amount. I watch the robot happily working come rain or shine (works perfectly even in downpours), and it is always a talking point when anyone comes to our house for the first time. They are not super cheap, but when you weigh it up against the hours and hours you’ll spend mowing, the many days your lawn does not look mowed in between times, the hauling of grass cuttings, and the overall boredom of constantly having to do this job, this thing pays for itself in no time! If you have any reservations about whether this robot works, stop wasting your time reading and start buying – you will not be disappointed!