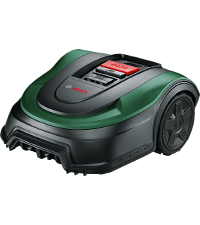
Indego M 700 UK

Effortless and quiet autonomous mowing
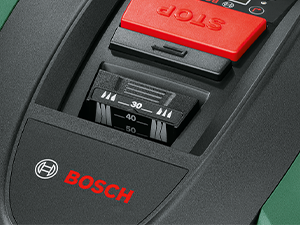
Cutting height
Choose between 3 settings: 30, 40 and 50 mm

HMI display
Integrated with Bosch AUTO Calendar Function
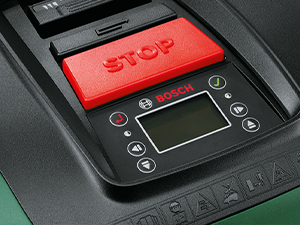
Manual stop button
Cutting blades also stop within 2 seconds of lifting the product
Less noise
Sound level up to 63 dB(A)
Narrow passage handling
This feature enables Indego to identify narrow passages of 75 cm or wider (between the wires) and mow them without the need for a guidance wire.
The mower remembers where the narrow passages are and builds them into the lawn map.

Mulching benefits
Indego distributes short clippings evenly which feeds the soil with nutrients ensuring a lush looking lawn.
Intelligent mowing

MultiArea
Indego can mow additional lawn areas if their combined size is no greater than 700 m2
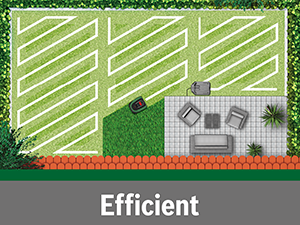
LogiCut
Indego cuts efficiently in neat parallel lines, freeing up your lawn sooner

AUTO Calendar Function
Indego autonomously maps your lawn and creates a mowing schedule optimised for your lawn size
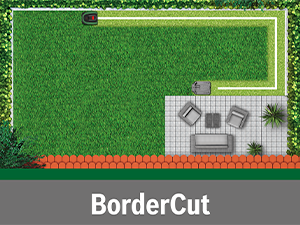
AUTO BorderCut
Ensures the edge of your lawn is cut at the start of each full mowing session
Indego Models Comparison
 Indego XS 300 |  Indego S 500 |  Indego S+ 500 |  Indego M 700 |  Indego M+ 700 | |
| Self-serviceable battery | ✘ | ✔ | ✔ | ✔ | ✔ |
| App connected | ✘ | ✘ | ✔ | ✘ | ✔ |
| Brushless | ✘ | ✔ | ✔ | ✔ | ✔ |
| LogiCut | ✔ | ✔ | ✔ | ✔ | ✔ |
| Narrow passages | ✔ | ✔ | ✔ | ✔ | ✔ |
| Narrow passages | NO | AUTO | AUTO | Selectable | Selectable |
| SpotMow (m x m) | NO | 2 x 2, 3 x 3 | 2 x 2, 3 x 3 | 2 x 2, 3 x 3, 4 x 4 | 2 x 2, 3 x 3, 4 x 4 |
| MultiArea | ✔ | ✔ | ✔ | ✔ | ✔ |
| Runtime (mins) | 45 | 60 | 60 | 75 | 75 |
| Charge time (mins) | 45 | 60 | 60 | 60 | 60 |
| SmartMowing | ✘ | ✘ | ✔ | ✘ | ✔ |
| Voice control / IFTTT | NO | NO | Alexa & Google Assistant / YES | NO | Alexa & Google Assistant / YES |
Can Indego mow more than one area without me having to buy an additional dock?
Yes, by connecting the additional lawn with the same perimeter wire used for the main lawn. Move the mower manually to the additional area until it runs out of power. Indego will navigate the additional area using a random mowing pattern.
What is the minimum width of the narrow passage?
The narrow passage has to have a minimum distance of 75 cm between the wires. The wire will need to be positioned 30 cm away from the edge when there is a wall, fence or a hard object next to it (total width = 135 cm. 75 cm + 30 cm + 30 cm).
How can I update my mower?
You can download the latest software with the newest features for free. Just follow the steps on the Bosch Indego Help page www.bosch-diy.com/indego-help
| Weight: | 5 kg |
| Size: | Basic |
| Dimensions: | 44.5 x 36.4 x 20.2 cm; 5 Kilograms |
| Model: | 06008B0273 |
| Part: | 06008B0273 |
| Pack Quantity: | 1 |
| Batteries Required: | Yes |
| Batteries Included: | Lithium Ion |
| Manufacture: | Bosch |
| Quantity: | 1 |
| Size: | Basic |
Best purchase eve
I don’t normally leave reviews but this indigo m+700 robot mower is great. Set up first time with guide wires and also set up 2 more zones so I can pick it up and use it in other places.
Love it so much I’ve just purchased a second for the back garden.
This is my first robot mower so I don’t have anything to compare it to but I am very happy with it.
The installation involved pegging a perimeter wire around the lawn which seems straightforward but it took several hours. I wanted to get right up to the borders to minimise strimming, so there were multiple runs of the mapping process, adjusting the wire. The next day I made more adjustments like adding soil around the edges to allow the mower to get part way up onto the bricks along the edge. Then deleted the map and allowed it to re-map the lawn. The result now is the wire at 5cm from the edging on three sides and 20cm from the higher patio so just a small amount of strimming which I can do with shears.
I’m very pleased with the cutting itself, it covers the whole lawn at a different direction each time. The lawn looked much better after 4-5 mows last autumn, and then I stored the mower and docking station inside for the winter months. It’s now back outside and doing its job nicely. It seems to be fine out there in the rain but I might build it a garage out of a plastic storage box.
The firmware update requires a download to USB, but then you need a USB to micro USB converter cable which is a bit annoying because I had to buy one. Therefore gave it 4 stars tech support.
if you like proper mowing without the hassle: this is your solution made in Germany! A bit complicated to get the app making the right connexions and settings, but after a while we got it right. Tech support is not existing except for the countless unhelpful and automated emails you get every time something went wrong mostly their side. By the way, this robot mows leaving perfect symmetrical stripes, not random mowing like most of the other brands.
Installation
I knew from my pre-purchase research that this mower would require a fair amount of time to set up, although it is still quite frustrating when you just want to see the new mower in action.
I set up the new mower when the lawn was in need of good cut. That way, at least the time spent setting up the mower would be offset by the time I would usually spend going round with my old mower.
The first challenge was finding a suitable spot to site the power supply. The base has to face in a suitable direction to allow the border to be mowed in a clockwise direction. This is clearly described in the instruction manual
The next step is installing the perimeter wire. This is a little tricky as you have to strip the wire yourself, made more complicated when my usual wire strippers broken. I had always assumed that the perimeter wire was mark out the area covered by the mower. I found out that the perimeter wire for this mower is used for its “golden source” around the garden. This means that the wire has to be away from the edge itself, without anything blocking the border so it can then map the rest of the garden. One thing I learned was to be initially lay the perimeter loosely with as few pegs as possible and then go back and fill in between the gaps. You also need to avoid placing any loose plant pots on the borders of your garden as the mower uses the perimeter wire as its primary path around the garden. It is also good to leave some excess wire for changes later, which can be done by pegging in a zig-zag pattern.
Using the Device
When the mower it first used, it follows the perimeter wire around the edge of the garden and once it has completed its route, returns to the dock, having saved a map of the garden. It will stop if encounters an obstacle and will ask you when it is in the dock!
Once this has been completed, it is free to mow. Compared with using a conventional lawnmower, the robotic lawn mower seems to take a far more circuitous route around the garden.
One problem is that it can easily get stuck in minor ditches so these need to be levelled out so it can move freely around the garden. If it does get stuck, it has to re-calibrate by moving back to the perimeter wire.
It also has problems dealing with fixed obstructions on the lawn such as play frames, which it keeps bashing into whilst it is trying to find its way past the obstacle. Unlike my robotic vacuum cleaner, it lacks detectors to prevent it hitting garden furniture.
It also often takes a long path around the garden when getting back to the dock as it seeks out the perimeter wire.
Specific Features/App
The “border cut” is a promoted as a feature of this mower. However, in practice I found that I still needed to use my strimmer at the very edge of the lawn as the perimeter wire cannot be placed directly on the border.
The accompanying smartphone app is intuitive and allows a smart mowing schedule that takes everything into account from the weather to days you don’t want it to mow the garden for example weekends when you’re out there. It’s easy to setup and use and that certainly adds ease of use to the system.
I have found it struggles to get to specific sections of the garden (for example on the other side of my path through the middle) — although it can get there very easily around the perimeter wire, it hasn’t quite learnt the optimal way to get there because it doesn’t “learn” as it goes so it makes the same troubles multiple times around really. I think it often just misses out some of these sections when it says Lawn Complete which is a bit frustrating, because there’s no simplistic way to set it off to only mow a specific section of the lawn (this would be a great feature in my opinion). Especially as it already has an image map layout of your garden — it would be a great feature (probably via software only) to be able to do several things:
* Draw out paths/objects that don’t move even if in approximated places so it can learn the exact place on its round
* Be able to draw a shape on the map of the section you want it to specifically do (some areas grow quicker than others or if something is missed out you can easily make it cover that specifically or if the kids are playing or their toys are all scattered in one section you can just eliminate that and come back to it later rather than not being able to run a 4-5 hour cycle over 400sqm).
Conclusion
I wouldn’t say at least I’ve got it to the point where I can go on holiday for a week or go to the office and expect to come home and find the lawn fully maintained for me and the device on the dock charged up nicely — it’s great if you’re around and can give it the nudge it needs when needed (if stuck) but at the same time it’s a gadget of sorts that makes your friends and family eyes light up with curiosity and a good conversation starter on the world of digital tech. If I assume I had to spend around 3 hours every 2 weeks on my lawn especially during the peak months of growing and it looked quite long after 2 weeks — I’ve probably simplified my remit down to about 15 mins every 2 weeks doing the edges and any other general maintenance and the odd kick here and there to get it out of the copious ditches I have that I’ve been trying to fill in on a case by case basis. So yes, it saves me time and from that perspective I’m more than happy as it stands — I’m sure there’s some other good models out there too so I wouldn’t necessarily say this is the best of all of them (I’m not working with comparisons in mind) but Bosch is normally reputable for reliability so time will tell if I made the correct choice!
Works as well as the Flymo original but the outer diameter of the wire is very slightly thinner.
Works perfectly fine with Flymo 1200R
If you have a flymo 1200R and need more Boundary wire this one works perfectly well.
Robot wire.
Strong boundary wire ,easy to splice.and lay.Thank you.
Dennis.
Works with McCulloch Rob 1000
Appears to be the cheapest of the boundary wires. Works perfectly with the McCuloch Rob 1000. I used it as the guide wire.
Useful
It is useful to have as dependent on your lawn you may need to use more wire. You could extend the area or have damage.
Worked well and far cheaper than going direct to Flymo. Should mention that despite being Bosch, this does work with Flymo robot mowe
It’s a role of single core wire
Works fine, if a little expensive for what it is.
Used this with my Husqvarna Automower, the wire seems identical to that supplied by Husqvarna but this is quite a bit cheaper than any other boundary wire i could find. Worked perfectly to boundary off several fruit trees and bushes that my mower was intent on demolishing otherwise. It is amazing how much wire you need, i only went around about 10 trees/bushes in a fairly small area and used about 70-80m!
Best price I could find anywhere
Best price I could find anywhere. We purchased this for our Flymow automatic mower – the fundamentals are the same so this wire will do nicely.
Not needed
Not needed as there was a similar one enclosed in the box
Its bosch perimeter wire, so you know that it will be compatible with your indigo mower.
Set your mower at a cut level between 8 (long grass) and 3 (short grass), then you will not need to bury the wire.
(I had tried with cut level 1 but had a few cut wires)
Make sure you use lots of pegs – every 50cm as recommended by bosch, but if your wire still looks like it is sticking up a bit, use an extra peg.
It’s worth installing the perimeter wire very well the first time, pays off in terms of trouble-free automatic mowing in the long term. You really should dig it in at least 1cm below the surface and in order to put it in properly, you need to strim/mow the perimeter to military-style crew cut length. Also need to even the perimeter and fill in any holes. It’s vital to get this right otherwise you will have trouble with the mower, if not immediately, in the longer term. Gardens are actively used, walked on, played on, changed, maintained. The manual is just plain wrong when it says that the wire can go on the surface of the grounds, doesn’t work in the real world because of the reasons given above. Also, you need a LOT more wire than you think. The manual focusses on the perimeter but the real mileage comes from marking off all the objects in the garden. Bottom line is have at least one reel of wire spare, its so frustrating to need it and not have it.