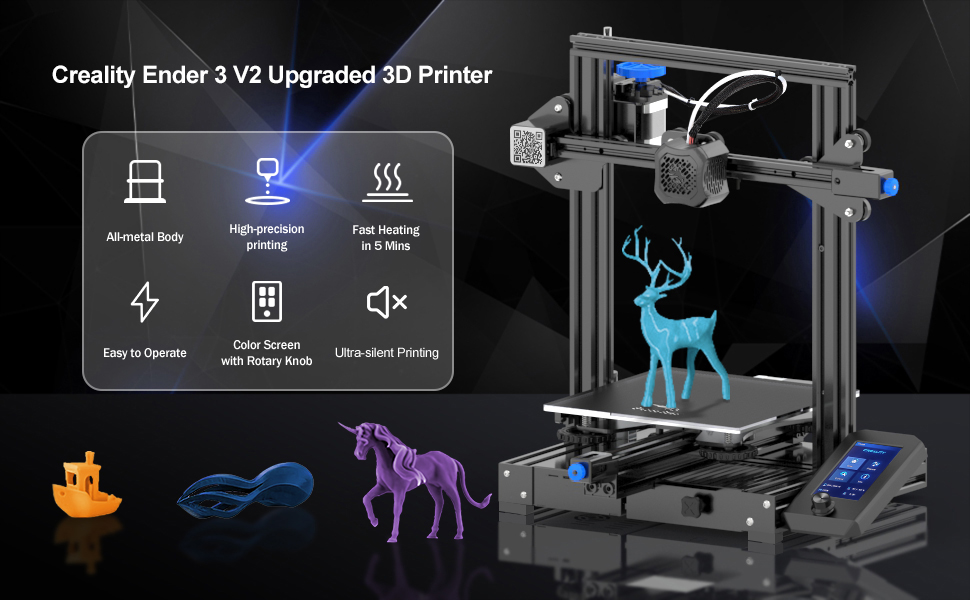
Creality Official Ender 3 V2 Upgraded 3D Printer, with Silent Motherboard Mute Printing, Carborundum Glass Platform, Resume Printing Function After Power Failure, Build Volume 220x220x250mm
* Creality has been focusing on the design, research, production of 3D printers and 3D printing products since 2014.
* * Factory is covers an area of 50,000 square meters, reaches an annual production capacity of over 1,000,000 units. Products are all certified to CE, FCC and R-OHS standards and have been exported to more than 100 countries.
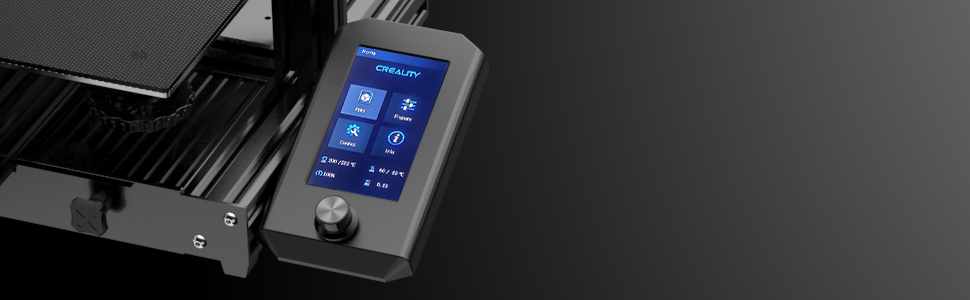
New Operating UI System
Brand new UI operating system and 4.3-inch color screen, easy to operate.
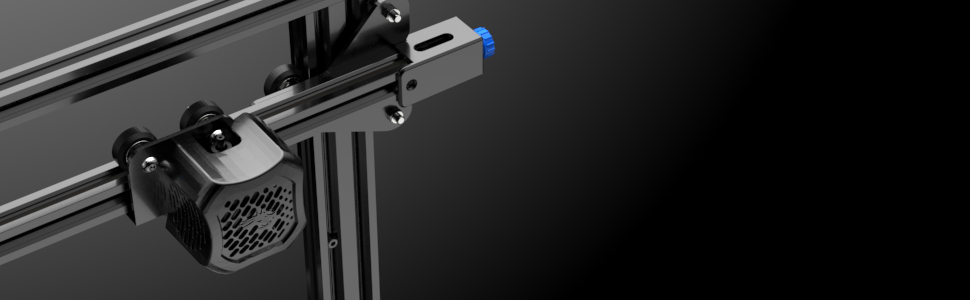
Dual cooling fans
Help hot-end heat dissipation continuously and cooling on the extruded filament quickly.

Easy installation of filament
Rotary buttons are installed on the extruder to load filaments very easily.
Carborundum Glass Platform

The temperature rises faster and the printed object sticks to platform better
1. Carbon crystal silicon glass heating plate, strong adhesion, rapid heating, and the model does not warp edges.
2. Mute drive motherboard, mute noise reduction, low decibel operation, mute printing.
3. Continue to printing after power off, protect the abnormal situation, and continue to work after power on.
* Printing consumables: PLA/TPU/PETG/carbon fiber, etc.
* Hot bed temperature: ≦100℃
* Printing method: online or TF card offline
* Operation interface: switch between Chinese and English
* Support format: STL/OBJ/AMF
* Slicing software: Cura/Repetier-Host/Simplify3D
* Computer operating system: WIN/XP/MAC/Linux/Vista
Service: In 3D Printers,Creality Ender 3 V2 3D Printer provide lifetime service.
Stable printing: FDM 3D Printer, using V-belt pulleys, the track runs smoothly, with low noise, and the Small 3D Printer is more stable.
Semi-assembled kit: 3D Printer Kit, which is a semi-finished product. It is more convenient for you to assemble it, Mini 3D printer can be assembled by one person..
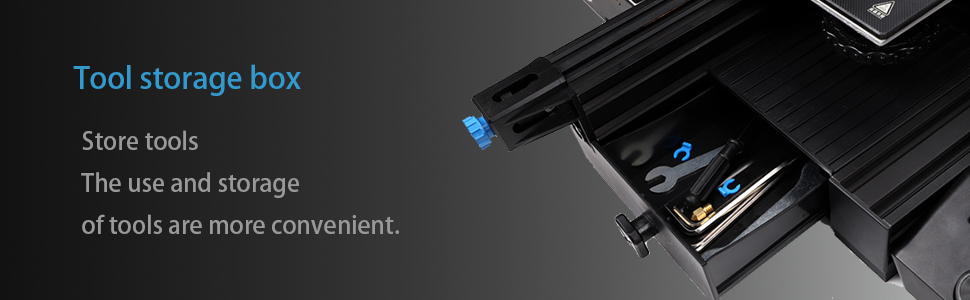
Integrated structure design: ender 3 v2 printer,All accessories are hidden in the 3d printer’s machine, which is not easy to damage and extend the service life. creality 3d printers,At the same time, wearing a tool box makes it easier to disassemble.
| Dimensions: | 47.5 x 46.99 x 61.98 cm; 612.35 Grams |
| Model: | Creality Ender 3 V2 Upgraded |
| Manufacture: | Creality 3D |
Excelente para quem quer começar com qualidade
Produto de dificuldade mdia para montagem (muito contedo de auxlio na internet). Excelente para quem quer iniciar na impresso 3d.
Fica a dica para j encomendar filamento enquanto o equipamento no chega, pois assim que montada, voc vai querer imprimir muita coisa e a quantidade de filamento que acompanha bem pouca (apenas para teste de impresso de pequenos objetos).
Sistema muito fluido e material parece robusto de qualidade muito boa, veio com 01 bico a mais e parafusos sobressalentes.
Great for beginne
My first 3d printer, took a while to assemble, I reccomend following an assembly video on YouTube as the instructions aren’t amazing. Took a few hours to dial in settings but now produces great prints
Knew nothing about 3d printing. This was easy to learn and use. Did get help from my brother in law to put together tho
Knew nothing about 3d printing. This was easy to learn and use. Did get help from my brother in law to put together tho
Custo benefício
ima impressora, encaixes precisos, o cabo de fora no est nas normas regionais, necessita adaptador.
Muy bien en general
Despus de una entrega rpida y en buen estado. Mi Primera Impresora 3D Jjjjj. El montaje, he preferido ir sin prisas y haciendo las cosas bien para que al final todo funcionase, 2h mas o menos. Por fin todo listo, despus de 15 das imprimiendo cosillas y todo sin ningn problema, puedo decir que estoy muy satisfecho con la impresora. Genial.
Imprimante précise ete rapide
Pour ma seconde imprimante 3D, il y a pas photo, la Creality Ender 3 V2 est trs simple d’utilisation avec son cran avec molette tactile qui permet de se balader dans les menus et qui par un clic dessus valide l’option choisie. Rendu superbe avec du PLA, j’ai pas encore essay d’autre matriau mais vu le rendu je la recommande fortement.
Excelente impressora
Embora estou iniciando neste segmento, impresso 3D, estou fascinado com a impressora. Muito boa.
Ótimo produto.
O produto foi postado com bastante rapidez, assim chegando at antes do prazo, vem muito bem embalado. Super recomendo.
Valor do custo benefício, sem frete
Parabns excelente produto e pela qualidade da empresa na honestidade com os clientes e no prazo descrito entrega do produto….obrigado.
Perfecta para iniciarse
muy buena impresora para maker’s super ampliable,silenciosa
eso si cuando os decidais a comprarla aadir al carrito los muelles duros o gomas para la cama y una extrusora metalica ya que las de serie pues eso para probar bien pero nada mas
This is my first printer and it works amazing! It took some time to get the bed leveled properly but after that I am very impressed with this 3D printer. I have printed many things and am now on my second roll of filament. The entire first roll there were no issues with the printer, it's built very well
This is my first printer and it works amazing! It took some time to get the bed leveled properly but after that I am very impressed with this 3D printer. I have printed many things and am now on my second roll of filament. The entire first roll there were no issues with the printer, it’s built very well
Melhor custo beneficio possivel
Melhor custo beneficio possivel
Melhor custo beneficio possivel
Way more reliable than I expected
I was reluctant to try a 3D printer after reading comments about bed leveling and layer adhesion and on and on but I went ahead and order this one hoping that the user base would help me through the learning curve. Happily, it has been super reliable once I understood the setup a little better but that is more of a user training thing to me than a machine issue. It took me 4 or 5 starts to get the first layer to adhere because I didn’t have experience with the bed leveling (and I didn’t tighten Z axis limit switch which I installed.) Essentially, you level the bed my going from corner to corner using some sort of feeler gauge to judge the distance of the nozzle from the bed. I used a piece of notebook paper and set the bed based on a light drag which is how I would use a feeler gauge in the garage. However, this was still too far away for the first layer and it didn’t stick. When I adjusted the bed so there was a heavy drag on the paper, it worked fine. Two weeks later, I have printed dozens of things and have yet to clean the bed or level it again. It just works. Every time. The glass bed on the V2 releases printed PLA objects very reliably once it cools down. Be patient and just wait a few minutes for it to cool and the object literally falls off.
Things I wish I had realized before purchasing: The prints take way longer than I expected. I got that reality check when I put a (what was to me a modest sized) model of something through the slicer and it was estimated to take 24+ hours. The other thing I don’t care for is that this version apparently was upgraded from USB Mini B to USB Micro B rather than just jumping to USB-C. I have so far only been using the SD card sneaker network rather than USB but I will be trying USB prints direct from Cura in the near future…once I find a micro B cable that isn’t trashed. The last thing I wish I had known (or realized) was that the limitation of the printer isn’t really the build volume so much as the insane amount of time it would take to actually print something that fills the build volume. I would imagine I could order most parts and have them delivered before this printer was finished spitting it out (and quite a few could be quickly out of hardwood faster than they could be printed.) Don’t get this because there is something mundane out there that you just want to make yourself because it will be frustratingly slow. Get this because there is something that is either not available or almost what you need and with a little modeling, you can get exactly what you need, albeit in plastic… in plastic layers… hopefully without any stringy things attached… hopefully without an insane amount of breakaway support layers that will leave a rough finish… hopefully… well … you get the idea.
I was printing after a laid back couple of hours of assembly. I watched a very helpful youtube video, pausing as I went, and took a good amount of time to make sure everything was tightened down square. Clearly bed leveling is crucial. I used a piece of paper and with the machine on there was a certain point where the paper started to vibrate from the blower vibration through the nozzle. I kept going around and all over with the paper under the nozzle until it vibrated just right everywhere. My first prints came out flawless. I've been waiting ages to get one of these but they never seemed to be good enough. This one seems like the gold standard for price and capability, and all the major bugs of 3d printing have been solved. Whatever is on the surface of the bed works great; I'm glad I never had to mess with tape, glue, or whatever else people used to use to hold parts down.
I was printing after a laid back couple of hours of assembly. I watched a very helpful youtube video, pausing as I went, and took a good amount of time to make sure everything was tightened down square. Clearly bed leveling is crucial. I used a piece of paper and with the machine on there was a certain point where the paper started to vibrate from the blower vibration through the nozzle. I kept going around and all over with the paper under the nozzle until it vibrated just right everywhere. My first prints came out flawless. I’ve been waiting ages to get one of these but they never seemed to be good enough. This one seems like the gold standard for price and capability, and all the major bugs of 3d printing have been solved. Whatever is on the surface of the bed works great; I’m glad I never had to mess with tape, glue, or whatever else people used to use to hold parts down.
La migliore!
una delle stampanti pi belle, facili da usare e silenziosa che abbia mai provato. Se la vostra prima stampante state comprando una BMW
Facile da montare, affidabile e precisa.
Questa stampante davvero efficiente. Una volta calibrato il piano di stampa va che un piacere. Da consigliare!
Mein 2. Ender nun in der besseren Version v2
Da mein erster Ender 3, leider zurck geschickt werden musste habe ich mich nun fr den Ender3 v2 entschieden. Ich bereue es nicht!
Das neue Board mit den sielent Treibern (4.2.2 STM stand-alone) ist mehr als sein Geld wert, welches beim V2 schon dabei ist. Abgesehen von dem vernderten Hotend und Display, sowie die Gummi Fe und riemenspanner sind sie baugleich. Und das ist verdammt gut so, weil es aus meiner Sicht, selbst Anfnger einer der besten Drucker OutOf the Box ist (siehe Wrfeltestdruck) nachdem aufbauen. Okay auf meinen Bildern sind schon Upgrades montiert diese waren aber zum testdruck noch nicht dran!
Aufbau dauert knapp 1 Stunde, wenn man es schon einmal gemacht hat, ansonsten locker 2 Stunden. Strom ran, fertig. Man sollte beim Aufbau Winkel und gradlinigkeit der Profile und co beachten prfen und justieren, ansonsten wird es beim Leveln schwierig! Nachdem man aber erster mal vernnftig gelevelt hat, kann man drucken bis der Arzt kommt!
Meine Empfehlung ist ein BLtouch, Haftspray frs Glssbett und ein Software Upgrade, das sind aber alles keine muss! Der Drucker ist sehr leise nur die Lfter sind zuhren, schneller als der ender 3 und sehr sehr genau. Verwendet wurde PLA + von einer bekannten Firma mit S.
Klare Empfehlung fr Anfnger, die Community ist gro und es gibt eine Menge Anleitung.
Better than expected. Everything worked out of the box with no issue. Great 3D prints!
Better than expected. Everything worked out of the box with no issue. Great 3D prints!
Only thing I ran into was the power supply was set to 220V by default. When I first powered up, nothing happened. After some troubleshooting, found this, switched it to 110V and everything just worked.
I bought this to upgrade from my monoprice mini select v1. Much bigger print area, so quiet compared to my last printer. I had trouble initially getting the filament to stick to the glass.. I’ve since got a magnetic pad on there, and with proper bed leveling with the bltouch, it’s great now. Bigger build area opens up a whole new scope of things to print. I loaded the latest firmware in the printer to support the bltouch.. very easy to do, and upgraded to the jeyers firmware for the screen.. again very easy to do.
I bought this to upgrade from my monoprice mini select v1. Much bigger print area, so quiet compared to my last printer. I had trouble initially getting the filament to stick to the glass.. I’ve since got a magnetic pad on there, and with proper bed leveling with the bltouch, it’s great now. Bigger build area opens up a whole new scope of things to print. I loaded the latest firmware in the printer to support the bltouch.. very easy to do, and upgraded to the jeyers firmware for the screen.. again very easy to do.
Endlich habe ich mich durchgerungen mir einen 3D Drucker zuzulegen. Ich hatte schon lnger damit geliebugelt aber die Preise waren mir immer etwas zu hoch. Aber bei knapp 300 Euro und viel Cor. bedingter Freizeit konnte ich dann nicht mehr Nein sagen
Um es vorweg zu nehmen — das Drucken macht richtig Spa, aber es kostet auch Zeit sich in die Thematik reinzuarbeiten. Der Ender kommt sehr qualitativ daher. Bereits bei der Verpackung wird das deutlich. Alles ist in extra geformten Schaumstoff gepolstert. Gut so! Denn es sind eine Vielzahl an mechanischer Bestandteile, die auch genau diesen Schutz brauchen im Transport.
Ich hoffe auf dem Video erkennt man das ganz gut.
berrascht war ich etwas von der Gre, er ist tatschlich kleiner als erwartet. Trotzdem arbeitet er sauber alles weg, was man ihm auftrgt. Von der Lautstrke her bin ich zufrieden. Werkstatt Lrm Feeling hat man hier keines.
Bisher habe ich nur mit PLA gearbeitet. Dabei gibt es schne Vorlagen zu einem bestimmten Film den ich aus Copyright Grnden vermutlich nicht nennen darf. Aber es geht um einen Vater mit “Kehlkopferkrankung”, irgendwo im Weltall.
Aber auch abseits von Spleens kann man wirklich schne Sachen damit drucken. Von Spielfiguren, zu Schatullen, Anhnger, Ersatzteile, Vasen usw.
Die einzige Grenze ist die Vorstellungskraft und bei anspruchsvolleren Zielen vermutlich auch das Material.
Bisher habe ich es nicht gebraucht aber Ender wirbt mit lebenslangen technischen Service fr das Produkt.
Ich bin insgesamt sehr zufrieden. Es macht mega Laune und frisst einiges an Zeit. Wer also ein bisschen Ablenkung braucht von seinem Alltag, der ist hier genau richtig.
Simple and great low budget 3D printer! this low budget 3D printer is perfect for beginners, since it has simple to follow instruction , this printer took a bit of work to put together, however with patience and by following instruction this can be done in few minutes, the printer comes in a very flat box which is excellent if you are giving it as a gift, it will be very simple to wrap! the controls are simple and easy to understand thanks to the large LCD screen.
Tip; make sure that the printer plate is hot enough before you start printing, the platform also has to be very clean, in that way the print will stick to the platform very easily 🙂
Before removing the 3D PRINT make sure you wait for the platform to be completely cool so the print will come out super easily!
The structure is very strong and great! we recommend to use PLA+ filament to get a smoother finishing in the printed pieces, the rainbow one is quite fun to work with!