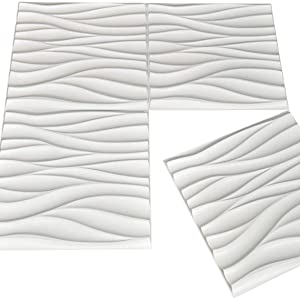
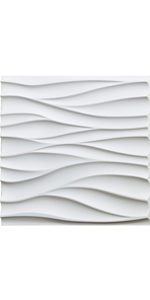
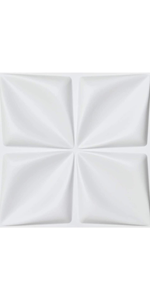
Art3d 3D Paneling Textured 3D Wall Design, Black Diamond,50
Art3d 3D Paneling Textured 3D Wall Design, Black Diamond,50 * 50cm (12 Pack)
Surface Requirement
Make sure the surface is clean, dry, free of any residue. Remove old or loose wallcoverings, damaged wallboard or plaster, and repair any damaged surfaces if needed.
Priming is always recommended to ensure a better performance.
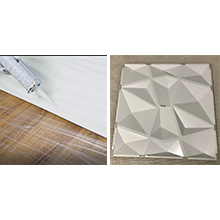
Glues for installation
Before installation, laying the panels on the floor for 24 hours to let it physically flat for easy installation
The easiest way is to install with 3M Command Strips, but only those sleek surfaces like metal, glass, ceramic or well primed are right for it
We recommend to install with heavy duty construction adhesive(gorilla brand recommended) for all kinds of surfaces
Cutting for 3d Wall Panels
Using tile saw( diamond bladed is ideal), table saw or other electric saw to cut the tile
For outlet cutting, using a Dremmel or tin snips would be easier
To trim, use a pair of tin snips / aviation snips.
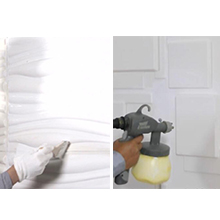
Panels Painting
It can be left as what it is, no additional finish required
For painting, leaving around 1mm gap bewteen tiles to fill the caulking for creating a seamless look if needed
Choosing the oil-based paint to finish the PVC wall panel (please take note for Plantfiber wall panel should using water-based paint)
To achieve a good performance of finish, spray is recommended
If spray is not available, brushing or rolling works as well
If you really want to give your room a unique upscale look I highly suggest these pannels. They cam in perfect condition make sure you measure your wall before ordering. Measure twice order once I got two of the 12 packs and had two left over. These are really amazing and when the light hits these it gives it a great look. Make sure you use liquid nails to put these up. The gorilla double sided tape is actually hard to use. Liquid nails makes it easier to stick. These definitely seem very durable and the size is great and materials seem solid. If you really want to give your room a unique upscale look I highly suggest these pannels. They cam in perfect condition make sure you measure your wall before ordering. Measure twice order once I got two of the 12 packs and had two left over. These are really amazing and when the light hits these it gives it a great look. Make sure you use liquid nails to put these up. The gorilla double sided tape is actually hard to use. Liquid nails makes it easier to stick. These definitely seem very durable and the size is great and materials seem solid.
Bellissimi ma sono MOLTO scuri. Ho acquistato quelli bianchi e sono rimasto molto felice, ho preso anche i blu ma purtroppo sono di una tonalit molto pi scura che in foto ed in stanze poco illuminate sembrano neri. Consigliati ma sappiate della tonali
Easy to install, looks great and adds to any blank wall! I was not sure about these initiallymy son wanted them behind his “gaming set-up” we lit the back with sticky led lights and now I am a HUGE fan! Cutting them is a bit annoying around light switches etcand finding the right adhesive. I tried all the adhesive stickiesspent WAY too much on a variety of kinds and the adhesive mounting tape on a roll attaches to the wall the best, leaving less spaces and has never fallen. I place them in 4 places and they look amazing!
Easy to install, if you have to cut use an exacto knife and maybe purchase a few more than you think you need (;
Gu Optisch sieht es gut aus an der Wand. Habe mit die Doppelseitigen Klebebnder geholt damit befestigt. Fr mich erfllt es den Zweck. Qualitt ist Gut das ist meine Persnliche Erfahrung. Danke
Muy bie No tienen adhesin, no vienen con autoadhesivo ninguno, hay que comprar a parte alguna cinta o pegamento.
Por lo dems son muy estticos y quedan bonitos en cualquier superficie, en mi caso tap un gotelet que no me gustaba nada.
We used these panels to cover a painted wall. The panels are large but because you have to cut a few to fit, you will need an extra box. Our wall used 2 full boxes and one half on the bottom (shown in photo) because we had to cut them to fit. We framed mirrors but if we covered the entire wall, we would have doubled the number of times. Keep that in mind when ordering. The room is 10x10 and the panels gave us the dramatic feel we wanted. I recommend using clear gorilla construction adhesive. They stick better and allow you to align better. I recommend them for easy room transformation. We used these panels to cover a painted wall. The panels are large but because you have to cut a few to fit, you will need an extra box. Our wall used 2 full boxes and one half on the bottom (shown in photo) because we had to cut them to fit. We framed mirrors but if we covered the entire wall, we would have doubled the number of times. Keep that in mind when ordering. The room is 10×10 and the panels gave us the dramatic feel we wanted. I recommend using clear gorilla construction adhesive. They stick better and allow you to align better. I recommend them for easy room transformation.
Great product to enhance the aesthetics of your space! It provides for a very clean look when you take the time to install properly. I rent and was even able to hide a few of the tv wires behind the panels. Very pleased with how everything turned out. Great product to enhance the aesthetics of your space! It provides for a very clean look when you take the time to install properly. I rent and was even able to hide a few of the tv wires behind the panels. Very pleased with how everything turned out.
Cheap quality but looks great! Mixed thoughts on these panels.
At first appearance, the panels look cheap and flimsy and overpriced for what they were.
To fix them to painted plaster walls I used clear liquid nails to suit plastics.
Cutting was a nightmare. scissors do work, but you won’t get straight lines with these profiles, use a blade you’re asking for an injury. I used a mitre saw and it worked great. It gave me straight cuts on a difficult profile.
After fixing panels, I was annoyed at the joins so I ran type either side and join, ran a bead of gap filler, smoothed and pulled off the tape straight away to hide the joins. I used gap filler to fill any gaps around the outer edge adjoining the cabinet.
At this stage. I was surprised at how great they looked. The Matt finish on the panels looks very nice & when using TV lighting these panels just look fantastic!
That’s when they become worth the money.
There is a bit of work installing these. Overall I think the price could be a bit cheaper but they do the job and look great when completed!
Queda mejor delo que me esperaba. Hay que tenmer en cuanta que mi pared es gotel, es decir, tiene una infinidad de grumos que sobresalen bastantes. Y no quise lijar toda la pared, prob a ponerlo encima usando un adhesivo de montaje multimaterial de la marca Ratio, el tcpico que se aplica con pistola. Y an as ha quedado muy bien, si la pared fuera lisa habran quedado completamente perfectos. Pero en resumen, buen material, duro, bonito, recomiendo ir girando la placa para que no quedentodas iguales, y asi alternar las formas, queda mucho mejor. EXCELENTE PRODUCTO.
Awesome accent wall! I used these panels to create an accent wall in the gaming room, and it turning out amazing! I was a tad hesitant at first because I live in an apartment and wasn’t sure how to make a floating accent wall without doing a bunch of damage. But after some brainstorming, I figured out a way to make it work.
Here’s how I created a renter-friendly floating wall with backlights.
Supplies:
6 of these awesome panels in black
3 20×30 inch black foam boards from Michaels
A bag of 1-inch square wooden blocks from Michaels
Double sided gorilla tape
Small D-ring hangers
Light strip
I used the tape to stick two panels to each of the foam boards and trimmed the extra bit of foam board off the sides. On the back of each foam board, I taped one wood block at the top and two at bottom of each board. Then I screwed a d-ring hanger to the top wood block on each panel section. I did have use nails to hang each panel but that’s because there’s too much humidity where I live to use command strips for this. But you could definitely use command strips instead of nails to hang up these panels. Once all three panels were up, I stuck a nice light strip to the back edge of the whole thing. It definitely gave the gaming room a very cool vibe!
I initially accidentally ordered the 30cmx30cm and immediately exchanged it for the 50cmx50cm. These panels are a sensational piece of art when used with the proper lighting. I'm just mind blown at the beauty. It's like I'm at an art museum. Great product although very pricey! Strongly recommend to get it if you are looking for a cool backdrop for your youtube podcast/channel. The photos attached have NO filter, raw photo taken with my Samsung S22. I initially accidentally ordered the 30cmx30cm and immediately exchanged it for the 50cmx50cm. These panels are a sensational piece of art when used with the proper lighting. I’m just mind blown at the beauty. It’s like I’m at an art museum. Great product although very pricey! Strongly recommend to get it if you are looking for a cool backdrop for your youtube podcast/channel. The photos attached have NO filter, raw photo taken with my Samsung S22.
They were a bit tricky to cut but once we got them all on they look amazing They were a bit tricky to cut but once we got them all on they look amazing
Für jede vielfältige Kreativität passend. Top Qualität. Sehr empfehlenswe Fr jedes gewnschte Ergebnis kann man seine Kreativitt frei entscheiden. Ideen sind reichlich vorhanden und erreichbar. Top Produkt, top Qualitt, top Verarbeitung kann es jedem empfehle
I love them but def not easy to install lol. I recommend using command strips. I love them but def not easy to install lol. I recommend using command strips.
he 3d wall panels looks so good on top of my desk! It really blends in my whole set up! really like it~ he 3d wall panels looks so good on top of my desk! It really blends in my whole set up! really like it~
Wanted to use something to give the game room an upgrade so decided on these. It’s really easy to install and a really fair price to change up a whole room like it has, very satisfied with the tiles! Wanted to use something to give the game room an upgrade so decided on these. It’s really easy to install and a really fair price to change up a whole room like it has, very satisfied with the tiles!
Beautiful tiles but not for cutting I started with double sided gorilla tape, once I ran out I got the Scotch double sided tape and it was much easier to use. Gorilla was super sticky and it was hard to see the peeling that needed to be removed. Both worked well.
I painted a white border before starting so that I wouldn’t have to cut them. Although the tiles can be cut, it’s not a clean, easy cut but more importantly, the inside is hollow so it needs to be filled in with something. I only had one outlet cover towards the bottom of the wall and it looks a bit awkward with the sides open. These tiles are definitely better when they don’t need to be cut.
They’re very nice and a great size, I wish they came with their own adhesive but regardless it’s still a really nice product. They’re very nice and a great size, I wish they came with their own adhesive but regardless it’s still a really nice product.
Loved them These were super easy to install and really have my studio a nice and more elegant look. They are very lightweight and easy to work
With. They look perfect!
Super dans le bureau gaming Nous avons coll ces panneaux directement sur le mur du bureau afin de donner un peu de style au bureau gaming.
Le rendu est top puisque lorsque la lumire est allume le mur un effet 3D vraiment gnial.
Le top, c’est galement lorsqu’on allume les LEDs: les formes changent de couleur et s’adaptent la lumire de la LED choisi ( cf photos). C’est tout fait ce qu’il fallait pour donner du cachet la pice.
These look awesome! Especially with color changing lights. I may have cussed a little during the installation part, but that was mainly due to the double-sided tape that I chose. I bought 2 boxes and used them for two different rooms. 10/10 would buy again! These look awesome! Especially with color changing lights. I may have cussed a little during the installation part, but that was mainly due to the double-sided tape that I chose. I bought 2 boxes and used them for two different rooms. 10/10 would buy again!
Love how this *pops* as a headboard in this bedroom! We used carpet tape to install. So easy and such a cool look! Love how this *pops* as a headboard in this bedroom! We used carpet tape to install. So easy and such a cool look!
Mycket snygga! Har monterat dessa i min mancave och de r riktigt snygga! Funderar man p att lysa RGB-slingor eller liknande p dem s r ett tips att kpa den gr eller vita istllet d dessa mattsvarta kkar upp ljuset, s det blir inte mycket frg kvar p vggen tyvrr, OM man inte har vldigt starka RGB-ljus.
Great customer service Here is my updated review. I had a situation with my packages and the company reached out to me personally and asked me questions on my situation and helped me out by making me a happy customer. I now have all the tiles I needed with no problem. I highly recommend this company if there’s a situation I personally recommend reaching out because they actually do help so that was my mistake not contacting first. Thank you guys again.
I was so excited for these products. I got these for a birthday gift for my bf and our game room. So once finally opened, these tiles were so beautiful, until we were putting them up on the wall we noticed that both box’s tiles had a reddish Orange stain on some parts not huge stains but little spots and we used everything even goof off and it didn’t come off. It was like these tiles were used not brand new Than realized that out of both boxes of 12 one was missing tiles like are you serious. I 100% don’t recommend this company go to a different seller I would of returned them or exchanged them but I was out of the return date already and I put on my walls aswell. And when you try and remove tiles from the wall with adhesive it ruins the wall so I’m not removing what a waste of $120 I measured the room to need exactly 24tiles makes me so mad DONT BUY!!
Beau rendu! Facile d’utilisation, bonne qualit, cependant, comme la majorit des commentaires le mentionne, pas vident dcouper, surtout au ciseau. J’ai prfr utiliser ma miter saw – mais vous devez prendre votre temps. Vous devez couper milimtre par milimtre, si vous allez trop vite, le panneau va clater. Mais dabs l’ensemble, j’dois avouer que j’aodre le rendu final.
Its an amazing product.. it makes our bar counter more elegant and classy looking.. Absolutely love this..
Easy to cut.. even its made from hard plastic,
just make sure to use strong and heavy duty double sided tape..
Wertige Paneele, tolle Optik, kleinste Abweichungen in der Passform Inspiriert durch eine Browand in einem Youtube-Video habe ich diese Paneele hier gefunden und bin nicht enttuscht wurden.
Entgegen gnstigerer Alternativen sind diese hier nicht aus Styropor (oder anderen, weichen und empfindlichen Materialien), sondern hartem (im Bezug auf die geringe Materialstrke) Kunststoff. Die Farbe ist super einheitlich, keine Verfrbungen oder helle Stellen, keine Angusspunkte o.. – wirklich sehr homogen. Das Anbringen an der (achtung: glatten und ebenen!) Wand gestaltete sich jedoch trotzdem teils kniffelig, denn 2 der Paneele waren nicht zu 100% quadratisch, egal wie man sie gedreht und geschoben hat, es entstanden kleine Spalte zu den benachbarten Paneelen. Ich habe 3 Reihen zu je 4 Paneelen ber einander angebracht und die erwhnten, kleinen Lcken, mit passend grauem Silikon gefllt und glatt gestrichen.
Ich bin vom Ergebnis berzeugt und wrde mit meinem heutigen Wissen und den gemachten Erfahrungen absolut wieder zu diesen Paneelen greifen 🙂
Looks so good Love these they were very easy to put up makes my sitting room look so bright
I used scissors to cut round the sockets
Little tricky but just take you’re time
I used no more nails to attach
Spettacolare Da un’immagine ai miei video che da molto tempo volevo. Riflette le luci che li progetto dando una sensazione diversa e interessante. Sono molto contenta. L’ ho istallato con un nastro adesivo forte per appendere quadri e funziona perfettamente. Bisogna solo stare attenti a saperlo istallare perch i bordi tendono a non allinearsi perfettamente ma forse per il sistema che ho usato per incollare e poi io non sono una persona precisa. Vale la pena e forse ne comprer altri.
Perfect for feature walls and lighting effects. Love these panels, was the perfect feature to our upgraded setup.
Easy to adhere to the wall, we used no more nails to apply. The panels aren’t heavy so was quick to get them up. Our walls aren’t straight either so the flex in the panels helped greatly. The way the RGB lights bounce off them creates a lovely effect. We didn’t need to cut ours down so can’t comment on this but given how thin they are, shouldn’t be too difficult to do.
I literally Love These. I used double sided mounting tape to install these. Very easy. I think the gorilla tape will peel the wall. This tape i used may not. Not 100% sure guys, just a suggestio I literally Love These. I used double sided mounting tape to install these. Very easy. I think the gorilla tape will peel the wall. This tape i used may not. Not 100% sure guys, just a suggestio
Amazing I got these tiles for my living room wall and I’m delighted at how well its turned out! So easy to work with and sticks very well. I used no more nails and had no issues with it, makes some difference and looks a lot more expensive than it actually was.
Daño las minas PVC Hola hice la compra de varias cajas de las lminas de pvc pero una de ella lleg con deformidad y la empresa que me las hizo llegar a Venezuela alega que fue recibida en esa condicin, agradezco que debo hacer al respecto.
Mi propio efecto game El efecto 3D es alucinante, en el producto viene los que son solo las laminas de plstico con forma de 3D.
Yo por cuenta propia me constru un bastidor como si fuera un cuadro para no pegarlas a la pared, as como veis en las fotos va sobre un marco y lo cuelgo como un cuadro y me quito de tener que pintar la pared cuando desee quitarlo xD.
Adems , al ponerle el bastidor ( marco) me da la medida lo suficiente como para poner una tira de luces leds al rededor para que le de un toque ms gamer.
Espero que os guste el invento 🙂
Highly recommend My Son outgrown his ‘football’ room and wanted a ‘gaming’ room. These look really good, easy to install with double side tape and no more nails type glue. A little tricking to cut but overall really pleased with the resul
Super produits 👌 Ayant achet c’est plaques ,je peux vous dire que c’est de la qualit .Aucun dfaut a dplor.Attention la pose ,avoir une bonne colle qui sche trs vite surtout en pose plafond.Justement en crivant se commentaire je tombe sur la dernire srie Netflix de Better Call Saul qui on exactement les mmes de poser au mur pour le tournage .
Quand je vois a ,je me dit j’achte les yeux ferm .
Amazing!!! These panels are superb.
Good quality and stick well. I used large double sided sticky tape and fits well up on the wall and hasn’t come off after a couple of months.
They look the business and there’s a reason they are the price they are.
Top quality. Love them.
I’ve had these panels saved in my cart for almost a year and finally pulled the trigger. Not sure why I waited so long! Installation was a breeze and I’m very happy with how they turned out. 12 panels was plenty to encompass my 55” Samsung and add some character to the room. Also, I used Scotch mounting tape for painted surfaces and had no issues whatsoever. Look forward to seeing how they hold up. I’ve had these panels saved in my cart for almost a year and finally pulled the trigger. Not sure why I waited so long! Installation was a breeze and I’m very happy with how they turned out. 12 panels was plenty to encompass my 55″ Samsung and add some character to the room. Also, I used Scotch mounting tape for painted surfaces and had no issues whatsoever. Look forward to seeing how they hold up.
Very Cool Gaming/Streaming Studio Use i personally love these, they look awesome with a led strip around them, and work perfectly in my gaming and streaming studio!! they give a nice pop to the area i will say. it doesn’t come with sticky mounts , so you’ll have to do that yourself which kind of stunk i had to buy glue and tape. they take a bit of time after that to hang up but other than that, they’re worth it!!
– the video is a little blurred and the panels don’t look as cool because of the light outside.. looks way cooler at night though!
Quite simple to set up and maintain, as well as being extremely light. I’m a professional amateur in certain ways. I bought three 12-packs but only used 25 of them. I intend to eventually cover the entire wall, but for now I’m satisfied. Because I didn’t have snips, I used kitchen scissors. It’s simple and straightforward. I eyeballed everything and centered it on the Vizio TV logo, then taped it up with 3m double sided tape and called it a day.
These look amazing as a feature wall behind my 55-inch TV in my bedroom. The white panels brighten up the led colors and make them pop even brighter. They have amazed everyone who has seen them. I’ve even been asked if I might help with some of their projects.
It didn’t come with anything to use to hang so we bought adhesive nails. My 13 yr old son put it up by himself. We need to get more but he loves it. It didn’t come with anything to use to hang so we bought adhesive nails. My 13 yr old son put it up by himself. We need to get more but he loves it.
For Christmas this year I (negative) got a week vacation in my den bc my wife (omicron) is quarantined upstairs. I got a little restless. I tend to learn things the hard way…don’t do things the hard way. That being said, use 3m double sided tape. After two bottles of loctite adhesive, and a cartridge of staples I finally remembered I had a whole roll of 3M double sided tape. I’ve never found much use for it as I’ve had it for about five years and tried it on a few other things that didn’t work out. I’m telling you I put about about 35 panels and the adhesive only got me through about 8. The tape works perfectly and you don’t need to cover the entire flat lines on the back. Things went even smoother when I realized I could cut these cleanly with the table saw instead of only using snips. (Keep the snips on hand though for detail). I advise stripe coating with black paint prior to install. You’ll be happy you did around the edges. Black sharpie is your friend too. I overlapped the edges and minus building the entertainment center (staining and poly in between paneling) it took me about a day and a half. Throughly satisfied with this. Ordered one box just to check the quality. Ordered around 9pm on 12/23 and they were delivered at 8:30am 12/24. As soon as I took them out of the box I ordered four more boxes. Overestimated how many I needed so I’m left with an extra two boxes plus and my wife is excited to hear it. They do seem to collect everything in the air, but are super easy to dust. This made Christmas quarantine a little bit better. I’m excited to be free and show off my updated den. Great product. For Christmas this year I (negative) got a week vacation in my den bc my wife (omicron) is quarantined upstairs. I got a little restless. I tend to learn things the hard waydon’t do things the hard way. That being said, use 3m double sided tape. After two bottles of loctite adhesive, and a cartridge of staples I finally remembered I had a whole roll of 3M double sided tape. I’ve never found much use for it as I’ve had it for about five years and tried it on a few other things that didn’t work out. I’m telling you I put about about 35 panels and the adhesive only got me through about 8. The tape works perfectly and you don’t need to cover the entire flat lines on the back. Things went even smoother when I realized I could cut these cleanly with the table saw instead of only using snips. (Keep the snips on hand though for detail). I advise stripe coating with black paint prior to install. You’ll be happy you did around the edges. Black sharpie is your friend too. I overlapped the edges and minus building the entertainment center (staining and poly in between paneling) it took me about a day and a half. Throughly satisfied with this. Ordered one box just to check the quality. Ordered around 9pm on 12/23 and they were delivered at 8:30am 12/24. As soon as I took them out of the box I ordered four more boxes. Overestimated how many I needed so I’m left with an extra two boxes plus and my wife is excited to hear it. They do seem to collect everything in the air, but are super easy to dust. This made Christmas quarantine a little bit better. I’m excited to be free and show off my updated den. Great product.
I’m still on the fence with these When done and finished they look greatbut, not a single panel was the same size (hence a lot of gaps that needed filling). Take your time to make it right, spirit level/laser is a must have to complete these to a good standard. Fine tooth saw and blade were enough for cutting. If cutting around sockets, make sure you get long screws and socket spacers. Overall we’re happy with the effect (by no means it looks cheap) but it took longer than expected to install and finish.
These are absolutely gorgeous!!! Took a bit more industrial adhesive than we thought. But once we got the hang of it, it was easy. I love the look in our party room! These are absolutely gorgeous!!! Took a bit more industrial adhesive than we thought. But once we got the hang of it, it was easy. I love the look in our party room!
Bellissimi, ma prezzo non amico! Pannelli ottimi per decorare una parete diversa dal solito, si installano molto facilmente utilizzando L apposito prodotto per pvc, lo stesso che si usa per le cornici sui soffitti per intenderci, molto resistenti e pvc di qualit quasi perfetta, non credevo sinceramente! Se si installano anche i led come ho fatto io in foto in modo da illuminare dall alto verso il basso e viceversa le facce dei triangoli hanno colori contrastati uno con L altro L effetto impagabile costano parecchio per 12 pannelli a confezione ma il risultato credo parli da solo.
Horrible product to install, I do construction, and thought I might try this, bad idea. Firstly the instructions shows to cut with a miter saw with a wood blade...that's all you need to know. Even cutting with a PVC specific saw blade, it chips and cracks (Im using heavy duty scissors now). Some tiles aren't perfectly square either so the lines will be all messed up, so I decided to start alternating patterns like real tile. Using no nails as per instructions is a horrible idea, during Install you will get multiple high spots etc, I'm using 2x4s to hold pannel high points usually sides for 10hour cure time. If you do use no nails try to find a white color adhesive, or better yet avoid this nightmare DIY Install, unless you are ok with a bunch of gaps everywhere. And I'm no slouch I've built multiple cottages and was an industrial contractor. The only last solution I found for these is to have high/low in alternating patterns, 1 with no nails, 1 with 2sided 30lb gorrila tape... anyways what a nightmare to install so that there are no seams, and because the tiles are also very inconsistent & wavy. Horrible product to install, I do construction, and thought I might try this, bad idea. Firstly the instructions shows to cut with a miter saw with a wood blade…that’s all you need to know. Even cutting with a PVC specific saw blade, it chips and cracks (Im using heavy duty scissors now). Some tiles aren’t perfectly square either so the lines will be all messed up, so I decided to start alternating patterns like real tile. Using no nails as per instructions is a horrible idea, during Install you will get multiple high spots etc, I’m using 2x4s to hold pannel high points usually sides for 10hour cure time. If you do use no nails try to find a white color adhesive, or better yet avoid this nightmare DIY Install, unless you are ok with a bunch of gaps everywhere. And I’m no slouch I’ve built multiple cottages and was an industrial contractor. The only last solution I found for these is to have high/low in alternating patterns, 1 with no nails, 1 with 2sided 30lb gorrila tape… anyways what a nightmare to install so that there are no seams, and because the tiles are also very inconsistent & wavy.
Great quality plastic, the only thing I hope it does have is the adhesive. I ended up using a Gorilla double sided tape (~2 inches cuts of tape on the back edges and centre section) and it has been holding up very well. Additionally, it is very difficult to cut (needed to cut a rectangular hole for the TV wall mount on the wall) and required a proper pair of scissors for that. Otherwise, I like how it turned out. You just need to be a little creative and I am sure you'll be able to make something beautiful with it. Great quality plastic, the only thing I hope it does have is the adhesive. I ended up using a Gorilla double sided tape (~2 inches cuts of tape on the back edges and centre section) and it has been holding up very well. Additionally, it is very difficult to cut (needed to cut a rectangular hole for the TV wall mount on the wall) and required a proper pair of scissors for that. Otherwise, I like how it turned out. You just need to be a little creative and I am sure you’ll be able to make something beautiful with it.
Difficult but worth the effo Installing is difficult, however the end product looks beautiful, and the white plastic is strong with a clean aesthetic. LED lights really help show the pattern of the tiles. As long as you have some strong adhesive, it is a very good purchase
Perfekt! Stabil und ohne billige Selbstklebefäche! Wir haben uns ein Paket fr unseren Gaming Room gekauft und zunchst gedacht, der Preis sei recht hoch. Hier mssen wir jetzt im Nachgang jedoch sagen, dass der Preis fr diese Qualitt absolut okay ist. Die Paneele sind aus hartem Plastik, nicht aus Schaumstoff, wie man das bei gnstigen Paneelen oft kennt.
Sie sind auerdem nicht selbstklebend, was wir sehr begrt haben, da selbstklebene Paneele fast immer so schlecht haften, dass man andauernd berall die Kanten wieder andrcken muss und es billig ausschaut.
Diese Paneele hier sind, wie gesagt, nicht selbstklebend. Wir haben sie mit guten doppelseitigem Klebeband an der Wand angebracht, da rhrt sich nichts mehr.
Das Hartplastik ist stabil, jedoch noch dnn genug, als dass man die Paneele auch zuschneiden kann, sofern man diese anpassen muss. Wir haben sie an den Auenrndern der Wandflche mit einer starken Schere zurecht geschnitten. Da brauchte man schon Kraft aber es war gut mglich.
Wir wrden diese Paneele immer wieder kaufen. Uns hat die Qualitt und das Ergebnis absolut berzeugt!
Hard to stick! Very hard to stick, no idea how people managed it! I read all the reviews and nothing worked! Had to staple gun them to the wall and then paint over staples! Looks fab when on though and add’s extra effect!
Although the directions (and videos) suggest starting in the middle of a wall, I have off center windows (3) and the best way to do this is to start from the top end corner. I started at the very top because the bottom would have cut pieces that would be flush with the floor and look like it goes into the floor. NOTE: These are meant to be permanent! If you use the right adhesive, they will not come off unless you want new drywall installed. So take your time and remember......The first few pieces of tile will need to be 100% level! Cross measure the wall for straightness. If you have sloped ceilings, use the lowest point for level and fill in the peak. Some have suggested using latex or silicone calking for the seams (no silicone if you plan to paint). What works the best (and is paintable) is drywall grout (unsanded). Easy to use. For around light switches where the cut raised part of the panel is around the switch cover, but a 8ft piece of tile strip and cut some of it off to have a flat strip. Cut the strip to edge around the switch and it looks seamless. Although the directions (and videos) suggest starting in the middle of a wall, I have off center windows (3) and the best way to do this is to start from the top end corner. I started at the very top because the bottom would have cut pieces that would be flush with the floor and look like it goes into the floor. NOTE: These are meant to be permanent! If you use the right adhesive, they will not come off unless you want new drywall installed. So take your time and remember……The first few pieces of tile will need to be 100% level! Cross measure the wall for straightness. If you have sloped ceilings, use the lowest point for level and fill in the peak. Some have suggested using latex or silicone calking for the seams (no silicone if you plan to paint). What works the best (and is paintable) is drywall grout (unsanded). Easy to use. For around light switches where the cut raised part of the panel is around the switch cover, but a 8ft piece of tile strip and cut some of it off to have a flat strip. Cut the strip to edge around the switch and it looks seamless.
I like them very much but, finally, I must admit they don’t fit in a small room. They are big and the blue is splendid. Unfortunately I have to return them. I like them very much but, finally, I must admit they don’t fit in a small room. They are big and the blue is splendid. Unfortunately I have to return them.
We installed these to replace ugly ceiling tiles in our entryway. For large areas, take time to plan out the order and placement of all the tiles before you start. I'd recommend placing chalk or pencil lines to mark a grid where all the tiles should go. These tiles were designed for walls, but we used heavy-duty construction adhesive to apply them to a fresh dry-walled ceiling and then clamped from below with C-stands and padded blocks. We worked slowly, installing one or two at once, clamped them until the adhesive cured, and then did the next tile. A 22' x 5' area took us about a week to finish. Since most walls & ceilings aren't perfectly square, adjust tiles as you place them. The goal is to keep tiles aligned with your chalk or pencil lines. Keeping true to your chalk/pencil lines, some of the tiles will have small gaps between them (last photo), which you can fill in with sparkle or caulk. When everything is cured and dry, sand, cleanup, prep and paint. We installed these to replace ugly ceiling tiles in our entryway. For large areas, take time to plan out the order and placement of all the tiles before you start. I’d recommend placing chalk or pencil lines to mark a grid where all the tiles should go. These tiles were designed for walls, but we used heavy-duty construction adhesive to apply them to a fresh dry-walled ceiling and then clamped from below with C-stands and padded blocks. We worked slowly, installing one or two at once, clamped them until the adhesive cured, and then did the next tile. A 22′ x 5′ area took us about a week to finish. Since most walls & ceilings aren’t perfectly square, adjust tiles as you place them. The goal is to keep tiles aligned with your chalk or pencil lines. Keeping true to your chalk/pencil lines, some of the tiles will have small gaps between them (last photo), which you can fill in with sparkle or caulk. When everything is cured and dry, sand, cleanup, prep and paint.
They are good panels, I did a floating wall and double side taped them to 7 vertical boards cause I’m in a apartment and it turned out really good made it uneven a little but I’ll fix it later... note that they are pretty thin and bendy. And just my opinion but they are kinda over priced especially when you consider that I spent basically $200 on the panels in the pic and that 87 divided by 87 is 7 dollars a panels when it prolly cost 50 cents to make... was going to mount my tv above but broke my it during making it too tho... good times... 😁 (update, they get VERY dusty easily and I keep my place is very clean but if you got the white ones you can’t see it as much as you can on the black ones) side note: learn from my mistake, I had to take it all down because I didn’t put them together correctly it’s advertised the be the same measurements on both sides but it’s not... ALL of the panels are longer on one side by centimeters. It doesn’t seem like much but putting these together is more precise then it seems and if you don’t put them in order they WILL be The crooked. They are good panels, I did a floating wall and double side taped them to 7 vertical boards cause I’m in a apartment and it turned out really good made it uneven a little but I’ll fix it later… note that they are pretty thin and bendy. And just my opinion but they are kinda over priced especially when you consider that I spent basically $200 on the panels in the pic and that 87 divided by 87 is 7 dollars a panels when it prolly cost 50 cents to make… was going to mount my tv above but broke my it during making it too tho… good times… (update, they get VERY dusty easily and I keep my place is very clean but if you got the white ones you can’t see it as much as you can on the black ones) side note: learn from my mistake, I had to take it all down because I didn’t put them together correctly it’s advertised the be the same measurements on both sides but it’s not… ALL of the panels are longer on one side by centimeters. It doesn’t seem like much but putting these together is more precise then it seems and if you don’t put them in order they WILL be The crooked.
Because my walls and floors are uneven, I had to spend a lot of time carefully measuring and cutting the panels. First I outlined where each panel would be mounted with a pencil. I realized that I’d have quite a bit of trouble getting everything as even as possible, especially as the panels are kind of difficult to cut with just shears (but doable). I decided to mount the panels with double-sided mounting tape for a less permanent solution. Despite my best efforts, it still didn’t look great due to the hollow edges (See second pic). I enlisted help to put trim in between the wall and the edges of the cut panels and caulk the gaps, and now it looks MUCH, much better, but still not perfect (see first pic!!). I think I’ll need to caulk in between each panel as well, and then paint over everything with a coat of white paint for everything to look seamless. It takes a bit more work to get these panels to work on uneven walls, but it is worth it in the end. It was a simple and cost-efficient way to modernize an old-fashioned Brooklyn apartment and I’m very happy with the result. Because my walls and floors are uneven, I had to spend a lot of time carefully measuring and cutting the panels. First I outlined where each panel would be mounted with a pencil. I realized that I’d have quite a bit of trouble getting everything as even as possible, especially as the panels are kind of difficult to cut with just shears (but doable). I decided to mount the panels with double-sided mounting tape for a less permanent solution. Despite my best efforts, it still didn’t look great due to the hollow edges (See second pic). I enlisted help to put trim in between the wall and the edges of the cut panels and caulk the gaps, and now it looks MUCH, much better, but still not perfect (see first pic!!). I think I’ll need to caulk in between each panel as well, and then paint over everything with a coat of white paint for everything to look seamless. It takes a bit more work to get these panels to work on uneven walls, but it is worth it in the end. It was a simple and cost-efficient way to modernize an old-fashioned Brooklyn apartment and I’m very happy with the result.
Big impact feature wall I was worried it might look a bit cheap but it does look really classy. I’d avoid cutting if you can, I got away by centreing fro the top and just cutting the bottom. Stanley knives are good for clean up but I used a large fine saw good scissors but a Dremel would probably be best.
For sockets I got some right angle lengths and bordered them then used a fair bit of caulk to fill the gaps.
TV is a Phillips Ambilight with a hue hub and two hue bulbs. All set for Halo now
Full Installation Tutorial / Honest Review Love these wall panels. Read for full installation tutorial (one of many methods)
First off, the description says “32 sq feet”, which to most people not using the metric system, means 8×4, which is the standard size for most sheets of plywood. These panels, however, are 19.65625 x 19.65625…so they don’t cover a traditional 8×4 sheet of plywood.
I didn’t want to ruin my drywall in case I didn’t love them, so I wanted to put a backer board over my drywall so that I could remove it/the tiles if need be. Using liquid nails or double sided tape on drywall is a recipe for disaster if you ever want to remove it.
I purchased 3 sheets of 4×4 hardboard from Menards at $5.50 a piece. I didn’t want to make a mess with liquid nails so decided I was going to use double sided tape. I picked up 3 rolls of 150 feet Gorilla heavy duty for $10 a roll. So my total for the project including the 3D panels themselves was about $130.
The box has 12 tiles and I could fit 6 length-wise on my wall with about 7 inches left over. So I decided to do 2 rows of 6 panels.
1. I took 19.65625 x 6 and got 117 15/16 and 19.65625 x 2 to get 39 5/16. So I knew that was the size my backer board needed to be.
2. I laid the sheets on the floor, measured, marked, and drew straight edge lines across at the marks.
3. I cut the sheets with my circular saw. (They Cut very well if you cut with the grain)
4. I brought the sheets inside, marked the edge on the wall where the first sheet would sit, and then I marked the stud lines above the sheets so that I knew where to screw in so that I hit the studs.
5. I screwed the panels into the wall at the stud points. For the corners of the sheets that were not close to a stud, I hammered some nails so that the sheets would not come away from the wall in those areas.
6. I framed the entire structure with double sided tape. I also added a line of tape through the direct center. This way the panels would have at least 2 contact points with the tape in all spots.
**note – if you mess up and pull the tape from the hardboard, the tape will not stick again so you will need to use new tape.
7. I carefully placed the 3D panels onto the wall and pressed down firmly to secure with the tape. Take your time, it’s tough to unstick the panels from the tape.
8. I ran my finger slowly along all the edges to make sure all the panels had good contact with the tape.
9. Enjoyed my new wall.
Hope this helps. These panels are awesome. With a little planning and patience, they can make a nice feature wall.
Fantastic Amazing product and honestly looks fantastic. Still need to purchase a few more panels to finish the wall, but i couldn’t be happier. Makes a great feature wall.
Amazing quality and design. Awkward to fit but when fitted is amazing Very good quality and looks amazing on the wall especially with bright lights shining onto them.
Negative is that there isn’t much room for the adhesive to be applied to. Only in small strips however with no nails has held up for 3 months and still going…
Difficult to cut however very easy to cut with a dremmel.
Easy to use cost effective cool feature I love the fact that it is an easy prduct to work with and to attach all u need is an adhesive then play around with however you want to create your feature wall. It a bit tricky when cutting out sockets but if you mark up properly and use a sharp blade its not a problem.
Games room feature wall completed in ART3D tiles Fantastic product, really happy with the finished product. Tiles can be quite difficult to cut due to all the different angles on the tiles, but with a bit of thought, time and patience you can get the job done. Over the moon with how it all looks. Highly recommend, thanks very much
Impressive results with a little effort 👍 Really really impressed with this product. I was a little sceptical before ordering as to do this job properly I wanted to use plaster tiles but didn’t want to fork out for the expense at 25 per tile! I mounted them onto 9mm ply backing boards with strengthening beams, and glued the panels on with no nails. The panels are very fragile until they are mounted. Once glued in place they feel strong, rigid and a nice tactile feel over plaster. No need to paint and the surface can be easily cleaned with household cleaners. The only issue I’ve had is hiding the joint in the tiles but will have to play around with a few solutions. Would definitely recommend these tiles but beware you need to have a reasonable skill level to pull of a good result if your going to DIY.
Easy to install and they look fantastic I remodeled a guest bedroom and wanted to put in a floating wall with a TV and fireplace. I originally though about doing this wall with a dry stack stone, but it was cost prohibitive and would be messy and time consuming. I’m glad that I went with these 3D panels instead. Everyone who has seen them has been wowed by them. I built the floating wall using 3-1/2″ steel studs and covered it in 1/2″ OSB. I primed it with white Kilz (so that any gaps in the panels would not be as noticeable) and used double sided carpet tape to adhere the tiles. The tiles look fantastic! If you are going to build a floating wall, I would suggest that you build it to the same dimensions as the number of tiles you plan to use (width and height). I don’t think you could find a way to make a cut edge look finished, unless it butts up against and adjoining wall. To cover the edge of the OSB (plywood) I used the plastic drywall finishing edge from the local Big Box hardware store (see the second picture). I left approximately 4 inches of overhang on all sides and mounted these chasing LED’s from Amazon https://www.amazon.com/gp/product/B07M9XHYVB/ref=ppx_yo_dt_b_search_asin_title?ie=UTF8&psc=1
in these angled channels https://www.amazon.com/gp/product/B01LL3S006/ref=ppx_yo_dt_b_search_asin_title?ie=UTF8&psc=1
The TV mount and fireplace are also from Amazon. When building the steel stud wall, I internally braced the TV mount location with wood 2×4″ and ran a power cord to that area.
I used a table saw to cut the panels for the bottom row, but I could have used a handsaw or really good scissors. These panels are a decent thickness and not flimsy at all. There are microscopic gaps between the panels, but they are only noticeable close up. If you are concerned about the gaps, I would suggest that you mount the panels, then fill the gaps and paint the panels with a paint suitable for plastic. BTW, the electric fireplace puts off quite a bit of heat (mostly forward and up) and it has not affected the tiles at all.
Easy to install. Look great. Xtra tips for cutting & sticking to wall... Overall, these plastic tiles are great. Definitely a unique looking accent wall. Lightweight, easy to work with, but there are some tips for making the job easier.
1. Use 3M Command Strips to hang them. It’s much easier and you can repositioning if you need to. Get the poster size and cut them in half.
2. Practice a layout. Use 2-3 command strips to temporarily hold your pattern on the wall. You can then figure out if it works best to center your design or start on one end. Also, will help you figure out if you want to alternate the direction (I did) or lay them all the same way.
3. Make sure you are level horizontal & vertical. Use a laser, snap a chalk line, use a level, whatever you prefer. Just don’t assume everything is straight & level.
4. To cut straight tiles, I used a diamond bladed tile saw (used it dry, not wet). This will allow you to cut straight for your ceiling & corners. Do not use a regular table saw or mitre saw blade. It will chip & splinter your edges.
5. To trim, use a pair of tin snips / aviation snips.
6. To smooth out any edges or to trim, you can use a Dremmel with a sandpaper head on it. Works great.
7. Outlets are very difficult. I took off the outlet cover, then cut out only the size of the outlet with tin snips so it would sit flush up against the wall.
Hope those tips & pictures help make your project go smoothly.


If you really want to give your room a unique upscale look I highly suggest these pannels. They cam in perfect condition make sure you measure your wall before ordering. Measure twice order once I got two of the 12 packs and had two left over. These are really amazing and when the light hits these it gives it a great look. Make sure you use liquid nails to put these up. The gorilla double sided tape is actually hard to use. Liquid nails makes it easier to stick. These definitely seem very durable and the size is great and materials seem solid.
If you really want to give your room a unique upscale look I highly suggest these pannels. They cam in perfect condition make sure you measure your wall before ordering. Measure twice order once I got two of the 12 packs and had two left over. These are really amazing and when the light hits these it gives it a great look. Make sure you use liquid nails to put these up. The gorilla double sided tape is actually hard to use. Liquid nails makes it easier to stick. These definitely seem very durable and the size is great and materials seem solid.
Bellissimi ma sono MOLTO scuri.
Ho acquistato quelli bianchi e sono rimasto molto felice, ho preso anche i blu ma purtroppo sono di una tonalit molto pi scura che in foto ed in stanze poco illuminate sembrano neri. Consigliati ma sappiate della tonali
I was not sure about these initiallymy son wanted them behind his “gaming set-up” we lit the back with sticky led lights and now I am a HUGE fan! Cutting them is a bit annoying around light switches etcand finding the right adhesive. I tried all the adhesive stickiesspent WAY too much on a variety of kinds and the adhesive mounting tape on a roll attaches to the wall the best, leaving less spaces and has never fallen. I place them in 4 places and they look amazing!
Easy to install, if you have to cut use an exacto knife and maybe purchase a few more than you think you need (;
Gu
Optisch sieht es gut aus an der Wand. Habe mit die Doppelseitigen Klebebnder geholt damit befestigt. Fr mich erfllt es den Zweck. Qualitt ist Gut das ist meine Persnliche Erfahrung. Danke
Muy bie
No tienen adhesin, no vienen con autoadhesivo ninguno, hay que comprar a parte alguna cinta o pegamento.
Por lo dems son muy estticos y quedan bonitos en cualquier superficie, en mi caso tap un gotelet que no me gustaba nada.
We used these panels to cover a painted wall. The panels are large but because you have to cut a few to fit, you will need an extra box. Our wall used 2 full boxes and one half on the bottom (shown in photo) because we had to cut them to fit. We framed mirrors but if we covered the entire wall, we would have doubled the number of times. Keep that in mind when ordering. The room is 10×10 and the panels gave us the dramatic feel we wanted. I recommend using clear gorilla construction adhesive. They stick better and allow you to align better. I recommend them for easy room transformation.
Great product to enhance the aesthetics of your space! It provides for a very clean look when you take the time to install properly. I rent and was even able to hide a few of the tv wires behind the panels. Very pleased with how everything turned out.
Cheap quality but looks great!
Mixed thoughts on these panels.
At first appearance, the panels look cheap and flimsy and overpriced for what they were.
To fix them to painted plaster walls I used clear liquid nails to suit plastics.
Cutting was a nightmare. scissors do work, but you won’t get straight lines with these profiles, use a blade you’re asking for an injury. I used a mitre saw and it worked great. It gave me straight cuts on a difficult profile.
After fixing panels, I was annoyed at the joins so I ran type either side and join, ran a bead of gap filler, smoothed and pulled off the tape straight away to hide the joins. I used gap filler to fill any gaps around the outer edge adjoining the cabinet.
At this stage. I was surprised at how great they looked. The Matt finish on the panels looks very nice & when using TV lighting these panels just look fantastic!
That’s when they become worth the money.
There is a bit of work installing these. Overall I think the price could be a bit cheaper but they do the job and look great when completed!
Hay que tenmer en cuanta que mi pared es gotel, es decir, tiene una infinidad de grumos que sobresalen bastantes. Y no quise lijar toda la pared, prob a ponerlo encima usando un adhesivo de montaje multimaterial de la marca Ratio, el tcpico que se aplica con pistola. Y an as ha quedado muy bien, si la pared fuera lisa habran quedado completamente perfectos. Pero en resumen, buen material, duro, bonito, recomiendo ir girando la placa para que no quedentodas iguales, y asi alternar las formas, queda mucho mejor. EXCELENTE PRODUCTO.
I used these panels to create an accent wall in the gaming room, and it turning out amazing! I was a tad hesitant at first because I live in an apartment and wasn’t sure how to make a floating accent wall without doing a bunch of damage. But after some brainstorming, I figured out a way to make it work.
Here’s how I created a renter-friendly floating wall with backlights.
Supplies:
6 of these awesome panels in black
3 20×30 inch black foam boards from Michaels
A bag of 1-inch square wooden blocks from Michaels
Double sided gorilla tape
Small D-ring hangers
Light strip
I used the tape to stick two panels to each of the foam boards and trimmed the extra bit of foam board off the sides. On the back of each foam board, I taped one wood block at the top and two at bottom of each board. Then I screwed a d-ring hanger to the top wood block on each panel section. I did have use nails to hang each panel but that’s because there’s too much humidity where I live to use command strips for this. But you could definitely use command strips instead of nails to hang up these panels. Once all three panels were up, I stuck a nice light strip to the back edge of the whole thing. It definitely gave the gaming room a very cool vibe!
I initially accidentally ordered the 30cmx30cm and immediately exchanged it for the 50cmx50cm. These panels are a sensational piece of art when used with the proper lighting. I'm just mind blown at the beauty. It's like I'm at an art museum. Great product although very pricey! Strongly recommend to get it if you are looking for a cool backdrop for your youtube podcast/channel. The photos attached have NO filter, raw photo taken with my Samsung S22.
I initially accidentally ordered the 30cmx30cm and immediately exchanged it for the 50cmx50cm. These panels are a sensational piece of art when used with the proper lighting. I’m just mind blown at the beauty. It’s like I’m at an art museum. Great product although very pricey! Strongly recommend to get it if you are looking for a cool backdrop for your youtube podcast/channel. The photos attached have NO filter, raw photo taken with my Samsung S22.
They were a bit tricky to cut but once we got them all on they look amazing
They were a bit tricky to cut but once we got them all on they look amazing
Für jede vielfältige Kreativität passend. Top Qualität. Sehr empfehlenswe
Fr jedes gewnschte Ergebnis kann man seine Kreativitt frei entscheiden. Ideen sind reichlich vorhanden und erreichbar. Top Produkt, top Qualitt, top Verarbeitung kann es jedem empfehle
I love them but def not easy to install lol. I recommend using command strips.
I love them but def not easy to install lol. I recommend using command strips.
Very nice looking and ez to install!!!!!
he 3d wall panels looks so good on top of my desk! It really blends in my whole set up! really like it~
he 3d wall panels looks so good on top of my desk! It really blends in my whole set up! really like it~
Excellent panneaux 3d
Tres esthtique surtout pour le prix, facile monter et pas trop cheap au touch
Wanted to use something to give the game room an upgrade so decided on these. It’s really easy to install and a really fair price to change up a whole room like it has, very satisfied with the tiles!
Wanted to use something to give the game room an upgrade so decided on these. It’s really easy to install and a really fair price to change up a whole room like it has, very satisfied with the tiles!
Beautiful tiles but not for cutting
I started with double sided gorilla tape, once I ran out I got the Scotch double sided tape and it was much easier to use. Gorilla was super sticky and it was hard to see the peeling that needed to be removed. Both worked well.
I painted a white border before starting so that I wouldn’t have to cut them. Although the tiles can be cut, it’s not a clean, easy cut but more importantly, the inside is hollow so it needs to be filled in with something. I only had one outlet cover towards the bottom of the wall and it looks a bit awkward with the sides open. These tiles are definitely better when they don’t need to be cut.
They’re very nice and a great size, I wish they came with their own adhesive but regardless it’s still a really nice product.
They’re very nice and a great size, I wish they came with their own adhesive but regardless it’s still a really nice product.
These were super easy to install and really have my studio a nice and more elegant look. They are very lightweight and easy to work
With. They look perfect!
Super dans le bureau gaming
Nous avons coll ces panneaux directement sur le mur du bureau afin de donner un peu de style au bureau gaming.
Le rendu est top puisque lorsque la lumire est allume le mur un effet 3D vraiment gnial.
Le top, c’est galement lorsqu’on allume les LEDs: les formes changent de couleur et s’adaptent la lumire de la LED choisi ( cf photos). C’est tout fait ce qu’il fallait pour donner du cachet la pice.
Pannelli 3D
Davvero belli e particolari fanno una bella impressione non difficili da montare
These look awesome! Especially with color changing lights. I may have cussed a little during the installation part, but that was mainly due to the double-sided tape that I chose. I bought 2 boxes and used them for two different rooms. 10/10 would buy again!
Stupendi spettacolari, venditore top
Love how this *pops* as a headboard in this bedroom! We used carpet tape to install. So easy and such a cool look!
Mycket snygga!
Har monterat dessa i min mancave och de r riktigt snygga! Funderar man p att lysa RGB-slingor eller liknande p dem s r ett tips att kpa den gr eller vita istllet d dessa mattsvarta kkar upp ljuset, s det blir inte mycket frg kvar p vggen tyvrr, OM man inte har vldigt starka RGB-ljus.
+ Vger inte mycket, stora, lttmonterade
– Repas ltt, samlar damm
Great customer service
Here is my updated review. I had a situation with my packages and the company reached out to me personally and asked me questions on my situation and helped me out by making me a happy customer. I now have all the tiles I needed with no problem. I highly recommend this company if there’s a situation I personally recommend reaching out because they actually do help so that was my mistake not contacting first. Thank you guys again.
I was so excited for these products. I got these for a birthday gift for my bf and our game room. So once finally opened, these tiles were so beautiful, until we were putting them up on the wall we noticed that both box’s tiles had a reddish Orange stain on some parts not huge stains but little spots and we used everything even goof off and it didn’t come off. It was like these tiles were used not brand new Than realized that out of both boxes of 12 one was missing tiles like are you serious. I 100% don’t recommend this company go to a different seller I would of returned them or exchanged them but I was out of the return date already and I put on my walls aswell. And when you try and remove tiles from the wall with adhesive it ruins the wall so I’m not removing what a waste of $120 I measured the room to need exactly 24tiles makes me so mad DONT BUY!!
ordinati diversi mesi fa, installati con particolare facilit grazie all’uso di silicone, prodotto fortemente consigliato
Facile d’utilisation, bonne qualit, cependant, comme la majorit des commentaires le mentionne, pas vident dcouper, surtout au ciseau. J’ai prfr utiliser ma miter saw – mais vous devez prendre votre temps. Vous devez couper milimtre par milimtre, si vous allez trop vite, le panneau va clater. Mais dabs l’ensemble, j’dois avouer que j’aodre le rendu final.
Absolutely love this..
Easy to cut.. even its made from hard plastic,
just make sure to use strong and heavy duty double sided tape..
Top
Pannelli bellissimi, cambiano totalmente la camera in cui vengono applicati. Molto semplici da applicare e leggeri.
Wertige Paneele, tolle Optik, kleinste Abweichungen in der Passform
Inspiriert durch eine Browand in einem Youtube-Video habe ich diese Paneele hier gefunden und bin nicht enttuscht wurden.
Entgegen gnstigerer Alternativen sind diese hier nicht aus Styropor (oder anderen, weichen und empfindlichen Materialien), sondern hartem (im Bezug auf die geringe Materialstrke) Kunststoff. Die Farbe ist super einheitlich, keine Verfrbungen oder helle Stellen, keine Angusspunkte o.. – wirklich sehr homogen. Das Anbringen an der (achtung: glatten und ebenen!) Wand gestaltete sich jedoch trotzdem teils kniffelig, denn 2 der Paneele waren nicht zu 100% quadratisch, egal wie man sie gedreht und geschoben hat, es entstanden kleine Spalte zu den benachbarten Paneelen. Ich habe 3 Reihen zu je 4 Paneelen ber einander angebracht und die erwhnten, kleinen Lcken, mit passend grauem Silikon gefllt und glatt gestrichen.
Ich bin vom Ergebnis berzeugt und wrde mit meinem heutigen Wissen und den gemachten Erfahrungen absolut wieder zu diesen Paneelen greifen 🙂
article conforme et identique au descriptif
panneau de bonne qualit il sont assez epais. il se pose assez facilment je suis ravis de cet acha
Looks so good
Love these they were very easy to put up makes my sitting room look so bright
I used scissors to cut round the sockets
Little tricky but just take you’re time
I used no more nails to attach
Spettacolare
Da un’immagine ai miei video che da molto tempo volevo. Riflette le luci che li progetto dando una sensazione diversa e interessante. Sono molto contenta. L’ ho istallato con un nastro adesivo forte per appendere quadri e funziona perfettamente. Bisogna solo stare attenti a saperlo istallare perch i bordi tendono a non allinearsi perfettamente ma forse per il sistema che ho usato per incollare e poi io non sono una persona precisa. Vale la pena e forse ne comprer altri.
Very good but overpriced
Look great behind my setup, but the price is a bit much for some plastic panels
Perfect for feature walls and lighting effects.
Love these panels, was the perfect feature to our upgraded setup.
Easy to adhere to the wall, we used no more nails to apply. The panels aren’t heavy so was quick to get them up. Our walls aren’t straight either so the flex in the panels helped greatly. The way the RGB lights bounce off them creates a lovely effect. We didn’t need to cut ours down so can’t comment on this but given how thin they are, shouldn’t be too difficult to do.
I literally Love These. I used double sided mounting tape to install these. Very easy. I think the gorilla tape will peel the wall. This tape i used may not. Not 100% sure guys, just a suggestio
Amazing
I got these tiles for my living room wall and I’m delighted at how well its turned out! So easy to work with and sticks very well. I used no more nails and had no issues with it, makes some difference and looks a lot more expensive than it actually was.
Cool and very easy to use!
Daño las minas PVC
Hola hice la compra de varias cajas de las lminas de pvc pero una de ella lleg con deformidad y la empresa que me las hizo llegar a Venezuela alega que fue recibida en esa condicin, agradezco que debo hacer al respecto.
El efecto 3D es alucinante, en el producto viene los que son solo las laminas de plstico con forma de 3D.
Yo por cuenta propia me constru un bastidor como si fuera un cuadro para no pegarlas a la pared, as como veis en las fotos va sobre un marco y lo cuelgo como un cuadro y me quito de tener que pintar la pared cuando desee quitarlo xD.
Adems , al ponerle el bastidor ( marco) me da la medida lo suficiente como para poner una tira de luces leds al rededor para que le de un toque ms gamer.
Espero que os guste el invento 🙂
Highly recommend
My Son outgrown his ‘football’ room and wanted a ‘gaming’ room. These look really good, easy to install with double side tape and no more nails type glue. A little tricking to cut but overall really pleased with the resul
Ayant achet c’est plaques ,je peux vous dire que c’est de la qualit .Aucun dfaut a dplor.Attention la pose ,avoir une bonne colle qui sche trs vite surtout en pose plafond.Justement en crivant se commentaire je tombe sur la dernire srie Netflix de Better Call Saul qui on exactement les mmes de poser au mur pour le tournage .
Quand je vois a ,je me dit j’achte les yeux ferm .
These panels are superb.
Good quality and stick well. I used large double sided sticky tape and fits well up on the wall and hasn’t come off after a couple of months.
They look the business and there’s a reason they are the price they are.
Top quality. Love them.
I’ve had these panels saved in my cart for almost a year and finally pulled the trigger. Not sure why I waited so long! Installation was a breeze and I’m very happy with how they turned out. 12 panels was plenty to encompass my 55″ Samsung and add some character to the room. Also, I used Scotch mounting tape for painted surfaces and had no issues whatsoever. Look forward to seeing how they hold up.
Just what I wanted
Easy to install for my sons room. Brilliant feature wall used no nails adhesive went on easy.
i personally love these, they look awesome with a led strip around them, and work perfectly in my gaming and streaming studio!! they give a nice pop to the area i will say. it doesn’t come with sticky mounts , so you’ll have to do that yourself which kind of stunk i had to buy glue and tape. they take a bit of time after that to hang up but other than that, they’re worth it!!
– the video is a little blurred and the panels don’t look as cool because of the light outside.. looks way cooler at night though!
I’m a professional amateur in certain ways. I bought three 12-packs but only used 25 of them. I intend to eventually cover the entire wall, but for now I’m satisfied. Because I didn’t have snips, I used kitchen scissors. It’s simple and straightforward. I eyeballed everything and centered it on the Vizio TV logo, then taped it up with 3m double sided tape and called it a day.
These look amazing as a feature wall behind my 55-inch TV in my bedroom. The white panels brighten up the led colors and make them pop even brighter. They have amazed everyone who has seen them. I’ve even been asked if I might help with some of their projects.
The overall design and finish is fantastic.
It didn’t come with anything to use to hang so we bought adhesive nails. My 13 yr old son put it up by himself. We need to get more but he loves it.
It didn’t come with anything to use to hang so we bought adhesive nails. My 13 yr old son put it up by himself. We need to get more but he loves it.
For Christmas this year I (negative) got a week vacation in my den bc my wife (omicron) is quarantined upstairs. I got a little restless. I tend to learn things the hard waydon’t do things the hard way. That being said, use 3m double sided tape. After two bottles of loctite adhesive, and a cartridge of staples I finally remembered I had a whole roll of 3M double sided tape. I’ve never found much use for it as I’ve had it for about five years and tried it on a few other things that didn’t work out. I’m telling you I put about about 35 panels and the adhesive only got me through about 8. The tape works perfectly and you don’t need to cover the entire flat lines on the back. Things went even smoother when I realized I could cut these cleanly with the table saw instead of only using snips. (Keep the snips on hand though for detail). I advise stripe coating with black paint prior to install. You’ll be happy you did around the edges. Black sharpie is your friend too. I overlapped the edges and minus building the entertainment center (staining and poly in between paneling) it took me about a day and a half. Throughly satisfied with this. Ordered one box just to check the quality. Ordered around 9pm on 12/23 and they were delivered at 8:30am 12/24. As soon as I took them out of the box I ordered four more boxes. Overestimated how many I needed so I’m left with an extra two boxes plus and my wife is excited to hear it. They do seem to collect everything in the air, but are super easy to dust. This made Christmas quarantine a little bit better. I’m excited to be free and show off my updated den. Great product.
When done and finished they look greatbut, not a single panel was the same size (hence a lot of gaps that needed filling). Take your time to make it right, spirit level/laser is a must have to complete these to a good standard. Fine tooth saw and blade were enough for cutting. If cutting around sockets, make sure you get long screws and socket spacers. Overall we’re happy with the effect (by no means it looks cheap) but it took longer than expected to install and finish.
These are absolutely gorgeous!!! Took a bit more industrial adhesive than we thought. But once we got the hang of it, it was easy. I love the look in our party room!
These are absolutely gorgeous!!! Took a bit more industrial adhesive than we thought. But once we got the hang of it, it was easy. I love the look in our party room!
Pannelli ottimi per decorare una parete diversa dal solito, si installano molto facilmente utilizzando L apposito prodotto per pvc, lo stesso che si usa per le cornici sui soffitti per intenderci, molto resistenti e pvc di qualit quasi perfetta, non credevo sinceramente! Se si installano anche i led come ho fatto io in foto in modo da illuminare dall alto verso il basso e viceversa le facce dei triangoli hanno colori contrastati uno con L altro L effetto impagabile costano parecchio per 12 pannelli a confezione ma il risultato credo parli da solo.
Horrible product to install, I do construction, and thought I might try this, bad idea. Firstly the instructions shows to cut with a miter saw with a wood blade…that’s all you need to know. Even cutting with a PVC specific saw blade, it chips and cracks (Im using heavy duty scissors now). Some tiles aren’t perfectly square either so the lines will be all messed up, so I decided to start alternating patterns like real tile. Using no nails as per instructions is a horrible idea, during Install you will get multiple high spots etc, I’m using 2x4s to hold pannel high points usually sides for 10hour cure time. If you do use no nails try to find a white color adhesive, or better yet avoid this nightmare DIY Install, unless you are ok with a bunch of gaps everywhere. And I’m no slouch I’ve built multiple cottages and was an industrial contractor. The only last solution I found for these is to have high/low in alternating patterns, 1 with no nails, 1 with 2sided 30lb gorrila tape… anyways what a nightmare to install so that there are no seams, and because the tiles are also very inconsistent & wavy.
Great quality plastic, the only thing I hope it does have is the adhesive. I ended up using a Gorilla double sided tape (~2 inches cuts of tape on the back edges and centre section) and it has been holding up very well. Additionally, it is very difficult to cut (needed to cut a rectangular hole for the TV wall mount on the wall) and required a proper pair of scissors for that. Otherwise, I like how it turned out. You just need to be a little creative and I am sure you’ll be able to make something beautiful with it.
Difficult but worth the effo
Installing is difficult, however the end product looks beautiful, and the white plastic is strong with a clean aesthetic. LED lights really help show the pattern of the tiles. As long as you have some strong adhesive, it is a very good purchase
Wir haben uns ein Paket fr unseren Gaming Room gekauft und zunchst gedacht, der Preis sei recht hoch. Hier mssen wir jetzt im Nachgang jedoch sagen, dass der Preis fr diese Qualitt absolut okay ist. Die Paneele sind aus hartem Plastik, nicht aus Schaumstoff, wie man das bei gnstigen Paneelen oft kennt.
Sie sind auerdem nicht selbstklebend, was wir sehr begrt haben, da selbstklebene Paneele fast immer so schlecht haften, dass man andauernd berall die Kanten wieder andrcken muss und es billig ausschaut.
Diese Paneele hier sind, wie gesagt, nicht selbstklebend. Wir haben sie mit guten doppelseitigem Klebeband an der Wand angebracht, da rhrt sich nichts mehr.
Das Hartplastik ist stabil, jedoch noch dnn genug, als dass man die Paneele auch zuschneiden kann, sofern man diese anpassen muss. Wir haben sie an den Auenrndern der Wandflche mit einer starken Schere zurecht geschnitten. Da brauchte man schon Kraft aber es war gut mglich.
Wir wrden diese Paneele immer wieder kaufen. Uns hat die Qualitt und das Ergebnis absolut berzeugt!
Very hard to stick, no idea how people managed it! I read all the reviews and nothing worked! Had to staple gun them to the wall and then paint over staples! Looks fab when on though and add’s extra effect!
LOOKS FANTASTIC
USED 3M TAPE BUT CAME OFF AFTER A WEEK-WOULD ADVISE TO USE ADHESIVE
EXPENSIVE ITEM FOR WHAT IT IS BUT LOOKS VERY NICE.
Looks amazing once it’s on the wall
Happy with the purchase.
Although the directions (and videos) suggest starting in the middle of a wall, I have off center windows (3) and the best way to do this is to start from the top end corner. I started at the very top because the bottom would have cut pieces that would be flush with the floor and look like it goes into the floor. NOTE: These are meant to be permanent! If you use the right adhesive, they will not come off unless you want new drywall installed. So take your time and remember……The first few pieces of tile will need to be 100% level! Cross measure the wall for straightness. If you have sloped ceilings, use the lowest point for level and fill in the peak. Some have suggested using latex or silicone calking for the seams (no silicone if you plan to paint). What works the best (and is paintable) is drywall grout (unsanded). Easy to use. For around light switches where the cut raised part of the panel is around the switch cover, but a 8ft piece of tile strip and cut some of it off to have a flat strip. Cut the strip to edge around the switch and it looks seamless.
I like them very much but, finally, I must admit they don’t fit in a small room. They are big and the blue is splendid. Unfortunately I have to return them.
I like them very much but, finally, I must admit they don’t fit in a small room. They are big and the blue is splendid. Unfortunately I have to return them.
We installed these to replace ugly ceiling tiles in our entryway. For large areas, take time to plan out the order and placement of all the tiles before you start. I’d recommend placing chalk or pencil lines to mark a grid where all the tiles should go. These tiles were designed for walls, but we used heavy-duty construction adhesive to apply them to a fresh dry-walled ceiling and then clamped from below with C-stands and padded blocks. We worked slowly, installing one or two at once, clamped them until the adhesive cured, and then did the next tile. A 22′ x 5′ area took us about a week to finish. Since most walls & ceilings aren’t perfectly square, adjust tiles as you place them. The goal is to keep tiles aligned with your chalk or pencil lines. Keeping true to your chalk/pencil lines, some of the tiles will have small gaps between them (last photo), which you can fill in with sparkle or caulk. When everything is cured and dry, sand, cleanup, prep and paint.
They are good panels, I did a floating wall and double side taped them to 7 vertical boards cause I’m in a apartment and it turned out really good made it uneven a little but I’ll fix it later… note that they are pretty thin and bendy. And just my opinion but they are kinda over priced especially when you consider that I spent basically $200 on the panels in the pic and that 87 divided by 87 is 7 dollars a panels when it prolly cost 50 cents to make… was going to mount my tv above but broke my it during making it too tho… good times… (update, they get VERY dusty easily and I keep my place is very clean but if you got the white ones you can’t see it as much as you can on the black ones) side note: learn from my mistake, I had to take it all down because I didn’t put them together correctly it’s advertised the be the same measurements on both sides but it’s not… ALL of the panels are longer on one side by centimeters. It doesn’t seem like much but putting these together is more precise then it seems and if you don’t put them in order they WILL be The crooked.
Because my walls and floors are uneven, I had to spend a lot of time carefully measuring and cutting the panels. First I outlined where each panel would be mounted with a pencil. I realized that I’d have quite a bit of trouble getting everything as even as possible, especially as the panels are kind of difficult to cut with just shears (but doable). I decided to mount the panels with double-sided mounting tape for a less permanent solution. Despite my best efforts, it still didn’t look great due to the hollow edges (See second pic). I enlisted help to put trim in between the wall and the edges of the cut panels and caulk the gaps, and now it looks MUCH, much better, but still not perfect (see first pic!!). I think I’ll need to caulk in between each panel as well, and then paint over everything with a coat of white paint for everything to look seamless. It takes a bit more work to get these panels to work on uneven walls, but it is worth it in the end. It was a simple and cost-efficient way to modernize an old-fashioned Brooklyn apartment and I’m very happy with the result.
I was worried it might look a bit cheap but it does look really classy. I’d avoid cutting if you can, I got away by centreing fro the top and just cutting the bottom. Stanley knives are good for clean up but I used a large fine saw good scissors but a Dremel would probably be best.
For sockets I got some right angle lengths and bordered them then used a fair bit of caulk to fill the gaps.
TV is a Phillips Ambilight with a hue hub and two hue bulbs. All set for Halo now
Love these wall panels. Read for full installation tutorial (one of many methods)
First off, the description says “32 sq feet”, which to most people not using the metric system, means 8×4, which is the standard size for most sheets of plywood. These panels, however, are 19.65625 x 19.65625…so they don’t cover a traditional 8×4 sheet of plywood.
I didn’t want to ruin my drywall in case I didn’t love them, so I wanted to put a backer board over my drywall so that I could remove it/the tiles if need be. Using liquid nails or double sided tape on drywall is a recipe for disaster if you ever want to remove it.
I purchased 3 sheets of 4×4 hardboard from Menards at $5.50 a piece. I didn’t want to make a mess with liquid nails so decided I was going to use double sided tape. I picked up 3 rolls of 150 feet Gorilla heavy duty for $10 a roll. So my total for the project including the 3D panels themselves was about $130.
The box has 12 tiles and I could fit 6 length-wise on my wall with about 7 inches left over. So I decided to do 2 rows of 6 panels.
1. I took 19.65625 x 6 and got 117 15/16 and 19.65625 x 2 to get 39 5/16. So I knew that was the size my backer board needed to be.
2. I laid the sheets on the floor, measured, marked, and drew straight edge lines across at the marks.
3. I cut the sheets with my circular saw. (They Cut very well if you cut with the grain)
4. I brought the sheets inside, marked the edge on the wall where the first sheet would sit, and then I marked the stud lines above the sheets so that I knew where to screw in so that I hit the studs.
5. I screwed the panels into the wall at the stud points. For the corners of the sheets that were not close to a stud, I hammered some nails so that the sheets would not come away from the wall in those areas.
6. I framed the entire structure with double sided tape. I also added a line of tape through the direct center. This way the panels would have at least 2 contact points with the tape in all spots.
**note – if you mess up and pull the tape from the hardboard, the tape will not stick again so you will need to use new tape.
7. I carefully placed the 3D panels onto the wall and pressed down firmly to secure with the tape. Take your time, it’s tough to unstick the panels from the tape.
8. I ran my finger slowly along all the edges to make sure all the panels had good contact with the tape.
9. Enjoyed my new wall.
Hope this helps. These panels are awesome. With a little planning and patience, they can make a nice feature wall.
Amazing product and honestly looks fantastic. Still need to purchase a few more panels to finish the wall, but i couldn’t be happier. Makes a great feature wall.
Very good quality and looks amazing on the wall especially with bright lights shining onto them.
Negative is that there isn’t much room for the adhesive to be applied to. Only in small strips however with no nails has held up for 3 months and still going…
Difficult to cut however very easy to cut with a dremmel.
Very good product.
I love the fact that it is an easy prduct to work with and to attach all u need is an adhesive then play around with however you want to create your feature wall. It a bit tricky when cutting out sockets but if you mark up properly and use a sharp blade its not a problem.
Looks great, much thicker and heavier than I thought, but stuck well to the wall, I used forget nails as the adhesive.
Fantastic product, really happy with the finished product. Tiles can be quite difficult to cut due to all the different angles on the tiles, but with a bit of thought, time and patience you can get the job done. Over the moon with how it all looks. Highly recommend, thanks very much
Really really impressed with this product. I was a little sceptical before ordering as to do this job properly I wanted to use plaster tiles but didn’t want to fork out for the expense at 25 per tile! I mounted them onto 9mm ply backing boards with strengthening beams, and glued the panels on with no nails. The panels are very fragile until they are mounted. Once glued in place they feel strong, rigid and a nice tactile feel over plaster. No need to paint and the surface can be easily cleaned with household cleaners. The only issue I’ve had is hiding the joint in the tiles but will have to play around with a few solutions. Would definitely recommend these tiles but beware you need to have a reasonable skill level to pull of a good result if your going to DIY.
I remodeled a guest bedroom and wanted to put in a floating wall with a TV and fireplace. I originally though about doing this wall with a dry stack stone, but it was cost prohibitive and would be messy and time consuming. I’m glad that I went with these 3D panels instead. Everyone who has seen them has been wowed by them. I built the floating wall using 3-1/2″ steel studs and covered it in 1/2″ OSB. I primed it with white Kilz (so that any gaps in the panels would not be as noticeable) and used double sided carpet tape to adhere the tiles. The tiles look fantastic! If you are going to build a floating wall, I would suggest that you build it to the same dimensions as the number of tiles you plan to use (width and height). I don’t think you could find a way to make a cut edge look finished, unless it butts up against and adjoining wall. To cover the edge of the OSB (plywood) I used the plastic drywall finishing edge from the local Big Box hardware store (see the second picture). I left approximately 4 inches of overhang on all sides and mounted these chasing LED’s from Amazon https://www.amazon.com/gp/product/B07M9XHYVB/ref=ppx_yo_dt_b_search_asin_title?ie=UTF8&psc=1
in these angled channels https://www.amazon.com/gp/product/B01LL3S006/ref=ppx_yo_dt_b_search_asin_title?ie=UTF8&psc=1
The TV mount and fireplace are also from Amazon. When building the steel stud wall, I internally braced the TV mount location with wood 2×4″ and ran a power cord to that area.
I used a table saw to cut the panels for the bottom row, but I could have used a handsaw or really good scissors. These panels are a decent thickness and not flimsy at all. There are microscopic gaps between the panels, but they are only noticeable close up. If you are concerned about the gaps, I would suggest that you mount the panels, then fill the gaps and paint the panels with a paint suitable for plastic. BTW, the electric fireplace puts off quite a bit of heat (mostly forward and up) and it has not affected the tiles at all.
Overall, these plastic tiles are great. Definitely a unique looking accent wall. Lightweight, easy to work with, but there are some tips for making the job easier.
1. Use 3M Command Strips to hang them. It’s much easier and you can repositioning if you need to. Get the poster size and cut them in half.
2. Practice a layout. Use 2-3 command strips to temporarily hold your pattern on the wall. You can then figure out if it works best to center your design or start on one end. Also, will help you figure out if you want to alternate the direction (I did) or lay them all the same way.
3. Make sure you are level horizontal & vertical. Use a laser, snap a chalk line, use a level, whatever you prefer. Just don’t assume everything is straight & level.
4. To cut straight tiles, I used a diamond bladed tile saw (used it dry, not wet). This will allow you to cut straight for your ceiling & corners. Do not use a regular table saw or mitre saw blade. It will chip & splinter your edges.
5. To trim, use a pair of tin snips / aviation snips.
6. To smooth out any edges or to trim, you can use a Dremmel with a sandpaper head on it. Works great.
7. Outlets are very difficult. I took off the outlet cover, then cut out only the size of the outlet with tin snips so it would sit flush up against the wall.
Hope those tips & pictures help make your project go smoothly.