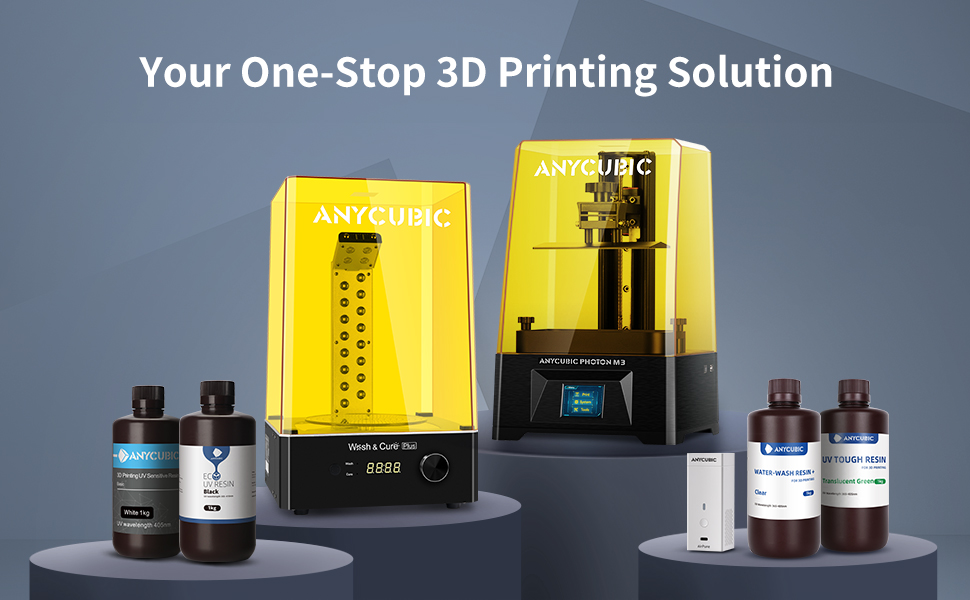
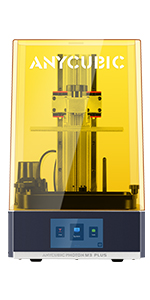
ANYCUBIC Photon M3 Resin 3D Printer, UV LCD 3D Printer
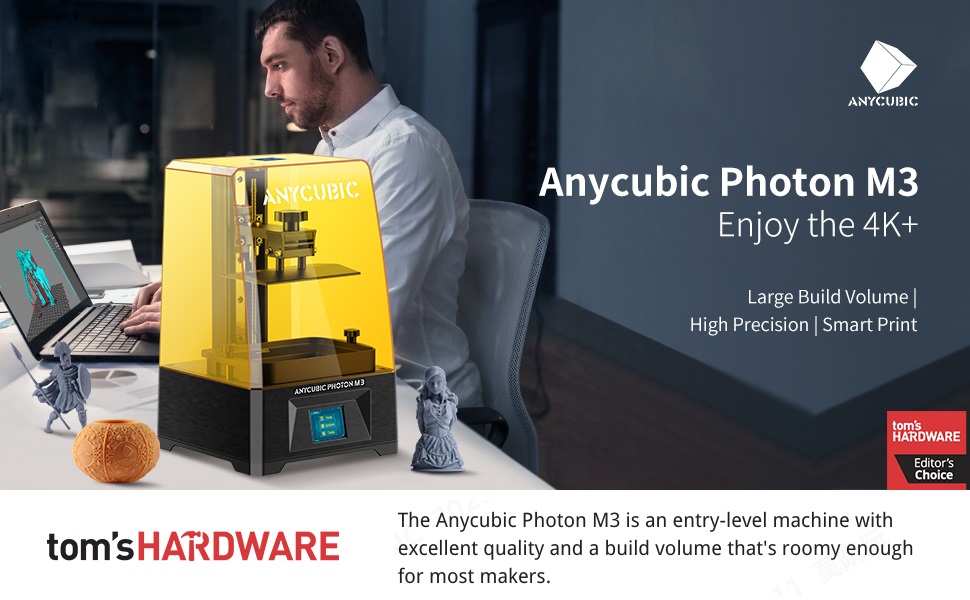
ANYCUBIC Photon M3 Resin 3D Printer, UV LCD 3D Printer with 7.6″ 4K+ Monochrome Screen, Fast Printing, Printing Size 6.41″ x 4.01″ x 7.08″
 |  |  |  |  |  | |
|---|---|---|---|---|---|---|
| LCD Type | 9.25” Mono LCD | 8.9” Mono LCD | 6.23“ Mono LCD | 9.25” Mono LCD | 13.6” Mono LCD | N/A |
| Build Area | 7.8” x 4.8” x 9.6” | 7.55″x4.7″x9.6″ | 5.19″x3.14″x6.5″ | 7.7” x 4.8” x 9.6” | 13.0” x 11.7” x 6.5” | N/A |
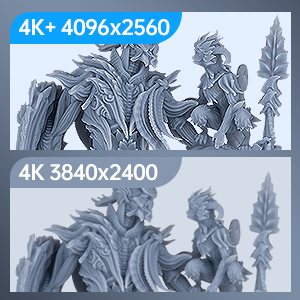
| XY Resolution | 5760 x 3600(6k) | 3840×2400(4K) | 3840×2400(4K) | 5760 x 3600 (6k) | 6480 x 3600(7k) | N/A |
| Layer thickness | 0.01-0.15mm | 0.01-0.15mm | 0.01-0.15mm | 0.01-0.15mm | 0.01-0.15mm | N/A |
| Z Axis Accuracy | 0.01mm | 0.01mm | 0.01mm | 0.01mm | 0.01mm | N/A |
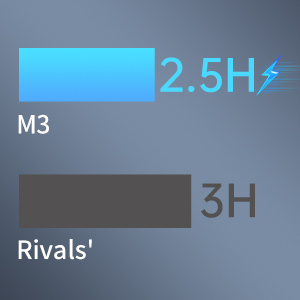
| Printing Speed | 80mm/h | 60mm/h | 50mm/h | 100mm/h | 60mm/h | N/A |
| Material | 405nm UV-Resin | 405nm UV-Resin | 405nm UV-Resin | 405nm UV-Resin | 405nm UV-Resin | N/A |
| Weight: | 8.7 kg |
| Dimensions: | 33 x 33 x 63.5 cm; 8.7 Kilograms |
| Part: | QICP-PMSA0BL-FBA |
| Pack Quantity: | 1 |
| Batteries Required: | No |
| Batteries Included: | No |
| Manufacture: | ANYCUBIC |
| Dimensions: | 33 x 33 x 63.5 cm; 8.7 Kilograms |
| Quantity: | 1 |
| Reference: | QICP-PMSA0BL-FBA |
Read up on what to do...
Brilliant 3d printer…was up and running within 5mins of powering up.
I normally don’t leave reviews on products, but for this item I decided that I would. Hopefully if you are reading this, it will help you decided if you want to buy it or not!
I will split this review into sections to make it easier.
Overall, I am blown away by how good this printer (ANYCUBIC Photon M3 Resin 3D Printer) actually is, especially for its low cost! if like me you are just getting into 3D printing, I can’t recommend this printer enough!
— Other Reviews—
After looking for a few weeks for which printer would best suit me, I came across this one a few times and decided to look at the other reviews. Normally I am hessitant with reviews as they could be fake to make the item look better than it actually is, then when the item arrives, it’s not what it should be. But I took the gamble in buying this printer, and honestly, I regret not getting one sooner!
—Packaging & Assembly—
The printer was extremely well packaged and was very easy to assemble as the majority of this printer is already built, so as for setup time, it only took about 10 minutes. The only thing with it that was a little tricky was the lid that goes on as for some reason the plastic is ever so slightly warped inwards, so when putting the lid on, I have to push a little so it fits over the lip on the bottom (but this honestly doesn’t bother me at all and probably wont happen to you!).
—Extra Costs—
So there are some extra things you need, or should get in for the future.
The vat (tray you pour the resin into) has some thin see though plastic sheets on the bottom, they will need replacing eventually.
The screen also only lasts for so long and will have to be replaced (fit as many items onto the build plate as you can to save using the screen as much).
Nitrille gloves are a must when working with resin, so a box of them will come in handly.
You get some paper strainers with this printer, but more will come in handy for when you clean out the vat as little bits of cured resin may be floating around.
A container that you can use to transport the plate and miniatures in so you don’t drip resin all over the place (as I use water washable resin, I use a tub to transport the plate and miniatures to the sink to clean them off).
A washing up cutlery tray (or something similar) so your prints can dry off after you wash them in water/isopropyl alcohol. Putting wet prints into a UV box/machine is a big no no!
I bought some water washable resin which in my opinion is briliant, not sure if it’s the best, but water it’s much cheaper than buying isopropyl alcohol.
UV light to cure the prints once you have taken the supports off and washed them, so rather than spending 100s on a UV box, I bought a small black plastic container with lid, a UV light for around 20 and some tinfoil and made my own UV light box and it works perfectly! though it would be nice to have the cool fancy spinning UV machine!
—Mess and Print Fails—
Some people will tell you that resin is messy, and to be honest, it can be! but as long as you wear gloves take your time, and keep everything clean, then there shouldn’t be much mess at all. It does however stink, so maybe some charcoal USB air purifiers that sit inside would be a good idea. I bought some and they work wonders.
Time to time there will be prints that fail, and more than likely there will be a chunk of resin stuck to the bottom of the vat which you pour the resin into. You MUST! and I mean MUST! check often to make sure there is no cured resin stuck to the bottom, otherwise when the plate moves down, it will push it and not only break the thin plastic on the bottom of the vat, but it will also break the screen underneath and honestly, it can be pricey to replace them due to a slight mistake.
—Price & Quality—
As shown in the images, I have printed a few items already and I am amazed at how good they actually are! originally I though I would need to spend closer to 1000, if not more, to get this quality of miniature, but for the 200 odd I spent (during the Christmas/New Year sale) I am shocked. The only thing I am having a slight issue with, which to be honest will almost be 100% my fault is when adding supports to the minitaures, it leaves lots tiny indents or scuffs on the parts where I have to add multiple supports. This however can be fixed, a bit of sanding and filling fixes the problem.
—3D Software —
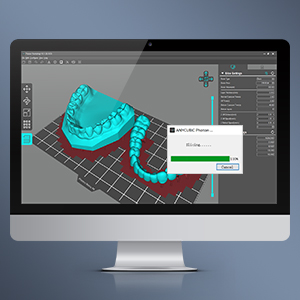
Just to note, I have not messed with any of the settings on the printer other than setting the plate’s Z axis like the instructions tell you too. There will be settings somewhere that deal with support depth and size, layer thickness, etc. which will be in the software provided.
Along with the printer, you get a USB stick that has a test print on it, along with the 3D slice software. Is the software the best you can get? probably not! but it is very simple to use, File > Open > STL file and you have a figure in the software that you can get ready to print.
—Miniature Supports—
Supports are a must for when you are building miniatures, if you don’t add them, I can guarentee whatever you print will fail, for example a wolf I printed didn’t have enough supports on it head, so half of its face didn’t build and it looked dreadful. As mentioned above, I need to do some more research into supports as I probably go way over the top, but I would rather waste a little bit more resin making supports, than waste 4/5 hours for a print that then fails and has to be binned.
—Print Time & Support Tip—
Print time is really good as well, I average around 4/5 hours. One tip I can give is to tilt the miniature slightly in the 3D slice software. An example would be a man, don’t just stand him up on his feet, lean him back slightly as you can not only add more supports, but the figure won’t be as tall, and in turn, less layers will need to be created, meaning the print time is quicker. I will try and add a screenshot of what I mean.
—Issues—
There has only been one issue and that was with the base plate that the miniature prints onto. I tried to use the plastic scraper that came with the printer to remove the prints, though this did not work so I used the metal one provided, this however over the past couple of weeks has been scratching away at the plate and has some pretty bad scuffs on it. I got in contact with the seller and they have helped me out.
–Help & Support—
I contacted the seller about the scratches and they replied quite quickly. They have informed me that I need to reduce the bottom exposure time, this will allow me to remove the miniatures from the base easier. They have very kindly just send out a replacement plate for me which I can’t thank them enough for.
—Conclusion—
I am over the moon with this printer, and in the future I look forward to saving up and buying a more expensive one that has an even bigger plate and a higher resolution screen. If you want to print miniatures i.e. warhammer, D&D, then resin is the way to go and this printer can do that for you! Support is amazing and I am confident that if anything happens in the future, then the sellers will be on hand to help me out!
Fantastic value
Haven’t found any faults with it, and it has been producing very good prints
My first dip into the Resin world
I sent ages trying to find the right printer to move away from the Filament printer i was used to and pick this item, i got it when it was on offer and it hasnt disappointed , east to setup and the software that came with it was easy to use, the only thing i had to change was the led screen which was about 40 as i must of printed around 500 models of different sizes for the W40k Nids army and went from 8000pts to 15000pts of miniatures and monster size creatures
Realy good quality for printing detailed miniatures
Can anyone tell me where I can get a new resin tray I’m only useing washable resin and washing it out the straight after use but it appears to have many fine scratches I dryed it with very soft Tissue my conser is after a few uses will the scratches imped the print quality
Love i
Coming from FDM printers, this little machine’s ability to create stunning models is incredibly impressive. For under 250 it prints models and busts of a far higher quality than my 7,000 Ultimaker. Granted the FDM printer is better in other areas but this machine’s accuracy with minute detail is on another level.
The build quality feels sturdy and robust, with minimal noise when in use. I expected this to be an issue with the price so was pleasantly surprised. The build plate has a diamond pattern etched into it which helps the prints stick to it (impressively so) which is a nice touch. It also has a monochrome LCD which allows it to print very quickly with only 2 second exposure times per layer. Others I looked at before going with this were longer.
My only gripe is the screen is a bit fiddly for my big fingers, but I think that’s always going to be the case with the smaller machines.
Overall an excellent printer at an excellent price. Originally bought as a starter but will probably just stick with this.
Fast, easy to use and superb quality.
Small but powerful machine.
Easy to set up and get started.
Great detailed prints. Light weight.
Nothing bad to say about this printer.
I have 15 various makes of printer, this one is up there with the best.
I love this printe
This is my first ever 3D printer and I am so delighted with it! It was easy to set up right out of the box and I haven’t had a failed print yet (two months in). I will admit, I use pre-supported STL files as I haven’t really had the time to experiment much with the software. I use the plant based and water washable resins so when the cover is over the printer there is no smell at all. I cure all my prints on my sunny kitchen windowsill and it works within minutes. The clean-up/emptying of the resin bath can be a bit messy but it’s totally worth it for high quality, high resolution prints! And soooo much cheaper than buying models online/in the shops.
Finished setup in Day and a half
This machine is very good, I normally struggle with these things this was a very good process for setting up I think the average capable people would set this up in 15 minutes max and have it printing. I did one test print and it came out perfect. I have just unboxed the cleaner and curer took me about an hour. anyone else i would say a few minutes.
Amazing little printer!
So I got this delivered today.
I have 2 anycubic photon X’s but the screen has cracked on both (they’ve been hammered), and it would cost me more than the price to replace both, than it would have been to buy this . So I went for this fab little thing.
I say little – it’s bigger than my LD-002h, but smaller than my photon X’s.
Set up was really easy. Literally took minutes to remove the plastic screen and level the bed. Nothing else needed tightening. I printed the matrix first on basic settings on chitu. I’m using anycubics water washable resin (I usually use the normal translucent UV green but I’ve switched for now as I wanted to try water washable). The first matrix didn’t stick and I thought it was a levelling issue, so relevelled and then the second didn’t stick. I changed the settings from 23s bottom layer exposure to 25s, and it worked like a charm. Exposure was slightly too low so I changed it from 2s to 2.5s and it’s printed beautifully (this is for water washable – other resins may be fine for the original chitu settings, and some may need tweaking a bit more).
I probably could have done with sticking my little baby in meshmixer just to smooth it out, but because of the use for it it doesn’t really matter (I make bath bomb blanks for moulds).
The print time is a lot, lot faster than my photon X’s. What would take them 4 hours has taken half the time on my little M3.
I usually print 3 blanks on my photon X’s, but the build plate is smaller on the M3 so I just did the two to start with. But it’s still a decent sized plate – bigger than my LD-002h as that can only fit one of these on.. so using the two printers together makes up for the build plate size that I need (again, my photons are dead at the moment ).
I’m actually really pleased with it and I would really recommend it!
If anything changes (as I’ve only unboxed and used it today) then I will edit. But so far I’m really impressed.
Such a good mini printer!
I’ve used this printer for jewellery, minis, small props and recently printed off molecular models that would make an extrusion printer cry. Its easy to setup, intuitive to use and easy to clean. I’ve been using water wash resin in my apartment and had no issues at all. The resolution is as high as any hobbyist could wish for and the large print face means you can print in batches or play with larger designs.
One note about printing with this kind of resin (no fault of the printer) make sure you take your prints off the plate in a timely manner after the print is finished. They get more difficult to remove over time.
Photon 3D
First resin printer. Build plate was smaller than I thought, my fault. Prints very well not had problems with build plate. Need to do more prints to test it. Would reccomend this unit.
Photon 3D
First resin printer. Build plate was smaller than I thought, my fault. Prints very well not had problems with build plate. Need to do more prints to test it. Would reccomend this unit.
Fantastic little printe
Fantastic little printer and the print quality is much better as it’s got multiple points of lights instead of one single poi
Fantastic little printe
Fantastic little printer and the print quality is much better as it’s got multiple points of lights instead of one single poi
Super easy to set up and use
For beginners: Just download the stl file onto your pc, use the software on the USB stick and follow the guidance in the manual. Copy the sliced 3d image on to the USB stick, insert USB stick and hit print. Really is that simple. Took 5mins to set up and much easier than the filament 3d printer I have.
It failed on one print as I never added supports, so it ended up headless
Reprinted with supports and you can see the quality.
Highly recommended for newbies to 3d printing.
Great printe
My first 3d printer and I love it.
Easy to use, great results and pretty quiet.
I have it in the same room as me most of the day and the smell isn’t too bad either.
I’d recommend downloading an alternative slicing software than the one that comes with it (Chitubox is the best I found for free).
I love this printer great quality prints and a good build quality. The problem is resin smell gets all around the house and lingers for a long time and I’m really concerned about long term health issues. If you have to wear a mask and gloves to handle the resin the fumes during print just can’t be good for you. The tiny photon filter is useless, It’s a horrible smell and sticks in the throat, my wife can’t stand it. My shed is too cold and it looked like I would have to sell it. So I designed a filter and 3D printed the parts. The printer sits on top of it and a thin foam seal fits around the vent. The fan adjusts to create a small vacuum in the printer so nothing seeps out and as a bonus it runs cooler. I get zero emissions from my printer now, nothing but fresh air comes out of the filter. There are no modification to the printer and near silent operation. No heat loss through open windows, most resins seem to need 25-30deg. I plan to sell the printed parts soon if your interested on eBay through a friend sparkyjoe100. Hopefully I’m allowed to say that 🙂 btw I tried gas mask filters and they don’t work, it needs a filter with a large surface area with slow moving air passing through it.
After printing, the cleanup was still a little smelly. I bought a flexible build plate from Amazon and it’s great. I just strip it off and straight in the washer to reduce the cleaning smell, then remove the print and supports afterwards. I also didn’t realise I don’t have to clean the vat after every print which produced more resin smell. I printed a vat cover from thingiverse and apparently the resin is good for weeks in the vat. So now it’s just a little IPA smell at cleaning time which doesn’t last long. It’s now an indoor hobby.
The design of the vat is slightly different and is quick change. I assume this means that the replacement FEP film comes with the gasket at the bottom of the vat already attached. The gasket has injection moulded rivets, which break if you try to change the FEP film anyway by prising the gasket open. You can at a push just use the same gasket after changing the FEP but the vat will leak resin. I have been unable to source the proper FEP and gasket, and am in the process of asking Anycubic. In the meantime I’m using a spare vat from an Elegoo Mars, which just about fits.
Great little printer but it could be even bette
As others have commented, this is a great little printer and outperforms my old FDM (filament) printer in every respect except build size.
The only minor issue I have is that the SLA (resin) printing system can produce some unpleasant and potentially toxic odours.
The manufacturers have fitted a couple of activated carbon filters in the build chamber which helps but there is still a strong smell when printing which is why they recommend using the device in a well ventilated area.
One tip – I’ve found that taping a couple of cheap activated carbon facemask filters over the main vent on the bottom of the printer practically eliminates the odour. (see photo)
Having used this printer for few days I’m confident to leave review as it was enough time for me do make decision is this a good or bad printer for me.
This machine came well packaged with all the tools and bits needed to get started.
When you unpack everything level the bed you are ready to do your first print as included USB dongle contain prepared file for test print.
This included file was me first print also.
After finished print I was delighted that my first print was successful and with lot of small details printed correctly.
Pros:
Very good print quality
Price is acceptable for this kind of printer
Print speed, doesn’t matter if you have full build plate or just one small object print speed is same for same height as curing process of resin is done over whole build surface at once.
Noise wise depend on your retraction speed this printer is quiet, noise coming from fan is beat louder that moving build platform but having it working in another room that doesn’t make any noise.
Cons:
Will be great to have option of network connection.
Notes:
This is a resin printer so be ready to do more cleaning compared to FDM printer
Overall I’m very happy with this printer and I will recommend it to anyone who is just going in to resin printing.
so i ordered a Photon S as i do tonnes of FDM printing with Ender 3’s, 5’s and AnyCubic Chiron’s
what can i say!
from first opening the box and seeing how well the printer was packaged, to all the accessories and such you get with it.
i jumped straight in and started setting it up, watched YouTube for setup videos (although, it really doesn’t take much working out!)
Levelled the bed, poured in some resin that came with it, plugged in the usb stick and printed the first file on the USB, this was a reference file to show the best exposure for the resin you are using, it came out perfect.
i then printed the anycubic ‘benchy’ that came out perfect….
so next i went and found a file online and printed it myself and what you see is a print, not much bigger then a 1p piece thats very detailed and im massively impressed!
I then printed a hulk bust that was hollow, it’s come out amazing with the supplied green resin, will look amazing with a small light under the bottom of it!
100% go for this printer!!
This review is for the Anycubic Photon S UV LCD Resin 3d Printer
Having been a user of FDM printers for while i thought it was time to take the plunge and look at DLP printer.
This has a number of advantages the main one the level of detail you can achieve over regular FDM these really do look like cast or injection moulded items.
The printer arrives very well packaged and includes everything needed to get started.
Instructions (also available online)
Small kit of tools
Printing platform in a very nice blue.
Resin Vat
Power supply
Spare screws
USB memory stick with splicing software and test prints
Mask and gloves
Plastic Scraper
Extra FEP film (for the resin Vat)
Random Colour 500ml bottle of Resin (I got Clear Green)
Funnels inc filter (for filtering the resin after use)
The machine pretty much comes assembled ready to use, you just need to fit the Printing platform , level, inspect the vat (ensure the film is tight), fill the vat (1/3rd full) and select your print.
While it’s pretty simple to setup there are some key points to success.
Download the full manual from the Anycubic website, the printed instructions are basic and the full manual includes all the details you need.
Take your time to correctly setup and level the printing platform, this really is the key to 100% success and reduced failed prints.
Initially i did not tighten the levelling screw enough and the platform moved on the first print. Really make sure its tight unless you like levelling.
While the ball joint is tricky to start with you get the hang of levelling all 4 corners after a while.
Also make sure the printing platform is square to the LCD screen.
That pretty much the setup, get it right and you’ll print first time.
Also make sure you order or have IPA ( isopropyl alcohol ) on hand for cleaning and washing your going to need a lot of it 🙂
The software on the memory stick comes with windows and mac versions along with test prints, ( the machine only seem to read the root folder so there is another test print, cube in a folder you can move to the root folder).
If you are going to print loads consider a wash and cure machine to take the hassle out of post process.
The last note for successful prints. Master supports , what type and when they are needed.
Positives
For the price you get a lot for your money these machine use to cost 1,000’s
Incredible detail, you will be amazed just how much detail you can print.
Easy to setup and easy to use.
Slicing software is really fast ( Compared to others I’ve used)
High resolution print screen
Quiet ( actually soothing to listen to)
Great brushed aluminium print surface ( prints really do stick first time if set right)
Encased with air filters ( great reduced resin fumes)
Negatives
More expensive than FDM
Messy, there is a lot of clean up and process post print to get the most out of it.
Resin, is not great to handle you need to take precautions for safety. ( Gloves / Mask )
Overall, this is an amazing piece of kit, if your use to regular FDM printing, you will be blown away with the level of detail you can print and the final product. Really impressed with the machine, plenty more prints to come. Definitely one of the best things I’ve purchased in years.
I hope you found this review enjoyable and helpful.
Never had a 3D printer before but my wife somehow convinced me to buy one as we can print different types of figures for our kid so he can play with it.
Well, i’ve said let’s have a go, and to be fair, i’m quite excited by this new printing experience. For me was kind of fantasy looking at it the way it prints. I guess if my grandma would see it she would definitely be shocked.
As i’m new to it i aas little bit struggling with software and to set up, but it’s not that hard as i was thinking. Instruction manual and online resources directed me properly.
Overall it prints pretty accurate figures and objects. I do like it and keep doing different experiments with it.
Expensive piece of kit to be honest but i do enjoy i