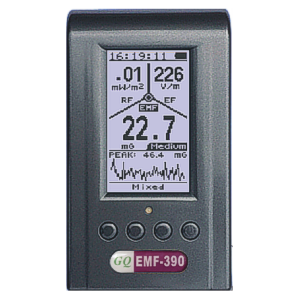
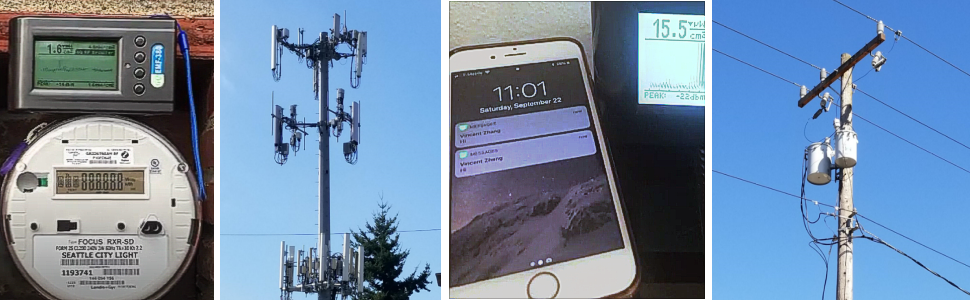
EMF Meter, Advanced GQ EMF-390 Multi-Field Electromagnetic
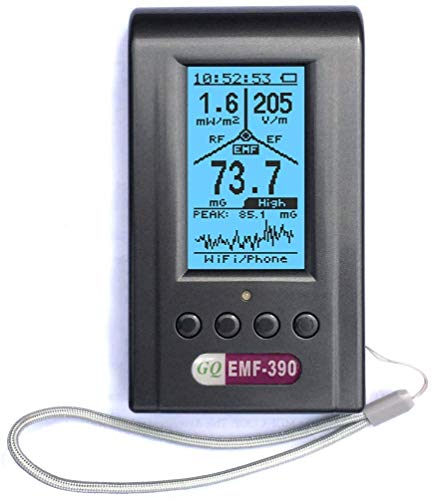
EMF Meter, Advanced GQ EMF-390 Multi-Field Electromagnetic Radiation Detector 3-in-1 EMF ELF Meter & RF Spectrum Analyzer, Cell Tower Smartmeter Signal Detector RF up to 10G Data Logge

Unlimited Applications
- Detecting EMF, ELF, EF, RF from all electronics devices but not limited to.
- EMF-390 can do more than what you see here. It is not only a tool, but also a teacher. User will learn and discover invisible world from it.
| Weight: | 283 g |
| Dimensions: | 13.97 x 7.62 x 2.54 cm; 283.5 Grams |
| Model: | EMF-390 |
| Part: | EMF-390 |
| Pack Quantity: | 1 |
| Batteries Required: | No |
| Batteries Included: | Lithium Ion |
| Manufacture: | GQ Electronics LLC |
| Dimensions: | 13.97 x 7.62 x 2.54 cm; 283.5 Grams |
| Quantity: | 1 |
Aparentemente fenomenal
Y digo aparentemente porque no tengo un calibrador para estar seguro de que lo que mide es el valor real.
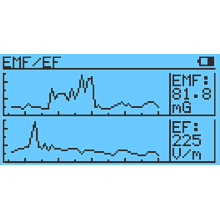
Pero estoy encantado de su funcionamiento, con una pantalla que te permite visualizar a la vez los 3 tipos de radiacin y muchas opciones de visualizar los resultados, incluyendo grficos.
Es muy intuitivo y fcil de manejar a pesar del nico defecto que le veo, que no tiene instrucciones en espaol.
I just got my GQ EMF-390 meter and have spent a number of hours playing with it and testing it. I like it, and it’s a good meter, but you gotta learn to sweet talk to it. In other words, you have to invest some time in learning how to use it properly. I am just a user. I have no official affiliation with GQ.
I am in training with the Building Biology Institute to become an Electromagnetic Radiation Specialist (EMRS). I’m speaking for me, not for them though. But, I mention it because I’ve spent a lot of time studying EMF meters and EMF measurements lately. That point of view affects how I view these instruments. Here are some things that I believe will help you use your instrument.
01) This is a consumer grade instrument, which they say in the FAQ, not professional grade. So, balance your expectations accordingly. However, that doesn’t mean it can’t be useful to a professional, as well as consumers.
02) The quick start guide is just that. Do read it. But realize that’s only the beginning of your journey. Download the full user guide, which is a PDF of many pages, and go through that. At least their documents are written in mostly good English, as opposed to Chinese-English. As a bonus, the quick start guide is in color.
03) Learn how to operate the controls. This may not be obvious at first. Once you’ve gotten used to them, it will seem much more natural. While the buttons don’t have printed labels on them, they do have shapes molded into the plastic, which you can see if you look.
Some buttons do different things depending on whether you press and release, or press and hold.
If you have the meter facing you, in landscape (wide) mode, and the buttons and model number are on the right:
The TOP button, which they call S4, can: check the battery when powered off, power the unit on and off, activate the menu system when powered on, select items in the menu system, and sometimes change things in the menu system.
The BOTTOM button, which they call S1, can: back you out of most menus, activate a menu to select the different screens of the device.
So, an effective technique to go through menu settings is: press the TOP S4 button to get into the menu, press one of the middle buttons to navigate, press the TOP S4 button to select an option, press the middle buttons to change an option, press the TOP S4 button to finalize your answer. Sometimes, pressing S4 will change an answer, so make sure the screen says what you want when you’re done. You can then get out of the menu system with the BOTTOM S1 button. You can, if you wish, go back into the menu, and examine each setting without changing it to verify the settings.
When not in a menu, the middle S2 and S3 buttons do various things, like allowing you to alter units, switching from EMF (magnetic and electric field) mode, to RF (radio field mode), moving a cursor, zooming in or out, etc. You kind of have to play with these buttons on each screen. Sometimes they do something different if you hold them down.
04) IMPORTANT, learn how to point the meter. Inexpensive meters have single axis sensors which are directional, and they care about how they’re oriented in space. This meter has a 3 axis magnetic field sensor, which they label on the screen as EMF. So, you can turn the meter any way you want to read magnetic fields. BUT, the electric field sensor (EF), and the radio field sensor (RF) are directional. If you’re pointing the meter the wrong way, you may get wrong readings, or no readings.
I have rewritten this section of text several times, as my understanding of the antennas in the GQ EMF-390 has changed. I will share my best understanding, but the reception pattern of the meter is not totally clear. So, you may have to point and orient the meter in various different directions and rotate it in various orientations to find the way you get the maximum signal in any given situation. See the EMF-390 How Is General RF Antenna Oriented link below for additional information.
Antenna placement is documented on page 5 of the quick start guide, as well as in the PDF. Nevertheless, it bit me and caused me to lose some sleep one night fretting with it. I haven’t done much with the EF sensor, but I’ve been working with RF. This meter may not work like you expect, but it will work if you treat it right. My Safe and Sound Pro II meter and my Cornet ED88TPlus will both respond to most RF signals if you are holding the meter in front of you in portrait mode (vertically), with the display facing you, and the RF source, like a cell tower, out in front of you. This meter may not respond optimally that way. With this meter, you would be pointing one of its sensors up into the sky. As I understand it, this meter has a 2 part general RF sensor. One part would respond to a source out in front of you if holding in portrait mode in front of you. The other part would respond if pointing the curved surface of the meter toward the transmitter. The first descriptions below are based primarily on the latter mode. Then I talk more about the former mode.
Imagine this meter is a small airplane. Place the meter flat on a table with the buttons and label near you and the display face up. The near end with the buttons is the tail. The far end where the propeller of a plane would be (its nose) is the front. On the GQ EMF-390, this surface is curved. The far end, curved surface, of the meter is where one part of the RF sensor is pointing. If there were a cell tower, for example, out in front of your table, you could get a reading on it. In terms of an airplane, pitch means to bring the nose up or down. Yaw means to slide the tail left or right, turning without changing the bank of the wings. And roll means to bank or tilt the wings left or right. Rolling left or right is (sort of) what a race car does going around a sharp turn on a banked track.
For lack of better terms to use, this meter CARES about pitch, roll, and yaw. If you pitch the nose of the meter up or down substantially off the line to the source, you will get bad or no readings. If you yaw the meter left or right substantially off the line to the source, you will get bad or no readings. But, that’s not all. The meter cares about roll too.
Just to be clear, ALL single axis meters care about these things. The Safe and Sound Pro II is RF only with a single axis sensor. The Cornet ED88TPlus has EF, MF (or EMF), and RF sensors, all of which are single axis. All these meters will give bad readings if they’re pointed wrong.
I did much research and i chose this gq model. Works very well and is reasonably priced
It works. I cannot comment on durability or value for money.
The unit was delivered promptly and does everything I expected, I cannot verify the value for money or the accuracy but it is easy to use.
A meno che non venga acquistato per divertimento o svago, scopo fondamentale di uno strumento di misura quello di quantificare al meglio (cio con un errore il pi basso possibile) le varie grandezze acquisite.
Pertanto, al di l delle varie “coreografie” grafiche di cui lo strumento ampiamente dotato, di seguito mi concentrer esclusivamente sull’aspetto pi qualificante di un dispositivo di misura ovvero, la sua accuratezza.
Naturalmente, trattandosi di un prodotto non professionale, tutte le valutazioni che seguiranno terranno sempre presente questo aspetto.
Le grandezze misurate dall’analizzatore sono:
1- Campo Elettrico BF (unit di misura V/m)
2- Campo Magnetico BF (unit di misura Gauss (o Tesla) e relativi sottomultipli)
3- Campo Elettromagnetico RF (unit di misura W/m2 e relativi sottomultipli)
Campo Elettrico BF
E’ necessario premettere che nel corso di una misura di Campo Elettrico, la stessa risulter parzialmente perturbata sia dalla presenza dello strumento (in modesta entit) che dalla presenza del corpo umano che eventualmente dovesse sostenere lo strumento o trovarsi in prossimit di esso.
In quest’ultimo caso, il campo elettrico misurato risulter considerevolmente pi alto sia a causa della riduzione del percorso dielettrico realizzata dalla presenza dell’operatore (che virtualmente rappresenta una massa conduttrice) , sia soprattutto a seguito del fatto che il corpo umano, risultando fortemente accoppiato a terra, riduce anche drasticamente la distanza tra l’armatura attiva sorgente del campo e il ground.
In ogni caso, qualunque sia lo scenario, lo strumento misurer il campo elettrico effettivo presente in prossimit del punto di misura, sia esso perturbato (ovvero incrementato) o meno dalla presenza umana. Essendo questa misura di tipo direzionale, il verso di misura del campo coincide con l’asse maggiore dell’involucro ovvero, quello che va dalla base alla testa dello strumento.
Fatte queste doverose premesse, ecco in sintesi i risultati acquisiti con lo strumento in mio possesso nella simulazione di un classico scenario domestico/industriale dominato da Campi Elettrici BF a 50Hz:
Lettura mediamente sottostimata di circa il 40%
che, considerata la natura dell’analizzatore, rappresenta un risultato tutto sommato accettabile.
In ogni caso, qualora si desiderasse correggere la lettura, sar sempre possibile accedere al men di calibrazione e al valore di default (i.e. 100) sostituire il numero 166.
Con riferimento alla risposta in frequenza, il grafico in allegato ne rappresenta l’andamento, normalizzato rispetto al valore riferito a 50Hz.
Ci che da esso si osserva, la cospicua reiezione operata dallo strumento per frequenze inferiori ai 30Hz (in netto contrasto con quanto dichiarato dal costruttore).
Tenendo presente ci, la banda utile dell’analizzatore va dunque dai 40Hz fino a oltre 1MHz.
Campo Magnetico BF
Lo strumento in oggetto misura il Campo Magnetico utilizzando tre induttori in ferrite disposti secondo le direzioni X, Y e Z ed allocati sulla parte frontale dell’involucro. A differenza delle acquisizioni di Campo Elettrico, in questo caso la misura di tipo triassiale (in altri termini, non necessario roteare lo strumento al fine di catturarne il valore massimo) e non risulta perturbata dalla presenza del corpo umano.
L’accuratezza di misura stata verificata a 50Hz in un classico scenario domestico/industriale dominato da Campi Magnetici BF a 50Hz.
I valori medi di campo acquisiti si sono rivelati prossimi al valore atteso (l’errore di misura stato inferiore al 5%, ovvero comparabile con il cumulo di tutti gli errori commessi nel banco di prova), evidenziando in tal senso un’ottima performance dello strumento.
L’errore isotropico (ovvero le variazioni di misura rispetto all’orientamento spaziale del dispositivo) risultato inferiore al 7%.
La risposta in frequenza non stata verificata e pertanto, suggerisco di attenersi ai dati forniti dal costruttore (naturalmente, da prendere con le pinze!).
Campo Elettromagnetico RF
Il campo elettromagnetico RF viene misurato utilizzando un’antenna disposta sulla parte frontale destra. Il verso di polarizzazione di questa antenna coincide con all’asse maggiore dell’involucro (asse X). Pertanto, non trattandosi di un trasduttore isotropico come invece avviene nel caso delle misure di campo magnetico governate da un trasduttore triassiale, al fine di minimizzare l’errore, in fase di acquisizione del campo RF sar necessario allineare l’asse di polarizzazione dell’antenna con quello del campo elettrico sotto indagine (ad esempio ruotando lo strumento lungo i tre assi sino a massimizzarne la lettura).
L’errore di misura, ovvero la risposta in frequenza dello strumento, stata stimata per confronto a partire dai valori di campo acquisiti da uno strumento campione di tipo professionale, certificato fino a 6 GHz.
I risultati acquisiti dal dispositivo in mio possesso (vedi grafico allegato), evidenziano una banda utile dello strumento compresa tra 800MHz circa e 6GHz (non disponendo di un dispositivo di riferimento certificato, non mi stato possibile effettuare misure oltre tale frequenza). Al disotto degli 800MHz, l’errore supera abbondantemente i 10dB, rendendo di fatto lo strumento totalmente inidoneo a quantificare la densit di potenza in questo range.
Nell’intervallo di frequenze suggerito (ovvero a partire da circa 800 MHz in su), al fine di minimizzare l’errore medio dello strumento, si consiglia di utilizzare un coefficiente fisso di calibrazione pari a + 2dB (i.e. con riferimento al parametro RF Density Gain presente in men, dal valore 10 di default, porlo pari a 16). In tal modo, l’attendibilit dei valori acquisiti tra gli 850MHz e i 5700MHz circa si assesterebbe entro 6dB. circa.
In alternativa, sar sempre possibile correggere puntualmente la misura utilizzando direttamente i valori correttivi tipici di ciascuna frequenza.
Concludendo: con riferimento alle misure in campo RF, nonostante il dispositivo sotto test (GQ EMF-390V2) sia dichiarato idoneo ad indagare l’intero range di frequenze compreso tra 10MHz e 10GHz e ad effettuare misure (con un’attendibilit pari a 10dB) nel range 240MHz — 10GHz, stando alle acquisizioni fatte, le specifiche fornite dal costruttore risultano alquanto ottimistiche.
Come gi detto, si suggerisce di considerare relativamente attendibili solo le letture riferite a frequenze oltre gli 800MHz. Al di sotto di tale frequenza, eventuali misure potranno risultare abbondantemente sottostimate (fino a oltre 20dB, ovvero di un fattore superiore a 100).
One of the Best professional EMF detector.
Very satisfied with the product.. Plus the rechargeable battery is easily removable if needed to be replaced!
The meter can be used in a simple or complex mode. Very detailed readings available if you study the instuctions carefully. It is not a “toy” but is a serious instrument and is well made. Although I am new to tha radiation measurement field, I would say this is an accurate meter. Nigel Moore. England.
Comprehensive measurements and seems to work well
Good range of measurement types and display options. Seems to work as expected (tested walking under power lines, turning phone and wifi on/off etc.).
Easy to use device, clear instructuons, very useful card is included with reference values for each measurement.
good
It seems to be slightly an outdated design like any technical equipment which is not on high popular demand…but is doing the job is designed to and at an acceptable price…the splitted screen is very useful and handy
This was bought for several purposes , including an educational one. 3 modes and several settings are presented with differing information being able to be displayed. The accuracy of measurement is always a difficult one to prove without spending loads of money on certified kit but comparison to friends much more expensive hardware and my own spectrum analysers show similar results. The unit presents information on the radiating source (wifi, cell tower etc) which has proven to be useful and you can focus on certain bands of the spectrum as well as the automated scans. navigating the menus is not that intuitive so I would recommend spending some time with the manual and online research . In the basic mode it is great for use in comparative measures , the display is grey and black, not high deff but good enough and battery life is extremely good . manufacture support is accessible and helpful. a nice case, wrist strap and credit card references outlining good and bad levels of exposure is also useful. You can customise the alarms and led warning as well as some of the settings but you do not get on screen help so need to read the manual
A quick indication of how much RF smog is prese
It is easy to use and gives some indication of what is present, giving strengths and to some extent direction of RF and EMF present in your location. I have no means of calibrating its results so I am not sure how accurate they are, but they give a good indication of what is there. Useful for a quick scan.
Seems ok
Easy to use and seems good value. From what I can tell its more a guide level as reading can flucuate when you hold it (your body interferes). Helpful identifying EF from motors anf cables.
Why does everybody not have one of these?
It seemed like something of a gimmick when first-purchased but having done a few readings, especially around my working area (Laptop, 2 screes etc) the level of AC radiation was ludicrous, especially from the Ikea desk lamp.
I sit at my desk for protracted periods and often wondered why I got headaches and tingling in my forearms… The answer would seem to be that I was getting a static electric charge from the desk lamp, which I have now replaced with an LED/DC item which has dropped the levels back into the safe-zone.
If it wasn’t for this relatively cheap gadget, I would have suffered the static effects for ever.. Not nice.
A compact EMF meter, with many functions; easy to read; shows all three values on one screen or can change to just one; easy to use it to scope out a room or building and find the hotspots. One thing that puzzled me for a while was that I was getting high EF values when holding the meter but low values without me holding it. After I turned off the mains supply (at the main fuse box to the house) the readings (when held) dropped to the same values as when not held. So it seems that my body is acting as an amplifier of the electric field inside the house. As soon as i step outside, the reading drops off again. More investigation needed but so far i am very happy with this meter. No idea as to accuracy, except I am getting standard RF values for my phone and wi-fi box. Would buy again.
Very sensitive and versatile device. ideal for tracking down RF and EF leakage to small area of investigation. As a mate said, it tracks ghosts too…. says it all really,. The only niggle when held is that static buildup will upset readings if you are not well grounded.
In my experience this Product reports much higher radiowave frequency when plugged into a charging point with a cable. It seems to get a field of radiowave presence from the charge cable that sends it into alarm mode , “”ringing it’s head off”” being a noise nuisance! Till its unplugged from the charge cable. Then it returns to average readings that match other RF meter readers like Soeks. Always happens. Some charge cables seem to leak radiowave frequency like “RF lava!” all along the cable. This meter needs a lot of radiowave technology knowledge to get full use of it. Nice large clean screen better than many other similar products.
Not happy.
Was sent the wrong model sent LKC-1000E should have sent LKC-1000S+ which I have paid for and not had replacement. Good product But not happy with what has been done. So can’t honestly give a score. Frank Clark.
This meter is half the price of equivalent competitors and provides everything a budding home worker or concerned parent could possibly need. Easy to use and sensitive enough to be able to easily sense check that the meter readings are reliable (which they are with mine). Super accurate in fact, especially when held correctly (as shown in small printed instructions). I wanted it to check my home office and particularly the electric / electromagnetic field fields and radio frequencies (aka WiFi exposure) at my desk & kitchen table (for home working under lock down). With some small changes was able to reduce our exposure to all forms of invisible radiation by more than 10 times. Also was able to see change in RF in real time as I used WiFi on my iPad. I already knew that you should not hold your iPad in your hands and use WiFi but the results were an eye opener. Needless to say my desktop computer is not connected by Ethernet cable and favoured (whenever possible) over the iPad. I have also move the modem (which is really harmful at short range, shit these things should come with a serious health warning!) as far from me as possible. This device is a God send and only after I had bought this meter did I watch ‘Better Call Saul’. So glad I went for this meter and would recommend to anyone remotely concerned about their health with all the debate raging over 5G
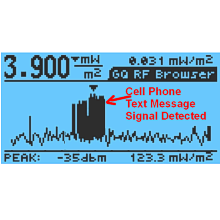
Excellent product Does what it says on the box , easy to use and an important buy if you are buying and new house or suspect your on is making you unwell? after testing the house i am going to buy a block of Black obsidian to go with the orgon I currently have to neutralize the effects. well worth the price if it keeps your family safe. took a pic of it scanning the microwave which was plugged but not on? it spiked badly when switched o
GQ EMF-390 Multi-Field Electromagnetic Radiation Detecto
The item is relativly easy to use and understand. once reading the manual. It comes with a card with clearly discribes safe raditaion levels. Thank you for the quick delivery.
Highly recommended.
First, this item was delivered in my porch, glass sided, door not locked, but delivery man had advised he had hand delivered it to me; a blatant lie.
This is a very useful functional item. It’s a tad more useful than detectors that are higher priced. More functional menu choices than advertised. Highly recommended.
I just got my GQ EMF-390 meter and have spent a number of hours playing with it and testing it. I like it, and it’s a good meter, but you gotta learn to sweet talk to it. In other words, you have to invest some time in learning how to use it properly.
I am in training with the Building Biology Institute to become an Electromagnetic Radiation Specialist. I’m speaking for me, not for them though. But, I mention it because I’ve spent a lot of time studying EMF meters and EMF measurements lately. That point of view affects how I view these instruments.
Consider this an introduction to a review, as I just realized I’m running out of time and have to continue later. So, for the moment, I’ll just post some high points.
01) This is a consumer grade instrument, which they say in the FAQ, not professional grade. So, balance your expectations accordingly. However, that doesn’t mean it can’t be useful to a professional, as well as consumers.
02) The quick start guide is just that. Do read it. But realize that’s only the beginning of your journey. Download the full user guide, which is a PDF of many pages, and go through that. At least their documents are written in mostly good English, as opposed to Chinese-English. As a bonus, the quick start guide is in color.
03) Learn how to operate the controls. This may not be obvious at first. Once you’re used to them, it will seem much more natural. While the buttons don’t have printed labels on them, they do have shapes molded into the plastic, which you can see if you look.
Some buttons do different things depending on whether you press and release, or press and hold.
If you have the meter facing you, in landscape (wide) mode, and the buttons and model number are on the right:
The TOP button, which they call S4, can: check the battery when powered off, power the unit on and off, activate the menu system when powered on, select items in the menu system, and sometimes change things in the menu system.
The BOTTOM button, which they call S1, can: back you out of most menus, activate a menu to select the different screens of the device.
So, an effective technique to go through menu settings is: press the TOP S4 button to get into the menu, press one of the middle buttons to navigate, press the TOP S4 to select an option, press the middle buttons to change an option, press the TOP S4 button to finalize your answer. Sometimes, pressing S4 will change an answer, so make sure the screen says what you want when you’re done. You can then get out of the menu system with the BOTTOM S1 button. You can, if you wish, go back into the menu, and examine each setting without changing it to verify the settings.
When not in a menu, the middle S2 and S3 buttons do various things, like allowing you to alter units, switching from EMF (magnetic and electric field) mode, to RF (radio field mode), moving a cursor, zooming in or out, etc. You kind of have to play with these buttons on each screen. Sometimes they do something different if you hold them down.
04) IMPORTANT, learn how to point the meter. Inexpensive meters have sensors which are directional, and they care about how they’re oriented in space. This meter has a 3 axis magnetic field sensor, which they label on the screen as EMF. So, you can turn the meter any way you want to read magnetic fields. BUT, the electric field sensor (EF), and the radio field sensor (RF) are directional. If you’re pointing the meter the wrong way, you may get wrong readings, or no readings.
This is documented on page 5 of the quick start guide, as well as in the PDF. Nevertheless, it bit me and caused me to lose some sleep last night fretting with it. I haven’t done much with the EF sensor, but I’ve been working with RF. This meter may NOT work like you expect, but it will work if you treat it right. My Safe and Sound Pro II meter and my Cornet ED88TPlus will both respond to most RF signals if you are holding the meter in front of you in portrait mode (vertically), with the display facing you, and the RF source, like a cell tower, out in front of you. This meter will NOT respond that way. With this meter, you would be pointing it’s sensor up into the sky.
Imagine this meter is a small airplane. Place the meter flat on a table with the buttons and label near you and the display face up. The near end with the buttons is the tail. The far end where the propeller of a plane would be (its nose) is the front. The far end, as in edge, of the meter is where the RF sensor is pointing. If there were a cell tower, for example, out in front of your table, you could get a reading on it. In terms of an airplane, pitch means to bring the nose up or down. Yaw means to slide the tail left or right, turning without changing the bank of the wings. And roll means to bank or tilt the wings left or right. Rolling left or right is (sort of) what a race car does going around a sharp turn on a banked track.
For lack of better terms to use, this meter CARES about pitch, roll, and yaw. If you pitch the nose of the meter up or down substantially off the line to the source, you will get bad or no readings. If you yaw the meter left or right substantially off the line to the source, you will get bad or no readings. But, that’s not all. The meter cares about roll too.
All radio waves move outward from the source. But they also have orientation in space. They may be oriented vertically as they move outward. This is called vertical polarization. This usually requires a vertically oriented antenna to receive well. They may be oriented horizontally as they move outward. This is less common and is called horizontal polarization. This usually requires a horizontally oriented antenna to receive well. There are even some sources which are circularly polarized.
If you have a cordless phone, you could test your meter with it. At least in the US, almost all cordless phone base stations radiate a strong signal all the time. One you should not stay around. Remember that verbiage on the box that says it will work 900 m away? But you don’t sit 900 m away do you? I have decommissioned all my cordless phones. But, they make a great little personal microwave beacon for testing. Just plug in the cordless phone base station to a power source, set it several feet away, and start taking readings. It should put out a continuous signal. On meters with a histogram mode or moving graph mode, like the GQ EMF-390 or the Cornet ED88TPlus, you should see a continuous signal or a continuous string of pulses. You can also test the meter pointing it at a cell tower, etc.
So, what this all this means is, assume you have pointed the meter up and down (pitch) to line up with the source, and you have pointed the meter left to right (yaw) to line up with the source, and it’s lying flat on the table (or in your hand) with the display up (roll), you STILL may not get a good reading. This was my experience testing with the cordless phone base station. I had to roll the meter 90 degrees, so the display was facing to my left. THEN, I got a strong and consistent reading.
You may have to do similar gymnastics with the Cornet ED88TPlus and other meters. This is true with any meter with single axis sensors. This may make the display hard to read because it’s facing away from you. The difference between this meter and the Safe and Sound Pro II and the Cornet ED88TPlus is that those measure RF with the display facing you as you might expect, and this one doesn’t.
That’s it for now. I hope to add more later. This should get you started. Forgive any typos as I was in a hurry.
Bottom line, this seems to be a good meter if you understand its limitations and treat it properly. If you treat it wrongly, it will give you bad readings in return.
Hope it helps.
Ro
Very easy to use. A large number of easily selectable user options. Seems accurate and covers a very wide range of frequencies and radiation amplitudes. An invaluable aid to checking for dangerous radio emissions in your house, e.g. Smart phones, smart meters,wireless devises, microwave cooker etc.
I am sat in my local library to use the WIFI and the meter is reading 810 v/m on EF together with beeping, EMF went as high as 13 mg and RF went as high as 29 mw/m2 but I am used to micro watts//m2 so have to get used to understanding the correlation. There is a cell tower across the road so perhaps that is the cause of what may be high readings. I was unable to find any information verifying the accuracy of the meter so took a chance but I notice that at my home there was hardly any activity at all in all three sections but here it is going into overdrive. I am glad that I bought a three in one meter otherwise I would have had no idea what other potential dangers are lurking around unnoticed. At home my dedicated RF meter showed activity as it is recognised for its sensitivity. I would liked to have had the option to set the RF to micro watts.
It is a clever gadget allowing both RF and low frequency EMF from the mains and other radiating sources, e.g. pest deterrents that use EMF, to annoy household pests. It also covers WiFi and 3G/4G up to 10GHz. There are various modes that allow signals to be measured as a numerical display and for RF as a spectral response for detailed frequency analysis. The device stores the results in memory that can be downloaded with a simple to use PC based application for offline analysis.
This is a very capable meter at this price bracket and perfect for home use providing all the necessary information required for general use (a lot easier than using Hall effect sensors and an Oscilloscope), more capable meters are available ( commercial / professional) but at a much higher price and few are available as an all-in-one, usually separate meters for EMF and RF. If you are just looking to see what magnetic and radio frequency levels are being generated in and around the home by you white and brown goods this little meter is perfect i.e. Wi-fi, TV, Bluetooth, Microwave etc. The meter will also display whether the levels are ‘normal or high’.
Totally top-level device for determining the level of electro-smog. Extraordinary function in the form of a simple spectral analyzer and a data signal oscillograph. I highly recommend to buy. The price versus utility ratio is very high.