Flymo EasiLife GO 400 Robotic Lawn Mower for the perfect
Flymo EasiLife GO 400 Robotic Lawn Mower for the perfect manicured lawn. Easy set-up and installation. Convenient app control. Quietly Safely cuts up to sqm, orange and grey, 400m2

Flymo – The Lawn Care Experts
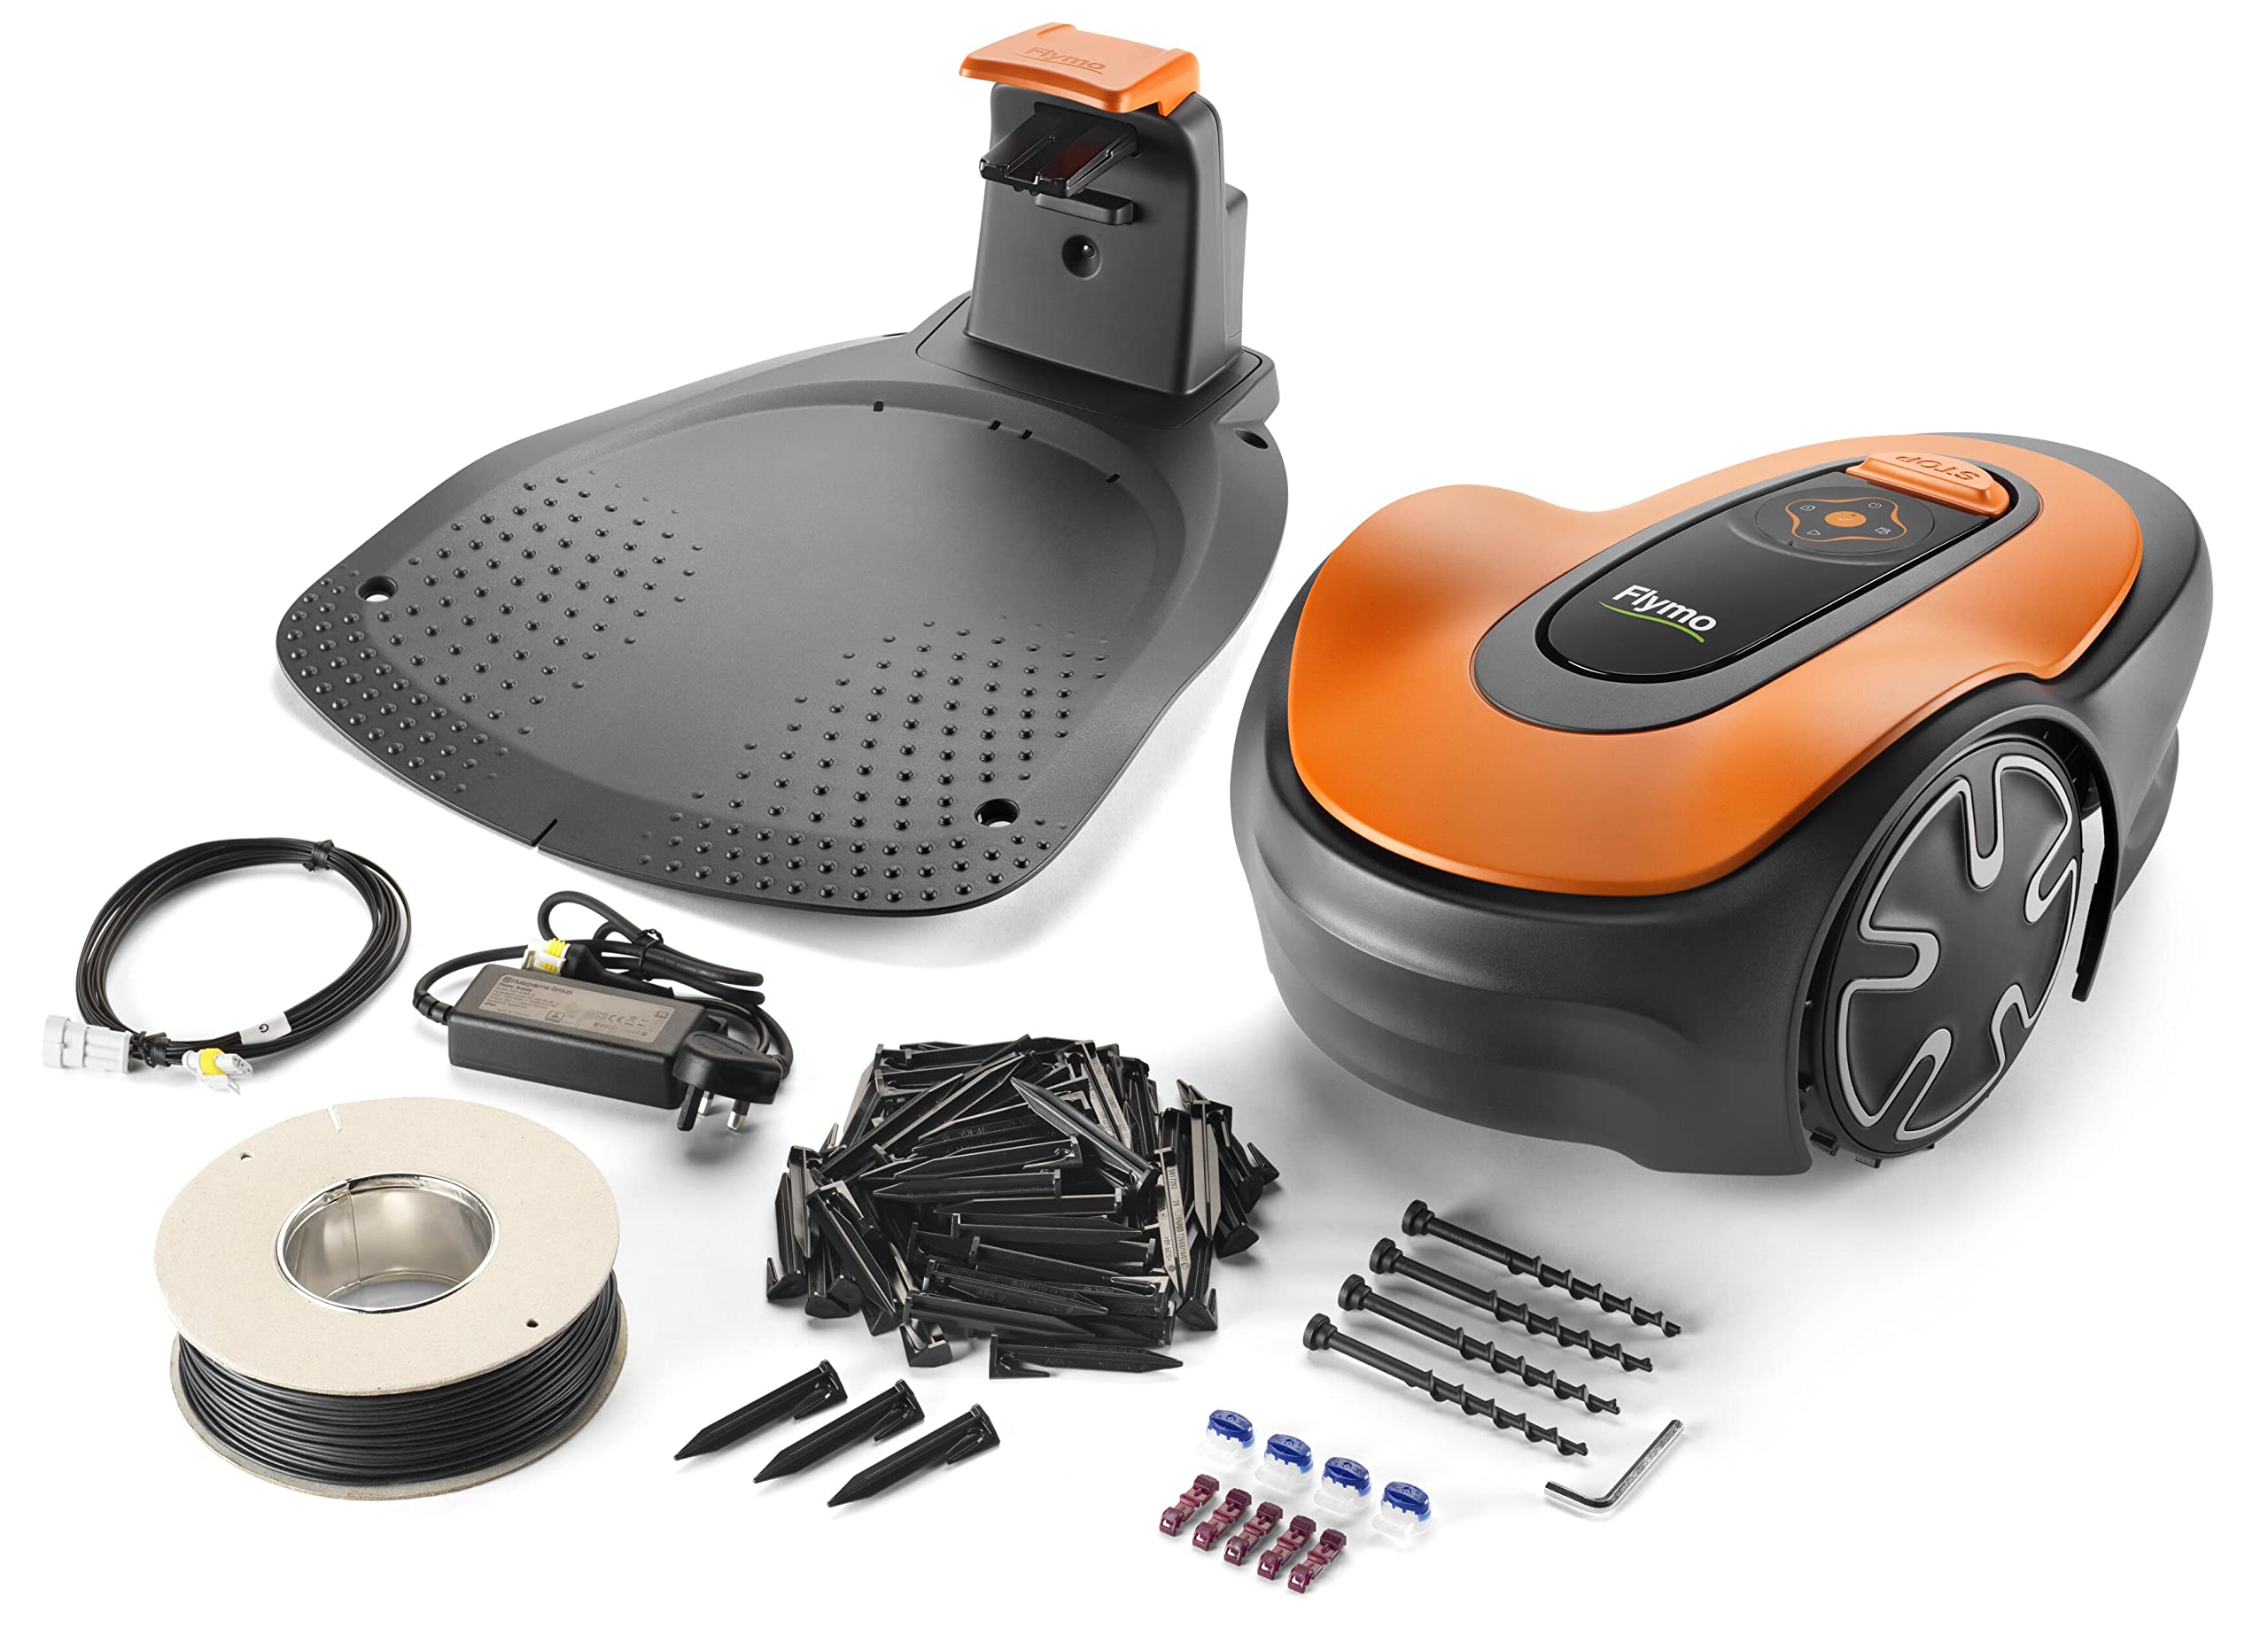
Flymo EasiLife GO 400 Robotic Lawn Mower
Our smallest robotic lawnmower yet with a simple Push & Go interface and advanced smartphone control. Designed for gardens up to 400m2 the Flymo EasiLife Go 400 is a fully automatic robotic lawnmower that gives you a tidy lawn with zero effort. Set a schedule in seconds and it automatically cuts the lawn returning to the charge station when needed.
- Streamlined Push & Go interface for instant scheduling & control
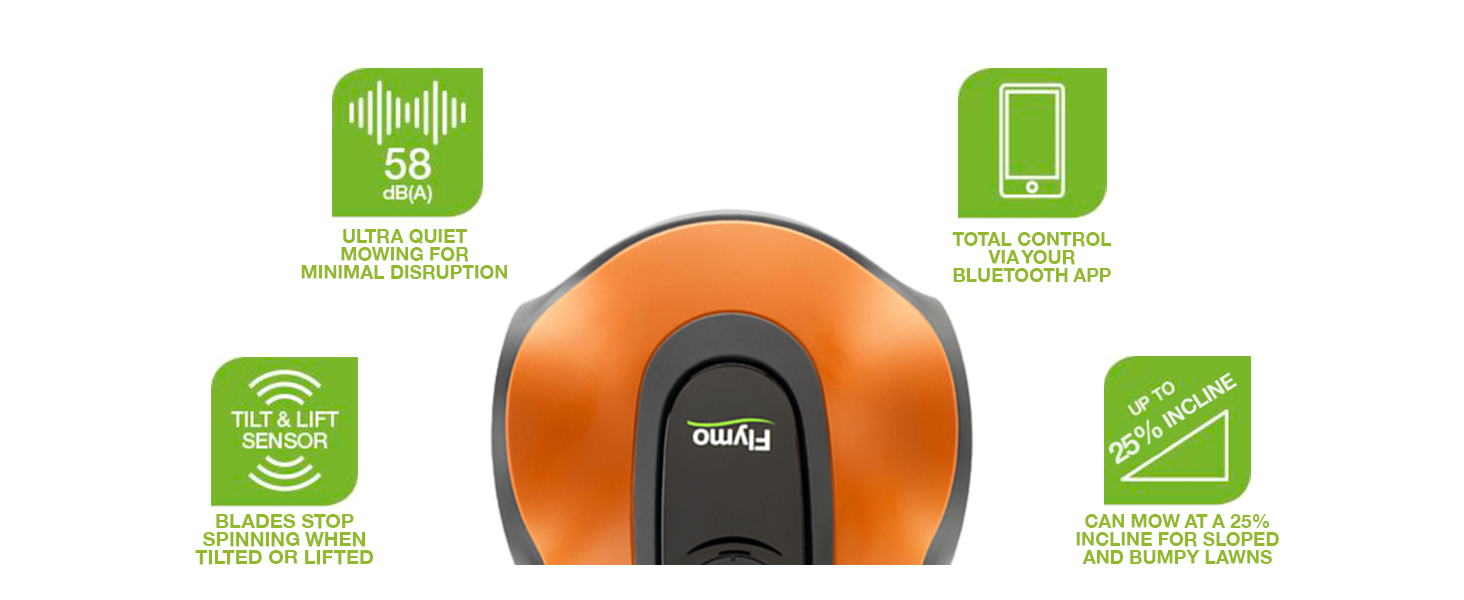
- Tilt, Lift and Collision sensors for your safety.
- Hose washable for your convenience.
No screen or complex programming. LED indicators guide you for quick and easy control
Where do the grass clippings go?
A Healthier, Greener Lawn
No need to empty a grassbox or dispose of grass clippings, its regular cutting technique returns fine grass clippings back into the lawn which acts as a natural fertilizer and improves grass quality.
Does it have extra functions?
Extra Mowing Flexibility
It’s functions are designed to fit around your life: Spot Cut, Override, Park or Second Area – which can all be controlled from your EasiLife App!
Can it mow in the rain?
Adaptive mowing whatever the weather
Detecting grass growth, it automatically adjusts the schedule to suit conditions, ensuring an even cut and protects the lawn.
Can it mow my irregular shaped lawn?
Mows every corner of the lawn
Perfect for imperfect lawns, the EasiLife robotic mower can navigate across lumps, bumps and inclines of up to 25% so you can have a perfect finish.
Why Choose a Robotic Lawn Mower?
Why Flymo?
Finding the right robotic mower for your lawn can be daunting, and it’s important for you to find a lawn mower that fits your lifestyle. Robotic lawn mowers are ideal for those of us that want to spend less time mowing our lawn, and more time relaxing and doing the things we love…


What robot best suits me?
Push & GO | Interface | Assist-U LCD Screen |
25% | Slope Performance | 35% |
400m2 | Working Area | 800m2 |
16cm | Cutting Width | 16cm |
20-50mm | Cutting Height | 20-50mm |
Smartphone App | ||
Lifestyle Features |
Push & GO | Interface | Push & GO |
25% | Slope Performance | 25% |
400m2 | Working Area | 250m2 |
16cm | Cutting Width | 16cm |
20-50mm | Cutting Height | 20-50mm |
Smartphone App | ||
Lifestyle Features |
- Flymo Easilife 800

- Flymo Easilife GO 250


| Weight: | 12.7 kg |
| Size: | 400m2 |
| Dimensions: | 51.79 x 33.71 x 21.49 cm; 12.74 Kilograms |
| Model: | 970573301 |
| Part: | 970573301 |
| Colour: | Orange and grey |
| Pack Quantity: | 1 |
| Batteries Required: | No |
| Manufacture: | Husqvarna UK |
| Dimensions: | 51.79 x 33.71 x 21.49 cm; 12.74 Kilograms |
| Quantity: | 1 |
| Size: | 400m2 |
Fantastic piece of kit. Can't believe I'm not mowing the lawn!!
Best purchase made this year. Once programmed through the app, “ASIMOV” has been working away silently for the last 3 weeks.
Faultless operation and unbelievably quiet. I have it set to mow from 8am and with windows open, you cannot hear it – that’s how quiet it is.
I’ve not had any reason to call tech support, but online support is not great. I had to resort to YOUTUBE to answer any questions I may have had. That’s why they get 3 stars on that, which is still good, I think.
The app is good but not great, it lacks a few features that would make it more user friendly. It is quite basic.
The installation instructions are pretty clear and I didn’t have any problems laying the boundary wire and the setup. Having seen Asimov at work, I think I can probably move the boundary wire a bit further outwards.
I would buy another Flymo if I ever need to.
Always bury the Gide and Perimeter wire
Only recently set up my Flymo (otherwise known as Shawn Mower).We laid the perimeter and guide wire on top of the lawn – big mistake as not only is it a trip hazard but its too easy for the mower to cut the cable which happened twice before we started again and buried it. Setup wasn’t simple particularly as the mower screen is vary small and difficult to read. However with the help of my granddaughter’s husband we set up the APP and all was well. Don’t however let these minor gripes put you off it’s absolutely brilliant at what it does and amazing entertainment.
We love Mo!
I’ve waited a month or two to write this review as I wanted to see how Mo does over time.
Firstly, thank you to whoever the reviewer was that suggested using a kitchen knife to cut into the lawn and bury the boundary / guide wire. This worked perfectly for me, though it took a couple of hours, it was definitely worth it.
Also – top tip, when you’re pushing the ends of the boundary / Guidewires into the connection clip and then you push the clip closed with pliers, really apply pressure to that thing so it closes properly. I didn’t apply enough and then had a wasted hour checking my boundary wire for cuts / breaks when it wasn’t sending a complete signal to my dock. Was so annoyed with myself when I gave the clip another squeeze and it finally clicked all the way, closing the circuit.
Mo was easy to set up, his programming is simple to set on a schedule. We have him mow every morning. No grass clippings anywhere in sight and we have a pool, so I’d definitely be frustrated by grass clippings in there. They are so fine that they just disappear into the lawn. It looks so healthy and green. I do have to strim around the edges of his dock (we bought the garage lid for him too) as he obviously can’t reach those bits himself but there is no downside whatsoever for me.
If you’re unsure, just go for it – you will not regret it.
Very good once going but long grass needs to be cut down to a level it can cope with to start. Also, the loop and guide wires really need to be buried for best results. The connectors at the back of the base station sometimes work loose with the vibration from repeated docking.
After 11 months of use the robbot stopped charging, at first I thought it was the battery. Tried to contact flymo support
Could not talk to them.
Then I thought may be charging contacts between lawmover and the station need cleaning. With a fine sand paper cleaned charging contacts on the mover place it in the station that fixed the problem.
So to keep the unit going every time you clean/sharpen the blades clean mover charging contacts.
Love it.
One of my better purchases. I could sit and watch it all day. It’s better than the telly. I took some time planning the boundary wire lay out and buried it a couple of inches below the lawn surface. This was easily done with a serrated knife, cut a slit in the turf and then push the wire down into the slot using a short length of thin plywood or similar as a tool. Press the surface of the turf with your foot and you can barely see a scar. After a few days there is nothing to see at all and the wire is safe from harm. I have rubber edging round my lawn, see photo and I put the wire about 10 inches back from the upright. This seems to be just right. Barely any grass is left uncut and what is, is easily removed with a quick strim every few weeks.
Purchased this a while ago but have only got round to installing it this month. My garden is probably approaching if not slightly over the 800m2 recommended for this mower, happy to report that despite this it is doing a great job. I had to purchase additional boundary wire and pegs to cover the area I wanted, I got these in a kit off of Amazon, I also purchased a garage for ‘Ralph’ as well, in theory he doesn’t need one as he is water resistant but it does keep the weather extremes at bay and protects the base. My lawn is two large oblongs separated by a path which is only at a level that can be crossed at one end. Half of one is an orchard so due to falling branches apples etc. the robot Ralph will not be mowing this part. In order to mow the lawns effectively I set up two zones by using the mower guide wire, using this facility you can tell the mower to travel along the guide wire a certain distance before starting mowing. I split the time on the two sections so that Ralph spends 60% of his time on the large lawn and 40% on the smaller one, to get to the second area Ralph is programmed to travel 90 meters along the guide wire before starting to mow (this puts him in the middle of the second zone). Initially I had an issue with the mower not learning the guide wire properly it was supposed to follow the wire till it hit the place where it joined the Boundary wire, it did not make it all the way along. A discussion with Flymo technical established that max guide wire is 300m, his includes a section of the boundary wire which is not made clear. Anyway tweaked the length and it works OK now. The boundary wire is the most tedious of the installation process as you have to go right round the perimeter that you want to mow within, a bit of a back breaking job on my lawn but did it in about 4 hours. I also left some spare lengths of boundary as I went in a corner for example so that any changes could more easily be accommodated. It is important that the boundary wire is set at the correct distance from edges and obstacles, a cardboard ruler is included to help. Where the guide and boundary wire crossed the concrete path I cut a groove so that they are out of harms way and not a trip hazard. The mower has been out in all weathers including torrential rain, the only issue was that the really wet grass sticks around the cutting disc, simple enough to wipe away periodically. Security wise they are pin protected and Flymo will only give help with pin retrieval with definite proof of purchase, I have also included an Apple Air Tag as a tracker in case it gets half inched. It will be of no use to a thief but I would want it back of course. It is set to mow from 9am till 18:30 and this is doing a good job, the grass never looks that good in pictures and videos, mine included, but in real life the lawn is looking better and better. It mows for around 90 mins. then pops back for a 60min. recharge before hitting the road again. It is really therapeutic to watch a bit mesmerising, I was using a ride on mower previously but this is way way cheaper given the price of fuel. All in all I am very pleased with Ralph he is a great time saver.
I have had a Flymo 1200r for some time and it is good enough to convince me that robomowers are definitely a Good Thing.
I have several lawns that I can’t connect together so of necessity I’m establishing something of a fleet…
I’ve tried the EasiLife and EasiLife Go in various sizes, the difference between the sizes, as far as I can tell, is simply a software limit on the length of time it will operate each day – the hardware is identical except you (usually…) get more pegs and cables with the ‘bigger’ models.
I havent tried other makes (to be fair the Flymos appear have it sewn up on cost, but the prices do fluctuate wildly)) the Gardena in particular looks identical to me bar the colour and rather more expensive, the price for almost any of the models seems to change radically- in some cases from below 300 to above 1000 for the same model, so pick your moment to buy.
I’d say the 1200r is better built mechanically but the later EasiLife/Go versions have more software options and more flexibility in locating the base station, which is good.
Incidentally some bright spark decided that they would save cost by providing a low voltage lead of inadequate length- the 1200R was fine, but the EasiLife is pathetically short and the aftermarket leads are not cheap.
The perimeter wire supplied is on the mean side too so you may have to buy some aftermarket extras but they at least are readily available.
One thing I was unable to find out before spending my money was the differences between the EasiLife and EasiLife Go, pages of marketing nonsense about how your friends will envy your astuteness in buying a Flymo robot and having more free time and a better lawn than any of them, but a dearth of actual information.
So, here it is, some actual information:
There are only two significant differences: the cutting height adjustment, and an LCD screen on the mower itself.
The more expensive EasiLife version has a large knob to adjust the cutting height to pretty well any level you like but the Go has just three settings that you set by unscrewing the blade carrier and locating it in one of three positions. Probably fine, but a bit disappointingly cheap.
The Go version has 5 LEDs to tell you what is happening but they light or flash in a completely unintuitive pattern to indicate things such as such as charging or wrong pin code – I haven’t managed to do anything without the guidebook yet. A simple row of leds each with a single function and a label such as ‘charge’ or ‘spot cutting’ would be a huge improvement. The EasiLife version has a screen to help here.
Both versions have a bluetooth app which in the case of the Go is pretty well essential to make any sense of it, but the app itself is less than wonderful – it is grumpy about (unnecessary) email addresses and I have had to reinstall it and start again as the ‘help’ service is non-existent.
That said, once you have set up your mower then I don’t see the need to fiddle with it.
For that reason (well, because of the price difference really) I’m standardising on the Go version but it is slightly more frustrating to set up.
A couple of tips:
The time spent burying the wires with a lawn edger is well spent but if you are new to this try pegging out a trial area first so you can see how much border to allow (I reckon 25cm is a good balance – there is some adjustment on the App if you have got it slightly tight)
If it appears not to function it may just not be fully charged- until it is it just sulks in it’s charger and reuses to come out to play- but this is not obvious from the instructions, the panel or the app.
Oh, and you can’t get two of them to share the same lawn, they won’t play together – I had to try!
This is a review of the Easilife Go 150
I’m writing this review a week after purchase (7th April 2022) and will update at regular intervals.
First thing to note is that there is no real difference in new Easilife Go 150 / 250 / 500 range of lawnmowers. The only difference is the length of boundary wire and pegs you are given. My garden is around 100m squared and the amount of boundary wire provided by the Easilife Go 150 was more than enough. This was an impulse buy for me after receiving a notification on my Amazon app. I had been looking for a new lawnmower but hadn’t considered a robotic lawnmower as I was under the impression they didn’t really work properly. However, after reading the reviews and looking up reviews on YouTube I was convinced that they work well and that the price at the time was a cheap as they ever have been on a deal (I paid 372.99 for the 150 model, the 500 model was available for 409.99).
Set Up
After reading the reviews I expected the set up to me much more difficult and time consuming than it was. I have a relatively simple rectangular shape garden and I managed the set up in under an hour. It is much easier to follow the official Flymo set up video on YouTube (just search for it) than to follow the instructions provided. I am not a very practical person or a major DIYer but I managed it with ease. Also managed to connect it to my Android phone (Google Pixel 4a) with ease first time. By the way, you don’t need to use a phone app to for the lawnmower, it can be used standalone without the phone, it just makes life easier.
First Start
I was a little perplexed at first that the lawnmower was sitting in it’s charging dock and not moving despite me telling it to start both manually on the lawnmower and on the phone app. However, when I moved it from the charging dock to the grass it started working. I later realised that it will not move from the charging dock at first until it reaches 100% charge. So if you wonder why it will not move from the charging dock on its first use, this will be why. It worked its way around the garden and found its way home to charge when the battery it went down to around 20%. Then it moved back out again when it was fully charged. I have set it to mow for 4 hours a day but I will adjust as time goes on. I expect it will only need to be on duty 3-4 times a week.
Cutting and Performance
It did a very good job cutting the grass down. It makes very small cuts and does not collect the grass but leaves it on the lawn. I thought this would be an issue but it wasn’t. You don’t notice any of the cuttings on the lawn unless you look very closely. I have found that the cuttings have increased the quality of lawn already, as the cuttings naturally fertilises it. I started at the highest cutting height (3) and the reduced it to the middle cutting height (2) which is perfect for me. The advice is to gradually reduce the cutting height. I didn’t take any notice of this, and sure enough, I paid the price – it cut through a part of the boundary wire that was a little high. However, this was easily fixed (2 minute job) by using one of the spare electrical wire connectors provided. After this I also bought an extra pack of 20 wire connectors from Amazon for 7.99 for potential future use. Well worth an investment. Lot’s of people recommend burying the boundary wire when first setting it up, but if you do this it will be difficult to find any wire breaks in the early weeks when potential problems are likely to arise. As the weeks go by the wire will gradually sink into the lawn and get overgrown by grass anyway. I main problem is that people ignore the advice to put the boundary wire at least 10cm away from the edge in the hope of a closer cut of the edge of the grass, but if you have a weeds, clumps, dips or bumpy ground beyond the wire the lawnmower will lift or fall and in doing so change the angle of the cutting blades and potentially cut the boundary wire. I find that it edges the lawn perfectly with the boundary wire set 10cm away.
A Note on Changing the Cutting Height
At first I just couldn’t work out how to change the cutting height and the advice on Amazon Questions seemed different from different people. A lot of people told me I just had to turn a knob that didn’t exist on my model. I have since discovered that there have been subtle changes to the models over the years. My current 150 model is the latest model and was released in February 2021. On these newer models you have to take the small top cover off (the black plastic bit, not the main orange cover) and there you will find a hex key. You then flip the mower on it’s back and unscrew the blade mechanism and place it back on the mower on a different setting that is outlined. Easy when you know how but this took me ages to work out.
Neighbour’s and Dog’s Best Friend
A big bonus is that it is very very quiet, unbelievably quiet. You will be able to set it off to cut the grass at any time without disturbing the neighbours. Indeed it is very relaxing and meditative to watch. Also, my dog used to go absolutely mental when I used my hover mower to cut the grass and I was worried he would also bark at the robot mower. Praise the Lord, he takes no notice of it at all and this has saved me a lot of stress as no more unhappy spouse and children as the dog no longer bounces up and down at the patio doors like a demented banshie for an hour or so while I cut the grass.
Final Words
In short, if you’re tempted to buy this but not sure. Take the plunge and go for it. It is my favourite buy of the year so far. I love it. Easy to set up and works brilliantly.
The Easilife GO 250 is exactly the same as the Easilife Go 500 but has a different chip, that limits its operation to 180 minutes rather than 310 minutes. The battery, cable length, number of pegs etc is otherwise identical. I chose the Easilife GO 250 because it was considerably cheaper at the time and my lawn was OK with the lower capacity (I hope- its early days). I was tempted by the Worx Landroid s300 based on looks and the wifi controlled app but reviews seemed to suggest the Flymo coped better with undulating grass and was less likely to get stuck (perhaps due to the large wheels at the front). I thought a non-stuck mower was more likely to be important than the lack of wifi (fun for the first few days but then likely forgotten). The Flymo has a bluetooth based app that works fine over a short range and is intuitive once connection is successful. So far, it works fine.
I decided to install the boundary wire by burying it from the outset. It was a brave decision but I decided that I’d prefer to have it done at the outset than have constant problems with a cut wire- as others have reported. So far I think it was a good decision. The installation of the wire took a couple of hours but was tolerable on a nice day when the ground was soft and so the cuts were easy- it would be a different story on a rainy day or with rock hard ground. I laid out the boundary wire, included loops at the corners and where the guide wire was going to attach, and then buried the wire after cutting a slit with an edge cutter- with the wire being pushed down in the slit with a mallet and inverted peg. I set up a small connected secondary lawn area immediately adjacent to the main area too.
I then laid out the guide wire, attached it to the boundary wire and checked the connections via the lights on the charger. Initially I panicked- it was flashing blue (no connection)- but then realised I hadn’t pushed the connector parts together firmly enough when attaching the guidewire. Once squeezed some more, the light went green and bingo- all was good!
I’ve run it a couple of days now (already moving to a shorter cut height of level 2 since the wire is buried). So far its great- it trundles about the garden, doesn’t knock into things, stops the right distance after passing the boundary wire and there’s been no glitch. It got stuck once near the charging station but I think I didn’t put the boundary wire behind the changing station as required (the instructions aren’t totally clear on this) but I think I’ve sorted it now. I would say that the dog definitely wasn’t keen on it and made a bolt for the front of the house when it started up!
I contacted flymo in advance of purchase to ask about the difference between the Easilife GO 250 and 500 and they responded by email and phone- though clearly support was based in Europe. But it was helpful for the simple question- I’m not sure how it would be for a more complex query.
I would note that the low voltage power cable is very short- only about 3 metres long. I bought a weatherproof extension cable and box from Argos that allowed me to run the cable to where required. Otherwise all was good. There was enough boundary cable and guide wire for my 120m2 area (including the secondary area) and enough pegs because I buried most of the cable- more would be used perhaps if on the surface only.
I’ll see how things progress over the coming weeks but so far I’m very pleased. It’s not quick to set up but the instructions are clear if you take time to read and digest them.
Update after 12 months of use. Works brilliantly. It stayed out all winter – I built a small house for it to hide in- and it’s been great, with frost sense keeping it parked during snow for a couple of weeks. I kept it mowing once a week throughout winter and it keeps the lawn looking neat. Really I just forget about it and it does its thing without hassle. Had a loop signal fault once which was where the guide wire connected but it was easy to fix with a new connector- there’s even a Facebook page which has some useful advice from other users. App got updated last spring too and is better than before though still Bluetooth of course. Overall delighted – wouldn’t go back- it really is a time saver.
Moved into a more suburban house last year so this is the first time we’ve had a garden to look after. Instead of buying a conventional mower, I decided to spend the extra cash and buy a robot mower instead. The price of this mower does vary a little bit, so it’s worth keeping an eye on the price. I bought the Flymo 1200 R model (400m2) in April 2019 for about 460.
I’ve used this now for 2 seasons (summer/autumn 2019 and spring/summer/autumn 2020) and I’m not regretting the decision at all.
In general it’s a great bit of kit and once you’ve gone through the initial pain points of setting it up it really is a very low maintenance worker, considering it goes out (in our garden) 3 times a week.
A few points to note are:
1. the initial setup
Putting a guide wire around the area you want cutting takes a little while (a good afternoon’s work). We decided to just peg it in rather than dig a trench and have had no problems with the guide wire being cut. We started out with the cutting blade on it’s maximum height and slowly reduced it over the course of a month. The guide wire is now barely visible at all. In most places it’s completely invisible.
The manual recommends putting the base station out in the open, but I ignored this and shoved it in a corner. This doesn’t seem to be much of an issue, except that the mowbot can’t get to the spots in and around the base station to cut them. I just break out the strimmer once in a while to take care of this.
2. Including a separate garden area.
This is a little tracker to do, but not impossible. We have a very small front garden which needs mowing, didn’t want to have to buy a mower just for this, so instead we ran the guide wire from the back garden, through the garage and into the front garden. Looped the guide wire around the front garden and then back through the garage to the base station. This ensures the guide wire is one continuous loop. There’s a few places where the guide wire is plainly visible, but I’m willing to accept this as a compromise.
To cut the front garden I have to carry the mowbot through the garage, place it on the front garden and switch it to a ‘manual’ mode. It then bounces around the front garden until it’s battery runs out. Occasionally a passer by will stop to take pictures of it, it’s become quite the celebrity…
3 general maintenance
The main thing to do is to replace the cutting blades now and again. I’m particularly lazy with this and have used 2 sets of cutting blades per season. I think the manual advises to change them more often, but I’ve not had any issues yet. You get some spare blades in the box, but there are plenty of extra blades on amazon for a good price. I don’t think I’ve used all the original blades yet, but I have bought an extra pack (not flymo originals) which I haven’t opened.
The wheels sometimes get a bit muddy, especially during autumn months, so you might find you need to scrape mud off the wheel treads to make sure it doesn’t stop the wheels slipping or rotating. You could always stop it from mowing until it’s sunny again.
Otherwise, there’s very little to worry about. It’s very easy to get caught up watching it working to be honest. I’ve spent far too long staring at the thing.
4. Husqvarna
Husqvarna seem to be the industry standard and leader in robotic mowers. It’s interesting to note that some of the parts of the Flymo 1200 R are branded Husqvarna – I think this particular model is an older Husqvarna model rebranded with the flymo badge, which gives some confidence in build quality. (This is just my speculation, I’ve not researched this!)
In Summary there’s some pro’s and con’s to this mower;
Pro’s
– Never needing to mow your lawn again
– No clippings to take care of as the they are so small they’re basically invisible
– It lives outside so no storage space required inside until the winter months, but then it doesn’t take up much room.
– Seems to run pretty smoothly with very little maintenance required
– Works any hour of the day you want it to – rain or shine!
Con’s
– Initial setup takes some time
– If you have a separate front garden that you also want mowing, it’s a bit of a faff (but not impossible)
– It occasionally gets stuck either when it’s cutting blade is blocked (rogue palm leaves that it can’t cut through are a pain in our garden) or if it goes over a nasty pothole (we have a regular fox that visits our garden who digs holes for a laugh)
– It’s minimum operating temperature is 4 degrees (i think?) so it has to be put away for the winter (I also clean it off and shove it back in it’s box for the winter months.. this can take an hour or two)
– Doesn’t do the edges very well – especially where the edge of the lawn comes up against a wall or fence and it can’t get right up against the edge to cut. You may need to break out a strimmer or edging tool now and again.
Key points from my experience
– This mower does my 700 m2 metres meters square lawn quite easily. It cut all the fairly high grass down to a low height in only 2.5 days. In my opinion this mower would easily cut 1,000 m2 meters square plus as it can be set to run all 7 days of the week. One review on here suggests this mower will cut 4,000 m2. I can quite believe that because much larger areas offer long clean runs without continual stopping and turning, where as smaller lawns mean the mower is spending lots of time inefficiently stopping and turning.
– I paid 400 for the mower delivered from Amazon and bought an extra kit on ebay containing 150 metres perimeter wire, 300 pegs & connectors for the larger lawn. This extra kit cost 33. So total cost all in was 433 delivered.
– The total length of the supplied perimeter wire (150 metres) plus the additional perimeter wire I added on for the larger 700 m2 meters square lawn is 210 metres.
– The join in the perimeter wire for the return to base wire and the join for the extra perimeter wire do not affect the performance of the mower detecting the edge of the lawn. Edge detection works flawlessly on all of the perimeter.
– I installed this on Friday morning. It took the whole morning to install. It did 3 cuts and charge cycles on Friday before I realised that I had to press AUTO to get it working as much as it will (it will only cut 12 hrs a day because of Flymo imposed firmware limitations).
– After I had installed the RTB wire I did the initial “can it follow the RTB wire” test. On the menu it’s called the “Calibration”. This checks that it can follow the RTB wire all the way to the end. It does this then starts cutting. I thought that the mower was all automatic after that. It’s not. It does return to base, after this initial test then when it gets back you must press AUTO and start while it is charging. It will then cut automatically on the timer. You must also set the timers for the amount of cutting time & respective days you desire.
– This mower is a wholly HUSQVARNA mower. Husqvarna bought Flymo. The mower is badged Husqvarna all over. This is a quality mower. Husqvarna are the market leader and were building auto mowers decades(?) (a long time in any case) before anyone else.
Limitations / to do list :
– This mower is limited by the firmware on board to only cutting 12 hrs per day. Even if you set it to cut from 00:00 to 23:59 it will only cut for 12 hours in each day. You can set it to cut every day if you want. The literature does not list how many hours it will actually cut as a maximum per day if you set it to cut 00:00 to 23-59, only lists maximum operating time, which is charging time plus mowing time.
– The danger of power cuts. The mower uses the powered edge wire to know where the grass boundary is.
If like me you have a grass boundary which is a flat surface, and which is connected without barrier to another property owners land and the public highway then a potential power cut is a problem. Because in the eventuality of a power cut the mower would not be able to detect the edge wire – because the edge wire would no longer be powered – and the mower would potentially go off off my land into someone else’s. This obviously could bring mower into contact with children or animals and be a dangerous situation. For this reason I only operate the mower while I am in the house so I can be here in the event there is a power cut.
this problem can be resolved with a battery operated current detection system that will send a radio signal to the mower in the event it detects a lack of current in the edge wire, the more I would have a similar simple radio connected to a battery that would then activate the stop switch. this is actually a simple circuit to implement, but it is a question of when I get the time to do it.
– The mower is currently limited by it’s own firmware to being able to charge and cut for only 12 hours per day. This limitation can be circumvented through some combination of resetting the mower and reprogramming it on the fly while it is mowing (avoid on the fly reset while it is charging). This could be done through use of an additional pre-programmed chip, placed on top of or inside the mower, connected to the mower internal chip pin out. Or for more convenient control – even more work – through the use of simple radios as mentioned previously (NRF24 or RFM69C).
– additionally, the use of a GPS with an internal map would alleviate the problem that can potentially be caused by a power outage on the boundary wire, and a rogue mower going off to where it should not, and would also allow the mower to be directed to spend equal amounts of time in all areas. This is future work which I could do but simply have not the time to implement.
– Once an open source project is developed that provides a board with on board (i) control chip, (ii) firmware ie re-programmable software that is baked into a chip (iii) gps (iv) wi-fi (v) remote sophisticated app for our phones all we will need to do is disconnect the current control board and place in a new one. This cannot come fast enough. I am sure the Ardumower project will develop into this.
I will update this review after a few months
I’ve had my mowbot for a couple of months now and overall it’s brilliant. Not cheap, took some effort (and further expense) to get it up and running but now that it’s working I absolutely love it.
Price: when I first set eyes on it a year ago it cost 999. By Christmas it was down to 600. In March when I bought it, it was 487.50. Then it went up again. So if price is an issue for you, keep checking back until it reaches a level you’re happy with.
Setup: You can learn a lot by reading these reviews and the Q&As. You can also download the manual from the Flymo website before you buy to help understand the installation process. A key question is where you are going to position the base station and how you are going to get power to the base station. It comes with a power supply which you plug into a socket at one end and at the other end you either plug it straight into the base station, or into a 10m low voltage cable that is supplied (3m or 20m cable can also be purchased) which in turn plugs into the base station. I didn’t want to plug the power supply in inside the house and then run the low voltage cable out to the base station, as I didn’t think that would be safe. So I had to pay an electrician to put in an outdoor socket for me. (I got him to do two sockets while he was at it. They are very handy.) This meant the outdoor sockets were right by where i wanted to put my base station. So I didn’t need the low voltage cable.
However, the power supply must be kept dry at all times. My solution to this, which I had decided on anyway, was a robot mower garage. There are some very snazzy Swiss ones but they cost more than the mower! I found a wooden one online that came flat-packed and didn’t break the bank. It protects the mower from sun and rain, and it keeps the power supply dry (the power supply sits on top of an old hummus pot to keep it off the dew).
You have to choose whether to bury the boundary wire, or just peg it down using the pegs provided. I went for pegging because it’s less work and if there was a break in the circuit I wanted to be able to see it. It took several hours to lay the boundary wire and the guide wire. If you have a small or medium size garden then the pegs provided should be plenty. I have a big garden and the ground is quite uneven which means you need more pegs to keep it flat, so I ended up buying more. If you’re in a hurry to get the mowbot going, buy extra pegs in advance.
Once this was done I only had a couple of false starts, in both cases because I hadn’t followed instructions closely enough and in both cases I was able to identify the problem quickly using the troubleshooting guide.
Coverage: my garden is 400 sq m which is the upper limit of what the mowbot is said to cover. In fact it manages this quite easily and I think it probably could handle 500 sq m, maybe even if you ran it 7 days a week.
Slope: the mowbot is said to be able to handle 1 in 4 slopes, but the manual says not to lay the boundary wire on more than a 1 in 6 slope. Eh? My lawn has the same slope at the boundary as it does everywhere else. So I just laid it anyway down my 1 in 5 slope lawn. It hasn’t been a problem. (You can measure the slope of your lawn using Google Daft Logic tools to measure length of a line, and height above sea level at either end of the line.)
Mowing times: It’s important to understand that it doesn’t run all the time. It has a built in down time of 12 hours per day, so you can only run it for 12 hours per day. Within those 12 hours it will spend 6 hours recharging, so the most it will do is 6 hours mowing per day. The manual gives some figures for coverage to help you calculate how many hours you need, but I found it impossible to make sense of these figures so I just used trial and error. In any case I’m not there all the time, and I don’t like to leave it out when I’m away for security reasons, so I just run it to the maximum possible when I am there. This works for me.
Security: this was an issue for me as my garden backs onto allotments and anyone could walk in. I don’t worry about the allotment users but people do sometimes break into the allotments at night looking for things to steal. The mowbot comes with a pin code and you can’t use it without that, and it comes with a sticker that says so to put on the machine, but I’m not sure thieves would necessarily see that in the dark or believe it if they did. They would probably only find out later that it has no re-sale value, but I doubt if they’d bring it back. So I keep it on the highest security setting which means it screeches if you lift it and you need to enter the pin code to make it stop. This means I can leave it out overnight when I’m home knowing I’ll hear if anyone tries to move it. But when I’m away I leave it indoors.
Improvements: the mowbot works very well as is but I think it could be improved with a bit of smart technology. It would be nice if error messages to say it’s stuck or it’s been lifted could be sent to my smartphone. It would also be nice if I could tell it from my smartphone not to mow today if I can see it’s going to pour with rain. (It does work in the rain but it’s not ideal). No doubt future versions will have these features. But if I didn’t have one now would I buy one now or wait until it’s perfect? Get one now, no question.
I have waited a couple of months to write this review so that I could give an informed feedback – the result is that the mower is amazing, if you are considering buying this product you will have no regrets, I will have saved the money it cost me to buy it in 10 months as I have now got rid of my gardeners, the garden looks amazing all the time and in great condition as other reviews said it would, once you have this you can forget about your garden.
I bought what they call a robotic lawnmower garage roof for mine and I think it should house under some protection when recharging/resting although the manufacturers do not say too.
But here is the ‘biggy’ I can’t encourage everyone enough to bury the boundary wire in the dirt and do not run on top of the grass just using the pegs, the lawnmower kept cutting the wire in various places even though we pulled the wire tight and pegged it right down, this caused me so much hassle in the beginning, I almost gave up on it, and every time it was because it cut the wire.
I had to call the manufacturers to send me new wire connecters as there were only a couple in the pack and even then I had to buy more from ebay, I decided to put the effort in and bury the wire, it is simple, I literally used a large kitchen knife, cut into the ground about an inch, wiggled it side to side a bit and kept slicing though unil I finished, then open the cut grass and push the wire in just so its level with the dirt and not above it – since doing this about a month ago I have not had this problem again and love my garden and mower. If you found this review helpful please give it a like
I’ve had one of these running for three months now, through rain and sunshine, and my lawn has never looked so good. This is despite the fact that I installed the boundary loop around an area 40 by 20 metres, or 800 sq metres which is twice the recommended maximum. I have a very big garden, so I decided to experiment to see what is possible, as the manufacturers take no account of the fact that different grass varieties will grow at very different rates on different soils and in different weather conditions. My soil is sandy heathland, and the grass is of the fine variety recommended for dry conditions. What sets the limit? With a random mowing pattern, if you were to divide up the lawn into small squares, then statistically, in a given time, say a week, some squares will get mowed many times over while most will get mowed a few times. A few though will escape mowing completely, and after three or four days this was apparent, with a few small tufts visible and still at the original height. After another couple of days these disappeared though. I suspect that I could double the area again, and just about get away with it, though such tufts might become more prominent; and there might come a point at which the mower could not cope with these tufts but backed away from them (as it does when it senses increased resistance to the blade motor, though generally this does not matter as it nibbles away on subsequent tries from different angles until it wins). I hope to gradually extend the robot mowing to the whole garden, but clearing away stones and installing the boundary wire is no small job.
SInce then I have bought a second one, and set it to work on an even bigger area – 40m by 80 or EIGHT times the recommended area. It seems to work fine; always manages to get back to the charging station, and doesn’t mind that at it’s furthest it is 20m from the boundary wire (max is supposed to be 15m. This one has only worked in summer and autumn, so it remains to be seen how well it copes in a fast growing period of spring.
There’s a lot to take in when you first read the manual, so here are the essentials summarised. The mower comes with 150m of cable, which is green, multi-strand and fairly thick. This same cable is used as the boundary loop, and for the ‘guide wire’ which needs to run from the charging station across the loop and connect to it at some point. The mower must never be further than 15m from the boundary loop, so the maximum width of the mowed area is 30m, which is pretty good. The length of cable supplied is much more than you need for the specified area, because it is assumed that you will create islands around treees and beds, and these need quite a lot of cable to feed to and from. In my case I was able to loop around 40 by 20m, with another 20m across the middle as guide wire, and around 10m spare which I looped around a flower bed. I bought a 150m reel of recommended cable extra (same as Husqvana uses) plus extra connectors, but haven’t used these so far. The mower comes with two types of connector – 3 push-on ones (plus two spares) for connecting to the charger, plus a three-way sealed joining connector for connecting the boundary wire to the loop (plus two spares which can be used to repair a broken cable or to extend it). The cable from the charger to its power supply (which must be in a dry place) is a 10m long, thin twin cable carrying 28V DC, and there are warnings that this must not be extended or cut (maybe it’s resistance forms part of the charging circuit design), though you can buy a 20m version of this cable.
When laying out the wire, it should be 30cm in from obstacles, like raised slabs, or drops, but can be 5cm or even closer from level edges, patios etc, to allow the mower to ride onto the slabs, useful for avoiding the need for edge trimming. I have now discovered 250mm wire border edging fence in green plastic coated wire (11 for 10m) that just pushes into the ground, and find that this is ideal for surrounding bushes and plants – the mower bounces off it. I plan to use this around daffodil areas in spring as temporary protection. (later note – constant bumping is loosening the fences in the ground until they lean inwards and then the mower rides up on them if it hits obliquely. It’s only done this a couple of times, and it always turns off – the sensing of wheel spin and blade stalling works excellently.)
COMMON FAULT: Both mowers have developed the same fault, which I note several others here are reporting. After a brief power cut the mower stops and refuses to start up again whatever you do. Switching off the mains for an hour and then on again makes no difference. The light on the charging station flashes two colours (don’t ask me what colours – I have odd colour vision). Unplug the DC cable though, either at the power supply or the charging station with the mains on, and plug it straight back in again. Hey presto – solid light, and after pressing go and closing the lid off it goes; so long as it’s charged. Oddly though, it often isn’t charged even though it’s been sitting for hours switched on, so there is a delay before it goes off. I’m guessing from this that something is failing in the power supply, such that it is unable any longer to come up to voltage at switch-on when connected to the charging station without current limiting and cutting out. Plugging into the charging station when up to full voltage enables it to cope with the initial surge. Another fault is a tendency under some circumstances to fail to start each morning on the timer; though raising the lid and pressing start results in it going straight to work when the lid is lowered. Selecting manual and then auto seems to reset it, so that it then starts up each morning again, but finding out these things takes a lot of effort. This is not satisfactory, and technical support is non-existent (‘sorry, our only technical man has left the firm; try a local dealer’). Nevertheless, I am persevering for now with the work-arounds, as I like the mowers in other respects and they are good value. I like the fact that the blades are loosely mounted so that they fly out when rotating. This means that they can retract if they hit solid objects, minimising damage to the blades and disc.
SAFETY: From my reading I tended to assume that these mowers were fairly safe – cutting off power automatically if lifted off the ground, backing away from objects on contact, and with the blades well inset. After a few tests I’d say they are far from safe, and predict that more stringent safety requirements will come in as robot mowers become used a lot more and accidents occur. The instructions say that where the boundary wire is not looped round an object like a flower bed, or where the mower might escape onto the street or fall into a pond, a barrier must be provided which should be 150mm high minimum. This seemed a lot. Surely a row of paving blocks would do the trick, given that the front of the mower only looks about 25mm off the grass. So I place a paving block (50mm thick) in front of it. The mower rode up over it immediately and I just pushed it back in time! Then a paving block on it’s side (100mm). It pushed it over, rode up over it, and the sound of blades hitting concrete was alarming! Even a solid 100mm step is barely enough to stop it reliably – it takes some pressure before the body senses an object, and the rear wheel goes down into the grass while the front goes up, giving it a remarkable ability to climb over objects. This has serious implications ! Stand in front of the mower with your back to it and it will bounce off you, but stand in sandals in front of it and it will ride over them for sure and make a nasty mess of your toes and feet before your ankles stop it !! Fortunately I didn’t try this, but I am now much more wary, and would not let children play around it, innocuous though it looks as it slowly trundles along. Some of the bigger machines talk of automatic mowing of parks, but I can see some nasty accidents occurring unless future designs incorporate some sort of touch-free sensing with laser beams, ultrasound or whatever rather than bumper pressure sensing. I don’t even want to stand on the grass in sandals now as the mower is quiet enough to creep up on me while I am talking or not paying attention and take my toes off! Another issue is inability to remove the battery easily. I don’t work on my chainsaw without taking out the battery as recommended, and I don’t work on electrical circuits without proper isolation, which is different from just switching off (isolators have to meet high standards). So I’m not entirely happy changing the blades in this mower with the battery in. The manual says “the motor cannot operate with the switch (underneath the rear of the mower) off” but I don’t trust this – the switch could fail or be knocked on. Does the switch actually disconnect the power. As an electronics engineer I doubt it, because the timer and electronics keep going, so maybe it just turns off the motor via solid state switches (power MOSFETS). This is not good enough to rely on when changing razor sharp blades. The manual says, “wear gloves”, but doesn’t say what sort of gloves. Thick leather ones might help, but then you can’t put the screws in place that fix the blades. I really wish the battery popped out easily from the top (you have to take screws out to remove it from under the motor plate), not just for safety reasons, but to enable it to be easily changed. Another reviewer has written that he clamps the disc before replacing the blades and I think this is a very good idea.