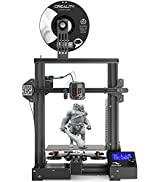
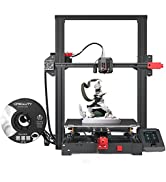
Creality Ender 3 V2 Neo 3D Printer with CR Touch Auto

Creality Ender 3 V2 Neo 3D Printer with CR Touch Auto Leveling, Full-Metal Extruder, PC Spring Steel Platform 220×220×250mm, 3D Printer for Beginne
From the brand


| Weight: | 7.8 kg |
| Dimensions: | 42.42 x 43.79 x 47.19 cm; 7.8 Kilograms |
| Model: | Ender 3 V2 Neo |
| Part: | Ender-3 V2 |
| Pack Quantity: | 1 |
| Batteries Required: | No |
| Batteries Included: | No |
| Manufacture: | Creality 3D |
| Dimensions: | 42.42 x 43.79 x 47.19 cm; 7.8 Kilograms |
| Quantity: | 1 |
This was my first 3d printer, and I have had no problems! If you end up getting this for yourself, please make sure to properly calibrate it. Bed adhesion is really good, as long as you clean it.
This was my first 3d printer, and I have had no problems! If you end up getting this for yourself, please make sure to properly calibrate it. Bed adhesion is really good, as long as you clean it.
This is my very first 3d printer and i've been VERY impressed! Before taking it out of the box, i found a great video on youtube from JustVlad about how to assemble, things to check for, and even some how to create a great Cura profile. From there I've had very few issues - mostly beginners issues because I didn't know what i was doing (manually leveling the bed wrong, setting the wrong things in cura, etc.). I would DEFINITELY recommend this to anyone wanting to get into 3d printing.
This is my very first 3d printer and i’ve been VERY impressed! Before taking it out of the box, i found a great video on youtube from JustVlad about how to assemble, things to check for, and even some how to create a great Cura profile. From there I’ve had very few issues – mostly beginners issues because I didn’t know what i was doing (manually leveling the bed wrong, setting the wrong things in cura, etc.). I would DEFINITELY recommend this to anyone wanting to get into 3d printing.
Pre assembly helps, and works great.
Friend of mine has one of these and I got another and they work very well for the price. Especially since the Neo has everything included.
The feeder on my first printer wooden feed, if you Google it you can find the feeder can have problems.
Buen equipo.
Ya cuento con otras impresoras Ender si las tienes bien calibradas te pueden dar buenos acabados, solo es cuestin de aprenderle y que te guste.
En mi caso la regrese ya que la impresora tena problemas con el eje y. No respetaba el punto de origen. Sin embargo no tuve problema con la devolucin, la empaque en su caja original y me hicieron la devolucin.
Great starter printer! Good support and Community
The product came perfectly packaged, it wasn’t damaged. It was fairly simple to put together however the PLA mount is a little fiddly and takes some getting used to. The instruction guide is mostly pointless and confusing, I recommend going to the YouTube tutorial by Creality in setting up as to know where the wires go. For the price I don’t think you could get a better starter printer, it seems like a tank and can get really detailed.
Only thing I would suggest to the manufacture is to create some written information on beginning 3D printing and what to do and not to do as my first attempt at printing ended in Spaghetti, this wasn’t the printers fault as I hadn’t added supports but overall really happy with the printer. I’m planning on printing DND terrain for our campaigns and it seems really capable. You also get some free filament in the box (it isn’t a full roll about 5 metres worth). Overall I think the support offered by Comgrow is outstanding and definitely worth it if you’re knew, it’s worth spending a little bit more to get the Neo as the screen is so helpful, also it has some upgrades for smoother building making it a lot easier for newer people like myself. Really excited with what I can make in the future!!
Wow I am impressed!
I know everyone says this, but I don’t normally do reviews. In this case I have to say I’m impressed. From unboxing thru assembly and set up, to my first prints things have gone very well. I did watch hours of videos prior to getting my machine which probably did help, and I highly recommend you do the same if a 3d printer is something your serious about. Setting my machine up took maybe an hour because i wanted to make sure everything was straight, not to tight or to lose and square. I only had to do some minor tweaking and assembly was very easy. Then another 30 or so minutes “leveling” the bed manually per video’s online and using the automatic bed leveling feature built into the printer.
So far i have printed six different things from test bunnies to tool holders and all have turned out great.
I would recommend this printer to anyone interested in getting started in 3d printing.
Wow, being fairly new to 3d printing, I purchased a Voxelab Aquila X2 as my first printer. I decided to pick this one up due to mainly the touch probe to assist me with bed leveling. I decided to try PLA+ instead of PLA for a first print. I have to say I was beyond impressed. The small banding issue with the hull is an issue with the slicer, not the printer. I was planning to spend a few hours putting it together but to my pleasant surprise, the printer came almost completely assembled minus a few bolts and a few pieces. I'm not exaggerating when I say I went from box to first print in about 20 minutes (that included time to level the bed). The display is crystal clear and all things considered it seems to be a solid printer for the price. I would highly recommend this printer to anyone looking to get into 3d printing.
Wow, being fairly new to 3d printing, I purchased a Voxelab Aquila X2 as my first printer. I decided to pick this one up due to mainly the touch probe to assist me with bed leveling. I decided to try PLA+ instead of PLA for a first print. I have to say I was beyond impressed. The small banding issue with the hull is an issue with the slicer, not the printer. I was planning to spend a few hours putting it together but to my pleasant surprise, the printer came almost completely assembled minus a few bolts and a few pieces. I’m not exaggerating when I say I went from box to first print in about 20 minutes (that included time to level the bed). The display is crystal clear and all things considered it seems to be a solid printer for the price. I would highly recommend this printer to anyone looking to get into 3d printing.
Guter Anfänger 3d drucke
Der 3d Drucker ist qualitativ echt gut und die Drucke sind auch gut.
Was mich nur etwas traurig gemacht hat war das der 3d Drucker beim Hersteller direkt viel viel gnstiger ist und ich somit schon viel Geld verschwendet habe.
A solid and reliable first printe
This is my first 3D printer and I’m glad I went for an easier to build model than the Ender 3. Only 3 parts to put together. Very simple.
The paper instructions are a bit vague but the video set-up tutorials on the memory card are much better at explaining bed levelling.
My first print went well (benchy from the two supplied files). Had a few things to learn bit it’s still performing very well
Ne fonctionne plus
Ne fonctionne plus au bout de 4 mois…aprs deux bonne journe pour trouver le problme cela n’tait rien de mcanique, le filament ne sortait plus mme avec une buse neuve.
Le problme avec les imprimante 3d c’est le sav, si cela fonctionne plus qui voir pour rsoudre le problme ??? Si pas bidouilleur faut pas esprer tre dpann et du coup la machine risque de finir au fond du garage….
Ausgezeichnetes Produk
Ich habe mir als Anfnger den Ender 3 V2 neo bestellt.
Das Paket kam zunchst schneller als erwartet an, also hier schonmal einen Daumen nach oben. Die Verpackung war sehr gut, sowohl vom Material, als auch vom Schutz.
Der Aufbau des 3D-Druckers funktionierte einwandfrei und war relativ einfach. Die Anleitung ist u.a. auf deutsch und gut (nur etwas kleingedruckt) beschrieben.
Das Leveln klappte auch problemlos, wobei ich den einfacheren Weg anhand von YouTube Videos vorschlagen wrde.
Zunchst habe ich eines der Modelle der SD-Karte gedruckt (den Hasen), wofr der Drucker etwa 2 Stunden gebraucht hat und dabei ziemlich leise war.
Ich bin mit dem Drucker eindeutig zufrieden und wrde ihn weiterempfehlen!
Beginner friendly
As a novice this printer has been great, the auto levelling is very useful. I’d recommend watching a video to help set it up, there’s loads on YouTube. Don’t know what the long term durability is like as I haven’t had it long but no problems so fa
This was my first 3D printer. First, I read different things in different reviews about the time required to set up this printer. Some sources said that the Creality Ender 3 V2 Neo took 2 hours to assemble. The specific item that I bought on Amazon said that it was “95% Pre-Installed” which was attractive to me. When it comes to putting things together, I’m guessing that I’m an “average” person, and it took me about 30-45 minutes of tinkering and reading the manual which was printed in a super small font size on a small booklet with detailed diagrams that were hard to see. I’d highly recommend skipping the paper manual and using the electronic version of the manual that is provided on the memory card–display it on a large monitor or print it full size on 8.5×11 paper. After a 1-time assembly, I was off to the races. Prints have been great, and any issues with printing have been due to me not correctly adjusting settings (especially Z offset). I love the auto bed leveling feature which makes pre-print prep a breeze. The flexible bed also makes it easy to remove print jobs without needing the scraper in most cases. For a first-time buyer of 3D printers, I could not be more happy with this product and would definitely recommend this item to anyone who is thinking of exploring the world of 3D printing.
Très bon même avec un début un peu brusque
J’ai reu l’imprimante 3D et je l’ai immdiatement monte.
Avant tout, je veut mentionner que j’ai achet ce modle car il disait auto-calibrer l’axe Z (la hauteur).
Les points ngatifs:
– Le plus important est que la courroie tait sale. Tellement sale que l’impression sur l’axe correspond cette courroie avait des problme majeur, car la courroie glissait certains endroits. Bref, j’ai du dmonter la tte et laver la courroie avec un brosse.
– La hauteur de la machine ne s’ajustait pas automatiquement du tout. Pour rgler ce problme j’ai du regarder plusieurs vidos jusqu’ trouver une vido qui mentionne un “GCode” insrer dans le slicing du programme pour que l’imprimante prenne en compte ses propres mesures d’auto-calibration (le GCode est “M420 S1 Z10 ; Use saved bed mesh”, il faut remplacer le code G29)
– Le manuel d’installation est… extrmement basique, et ne mentionne pas plusieurs aspects pour le bon fonctionnement de la machine
Les points positifs:
– C’est prcis. Trs prcis. Je n’ai pas essay de pousser les limites de l’imprimante, ni de faire des impression de qualit (mon slicer indique une hauteur de chaque couche 0.2mm) et cela fait quand mme des impressions plutt lisses.
– Le SAV rpondait aprs environ 1 3 jours aux messages, et m’a rembours 20 d au problme de courroie
En rsum, je pense qu’il pourraient vraiment amliorer la premire exprience des utilisateurs, mais mis–part cela, je ne regrette pas mon achat.
This is definitely more of an “analog” approach to printing. Although it comes in two pieces and easily put together and have leveling features, it requires constant fiddling and troubleshooting small hiccups. There are a lot of advancements from previous versions and is a must if you’re looking at a cheap PLA printer, but there is no way around layer lines, prints can be a little brittle and PLA just takes FOREVER. Example: I’m a nerd and printing off the Dragon Dagger, half of the blade alone will take me 34hrs and will barely fit in the build area. If you’re on the fence between PLA and Resin, if you have the ventilated space for it, Resin quality will be unparalleled. There are just a lot of downsides to using PLA because of what the device can adequately print, given the method is does so. Certain spots come out bad just because of the shape you’re trying to print. Screws and small cylindrical bits can just come out bad and there’s not much you can do. PLA is a novelty, in my opinion, and the mess you’re avoiding from resin will be accomodated by the tons of support and sanding material left over after you finish. Small miniatures are just not possible, so don’t get this thinking your going to just start printing small pieces because it will just end up a mess. If you want to experiment and find use out of some simple and practical things to print, this printer will be great for that.
As a 3D printing beginner, I got this printer to fulfil my personal needs and I’m more than pleased with its quality. It took me around 2-3 hours to put it together, configured and aligned it. The output quality is simply amazing.
So I have had this printer for a little bit now and I also have the ender 3 pro. I will say that out of the box this printer is really great. It prints nicely and setting it up takes a half hour. I’ve had no problem leveling the printer either. The reason I have given it 4 stars is because I have had nothing but challenges when trying to upgrade the printer. This printer is designed to be used as is. I upgraded the hot head and there is no way to move the CR-Touch to match the height of the new hot head. I used the creality spider 3.0 and it is slightly to short. This lead to it slamming into the build plate. Since there is no z axis switch the CR-touch has to be functional to use the printer. The stock fan shroud is also too long.
The direct extruded plate you can get for the ender 3s will not allow the print head to hit the x axis switch. I had to remedy this by putting a huge glob of hot glue on the end of the x axis belt that triggers the switch.
The three recommendations I do have are to get the dual x axis and the metal extruded. Then print a direct extrusion bracket for a V2 and use that. Happy printing.
Easy to build and use
Print quality is fantastic for a budget 3d printer! Watch YouTube video’s before you assemble it! Assembly is key to getting good quality prints! Build printer by assembling all components loose stand printer on a flat level surface then start tightening all the bolts to get the best results when building.
I’m a 75 year old woman. I bought this mostly so that I could do texture rollers and maker stamps for ceramic artists. Works well for that.
Then the bracket for my dog gate blew out and I needed to find a new one or throw the gate away. Light bulb moment – I could make one! And in the process fix all the things I didn’t like about the ones that came with the gate. And risers for a console table so that I could fit a set of drawers under it. Then there was sock clips. And a smoothing tool for the inside of clay mugs. And rooster cookie cutters, and a wall peg to hang my purse and a hydrometer stick for my self watering planter…
And I can have these things in a couple of hours without leaving my house and without having to wait while they manufacture, package, ship, and deliver them to me. Exactly as I want them. And out of PLA, made from corn starch which is biodegradable and hot-compostable so I don’t have to worry about bringing more plastic particles to the eco system.
And I got to learn a new program – Tinkercad. And Thingverse has items I can just download and print if I don’t want to bother designing them myself.
The best thing I did was learn Tinkercad as I waited for the printer to be delivered. You should read and watch set up videos. Swear a little as you figure it all out. It took me about 2 hrs to set up and get running. I skipped the useless things that they gave programs for and went right to a maker stamp that I designed as I was learning Tinkercad. Printed perfectly (except that I forgot to mirror the text and had to make another one – lesson learned (mostly). Probably went so well because I followed the directions to the letter and didn’t assume that I could skip anything or that I knew more than Creality.
And I still want to print that articulated dragon even though I have no earthly use for it. It’s just so neat. I bet my great-granddaughter would have fun with it, it’ll be so pretty in color change silk filament…
I purchased this printer a few months ago. It was very easy to assemble out the box. But I ran into probably every noobie issue possible. I would like to list the items of importance for anyone unfamiliar with 3d printing like me. Also I would describe myself as not very intuitive when it comes to mechanical things.
1. After assembling I had a hard time leveling it. Bed adhesion was a real issue. The printer was basically printing really sloppy birds-nests that were supposed to be a solid servo mount.
– It turned out that the slicing software was setup for a Ultimaker not a Creality Ender 3 . I somehow successfully printed a few things.. It was real touchy, an issue that I didn’t resolve until later.
2. I was still fighting with the leveling portion ( I didnt realize it has an CR-touch ).
– I decided to buy stiffer springs (yellow) they helped quite a bit as the originals were squishy.
3. I decided to flash the firmware as its something you will read everywhere. I downloaded the latest Creality 2 firmware for Marlin from jyers. This basically (to me) bricked it. Nothing came on the screen I was mortified.
– Turns out this model is fairly new and there are a few options in terms of firmware but they are not “official” and word of caution jyers doesn’t have anything for the Creality 2 Neo (devil in the details).
At this point I was excited I felt like nothing could stop me. I read that changing the nozzle helps. So I purchased a new one. ANDD
4. The fan which cools the PLA/PETG was very tightly bound in the wire harness. When I removed the snap on cover the fan leads broke off.
– Originally I soldered it back together, it happened again and this time I cooked the via. So I ordered a new 24v fan and have crimped dupont connectors to each side to make it some what sane to pop of the cover.
At this point I felt I was turning over a leaf with this thing. I went to auto-level it …
5. During the leveling process the hotend would plow into hotplate really hard. I shut it off a few times.
– I initially read this advice somewhere “Re-tighten everything when you receive it” If I would of done this the day I received it I think I would of avoided all of the problems except for 3 and 4. After removing the extruder and resetting the bowden tube. I was amazed at how this thing worked.
All things told I could of returned it but decided to push on and I am very grateful to have the experience now. My hope is that this advice is headed by someone new to this stuff. The whole time I was using this I thought it was basically a miracle if I printed something. The hot end was very loose and I thought that was for a reason , turns out it shouldn’t be loose.
I really really love my printer now despite it being difficult to get working initially. I print 10hr+ now and have rarely had an issue. Almost done with my first spool of PLA..
Good for hobbyis
Bought for a Christmas present. Recipient found it easy to assemble and make relevant adjustments. Printer has been in use most days and proven to be a perfect gift. Make sure to use good quality material. A clean bed is necessary for good adhesion. Excellent performance for a reasonable price.
When you get your printer and issues keep happening make sure to check everything. There were a couple of spots I missed that ended up fixing an issue of my printer having inconsistent problems. After talking with support, we were able to resolve it faster than YouTube videos I had watched.
The other issue is I suggest getting a new USB card reader for your PC. The one that comes with it is very cheap and you may run into issues with it as you keep using it.
Finally, bed adhesion is too good. Yes, too good. Lowering the temperature can help but also using a different bed entirely like glass with applied adhesion such as a glue stick can help.
For the price, I think it’s a great printer
The best thing about it is that when any kinks that may happen are out, it prints really well for something a fraction of the price of a Prusa. I genuinely think that unless you’re in production, this is a better buy over the Prusa because the only thing you really are missing out on I’d say is speed, for Quality/Speed, of course it’s going to be a bit slower but you’re saving a lot of money.
Would I recommend this to a friend? YES
Great buy
My first 3d printer. I’ve wanted one for ages to improve my cosplay outfits and so pleased I got the Ender 3 v2 neo. Really easy to set up, great print quality. One of the best things I’ve ever bought. Only had it a few days no problems so far, I did change the Bowden tube that came with it, I can tell I’m going to get lets of use out of it.
Complete Newbie
I am a complete newbie to 3D printing. The machine arrived and needed assembly and that was a daunting task at first but with a little video tutorial help on YouTube I figured it out. Once I had the plate levelled and knew how to get started I printed one of the test prints which came out great. After some investigation I discovered a 3D drawing app and downloaded a slicer program and have within 24 hours learned how to design and print my own creations. I would say I have average technical ability. Great product for a starter.
I originally bought a different type of printer but when browsing Amazon I spotted the Ender 3 for just a tad more money.
I sent the other back as it really did not feel well built and had a small print area and decided to buy the Ender 3……. money very well spent most definitely.
Setting it up is very straightforward and ot all seems well built and solid.
The Creality printers can be upgraded for little money and very easily.
I did have a screen issue but the service team rapidly sent me a new one and all was very good.
If you are looking to have a go at 3d printing then this is a great printer to buy backed by fantastic customer support.
Buy one you won’t regret it !!!
I’m a Techie, so me telling you that a piece of tech is “Easy to Use” is probably not going to mean much so I’ll preface this by saying that I purchased this 3d printer for my parents, who are both shall we say, technologically challenged. My Dad uses a flip phone and he STILL has a hard time making calls, my Mom, on the other hand, is a bit more tech-savvy and at the very least is willing to learn new things. But I digress, the “hardest” thing that I found with the Ender 3 was the initial setup. As with most 3d printers it comes as a kit that requires a fair bit of assembly. But if you can follow the step-by-step instructions that are included with the printer it shouldn’t take more than an hour or so to assemble. If you’re not the type to follow step-by-step instructions then there are many good videos on YT that walk through the unboxing and assembly of this printer.
The fit and finish on this device is pretty nice. Parts seemed to connect together as you’d expect and moving parts worked pretty flawlessly with no binding and virtually no noise. Operation is as you’d expect with any desktop 3d printer, there is a little bit of finagling with feeding the PLA filament. At this point, you do need to know a little bit about how to use Cura and how to manipulate the STL files so that they can be printed on your printer. Again there are a lot of good tutorial videos out there that can help you with this and once you’ve done it a few times it becomes second nature.
Now I purchased this device a couple of years ago and my parents have been using it pretty much weekly since it was bought. They have easily put several hundred prints through the printer and while not every print is successful, they haven’t experienced more than a 10% failure rate with their prints.
Print quality is extremely good for an FDM printer at this price point and after nearly 2 years of average use, there have been no hardware failures to speak of. About the biggest gripe would be the “Easy Release” coating that comes on the glass build plate. We found that after about 100 or so prints there’d be problems with adhesion to the coated build plate which would result in a failed print. We resolved this by flipping over the build plate to the uncoated side and coating the print area with a glue stick, which seems to work much better than the easy-release coating that comes with the device.
All in all, it is a very reliable and easy-to-use device, well worth it for anyone just getting started with 3d printing, and durable and versatile enough for those experienced people looking to tinker with and upgrade the devices capabilities.
Good little printer. Bit frustrating for a novice like myself but that’s on me, not the printer. A few days after owning it and figuring out how to use one, (bed leveling, adhesion, cleaning clogged nozzles, etc.) I can now print and I’m quite pleased with it.
Would I buy it again? I probably would.
So this is the second Ender 3 V2 I’ve bought.
The first one worked wonders. That’s how I know it’s a great machine. Everything about these machines is great, but!
My new one doesn’t work at all.
I set it up, started the Auto home. And it does nothing. The screen just gets stuck on auto home. Until I have to turn the whole machine of again.
Honest review on this printer. Right, here we go.
The printer came very smartly packaged, with everything included in separate packets. All screws came in their individual packets making it very easy to sort them out.
Putting it together wasnt as much of a hassle as i thought it would be. The instructions are OK, just a bunch of pictures on an A3 page. I recommend watching a youtube video, i managed to get mine build in roughly 2 hours working fine.
The printer also comes with an SD card, and USB converter/adapter. This has some test files and the software for the printer.
Easy to control, and work with. I recommend this printer for all starters.
This is a great first 3d printer. But to start, you need to understand low cost 3d printing is definitely still in its infancy, you should not expect everything to be super easy and awesome. You will need some patience and a willingness to learn. On to the review.
The printer came packaged in a fantastic box, every piece was securely contained in a specific spot and it was all correctly packed. Unpacking was pretty straightforward, I recommend having a utility knife to carefully cut off some plastic packing wrap. Assembly is very straightforward if you have a good guide. I used the “Creality Ender 3 V2 assembly and pro build tips” video from Tomb of 3d Printed Horrors youtube channel, it is excellent and walks through the entire build process and helps avoid almost every pitfall. I say almost because my z axis motor mounted in such a way that the z leadscrew was very crooked. I ended up installing a little cardboard shim between the motor and mount to move it out and straighten the z shaft. It is definitely worth checking for this issue. The failure symptom is noisy clicking when it tries to move the z axis up when it is down near the bed. Once that issue was fixed everything worked great.
The same youtube channel has a great video on bed levelling. Once my bed was level I printed the dog model included on the microsd card. It worked perfectly. I was shocked at the out of box print quality. It was fantastic.
The first thing I noticed during printing is how quite it is. The new silent stepper main board is really great, it alone it’s probably worth the price difference between the Ender 3 Pro and the Ender 3 V2. All the other little updates are great also. Strangely the little drawer on the front is one of my other favorite upgrades, it is just super convenient for storing the little parts. I like the PSU under the build plate, it just feels protected from stuff accidentally falling in our getting jabbed in by a child. Overall I feel like there design of the V2 is much more polished than the older Enders. I personally feel the V2 upgrades are worth every penny.
I was also surprised at how few problems I had initially with adhesion, many people complain about prints falling off, but the included filament worked on every print I ran. Notably, when I switched to Hatchbox copper colored filament I had a number of problems and had to have my bed dialed in perfectly to get adhesion, I also need to clean the print bed with isopropyl alcohol between prints. I lost my first 4 or 5 small prints in Hatchbox PLA due to adhesion issues.
For tools I downloaded the latest Cura slicer which seems to work very well. For high quality prints I use the custom cura setup from the above youtube channel for mini printing. It takes a little time to setup a custom cura profile, but it has produced beautiful mini prints as well as a functional threaded nut I needed for a broken fan.
I found Cura is not great for generating supports, my prints come off with lots of surface flaws that really ruin the print finish. I am now using Meshmixer for creating custom supports with much better results.
For my functional prints I have used Tinkercad, it was super easy to create the hex nut I needed, note plan to create threaded holes quite a bit larger than measured to account for plastic shrinkage.
Obviously, this wasn’t simple and I have learned a ton in 2 weeks. You will need to learn a variety of new skills and tools to get the most from your printer. If you are up for it this is a great printer.
I’ve had mine for about a week now, and I’ve been really impressed with the quality.
I’ve seen some issues and complaints on forums like Facebook, and I think they are mostly down to not setting it up properly. The build does take about 2 hours. You don’t need to do any soldering, just lots of nuts and bolts like making Meccano. However, everything needs to be *really* precise, things only need to be out by a little bit and things will go badly wrong. I recommend following a guide on YouTube, as frankly the instruction sheet is useless.
If you’re expecting it to be like getting an inkjet printer, you’ll be very disappointed. It takes a lot of time and effort to get a good print, even if you are just downloading models. If you plan to design your own, then think about what software you plan to use, something like Fusion 360 has a steep learning curve. This is a hobby, not a consumer product.
Good first 3d printer experience
My first 3d printer and it has been a good experience so far. Standard prints from Cura, the software you use to convert CAD STL files to gcode that is then printed off, are pretty good. I had to tighten the xaxis belt due to some shifting, but overall I’m happy with the purchase. Main negative is the bed levelling, a total pain. Can we get a firmware update to do this automatically? Also the removable magnetic plate isn’t great. I’ll replace this with a glass one soon. Hiwever overall for 170 I am very happy with the purchase.