Creality Official CR Touch Auto Leveling Kit 3D Printer Auto

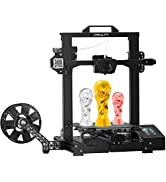
Creality Official CR Touch Auto Leveling Kit 3D Printer Auto Bed Leveling Sensor Kit for Ender 3 / Ender 3 V2 / Ender 3 Pro/Ender 5 / CR-10 3D Printers with 32 Bit V4.2.2 / V4.2.7 Mainboard
From the brand


| Weight: | 110 g |
| Dimensions: | 10.1 x 6.3 x 4.4 cm; 110 Grams |
| Part: | Creality 3D – CR Touch – Ender |
| Colour: | CR Touch |
| Pack Quantity: | 1 |
| Batteries Required: | No |
| Batteries Included: | No |
| Manufacture: | Creality 3D |
| Dimensions: | 10.1 x 6.3 x 4.4 cm; 110 Grams |
| Quantity: | 1 |
| Reference: | Creality 3D – CR Touch – Ender |
Just get one
This is one of those things you dont NEED, but think why did I not just buy one sooner.
Make sure you read everything carefully before installing, you’ll need to install new firmware too which is a hassle. Just take it slow and read things carefully. Worth it in the end, never need to faff around adjusting the bed anymore.
Official Firmware (Ender-3 V2-Marlin-2.0.1 - V1.3.1 - BLTouch) probably bugged
This is more of a troubleshooting help rather than a review. Installation was alright, just running a thin wire through the cable sleeve and attaching it to the motherboard. The trouble started after that point.
The printer does not auto home and the Z axis goes up but doesn’t move down. I tried everything including replacing the cable (I had spare parts). I thought the CR touch is faulty and I was filling out the return form on Amazon and it came to my mind to try a 3rd party firmware and see if it would work. I installed mriscoc’s firmware and now everything works perfectly. Also, the features are way superior compared to the official firmware.
So, if your printer’s Z axis acts weird, try mriscoc’s firmware. There is a big chance it is not the CR Touch but the firmware is faulty.
Ender 3 Pro Iphrades
The last of the real Ender 3 Pro upgrades. I am somewhat u clear if this has really made any improvements and my print bed was very level.
Anyway in for a penny in for a pound. The part is straight forward to fit and somewhat easier if you have the Ender direct extruder as the caning becomes much easier.
With the Bowden tube type extruder you need to use the full cable kit. With the Ender direct extruder use o ly need to use a small jumper cable, as the extruders ribbon cable has the ABL wiring.
Once the ABL G-Code commands are added into your slicer set up , the ABL will be activated and probe the bed when the printer first indexes.
All fits perfectly as it should on the ender 5 pro.
Now come the software issues! I updated my boards (4.2.2) firmware from stock.
Z axis only went down after removing z stop switch could not get it to go up. Every video online (and i watched loads of them) and in the book shows prepare in the menu option, I didn’t have that all I got was move and no bed leveling anywhere. Double checked and reflashed the firmware and imflashed the cr touch firmware.. Every video of installation for the ender 5 shows marlin software that I didn’t have.
After 6 hours it was either put in the bin or send it back, Then I resorted to installing any firmware for my board in hope something will work.. one update changed all the language on the printer to Chinese, that was fun.
When I eventually found one that had the Bed leveling in the option it worked. Thank god..
Put a test print on and boom another problem the extruder is now running backwards WTF.. again back to the online forums for help, only option is to change the 4 wires on the extruder (totally reverse the order 1234-4321)!! Surely creality would have sorted a software patch of for this by now it’s not like it’s a brand new bit of tech with teething issues it’s over a year old.
Other than that it now works like a charm.
Prints are slightly better..
After trying the usual print bed spring upgrade and still being tired of prints being slightly off due to the bed being slightly out if the manual leveling wasn’t perfect I made this upgrade.
This is really a 5 minute install, attach it to the print head, feed the wiring to the main board, plug it in and then remove the z axis switch. Update your firmware from creality’s website and it’s done. Once ready I tightened the levelling wheels so the bed was as low as the compression springs would allow, clicked auto home and let it do it’s thing. The software now homes the x axis in the center of the bed and not at the usual 0,0 position at the front left of the build plate. This is normal, don’t panic.
Once it has homed it will rais the z axis by 10mm away from the bed, this is it’s parked position. Now you and set your Z – offset (or Z – offest as the firmware spelling mistake reads) to lower the Z axis to 0, this will be your starting point to find your Z offset. Use the usual but of paper under the nozzle and lower the head with the Z offset function on the printer control screen. Once your happy you have found the correct height click it to save and run a test print. Fine tune as needed.
As a rough guide my z offset is -0.70 for 0.2mm layer height and I get a glass smooth first layer
Definitely 5 out of 5
Game changer!
I struggled to print anything and after installing this item I’ve got no problems. Usually the print didn’t want to stick due to unflat table. Now it doesn’t matter. Worth every penny!
Worth i
Bought for an Ender 3 V2 and have had very few issues with first layer adhesion. Makes leveling the bed easier. Would recommend upgrading the printer’s firmware to Jyer’s or Mriscoc to compliment this as they enable bed mesh mapping (plenty of tutorials on Youtube).
Can't believe I waited so long to get this.
Having my printer for over a year manually levelling my glass bed was honestly a chore that almost put me off printing entirely; as a last-ditch attempt to revitalise my love for 3d printing, I got the auto-leveller, and it works perfectly. Level the bed once when you install it, and then you never have to level it again—perfect adhesion and levelling every single time since I installed the touch. I could not recommend it more.
wish i got one soone
i always debated getting one of these because I didn’t believe it would be accurate.
i was wrong!, I wish I got one of these years ago, this saves so many man hours!
just follow instructions on youtube videos on how to install it and you will be good to go!
Makes 3d printing so much easier!
I got this for my Ender 3 v2, and it means I no longer have to do manual bed levelling.
The firmware I used for this did make it difficult to set up as I could not move the z axis into negative numbers, so I had to slowly change the z offset until it unded up where I needed it to be.
One key thing the installation guide left out was to unplug your z stop switch, most video guides other people have made suggest doing this so that you can go as low as you need to.
Works well after a lot of digging
The CR touch is a great piece of kit* that gives you piece of mind when you want a good print or can compensate for laziness (a little) if you can’t be bothered to bed level.
Whilst I’ve been incredible impressed with the results of the CR touch, the installation was a massive pain. I installed this onto an basic ender 3. Didn’t take too long. I had to update the firmware and I did through the creality website. It bricked my printer. I flashed different firmware – it worked for a bit and then crashed. I tried this over and over without success until I came across a Reddit post where someone had the same issue. The answer was to go to specific website, donate 1 for a new very specific firmware build and install that.
If you do buy this, be aware that you may have to do some digging to find the firmware you need.
Other than that, this is incredible helpful.
Easy to fit and use
I had no trouble fitting the BLTouch to my Ender-5 using the larger of the supplied brackets. The cable was easily long enough and plugged straight into my BTT SKR Mini E3 board although wire colours don’t match the AntClab originals (there are some scary comments online about wires being in the wrong sequence).
I configured my own Marlin build (there are several YouTube videos on the subject). For my setup, the nozzle-to-probe offsets are X = -45, Y = -6.5 and Z = -2.925mm. I set up a 5 x 5 mesh and probing only takes a minute or two. Several commentators recommend putting a G29 command in the machine start-up G-code but that forces a new mesh to be probed on each print. I left it out but added M420 S1 to restore the mesh after the G28 command homes the print head. (This can be automated in Marlin).
In use, the probe is very easy to use and saved me a lot of time when I decided to rearrange other parts of my printer.
Great touch probe upgrade
I bought this as it was on offer and knew if buy it anyway in the future. Since installing first layer adhesion has never failed. I did have an issue with the firmware from creality website not working so used the marlin version (well worth it to be honest) and has been very reliable since.
Metal probe means the bed levelling can be done while preheating compared to BL touch which has a plastic probe and subject to faster wear.
Wish this came as standard!
I wish I had purchased this at the same time as my Ender 3.
I spent hours and hours trying to get a level bed using the stock machine. To be honest, I haven’t printed anything in over a month because of the frustration.
With the automatic levelling, however, I am back on the hype train!
I have had no issues printing since installing this and I am pleasantly surprised by the results too.
Installing the add-on is not particularly challenging when you find a good YouTube video. I recommend watching a separate video on the z-axis calibration as this is crucial to making it work.
When uploading the firmware to the machine (from the Creality website) make sure there is nothing else in your SD card and it will work.
Good luck!
Better than BL Touch
Very straightforward to install (exactly like a BL Touch) but has a much more “premium” feel as a product. Installation on an Ender 3 with the 4.2.7 Silent board was a simple plug and play process, but would be the same with the stock motherboard. I did a custom Marlin firmware build to tweak the relevant menu item(s) to refer to CR Touch rather than BL Touch, but that was purely for aesthetics as I like to make full use of all the additional features Marlin has to offer. Standard Creality Ender series Marlin firmware can be downloaded from Creality for anyone nervous about compiling their own version (but don’t be, it’s a small learning curve but well worth it for the extra features). Overall, very happy.
Genuine BL Touch with correct wiring but poor instruction shee
I wanted to add a BL Touch to my Ender 5 Pro but wanted to avoid clones which may have poor operation and uncertain wiring so I opted for this official version assuming it would be problem-free! The device is nicely packaged and installation to the printer was simple with the kit having all the necessary parts and bolts but I checked the wiring before connecting.
I have upgraded the motherboard from the 1.1.5 to the new SKR Mini E3 v3 which has a dedicated port for the device so expected no issues but the wiring was difficult to clarify. The reviews of the board say that the wire colours are blue (grnd), red (pwr) and yellow (signal), which may normally be the case for the 3-pin connector plus black and white for the second grnd and signal connections. This BL Touch has these colour wires but in the reverse order so the white wire corresponds to the first grnd connection and black to pwr. I thought that I would have to crimp a new connector with the cables reversed but tried to check and a lengthy search online showed conflicting wiring schemes for the device depending upon the manufacturer.
Glossy printed instructions are enclosed but are small and the pictures are fuzzy so I could not determine which pins the individual wires connected to. Finally I found a pdf version of the instructions on the creality webstore and this indicted that the wires are in the correct order for my board so with some concern I connected it and switched on. No smoke and the Touch lights up correctly.
I then found that the BigTree release of Marlin firmware for my board would not trigger the sensor so I switched to Klipper (I use either while I get used to the board) and immediately everything is working perfectly. Ran a series of single layer test prints and achieved a near-flawless result after a few attempts, adjusting the z-offset.
In summary, this is an excellent item that performs exactly as expected but the documentation is poor.
This is a great addition to my Ender 3 v2, eventually!
The instructions for installation were not great – particularly around the firmware upgrade.
I managed to install the hardware easily enough. Took a few minutes to figure out which bracket to use (company could label the brackets to avoid any confusion?). Routed the cable in the existing cable guide from the hot end back to the main board. Removed the z-stop… and then…. figuring out what to do on the software side, it felt like I was a little lost at sea….
I ended up flashing jyers marlin (from github), specifically the unified bed levelling (UBL) version.
Now I have no more first layer issues, and more importantly I don’t need to further manually level the bed at all, which has always been the biggest turn-off in my 3d printing journey.
The 3d printing intelligentsia may demand novices learn the ‘proper’ way of levelling (though, it is still important the bed is reasonably level for ABL to work), but as a relative novice myself, I would not hesitate recommending this to make sure first layers are consistently perfect.
Easy to install
Very easy to install, comes with a selection of brackets in the box and a couple of hex bolts and zip ties.
While you have the mainboard tray off and some spare zip ties, Go the extra step and feed the cable up through the braid for a much cleaner look 🙂
Change the quality of my prints
I was a bit skeptical about a bed leveler as I thought my skills and bed leveling were ok. I was totally wrong. Using my 3d printer for printing RC planes I found I was having to do alot of post processing work to get parts to fit and had alot of prints lift from the bed. Having used this for a couple of days my prints look and fit fantastic little to no clean-up and no bed lifting. The item took only ten minutes to install. Would advise this product very happy with it.
Gets that first layer down perfectly
I installed one of these and wish I had done it a year ago. I have the creality Ender 3 max and this is a very useful accessory. It helps that first layer look perfect and I have had absolutely no issues with any prints since installing. Installation was simple and setup straightforward as long as you read the instructions and follow them.
Great. Instructions could be clearer.
Working well on my Ender 5 Pro with v4.2.7 mainboard. The physical installation is easy enough however I had problems setting the Z probe offset via the printer, The nozzle would always be too high despite me inputting the correct Z-axis compensation value.
I found a video posted online which instructed me to connect the printer to my PC an use Pronterface to turn off Soft Endstops and adjust it that way which worked perfectly.
The instructions didn’t mention anything about this an would have saved me loads of time if I had known about it earlier.
Very happy with the CR Touch an would recommend.
Purchased for my Ender 3 Pro
Purchased this kit for my Ender 3 Pro, which has the v4.2.2 32-bit board fitted. The kit comes well packaged, with reasonable instructions, the BLTouch sensor, and all the fittings required. Was pleasantly surprised to discover the supplied brackets were metal, not plastic. Installation is fairly straightforward. It is aimed at enthusiasts who have built their own printer from kit, though anyone familiar with a screwdriver should be able to fit one within an hour.
Creality provide firmware with BLTouch enabled, though I usually compile my own firmware from source (Marlin). There was some confusion when compiling the latest version of Marlin as to what servo driver (chips) the board has, though this is more an issue with the v4.2.2 boards (that may come shipped with one of two chips sets) rather than this kit itself.
My reason for purchasing this sensor was to eliminate the endless and tedious manual bed-levelling required before printing and to that end, this upgrade was a success.
Get the original... Take it from me...
So I wanted a BLTouch and was horrified at the price (still am, TBH) and went to another online supplier and bought a non-branded one. Yes it worked a bit, and yes it was a lot cheaper… but over a fairly short amount of time I discovered the cheapie one was costing me prints as its probe caught the print. Gritting my teeth, I bought this one. And it is a peach – easy to install (especially if you’ve already done it with another one) and easy to set up – honestly! Firmware is on the creality site and they’ve improved the layout so you don’t end up in tears trying to find the one you need. Heck, some of it is even in English! Learn, Oh padawans – buy the ‘proper’ one to start with – because the gamble may be more expensive than you had anticipated…