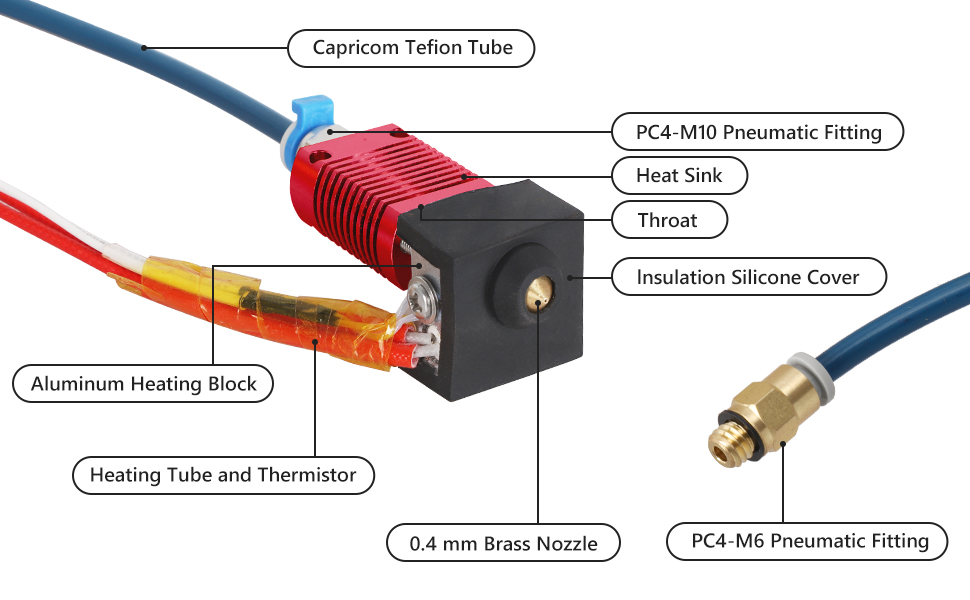
Creality Official Ender 3 Hotend Upgrade Assembled Extruder
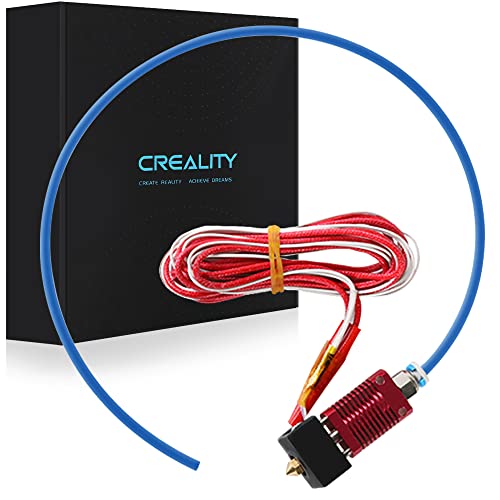
Creality Official Ender 3 Hotend Upgrade Assembled Extruder MK8 Hotend 24V with Capricorn Bowden PTFE Tube 1.75mm for ender 3, Ender 3s, Ender 3 pro, Ender 2 Pro

| Weight: | 210 g |
| Dimensions: | 16.2 x 16 x 5.2 cm; 210 Grams |
| Part: | XIN PT |
| Colour: | B-Hotend |
| Batteries Required: | No |
| Batteries Included: | No |
| Manufacture: | Creality 3D |
| Dimensions: | 16.2 x 16 x 5.2 cm; 210 Grams |
| Reference: | XIN PT |
Oui mais...
Efficace et relativement facile a installer. Cependant produit vendu pour tre compatible avec une ender 3 v2, oui mais avec quelques adaptations, ce n’est pas du plug and play. Une fois install et paramtr correctement, fait du bon travail
Impeccable. Serait mieux avec notice
Trs bon produit vendu avec une belle bote et tout l’intrieur. Dlais respects comme d’habitude. Malgr le manque de notice sur les emplacements de branchement, je n’ai eu aucun soucis vis vis du montage. En reprenant le mme emplacement que celle dmonte. Le plan sur le site amazone ne correspond pas. La carte est la mme. Mais les branchements ne correspondent pas.
L’imprimante fonctionne bien. Je suis en train d’imprimer depuis hier soir.
Gran mejora
Se me casc la resistencia calentadora y cambi todo el hot end… El cambio vali la pena… Superficies mejor acabadas y ms suaves sin tratamiento… Solo se echa en falta consejos de instalacin, pero con un buen tutorial no es difcil, y abundan!! Recomendable totalmente!!
Parfai
Suite quelques dboires j’ai finalement pu mettre en uvre la tte qui fonctionne parfaitement dans le cadre d’un upgrade de ma Geeetech A10M (clone Ender 3). Attention toutefois au tube un peu court.
Bin begeistert. Preis-Leistung top.
Habe es als Ersatz fr einen Ender 5 Plus verwendet. Kabel mussten geltet werden. Und der Schlauch ist leider zu kurz. War ja aber auch nicht fr den 5 Plus beschrieben. Von daher hab ich damit gerechnet.
Guter und preiswerter Ersatz.
Hallo,
Bei meinem Ender3 V2 hatte ich Probleme mit dem original verbauten Hotend.
Ich habe mich dann dazu entschlossen dieses hier zu bestellen und wurde nicht enttuscht.
Es passt komplett via Plug&Play an den Ender3 V2.
Ich musste auch nichts nachstellen.
Schnell noch ein PID Tuning gemacht und dann ging es ans Drucken.
Der Druck sah super sauber aus.
Super ist auch der Capricorn Schlauch. Den wollte ich mir eh kaufen. So hatte ich fr wenig Geld gleich beides.
Ich bin zufrieden und und wrde mir das Hotend wieder kaufen.
Einfach einzubauen, aber irritierend
Einbau war super einfach, war bisschen Fummelarbeit die Kabel durch die Schluche neu zu legen aber sonst ging es echt gut, dass einzige was mich irritiert hat war dass das Hotend nach dem Montieren schief hang, aber es luft einwandfrei.
Sehr gutes Hotend
Habs gestern eingebaut war super leicht. Es hat alles gepasst und der 3D Drucker luft wieder einwandfrei
Lieferung war wie immer sehr schnell und unkompliziert.
Kann das Hotend jedem empfehlen. Ich hab dieses Hotend in meinen Elegoo Neptune 2S verbaut und das hat auch gepasst. Super zufrieden.
Mit kleinem Trick ein super Hotend
Sehr gute Druckqualitt. Das einzige Problem, dass ich bisher hatte, war, dass bei ABS der Temperatursensor verrckt gespielt hat. Aber es hilft diesen mit Wrmeleitpaste in das Hotend einzusetzen. Seitdem funktioniert er wieder tadellos auch bei hohen Temperaturen.
Absolute Kaufempfehlung...
… habe es als Ersatzteil und Upgrade in meinem Ender 3 eingebaut.
Musste den Schlauch zwar was krzen aber es gibt nichts zu meckern. Funktioniert einwandfrei, Montage war sehr einfach und nach dem bzw. Seit dem PID Tuning, keine Schwankungen oder hnliches vernehmen knnen. Drcke kommen sauber vom Bed.
Das Teil kam gut verpackt und mit allen abgebildeten teilen.
Bin sehr zufrieden und kann es nur weiterempfehlen.
Man bekommt was man sich erwarte
Nichts berraschend, weder negatives noch positiv berraschendes. Man bekommt genau was man erwartet. Hab es fr meinen endet 3v2 nachbestellt weil mein erstes hotend kaputt gegangen ist. Natrlich gibt es qualitativ bessere Produkte aber es entspricht genau dem was original verbaut wa
Great Bit of Ki
Installation is nice and simple, but software setup is a bit of a learning kerb, especially if you haven’t updated/changed the firmware before. Look on YouTube for guides and step by step instructions is the best way to make sure you get it right.
Be wary the first time you use it, and make sure to test that it stops correctly by activating the touch while it is still a good distance from the bed. This will reduce the risk to your bed and give you time to stop it if there’s an issue.
Estrusore ufficiale Ender 3
il prodotto viene inviato in una confezione “lussuosa” per ribadire la qualit della “spare part” anche se devo dire che non ho poi trovato grosse differenze rispetto ad altri estrusori che ho comprato. Il montaggio facile per come concepita la stampante 3d Ender 3 per cui stato concepito. Il tubo blu per l’alimentazione in PTFE ottimo, anche se quello che avevo precedentemente essendo bianco e semi trasparente faceva vedere meglio il filamento durante il passaggio.
Trusty OEM
There is something about original equipment that you don’t get with even the fancy expensive pattern parts. I’ve had no trouble with these OEM hot ends, and I can’t see any reason you give them less than five stars. The cheap copies last for a very short time, and the expensive ones aren’t worth the money
I have not been able to use the product yet, but thought it would be important to let people know that the Hotend Nozzle Heat cable does not come with the Cable Connector, but the Hotend Nozzle Thermistor cable does.
Frustrating as I now need to find some.
Great upgrade for my voxelab aquila
After my disastrous attempt to mod my printer to be direct drive that killed my previous hot end I needed an upgrade to restore her to a Bowden setup, this has everything needed for that, and heats and cools quicker then stock and have had no issues so far with 12 prints successfully printed in two weeks with this upgrade,
Only gripe is the temperature wire is a little sho
Remplacement pour Ender 5 pro
Hollo ! le kit est trs bien , packaging simple et efficace et plutt de bonne qualit.
Cependant, il est prvu pour les imprimantes Ender 3 sries, et pas du tout pour des imprimantes core XY comme le ender 5. Le tube PTFE est beaucoup trop court , il manque au moins 20 cm , de plus la connectique n’est pas la mme pour entre ender 3 et ender 5 pro … du coup j’ai du dnuder, et changer le connecteur, dommage.
Malgr tout ca, le kit est trs bien et il faut a peine 20 minutes pour tout change
Ordered to replace hotend on my Voxelab Aquila (that I stupidly broke myself). Info for anyone reading this review: The Aquila is an (almost) 1-1 clone of the Ender 3 v2, so spares for that one will fit the Aquila (with a few exceptions – check online).
Everything fits perfectly, and the cables are plenty long enough to go through the loom to the mobo.
It’s been in place now for about 3 weeks, and everything is printing exactly as I would expect.
Highly recommended replacement.
works perfectly
Works as required and fits quite easily. Simple unscrew the cover and original heater, remove cover to motherboard and unclipped the connector (this is the hardest part fuel to creality hot glue it in pace) and pull wires out of sleeve. Screw new heater in place, feed wires along sleeve and clip to motherboard. Put covers back on and it’s ready.
Simple and a better heater than the original on a basic Ender 3. Worth it.
Original Creality Ersatzteil. In diesem Set ist wirklich alles enthalten, fr den Fall das einem das Hotend mal kaputtgeht oder die Heizpatrone den Geist aufgibt. Das Hotend ist bereits vormontiert das es einem wesentlich leichter fllt durch weniger Arbeitsaufwand dieses zu tauschen.
Ein paar Ersatzdsen kann man immer gebrauchen und auch die Silikonberzge sind fr den Preis mit enthalten. Sie sind schlicht schwarz, fr diejenigen, die etwas Farbe einbringen ein Manko, aber sie erfllen seinen Zweck, falls ein Schutz mal reisen sollte, weil er am Hotend fest gebacken ist. Auch zwei Stze Kupplungen sind mit im Set enthalten, damit man diese bei Bedarf tauschen kann. Am Hotend selber ist bereits ein Capricorn PTFE Schlauch in der passenden Lnge vormontiert. Preis-Leistungs-Verhltnis zu voller Zufriedenheit erfllt.