idaXL Firwood Robotic Lawn Mower Garage Outdoor Power
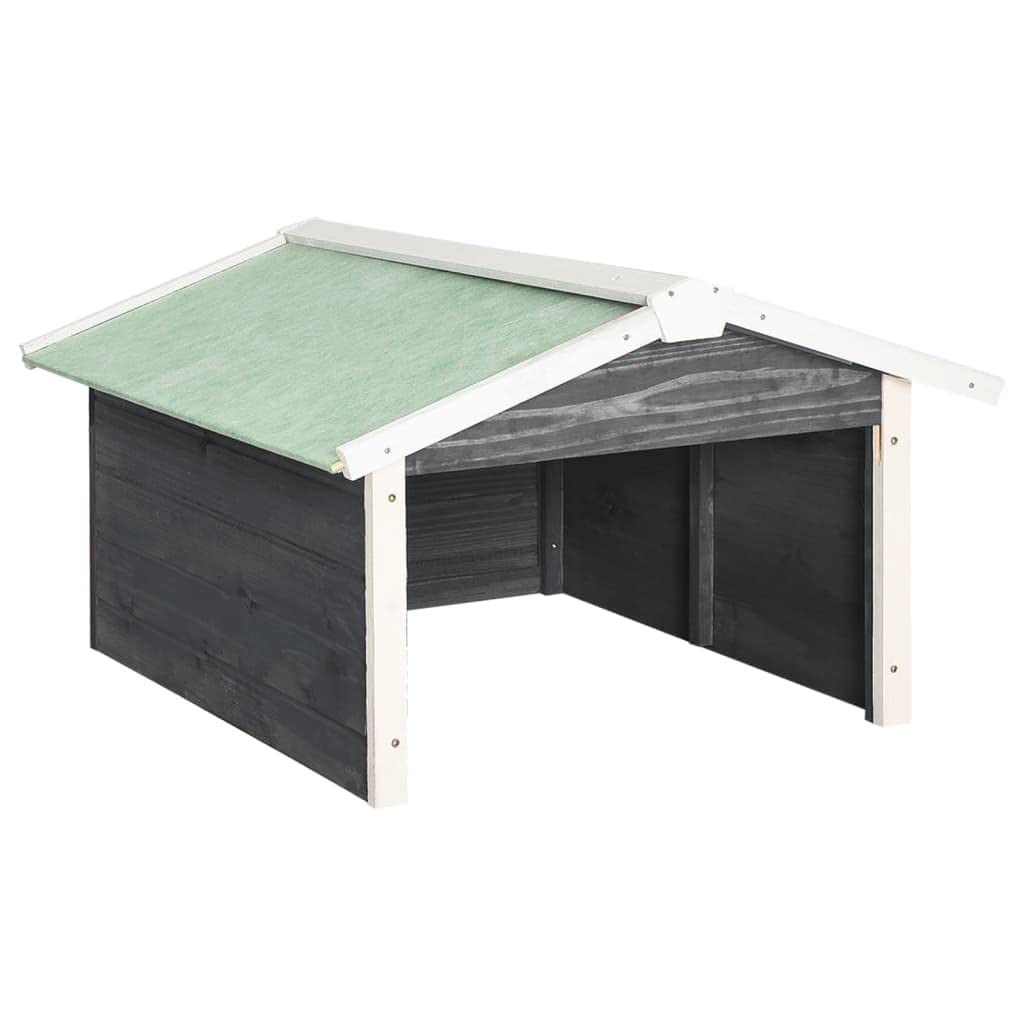
idaXL Firwood Robotic Lawn Mower Garage Outdoor Power Equipment Accessories Garden Wooden Mower Shed House Cover Stable Protector Grey and White
From the brand


vidaXL–Live it Up for Less!
| Weight: | 7.2 kg |
| Dimensions: | 72 x 87 x 50 cm; 7.2 Kilograms |
| Brand: | vidaXL |
| Model: | 170879 |
| Colour: | Grey |
| Dimensions: | 72 x 87 x 50 cm; 7.2 Kilograms |
4.0 out of 5 stars Instructions
It’s a nice product took over a week to arrive. Fairly easy to assemble . It’s a pity about the instructions they could be better.
5.0 out of 5 stars Does the job well and covers the whole robot lawn mowe
The cover fits the lawn mower well and keeps it dry easy to assemble and looks great in the garden.
Been using one of those curved shelters like you see over doorways that have legs and are now sold as robot mower shelters and although it worked brilliantly in the summer, in the winter it didn’t give enough protection for Larry. So been looking around for something better for a long time which gave more protection over winter to save me putting him in the shed over winter and something within my budget. Saw these on Amazon at over 100 each and then found this seller selling them at half the price made by exactly the same company. No brainer!
It arrived yesterday which was really fast delivery and I put it together in my living room as it was raining outside. The wood’s not the best and splits easily but the sides and ends were easy enough to screw together and there are holds for the screws to go through so no worries there.
The roof was a nightmare. I didn’t want it fixed to the sides because it would be more awkward to clean the charging base and inside of the ‘garage’, so it was quite a task to join the 2 halves together single handedly and independent of the sides. But I managed it. I’ll just have to be careful when lifting it off, that the 2 halves don’t part company. I’ll try and get something to make the join more permanent. But for now it’s ok. I must admit I am a little concerned about the weatherproof-ness (yes that’s not a word but this is a review not an academic essay) of the roof. It’s not a good fit and the white strips that go over the join are also joined together so there’s a small gap. I might have a nose around a DIY superstore for a length of timber thats the right angle to go over both halves, don’t know what that’s called but will know it when I see it.
The wood is quite thin, about 1/2″ an inch I reckon. So wouldn’t give much more protection from the frost than the curved cover I’d been using. So I had some twin wall polycarbonate in the shed which was an offcut from something else. I cut this into 13″ squares that fitted perfectly 2 on each side, and then a wider piece across the back panel. So its now winter proof. I fixed some large bubbled bubblewrap to the inside of the roof, but will get proper insulation board for that later on. That left the front which is open.
I wanted an automatic door that opened and closed as Larry popped in and out, but looking at the videos on youTube it looks a bit too complicated for me so for now I’ve bought a 1.5mm thick transparent table protector and will cut that to the width of the door and the height plus an inch so I can fix it to the inside over the doorway leaving the sides unattached. I’m hoping as Larry goes in it will drop down after him and form a barrier against the frost, we’ll have to wait and see if that happens if not and it gets stuck on top of him inside the house then I’ll have to try and fathom out how those automatic door openers work.
All in all I’m over the moon with the house, it’s not worth over 100 but I’m happy I paid 66 for it as that price seems very fair to me, and I didn’t mind strengthening and adapting it for that price. The white paint on the trim isn’t very thick and looks like it’s just been sprayed lightly on, so I gave that another lick of exterior white paint to protect it a bit.
One other thing I did do was buy 4 of those plastic tiles you buy as shed bases or to drive your car over on grass, that are rigid with holes in. Bought those on Amazon too and they’re arriving today. I think the 4 make up a square meter. The gap where this lovely little garage will stand is about 31 inches wide. That will take 2 whole ones one side (they’re about 500mm square and 40mm high) and then cut the other 2 narrower to fit so they’re 11″ wide making the 31″ overall width. I probably won’t put gravel in them but leave them as is, they will protect the little garage as they will raise it off the ground, preserving the wood a bit longer, and the charging base will be off the ground too.
I’ll take some pics if I can edit this review later when everything’s in place. I’m really pleased with how it’s come together, and the fact I did it all on my own. It’s a good job for a lady who’s almost 70 who’s got no man around to do these things. So if I can do it anyone can and its always good to blow your own trumpet when you’ve done something well. Now I’ve got a really sturdy and weatherproof little shelter for Larry and can happily leave him out in it all year round.
Hope this review has helped future buyers and also my little adaptation tips have helped too. Just don’t expect a top notch mower garage for this price, but it’s adequate and it can be made to be really really good with a little intuitive fiddling at not much cost. So yes I would recommend this little garage.