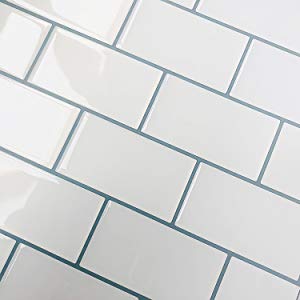
Art3d 12″x12″ Peel and Stick Backsplash Tile Sticker
Art3d 12″x12″ Peel and Stick Backsplash Tile Sticker for Kitchen, White, (10 Sheets), 30 * 30cm (A17049P10)

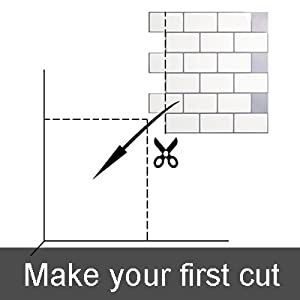
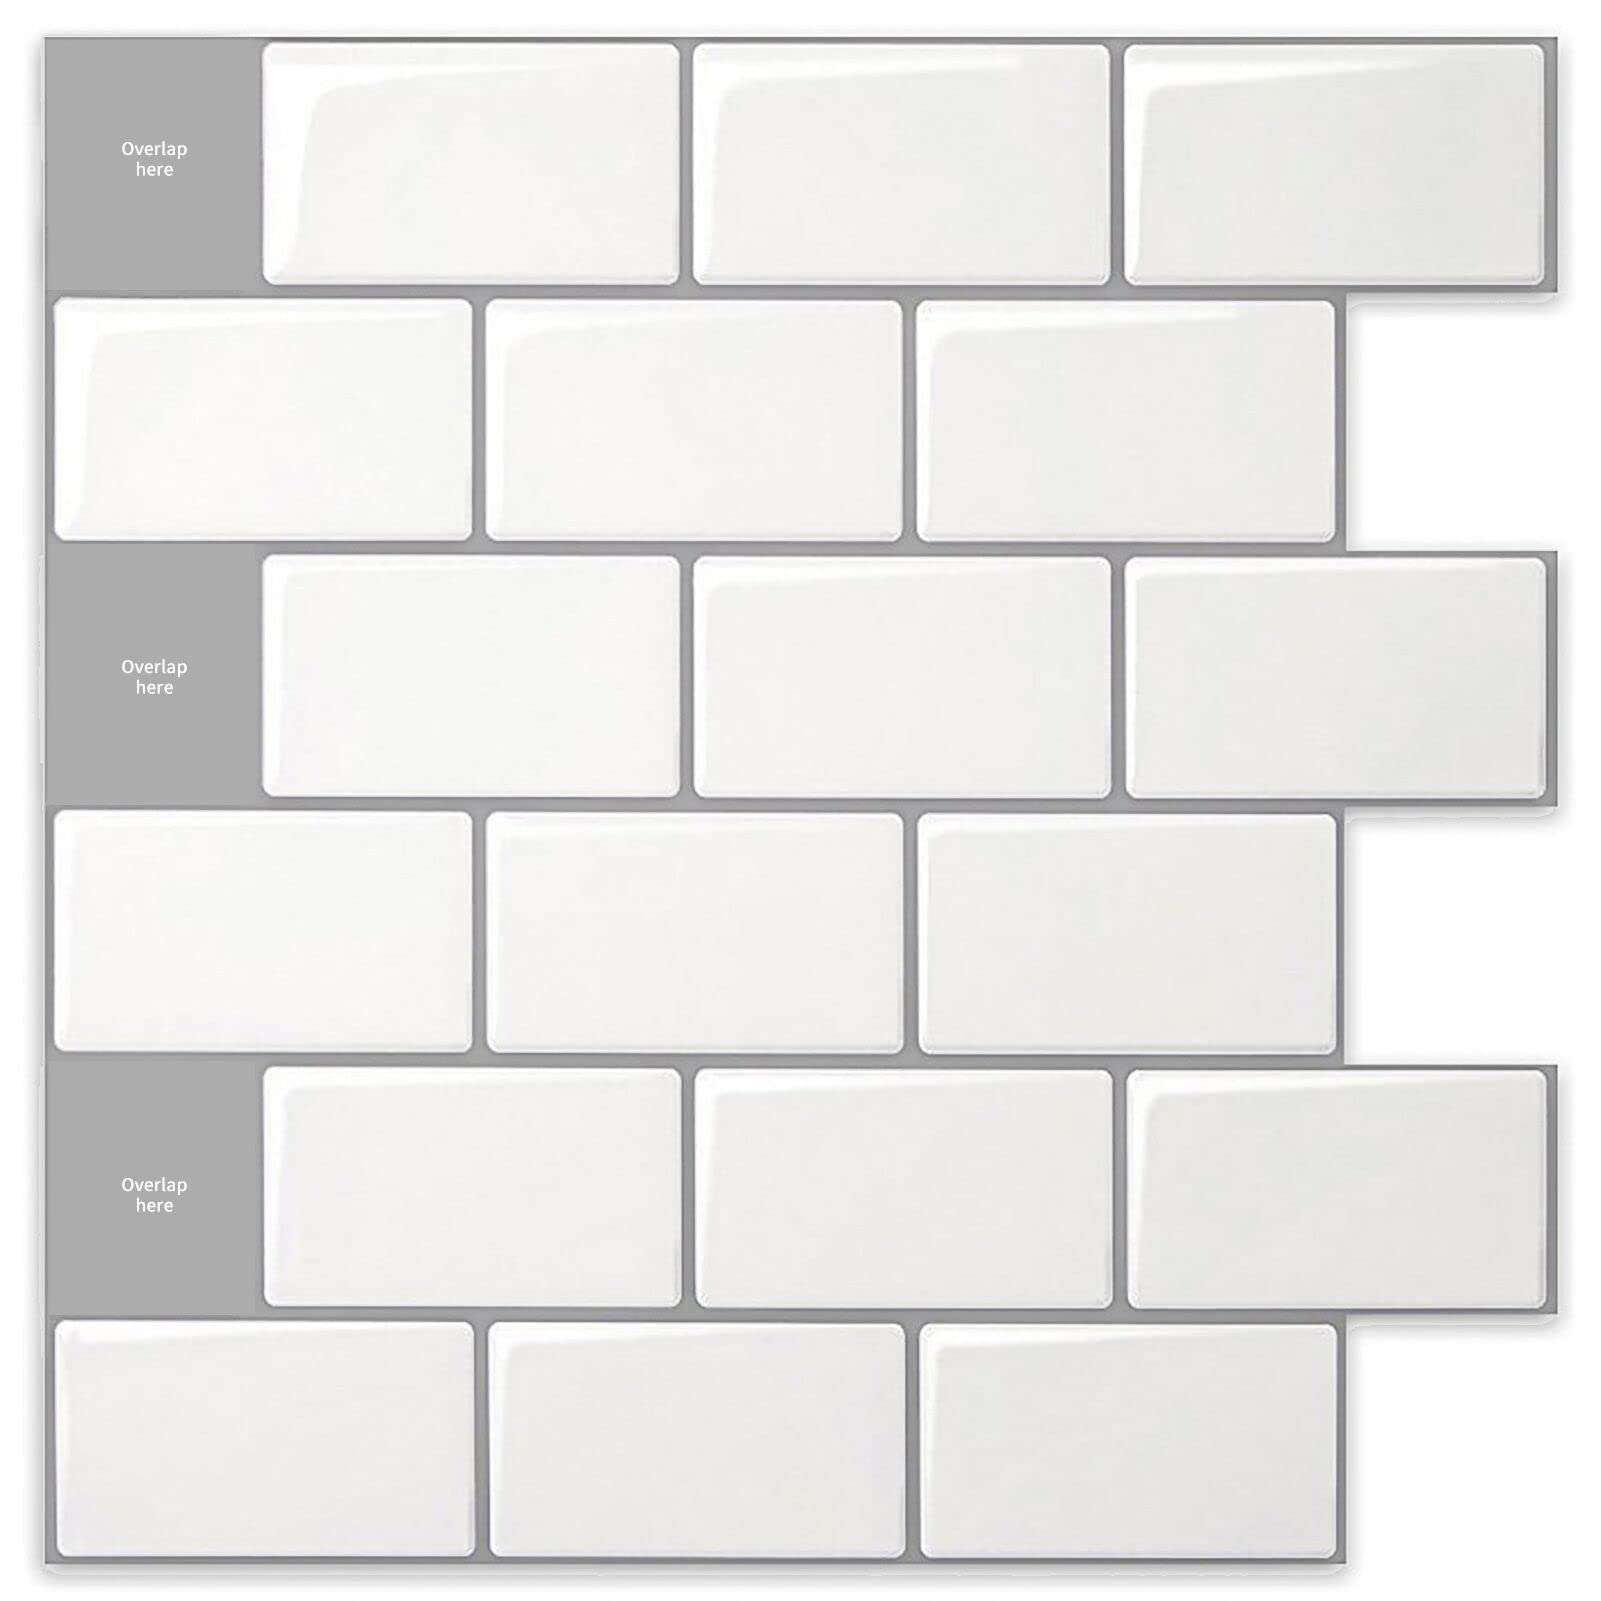
For the first tile, you need to cut the jagged side of the tile to create a straight edge
Put the cut side on the edge of the wall and start overlapping tiles in one direction
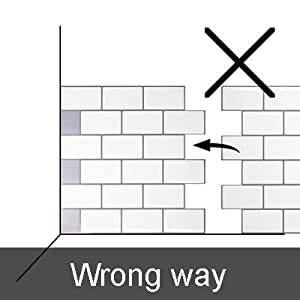
Don’t put the first tile in this way, otherwise you will have trouble in lining up
| Weight: | 113 g |
| Size: | 30*30cm |
| Dimensions: | 30 x 30 x 0.15 cm; 113 Grams |
| Model: | A17049P10 |
| Part: | A17049P10 |
| Colour: | White |
| Pack Quantity: | 10 |
| Batteries Required: | No |
| Batteries Included: | No |
| Manufacture: | Art3d |
| Dimensions: | 30 x 30 x 0.15 cm; 113 Grams |
| Quantity: | 10 |
| Size: | 30*30cm |
If you have a rental or apartment with finishes that aren’t ideal peak and stick tiles are your go to! Make sure you get these types. They’re easy to cut and resize. I made the mistake the first time by getting the stone ones.
They have the texture and appearance of real tile!! I can glide my nails on them and hear clacks like tile would. I can’t say this enough.. I truly enjoyed setting these up and they looked so good!
I never review things on Amazon but I HAD to review this to let y’all know I loved these they’re not fully whit alike the picture it’s like an off white ivory or like beige which looks sooooo good & clean against my granite countertops.
Great improvement, little tricky to use!
Perfetto per la cucina
Ottima resa visiva, l’adesivo si attacca molto bene, consiglio di applicare i fogli su un pannello (tipo di Forex) e poi di applicare tutto sulla parete cos pi semplice da usare. Io l’ho fatto per la mia cucina e il risultato perfetto.
Sticks well easy to use. Only problem colour is not quite what is shown title has a yellow tint to it. Wish it was what was shown. Otherwise great product.
Sticks well easy to use. Only problem colour is not quite what is shown title has a yellow tint to it. Wish it was what was shown. Otherwise great product.
I removed an ugly old spice rack/hood range and replaced with heat resistant tiles behind range then used these over awful wallpaper on walls. They are easy to cut but a little hard to align. I used a leveler to ensure lines were straight. It was a very unusual space so lots of odd cuts and took along time. Next I’m using them in a bathroom which is a regular wall so should be easier. They do allow for placing, removing and replacing which is helpful. Once on and pressed down they seem to stick well.
Ok so this stuff is a little tricky to apply. It doesn’t seem like it would stick but it does. I wiped my surfaces down really well first prior to application. Any degreaser would work fine I’m sure. I was moving right along at first and then realized the lines weren’t straight so I had to tear it off and restart. Our home is older so things aren’t level. There’s a tiny space at the bottom but it’s not overly noticeable. (I know it’s there but I don’t think anyone else would notice it unless they’re trying to pick it apart)
It can get bubbles underneath it while you’re applying it so it’s important to make sure you’re smoothing it down well while you’re applying it. It’s been up for a few weeks now and seems to be adhering well so far.
It took some time to apply. Longer than I anticipated but, overall, I’m pleased with the outcome.
Initially when I installed these they looked great but even in beginning they weren’t like crazy sticky but very early on what I had done behind the stove kept peeling up & id try to push back down but ultimately the edges all started curling up & turning loss now on the opposite wall above my bar it’s doing the same thing & im going to have to totally redo again with something less than 2 years in to having it. It was pricey in my opinion since I had to buy 3 packs to complete my project & to only last less than 2 years
Initially when I installed these they looked great but even in beginning they weren’t like crazy sticky but very early on what I had done behind the stove kept peeling up & id try to push back down but ultimately the edges all started curling up & turning loss now on the opposite wall above my bar it’s doing the same thing & im going to have to totally redo again with something less than 2 years in to having it. It was pricey in my opinion since I had to buy 3 packs to complete my project & to only last less than 2 years
I am pretty happy with the peel and stick backsplash. It was very easy to install. The complete installation in my utility room only took about a couple hours. They definitely don’t look like real tile but I was satisfied with the look since it was just for a utility room.
I am pretty happy with the peel and stick backsplash. It was very easy to install. The complete installation in my utility room only took about a couple hours. They definitely don’t look like real tile but I was satisfied with the look since it was just for a utility room.
Bought these to install a backsplash and tile wall in an RV. Real tiles are not an option for any RV or trailer due to the challenge ofntrying to keep the gross weight low, but also because the RV flexes. So, to refresh an older model RV, this was the beet option. Installation was pretty easy, i used a straightedge and razor knife to cut them. Make sure to use a new, sharp blade, otherwise theyll tear up. Then make sure you start your first section relatively level. Then juet peel, stick, and press down. I also usee a 3″ roller to help ensure proper adhesion. Like any project using adhesive items, make sure the surface is prepped well. It only took a few hours to install this in thrnkitchen and bathroom, and the RV looks much better now. I would not recommeme these in a home, it’ll look cheap plus it doesnt protect anything. Formthat application, use real tile. But for an RV, these are great. For an easy upgrade project, this will do it.
Adhesive is deceiving
Bought this product for my kitchen redo project. I read the reviews and because of recommendations I also bought a can of spray adhesive.
As I was installing, it seemed this product was super sticky. It made installation a little difficult because once it was on the wall it didn’t want to move. So I thought, “I don’t need the extra adhesive”. Wrong! 3 weeks in and I’ve noticed some areas are starting to pop away from the wall. I’m having to go back and now try to spray the adhesive carefully to adhere the tile to the wall. I do love the way the tiles look. For my budget redo, I would buy this product again.
But, long story short, use the spray adhesive.
Good looking but doesn’t last even a week.
EDIT: I’m back after a few days. So, it’s great to see how a backsplash would look in your kitchen, but it isn’t great for long term. I am constantly having to restick it to the wall, I ended up taking down half of it.
Seriously SO perfect and easy to instal. I cut the tiles to size with a pair of regular kitchen scissors. I’m not a diyer whatsoever, but these are incredibly easy to put up. They look great and they have a shiny finish to them.
If you are wanting a chic look on a budget this is the way to go. However they can be a challenge to install. I felt the directions could have been a little more detailed but once we got started we figured it out quickly. If you’re having to work around plugs the cutting can be tricky. Material is super thick which is a good and bad thing. Good because it will be durable, bad because trimming is required in some parts and it’s not the easiest to cut. Once it’s in the wall however it’s not going anywhere. Adhesive is very strong
If you are wanting a chic look on a budget this is the way to go. However they can be a challenge to install. I felt the directions could have been a little more detailed but once we got started we figured it out quickly. If you’re having to work around plugs the cutting can be tricky. Material is super thick which is a good and bad thing. Good because it will be durable, bad because trimming is required in some parts and it’s not the easiest to cut. Once it’s in the wall however it’s not going anywhere. Adhesive is very strong
I’m pretty happy with the results of my kitchen after installing this product.
However, after the first night I woke up to bubbles….I was able to fix but I can still see some – which is annoying! Be super careful as you lay it down. Don’t stick it quickly and DO NOT remove the backing until you have smoothed the tile over the wall super slow. (Prevent those bubbles!!!) I made a few beginner mistakes – the tiles weren’t completely straight, tho no one can tell, if I didn’t align correctly and pulled it up, I damaged some of the faux grout and lastly I didn’t use a tape guide or a sharp enough knife to cut/place everything perfectly straight. I installed this on a plasticky cheap preinstalled backsplash and the adhesive went on WELL. I see that almost everyone who installs this and the tiles fall down are installing on textured walls. It will not work on textured walls so don’t Waste your time or money. This will stick well to wood, real tiles, plastic or Formica backsplash and flat clean surfaces. I ordered one pack of tiles for a 14 x 90 inch backsplash. But I need a bit more for the outer edge. The project took me under an hour. I’ve only had it for two days and hope they last a long time….
Decent price with the coupon and so I decided to give this one a try. If you follow the instructions, installation isn’t too tricky and results are great. It does take a steady hand, a sharp cutting knife (I used a razor blade), and a good cutting setup (I used a self-healing cutting mat and a long ruler).
It’s really important to overlap the “grout” evenly. And a couple tips for the sections that are blank that say overlap here: First, if you follow the instructions, the words “overlap here” are upside down – that’s ok! Second, cut just a little sliver off the bottom of the bottom overlap square. I found it sometimes came down a bit too low and I struggled to cover it and keep the next sheet of tiles aligned properly.
Photos are of my project, a basement bar area. The wall was clean and dry when I started and the tiles stuck very well. I am going to add some grey caulking on the side edges to create a defined border.
This was the look I wanted and for the ease of use, I think this was a good value. So much easier than putting up real tiles!
Edited to add: This was on eggshell finish paint on a smooth wall. A lot of the reviews that show peeling issues, you can see the paint finish is probably a satin or semi-gloss (and some the wall just has too much texture). If the paint you are applying over has more than an eggshell finish, go over it with a fine grit sanding block first, then wipe dust away before applying.
This is an AMAZING and affordable alternative to real subway tile backsplash. My husband installed it without any issues. I had ordered the spray adhesive but it’s not necessary. This stuff sticks VERY WELL! My husband tried out 2 pieces and took them off the kitchen wall, and the pieces are so sticky they ripped of portions of paint layers that were on the wall lol. He left the pieces for several days expecting he’d have to use the spray adhesive to reattach them because he thought they’d dry out but they didn’t. So, great adhesion, fantastic price, easy install and amazing look. Friends and family didn’t believe it was peel and stick. They thought it was the real deal. I would say the one thing my husband didn’t like was having to be extra careful when peeling off the plastic to reveal the sticky side, as it would tare the piece in fragile places where the notches are cut out. But really aside from that we had no complications. It’s sooo easy to clean with just a damp cloth. Absolutely love it!
Worth the savings vs real tile
I really had a hard time deciding between this and just tileing the backsplash with real tile. I’m so glad we went with this peel and stick. It takes a little while to get going but is pretty easy once get in the groove. Take your time and double check your cuts and it will work out well.
I used a rotary cutter and scissors to cut these and it was very easy. They are super sticky, but I was able to remove a couple snd reposition them during the install with no damage to my walls.
I ran a line of caulk along the bottom edge for extra protection but the surface of the “tile” is very easy to clean and liquids just bead right off of it.
I’m super happy with how these came out and think it was well worth the price difference at least for now.
I was hesitant to buy peel and stick. I live in an apartment though and it desperately needed a bit of zing. I’ve looked at all kinds of peel and stick products and thought they would look tacky. I took the plunge and am so glad I did. It was easy to install and does come off the wall without damage, either to the wall or the product. It was a bit tricky to measure and cut for electrical outlets. The instructions didn’t offer guidance on that. It’s the only issue I have with it. From a distance you can’t tell it’s peel and stick. Up close, it looks really good. The only thing that kind of gives it away is the grout lines, but that’s subtle. I am really pleased with the overall effect and look.
Really love the look of these. This was a quick and inexpensive fix to our need for backsplash. The tiles went up really easily. Very easy to cut. I did use some adhesive when putting them up but we had some start to peel away. This could partly be do to the freshly painted walls and old adhesive I used. Husband brought home some stronger spray adhesive and I went back and sprayed the problem spots. Seems to be working better.
My negative comments would be – it really doesn’t do well behind the stove top. When I cook it warms up the tile and seems to warp it a bit. It does press back down but it definitely isn’t as heat resistant as I’d hoped.
Still overall very satisfied with this product! I just recommend the extra wall prep! I think I was just too excited to get it put up!
Careful attention to details is importa
I wanted to install backsplash in my kitchen and could no longer find “tile board” that would have been my preference material. Wall preparation is critical, I wound up having to sand down the wall surface, then wipe down the surface with Tack Cloth to remove the dust then needed to wash down the surfaces with denatured alcohol to remove surface grime. Installation of the tile squares requires a real steady hand not to crinkle the surfaces. I still have a few areas that there is minimal adhesion and am now waiting for an order of the recommended 3M adhesive.
My overall opinion is that it took plenty of patience with a steady hand to assure the interlocking squares were properly aligned and the slowly installed on the wall surfaces. The finished product looks very nice and gives our kitchen an immediate boost in its appearance. This was not a simple installation for those who have poor home construction skills, however when finally installed it was worth the effort.
Apt Renter Reno
Soo happy with what I chose, the white subway tiles with grey grout. It took some time to get used to following the pattern especially around awkward areas or electrical outlets but I got the hang of it. I’d recommend if your a beginner to start in an area that’s less seen visible, in case you mess up at first.
I also recommend getting an extra pack, you don’t want to run out in the middle of your project. Easy to return anyways. The first time I only bought 2 packs of the 12×12 and ran out. When I was going to buy another pack it was all sold out. First amazon item that took forever to restock or kept selling out quickly. Even tried buying from different site but had to return cuz it didn’t match. So I patiently waited and finally got it. Worth the wait and work. Totally recommend
These were SO incredibly easy to use & install. I like these because you dont have to cut them in order to piece them together. You just over lap them to fit into one another. I did need to cut some individual smaller strips because my backsplash was taller than the sheets, but they were easy to cut and easy to manually stick on to continue the pattern up the wall. Once applied to the wall, you literally cannot tell where one sheet ends & the next starts. It blends together seamlessly! They are also EXTREMELY sticky, so I have no worries about them staying adhered to the wall over time. I also have them partially behind my oven & have not had any issues with the heat. Would HIGHLY reccomend to anyone looking for a quick, high quality looking face lift for their back splash.
These were SO incredibly easy to use & install. I like these because you dont have to cut them in order to piece them together. You just over lap them to fit into one another. I did need to cut some individual smaller strips because my backsplash was taller than the sheets, but they were easy to cut and easy to manually stick on to continue the pattern up the wall. Once applied to the wall, you literally cannot tell where one sheet ends & the next starts. It blends together seamlessly! They are also EXTREMELY sticky, so I have no worries about them staying adhered to the wall over time. I also have them partially behind my oven & have not had any issues with the heat. Would HIGHLY reccomend to anyone looking for a quick, high quality looking face lift for their back splash.
So I had a peel and stick wallpaper as my previous backsplash to save some money when we first moved in because I had to redo the entire kitchen on a serious budget. So I opted to step it up while still keeping the cost down. I love the modern farmhouse look of these tile. They go very well with my updated decor. Once you get the hang of the pattern it’s very easy to apply. A few spots have air bubbles. But I got them all out except for a few tiles in one sheet. (Above the stove) I may replace it Bc I have a few leftover sheets but I may see how it looks in a few days first. I think they look very nice for the price and time saving factor of not having to put up tile one by one then grout etc. I think it’s worth the buy but at close range you can tell they’re not real tile so just keep that in mind. But when looking at the room in a while they look very good!!
I am a reader of all reviews and base my purchasing power on what others post. With that said most people's reviews where they complain of not sticking or peeling off haven't thoroughly read through the directions and are quick to give a bad review. The wall has to be be prepped, sanded, or just cleaned before installing the tiles. Yes, an additional adhesive is a good idea for extra protection against peeling or edges bubbling. I am about to install my second round of the tiles due to the tiles discoloring. I did get a good 5 years out of the first application but as a chef I am in my kitchen usually daily and the heat, water, and constant exposure to all the elements that occur in a kitchen this is to be expected. I am hoping that the color doesnt get dingy with the second round and I will be using the black grout option as it seems to be a better choice with how I know the white grout performed. For living in a NYC apartment these are still my choice of a inexpensive option when it comes to backsplashes and a small tiled spaces. Oh, I was able to get two applications out of the first box.. Not for my own kitchen but for my neighbors kitchen when I gifted her the remaining tiles for her space. She is much easier and doenst cook as much as I do and her tiles look brand new still after 5 years! So that's saying something there! Enjoy your tiles!
I am a reader of all reviews and base my purchasing power on what others post. With that said most people’s reviews where they complain of not sticking or peeling off haven’t thoroughly read through the directions and are quick to give a bad review. The wall has to be be prepped, sanded, or just cleaned before installing the tiles. Yes, an additional adhesive is a good idea for extra protection against peeling or edges bubbling. I am about to install my second round of the tiles due to the tiles discoloring. I did get a good 5 years out of the first application but as a chef I am in my kitchen usually daily and the heat, water, and constant exposure to all the elements that occur in a kitchen this is to be expected. I am hoping that the color doesnt get dingy with the second round and I will be using the black grout option as it seems to be a better choice with how I know the white grout performed. For living in a NYC apartment these are still my choice of a inexpensive option when it comes to backsplashes and a small tiled spaces. Oh, I was able to get two applications out of the first box.. Not for my own kitchen but for my neighbors kitchen when I gifted her the remaining tiles for her space. She is much easier and doenst cook as much as I do and her tiles look brand new still after 5 years! So that’s saying something there! Enjoy your tiles!
Ok, first let me say I read alll kinds of mixed reviews on this but most were positive so I decided to give them a try. We did a facelift on our kitchen and needed to hide a very damaged backsplash. This did the trick ! I’ve done the stick wallpaper and hated every second ! This was much more forgiving. Easy to stick and allowed for some minor adjustments. I actually messed up around some outlet covers and was able to replace just one time vs ripping up the whole thing ! I read a lot about seeing seems but I don’t find this to be an issue, sure , if you REALLY inspect ! But hey it’s peel and stick tile ! I also read a common complaint about installation. If you follow directions there is no issue that I found. I only rated 4 stars for easy to clean because my only complain is it’s a little sticky when you remove the clear plastic covering. It wiped pretty easily though . I’m so excited about my update kitchen !
Ok, first let me say I read alll kinds of mixed reviews on this but most were positive so I decided to give them a try. We did a facelift on our kitchen and needed to hide a very damaged backsplash. This did the trick ! I’ve done the stick wallpaper and hated every second ! This was much more forgiving. Easy to stick and allowed for some minor adjustments. I actually messed up around some outlet covers and was able to replace just one time vs ripping up the whole thing ! I read a lot about seeing seems but I don’t find this to be an issue, sure , if you REALLY inspect ! But hey it’s peel and stick tile ! I also read a common complaint about installation. If you follow directions there is no issue that I found. I only rated 4 stars for easy to clean because my only complain is it’s a little sticky when you remove the clear plastic covering. It wiped pretty easily though . I’m so excited about my update kitchen !
I added these to the back wall of my small laundry room and they turned out great! I am one of those people that read all the reviews before purchasing. Most of the low ratings are from people not using these correctly! Note that they OVERLAP, not interlock.
I used a spray adhesive for rubber and vinyl. I sprayed the wall and the back of the sticker before applying. I have no issues with them peeling off. I’m not sure if this extra step was necessary, but I did it just in case because I have some texture on my walls (pictured).
I used a combo of a box cutter and scissors to cut them. The gel can be a little annoying to cut through but just run the cutter through it a few times and it’ll work.
It took me about 3-4 hours to do this (4 boxes worth). Just be patient and take your time! It’s worth it in the end.
There are 3 layers to the stickers. My advice is to take the back off to expose the adhesive, apply to wall and then take off the top protective layer.
The only other thing to note is that the actual tile size is smaller than I expected (about the size of a business card). Still happy with my purchase and recommend this product. Can’t wait to finish the rest of the laundry room now!
Update:
Added a picture with the finished laundry room! I also had a visitor that tried touching the tile thinking they were totally real! Product is still holding up great.