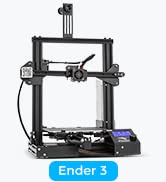
Creality 3D Printer Ender-3 Neo, CR Touch Auto-leveling
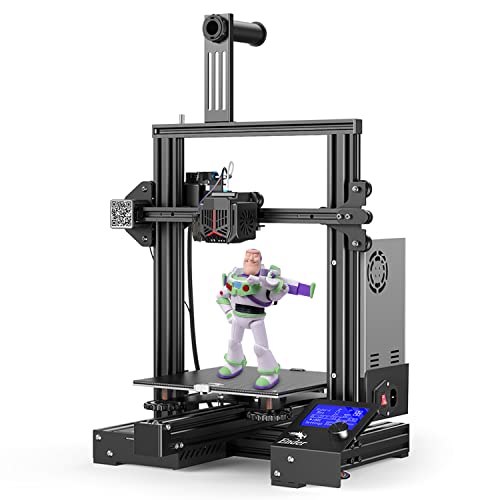
Creality 3D Printer Ender-3 Neo, CR Touch Auto-leveling, Full-metal Bowden Extruder, Large Corrugated Heat Sink, Silent Motherboard, Carborundum Glass Printing Platform, 220*220*250mm
From the brand


How we get our start?
Creality has focused on the design, research, production of 3D printers and 3D printing related products since 2014.
What makes our products unique?
Our factories and products are professionally certified, covers an area of 50,000 square meters, reaches an annual production capacity of over 1,000,000 units.
Why we love what we do?
Creality hopes to bring the convenience of technology to people. And should enable people to learn more about 3D printing technology. Create reality, make dreams come true! We want and do that.
| Dimensions: | 22 x 22 x 25 cm; 7 Kilograms |
| Manufacture: | Creality |
| Dimensions: | 22 x 22 x 25 cm; 7 Kilograms |
| Origin: | China |
Good reliable printe
I bought this for my husband for his birthday, he has been wanting one for a while, I researched the living daylights out of starter 3D printers and at the last minute I came upon this one. Obviously there is some good reviews and bad reviews but I decided from all the ones I looked at I decided this seemed the most reliable. I was right. He loved it of course! Set up was really easy, he did have to adjust the plate as his prints messed up a few times but once this was set its printed brilliantly. He printed me a little Eevee, my favourite pokemon and it turned out amazing. He is currently printing a full sized Mandalorian helmet which is his 1st big print. So far it’s working well!
Brilliant piece of kit for beginner or casual printers
As a DIY first machine, this is just about perfect. Easy to setup and assemble, nice color screen to naviate through menues, etc… operation is quite simple.
For what I do, few prints here and there, this is all you’ll ever need. The machine has a lot of buffer to do good fine quality prints, it’ll just take a long time.
A great 3D printer with great customer service from supplie
I had a Weedoo Tina 2 as my first 3d printer and decided I wanted to print bigger items.
This Creality Ender 3d V2 Neo met my requirements, there is loads of feedback that I reviewed along with YouTube videos.
From my perspective it was easy to set up and so long as you take your time in setting the level Z offset ( and do not move the machine once set up) you should be fine.
Use a good filament and keep it fresh, I use the large sealable food containers from the Supermarket to store when not in use.
Printing on the Heated bed is easy and the filament sticks well. Just wait for it to cool down after printing is completed to remove from the flexible bed.
I have read some horror stories about support from some sellers, however I had to contact them about a small issue which Creality EU HYD customer service were really very helpful. They are located in Asia, but were prompt in replying, in my opinion good customer service.
There is so much support from groups and lots of free STL files out there.
The only issue I see is loading and uploading the filament is not as automated as on the Weedoo.
So to sum up a good choice and many happy models printed.
First, if you are not comfortable with technical assembly it may not be suitable for you. The printer comes in several parts and so assembly is required. It took me about 4 hours to assemble and configure this printer. The instructions are ok but the parts are difficult to identify in some places as the drawings are quite small and requires a bit of detective work to identify the correct part during assembly. With perseverance and patience you should not have too much trouble. One problem I had and why I dropped a star is because the firmware was out of date. The first couple of test prints were good but then the control panel screen went dark. After some head scratching I updated the firmware to the current one and the panel came back to life. Usually when I buy electronics etc the item is supplied with the appropriate latest firmware. I think this was a major omission as finding the correct firmware for this model was difficult. Flashing with an incorrect one could brick the printer so I’m thankful YouTube is here. You need to be mindful when assembling that the gantry must be square so checking for this at stages is helpful in ensuring everything is correctly secured and accurately placed. It is also a good idea to check the pre assembled bolts as some of them were not quite tight. Printed models are clean and nicely printed. The printer is very quiet and the noisiest is the hot end fan but it’s ok. I bought this to teach my son how to 3D print his blender models. It is not too heavyv and can was be moved. In summary, a good printer for small projects and I would recommend it bearing in mind the above caveats. Bed levelling is easier than some printers but still a pain so I have invested in a CR Touch auto bed levelling kit. As long as you don’t expect to open the box and start printing straight away this is a great little printer. Happy printing.
very cheap for how good it is
it’s a really damn good printer, already printed a replica 1887 and 1897 shotgun, the cable is a bit short, and 3d printers in general are a bit loud, but it was definitely a good purchase
Insane Print Quality!
Didn’t expect much for such an affordable printer however the print quality is amazing for the price. I previously used makerbot printers that were 10x the price and feel that I prefer the quality of print that comes off this machine even at 100% print speed. Very very happy.
Impressive Performance and Endless Fu
The Creality 3D Printer Ender-3 V2 Neo has surpassed my expectations and continues to impress even after several months of use. Not only does it deliver outstanding print quality, but it also offers incredible value considering its affordability. From the moment I received the package, everything was included, and no essential components were missing.
Setting up the printer was a breeze, and the level of enjoyment it has brought me is unparalleled. Whether you’re a hobbyist, a maker, or a professional, this printer offers endless possibilities for bringing your ideas to life. I highly recommend the Creality Ender-3 V2 Neo to anyone looking for a reliable, cost-effective, and exhilarating 3D printing experience.
Great product, never gonna regret the money spe
Hey guys,
This 3D printer is one of the best you can get, print quality is great, it’s easy for setup, a great community behind it too! 5 stars for it no doubts if there was option for 10 stars was gonna give it 10!
Amazing!
It is common knowledge that Creality make great 3D printers, and my standards were met with this printer.
Great to assemble, although I was missing one screw (that wasn’t really needed).
Easy to get going, but make sure to go over print settings in your slicer.
I’ve owned 3D printers before so I knew they were hard to setup, the manual was for a different model, but luckily plenty of tutorials on youtube.
I’m still not happy with the levelling and Auto levelling is just something you can do to fine tune, after you have manually levelled, so I just need to keep gradually tweaking using the nozzle clear lines as a guide.
But I have since printed a few things and once off the bed, none have failed yet.
Quality is very good and that’s just on normal settings.
After many hours of experimenting the Sun came out. I levelled the bed and most importantly set the Z offset correctly. I now print perfectly, no stringing, good adhesion and good detail.
First 3D printer and it pretty much didn't stop for the first week.
It was simple enough to put together by following a Youtube video. I would say I’m a complete beginner and I was up printing within hours. The only tip I wish I knew before was to let the hotbed cool first, it’s much easier to remove the printed parts. I just wanted to print something else and didn’t know at the time how much easier it would have been if I had let it cool down. The new plate was about 20. Using websites like Thingiverse (look at other people’s 3D prints and download them) and Tinkercad (Edit 3D or create your own 3D projects) should help you get started if you are new to 3D printing. And I use Ultimaker Cura as the slicer.
I don’t really have anything to compare it with but I think it prints quite well and for my first printer, I’m happy with it.
I had next to zero 3d printing knowledge and exactly zero experience. This printer is a miracle – it has not put a foot wrong since I opened the box. Easy to assemble and fairly straightforward to do the initial levelling after watching some YT videos. There has been no days since I set it up 5 weeks ago where it hasn’t been printing something. I’ve learnt Fusion 360 (Free for non-commercial use) – which I never expected to be able to do. Some stuff I download. I’ve done many many dozens of prints and it has never once failed to produce a perfect print. I ma so pleased with this. I do need to source another magnetic plate some how, since I’ve scratched mine quite badly – this was my fault, I was using too much and the wrong kind of force to remove the print. You just need to bend the plate a lot and the print pops off. One of my better choices.
After spending an hour or so setting up and making sure everything runs smoothly, another 30 minutes doing the bed levelling paper thing, it was ready to print.
I found if you want good prints then repeat the manual bed levelling every day, repeat the Z-Offset adjustment on every print. If your prints don’t stick lower the z-offset, if they look smeared raise it slightly.
It now happily runs of print after print without issues. Would highly recommend this for anyone getting into 3d printing.
A collection of parts...
This is the place to start with 3D printing, but beware, the Ender 3 Pro2 is best described as a collection of parts that can be used for 3D printing. Expect to be tinkering with bed alignment, with z-stop consistency, with a wiring noise the hot end fan makes when it’s cold. But there is also a solid following and lots of advice on how to make the most of the Ender 3 and you will be printing great parts with this thing.
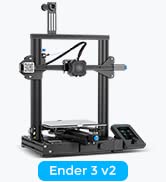
Ender 3 V2
First things first… well packaged and simple enough to assemble. this isn’t my first 3D printer but I wish it had been as this is a lot more user friendly than several of the others I have had previously. it’s modular design means that this machine functions as a stand alone unit but is also very easy to upgrade with almost no specialist tools or know how. I have added the CR-touch to mine so it’s now self leveling… this isn’t essential at all but like most geeks I’m lazy and like a machine to do the work for me.
This machine has taken the community by storm and because of that its a great first time machine with mountains of videos online exploring its full list of features.
unlike machines 10 years ago this runs almost silently other than the fans running… which is means you can use it without deafening everyone around you.
it’s also worth mentioning that this machine is fully supported by CURA and most other mainstream slicing software so you can expect reasonable results pretty much out of the box.
I’ve added a light on to mine that enables me to see exactly what’s going on while I’m printing the link to it is below.
https://www.amazon.co.uk/gp/aw/d/B07FCKKVW9?psc=1&ref=ppx_pop_mob_b_asin_title
Very Addictive
My first 3d printer. Wanted one for years but finally got the chance to use one and was hooked. Opted for Creality Ender 3v2 due to bed size, and someone I know having this model. Disappointed that it came with a lower spec chip (RCT6), but works and prints well. Currently a good way into 3d printing, but in hindsight might have made a different choice and gone for a cheaper clone of this printer.
Fantastic printer for the money.
Ender 3 printer. I upgraded to this from an old 3D printer so I have experience in printing.
Assembly took an hour or so and the instructions are fairly clear and there are plenty of videos on youtube of people assembling the machine, worth watching just to get an idea of what to do, and things like adjusting the offset wheels is well worth knowing.
My old printer had a bed leveling program that talked you through it step by step, which this lacks but apparently there are downloads from Thingiverse that do that for you. I managed without them. Threw on a roll of PLA and printed the cat from the micro SD card and it printed perfectly first time, though I don’t expect that to happen every time….
But so far I’m very impressed.
Note: There are slightly updated versions out, with a magnetic printing surface, this one holds the bed in place with clips, and a redesigned power supply in the base not on one arm, but pretty much the same machine.
Good printe
I have had it for about 3 weeks and was able to print almost out of the box. With in 14 hours of getting the printer I had my first print. It is worth updating the firmware, my printer came with the 4.2.2 32bit control board. it is simple to update by putting an SD card into the SD slot with just the new firmware. I have complied a copy of Marlin 2, I have done this as it has thermal runaway from the hot end.
It might be worth getting the 4.2.7 board upgrade as it does make the printer quieter. I have had success with PLA and ABS.
This is my 6th 3d printer and so far, the best!
Not too easy to put together if youre a beginner, although even my very first printer went together in just over an hour, but I’ve gained experience and found that I could put this together quite easily.
I upgraded the extruder kit and springs from the outset as other purchasers and reviews advise, but so far, I’ve only had 1 failed print and that was one of the samples supplied on the SD card lol
Printed off benchies in different filaments, one of which I got impatient with as I was waiting to start another print and although not perfect, it was adequate printed at 200% speed!.
Even a planter that was anticipated a 3 day print came out great in less than 24 hours.
Adhesion on the removable glass bed has been perfect with no problems so far with sticking to the plate or removing after printing.
The colour screen is best slightly shaded – in bright light it can be difficult to see the settings but it’s very organised and clear.
Highly recommended printer from a great brand name and lots of manufacturer and customer support forums.
Great piece of ki
This item is exactly what it is as described by the seller. I had received the item before its’ delivery due date and it came well packaged. Once I opened the printer’s box, the components was packed within a foam and the critical parts was packed in an electrostatic bag. The hardware was packed in its’ own baggie with part numbers. The main parts was shrinked wrapped. The assembly was a little tricky as the instructions was not completely clear even though they gave a video and a basic guide on a TF Card. I also relied on YouTube to help me out. The TF card also contained a useful piece of software and print examples. I had spent a great deal of time to adjust the bed and now I am finding that I have to re-adjust the bed fewer times as I do more prints. It also came with the required tools and a handy cutter to cut the included filament. The only complaint that I have so far is that the filament did not come on a spool. As I was using the included filament, it had jammed and stopped the printer. The menu control on the printer is easy to use and allows you to adjust the many variables that goes into a print. It is a great piece of kit and I look forward to many more prints.
Had my Ender3 for about month and it’s been very easy to use. The Instructions are bit unintuitive but I followed a guide on YouTube. They’re fine but they could probably have a little more detail.
Print quality is very good but I don’t use the included slicer (I use Cura) and I’ve had some good results on the recommended settings. I haven’t had to play with the settings too much.
Tuning and calibrating the bed plate was a bit tricky. Once it was leveled it was okay for about 6 or so 40min prints until I lost adhesion. I tried releveling it but the centre would still be too far away from the nozzle. I changed to a magnetic bed and it’s been perfect since.
To sum, it works well out of the box, only had a few failed test prints but nothing unexpected so far. Good value, lots of tutorials and tips out there, pretty solid bit of ki
I had this product recommended by a trusted friend that has had one for a couple of years.
There are a couple of niggles that don’t have lasting effect.
The first is that the instructions for assembly are fairly basic and not the easiest to follow. There are a whole collection of YouTube videos on the subject, I recommend you watch them.
The second is the product is essentially unfinished. There are a number of things that you are advised to print and attach to the printer to improve reliability.
The print quality is excellent for the price point, the software is easy to use, it is reasonably quiet Following reading what there is online, I thought I had the noise equivalent of a Jack Hammer coming to my home. While I wouldn’t want to sleep or watch TV in the same room as it, it cannot be heard outside the room it’s in and I’ve currently got the radio on while printing and typing this and can clearly hear the radio.
The output, printed with reasonable quality PLA is sturdy, durable and aesthetically pleasing, although on the default settings there is some patterning caused by the printing method.
I am new to 3D printing so cannot compare with other products but this has lived up to, and exceeded, expectations.
Be sure to claim your free glass bed with the special offer!
This was my first 3d printer after pondering the topic for years!
Originally I was looking at a Prusa but really couldn’t justify the price of it, especially as prices had fallen rapidly on competing products over the years.
When deciding to set my budget, I ended at 400 max – so was originally considering the Ender CR-6 SE.
After watching multiple youtube videos on the subject, the ender 3 v2 was clearly the better choice for quality and flexibility though (which was nice, as it was even cheaper than the 6!)
One of the deciding points for me about the ender 3 v2 was how much it can be modified. I’m sure this is also the case for other printers, but the ender 3 series definitely seemed to have more available models on 3d sites than other printers. There are so many mods and addons for this model that you can print out., it’s almost overwhelming – think I have about 200 models bookmarked so far :/ It does really amuse me that the printer can produce it’s own parts too – it’s almost having like a perpetual engine!
So at this point I’ve added a BLtouch auto-leveller (essential purchase!), changed the hotend for an all-metal microswiss one, made it virtually silent with noctua fan and hotend mods, changed the extruder to a dual-gear, etc. Quality-wise it’s now superb, silent, and all-in still much cheaper than any off the shelf Prusa, etc. Oh, the other essential addon imo is a pi running octoprint – you won’t regret it!
Regardless of any mods though, the printer is really solid and well thought out, and works well out of the box.
I didn’t have any issues assembling the printer at all – the instructions included aren’t amazing perhaps, but there are plenty of great videos on the topic online, from beginner to more complex topics on calibration and tweaking.
I’ve now printed with PLA, PETG, TPU and all have come out just as hoped. PETG is probably my material of choice currently. PLA does have less stringing and comes in more finishes, but PETG is really tough! The all-metal hotend means that I can print in ABS, but the fumes it gives off sound horrific so I won’t be going there…
Negatives? Well perhaps the included instructions could be better, and the default fans they fit can only be described as ‘industrial’ – they work but are really quite loud… Apart from that though, nothing awful to say about the machine at all thus far, regardless of the price.
What a great printe
For the last few years I have been struggling with a cheap i3 clone printer, I have had no end of problems and finally I decided to bite the bullet and purchase the new Ender 3 V2.
From the moment you open the box this feels like a slick professional product, it is well packed and includes everything you need to get started, even a small amount of filament (PLA I assume). The instructions are readable and simple to follow.
The printer requires some assemble but nothing like by last one, all the cabling is done and just needs to be plugged in the right holes, the most fiddly part is the hot end belt but even that just needs patience, to be fair I have bought children’s toys that were more difficult to assemble so just take your time and make sure everything is lined up and tight, check every screw even the ones fitted in the factory (30minutes to an hour should see you ready to print).
As soon as I had it assembled I levelled the bed with a piece of paper and loaded the supplied SD card, and set it printing the first model, I was amazed to see that it worked immediately, the filament stuck to the bed and the entire model printed without a problem, in fact the print quality was soo much better than I could have imagined, this really shows up the failings of my other cheap printer.
Setting up Octoprint was very easy on my Raspberry Pi, although I did have to purchase a Pi Camera but it only cost about 10 delivered so was well worth it. Octoprint displays an error with the V2 but it is simply fixed by using the recommended plugin to ensure that temperatures are reported correctly.
So my first impression of this printer is that it seems to be a great printer for the price, but would I recommend it to others? The answer is a resounding Yes, if you want to get into 3D printing then this is a great place to start and at under 300 it gives impressive results and won’t break the bank.
If like me you are tempted to spend less and buy a self build cheap clone kit then please learn from my mistakes and don’t waste your money. My old printer will now be stripped for parts to be used in other projects.
Great support from Creality EU
I unfortunately had the issue of damage during delivery (gauged rail and broken switch) clearly done by the courier. As I live in a remote location returning to amazon was not cost effective or realistically possible. Amazon was useless however Creality EU were excellent. The correspondence and support they provided was excellent and they have shipped replacement parts. I would fully recommend buying from them.
As a newbie to 3d printing this printer is superb. Asembly is a simple process however time sent now ensuring the gantry and frame is as square as possible is highly recommended. Also check all the bolts for tightness including those installed by the manufacturer, many of mine were loose. My first prints have all been successful and I’m just waiting on delivery of more filament.
Awesome bit of ki
Been looking at 3D Printers for a while now. A friend of mine said he had one (Creality Ender 3) but didn’t use it and said I could borrow it. After using it for a few weeks I decided I wanted to buy my own so went for the newer version the Creality Ender 3 v2. Wow what can I say this is an even better machine and prints like a 1000 printer. Putting it together was very very easy and then setting it up with your favourite PC software was straight forward. It’s now printing perfectly and I’ve had no problems what so ever and I’m very happy with it. I can’t believe that i had gone so long without a 3D Printer, there an absolutely awesome bit of kit so if your looking for a 3D Printer then I definitely recommend this one without hesitation whether it’s your very first, beginner or you have been 3D Printing for a while the Creality Ender 3 v2 will do the job and more without fail. Don’t sit there putting it off like I did buy one now you won’t regret it.
Ender 3 V1 - New Versio
Hi I’ve been using my Ender for a few weeks now and it’s excellent. My Ender 3 already had the new 32bit mainboard (v 4.2.2) fitted, older V1’s had a 8bit mainboard. Dont forget to level the bed and you should get good results. There are a few upgrades most people do to the Ender 3 V1, to make life a little easier It needs tensioners on the X and Y axis as the V2 has but there are plenty of them on Thingiverse for you to print then fit as I did. The ones I printed are excellent. There’s also the option of buying a set of after market X and Y tensioners on amazon I’ve seen for as little as 16. I’d also say a BL Touch or one if it’s clones is one of the best upgrades to any 3d printer.
The Ender 3 has been a mainstay of 3D printers for some time, and has contributed to making this technology available to the masses given its price point. This model (the V2) is Creality’s latest version of this model, and builds on the solid heritage of the Ender 3. Sturdier, stronger, and overall more feature rich, including a heated bed and glass building surface.
Out of the box you need to assemble the unit, yes you will read reviews citing how bad the instructions are, but to be fair they’re not that bad. My recommendation would be to fire up YouTube, there’s plenty of great walk throughs on building these, just follow along pausing as you complete each step, and you’ll be setup in no time.
Other reviews you may read concern poor print quality. Ignore them. All of them. If you take the time to set the printer up correctly, you’ll get amazing quality prints repeatedly. The key here is that out of the box you need to tweak and tune it to achieve the best results. “You get out what you put in” may be a cliche, but it applies here. Again, if you’re new, YouTube is your friend here. Lots of great videos on setting up and calibrating Ender 3’s. My overriding advice is to tighten every screw, all of them! There’s some hidden behind plastic covers, take the covers off and tighten them. Also, the belts need to be tensioned correctly, if you’re not sure a little too tight is better than a little too loose. So these, start off printing a calibration cube rather than an enormous intricate model for your first prints, and you’ll get super quality results in no time.
There’s an active community for these too. Don’t like the cable bring cable-tied together? Download and print off cable chains instead! Want somewhere to hold the larger tools? Download and print off a tool holder than clips on the side of the machine! What else have you ever known where you can browse internet, create a “thing”, and use that to upgrade the machine you’ve just used to make it?! Put the time in, and you can upgrade your printer yourself, meaning a budget printer suddenly rivals some much more expensive machines.
In summary, it’s a budget 3D printer, you won’t be running off any commercial grade print runs anytime soon, but for home and hobbiest users, this thing is fantastic. Take the time to get the setup right, learn the ropes of 3D printing, and you’ll be set.
Cracking printer straight out of the box (after assembly)
I was torn between this and a reain printer, and decided to go for this one due to all the faff that comes with resin printing, smell, mess, cleaning, curing. Having run this printer for a while now, I’ll say I’m pleased I did. It does good detail, enough for the sort of thing I am after, its quiet, apart from the hot end fan, and it looks sturdy.
If you want to be printing miniatures then first choice is always resin, but I have recently tested out printing a mini on my Ender 3 and I have to say, I was impressed with the results.
The glass bed heats up quickly and the prints stick to it well without any additional agents like gluestick or tape but they were a pain to get off until I realised I just had to wait until the bed had cooled down to 25 degrees or below, then they came straight off with ease.
If I had any complaints, it would be that I found the assembly instructions s difficult to follow (and this isnt my first printer assembly) and ended up following a youtube video.
Another complaint would be the fan noise. Now, I’m not saying it’s bad, just that it’s the loudest thing about the printer and it couldn’t cost more than a few bucks to add a quiet one in. I’ve looked into doi g it myself but it requires messing with the power board and a few other mods that I’m not prepared to do at the moment.
Great 3D printer but a few issues.
1/ manual is very hard to read and understand, better to either download a different version or watch YouTube as parts are not labelled.
2/ mine came with the old version board so had to upgrade. That’s a different story lol.
Other than that very fast delivery and very nice printer, just plan yourself if you decide to upgrade parts which you will more likely have to do for safety (power supply & motherboard).
UPDATE:
I would highly recommend that anyone using this machine with the micro sd card either buy a more reliable sd card or use via USB that being micro usb (upgraded silent board) or mini usb (basic board), as some of the micro sd cards fail and will make your machine freeze partially through a 3D print.
Superb choice for my first 3d printe
So far the Ender 3 V2 has produced superb results across the board. I’ve used mostly eSun PLA+ filament at 208 degrees which prints consistently and reliably, along with a few bits in a silk grey and a white. I’ve had no issues with adhesion to the bed.
The printer was fairly easy to put together in the first place (with extra guidance however from a couple of YouTube videos which really helped – especially pointing out which other bits to check, tighten etc).
I’m very pleased that I went for the Ender 3 V2, it has such a huge user-base so there’s plenty of information out there for any problems, upgrades etc. I’ve added a BLTouch for auto-bed-levelling. I’ve also printed out a few upgrades like a filament guide, smaller reel holder, SD card adapter bracket, filament sponge holder – not often you buy an item which then starts improving itself!
One thing to note, I’ve seen this mentioned in a few places as having a filament break sensor – but it doesn’t. I believe it’s relatively easy to add one though, and if you add a BLTouch you no longer need the z stop sensor which apparently can be re-purposed. Not sure about firmware support though yet for the break sensor on the V2.
I purchased the Ender 3 V2 as my first 3D printer and as such there was a learning curve in order to operate this machine to its full potential. Doing my research, I compared it to the current Ender 3 Pro and as this machine has the newer motherboard and display it made it a worthy upgrade to the existing models.
The machine is easy to put together and I would recommend watching any of the excellent Youtube tutorials covering these steps. Once constructed the printer is very sturdy and feels strong. All the tools you need are included and with care should take no more than an hour to complete.
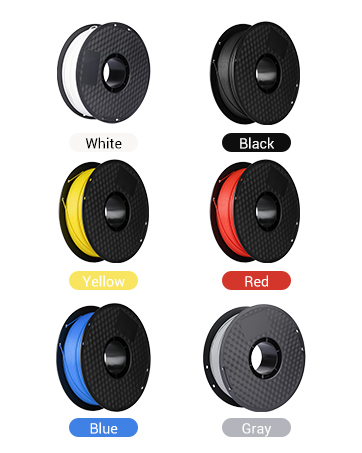
The filaments for creating the prints are easily purchased on Amazon and are available in many colours.
Starting out with 3D printing does require patience; bed levelling, slicing, temperatures and settings are all part of the process. Anybody who is entering the fascinating process should be prepared to learn about this but it is not difficult, just part of 3D printing.
The Ender 3 V2 makes all this particularly easy and once setup will quite happily go about its job producing quality prints. The support page by the manufacturer, Creatality, has plenty of information and software updates are produced timely.
So, in summary, a great machine to get into the world of 3D printing; sturdy and well supported in the 3D printing community. The V2 tweaks designed from previous build versions of the machine certainly make it worth buying this version of the previous designs.
The Ender 3 came well packaged, I can’t imagine it getting damaged in transit unless someone drove over it. Assembly was fairly straight forward. I took my time and spent perhaps 2 hours. Things not in the instruction manual? –
1) does your base frame sit flat? – mine didn’t. Loosen the four bolts holding the side pieces (and remove two bolts holding the enclosure front plate) to allow you to readjust this.
2) Bed wobble. – mine wobbled side to side/tipping not good. This is easily fixed by adjusting the eccentric nuts. Turn the nut/washer thing with the supplied small spanner until there is no wobble. – this is also the ‘trick’ to solving loose play in other parts of the printer.
3) hot end carriage – also had wobble, also fixed by adjusting the eccentric nut.
4) bed leveling. – no instructions provided but this is fairly generic. Screw down the springs so they’re fully compressed. Set the z axis endstop so the printer zeros a couple of mm above the heatbed (for me this was at the lowest if could be). Move the head to the centre of the board (you should disable steppers in the menu or at least move the head very slowly to avoid generating too much current and frying your electronics), lift the bed until it just catches a piece of paper. Next repeat this step at each four corners & keep repeating all corners until your happy.
After this the printer just works for me. Hassle free printing – so far. For slicing software (stl -> gcode) I downloaded the free CURA which does now support the Ender 3 model (no need to adapt from a CR10).
I’ll be ordering or printing belt tensioners in the future though it’s not needed right now. Out of the box this printer is miles better than the DIY 3d printer I’ve spent the last 2 years working on (great learning process but pain in the neck).
Am I glad I didn’t spend 3 times as much for a Prusa i3 Mk3? yes. Manual bed leveling is not a big deal. – though the option is there to stick on a BL touch sensor.
I researched this printer for quite a few weeks, before taking the plunge … watching endless YouTube channels (CHEP, Teaching Tech, Just Vlad, Nexi Tech) … it was those guys that helped make the decision to buy the Ender 3 …
Boy what a fantastic printer … the first prints came out better than I expected … very smooth and better than some of the YouTube channels efforts …
This is a no brainer 3D Printer, at this price … it’s the best bit of Tech I’ve bought in years … I am now making the classic ‘LACK Enclosure’ for it …
The filament I bought, at the same time, was the SUNLU 3D Printer Filament (Twin Pack) PLA+ 2KG (Black-White), 1.75mm … this filament went out of stock for quite some time but I just checked again (April 2019) and it’s back in stock …
MY ENDER 3 NOTES:
The Sunlu filament:
With the above Filament, I used 60Deg ‘C’ for the Bed Temp … and 212 Deg ‘C’ for the Hot End … I used this setup for all my prints and seems to work great …
THE ORIGINAL ENDER 3 FIBERGLASS BED:
The removable (not genuine) “Buildtak” bed plate (with fiberglass bottom) was a bit of a devil to get a proper bonded print evenly … it worked OK after a few tries … it still didn’t seem to want to bond on certain parts of the bed … there were spots it didn’t like to stick to … I even tried Pritt Stick … that seemed to work but what a mess! …
NEW BED:
After watching a few more videos, I noticed that a lot of people were printing on GLASS … so I investigated and found a great supplier, on the Bay (seller: gcc-systems) … this type of bed was a ‘Mirrored Glass Tile’ but cut to Ender 3 bed size, 220x220mm (they cope for other printers too) … it cost about 14 and damn was it worth it … the official Ender 3 glass base is 28 (ish) … this new glass bed just clips on as before, with 4 small bulldog clips …
You do not need to prime the base with hair spray, Pritt stick or any other product, in order to get good adhesion … the glass just needs to be cleaned properly … after it cools down you start to hear little noises as the print starts to release itself … so much easier to get prints off glass … you get a nice silky smooth underside too …
Glass Bed Pre-Print Washing Tip:
The thing I was doing wrong, with cleaning the glass bed, was using de-greasing agents like Isopropyl (alcohol), etc … no, no ,no, and no! … these agents actually leave a ‘very fine’ film of ‘something’ and so prevents the filament adhering to the glass … even if they say smear free there is still a deposit left behind …
I discovered that you only have to wash the glass thoroughly with washing up liquid and dry it off with a kitchen paper towel … do not touch the clean surface afterwards (use the corners) … but to see if it is clean enough you need to rub your fingers over the glass while washing it, so you get that squeaky feeling/noise … then you know you’re done … that’s all you need to do … and BAM! with the first print the filament stuck like glue, everywhere it printed … success! …
After I had done all of the above, I recently watched CHEP’s video (Older ENDER 3 vs New ENDER 3 – 3D Printer Review/Comparison) … he experimented with 2 x Ender 3 printers (from different suppliers) and he had the same issue with the Buildtak fiberglass plate … he said it was actually the fiberglass base that had blind spots … so it’s possible it’s not as level as the glass bed …
GENERAL TIPS:
1. To get the bed just right and level and without any slack (the main issue for wobbly prints) watch Just Vlad’s ‘Creality Ender 3 Pro – 3D printer – Unbox & Setup’ as he is the only one, that I noticed, who shows you how to set the slack up on the slotted ‘V’ runners …
2. To make the printer even quieter I cut a few thick square blocks, from the grey packing material and put them at each end, under the base supports … damn if this doesn’t reduce the noise by a ton! …
I have attached some photos of the first set of prints I did … all downloaded from Thingiverse …
If you’re just starting out or thinking of getting a 3D printer then this puppy will do you proud …