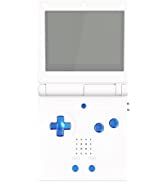
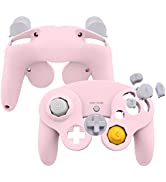
eXtremeRate Replacement Full Housing Shell for Nintendo DS
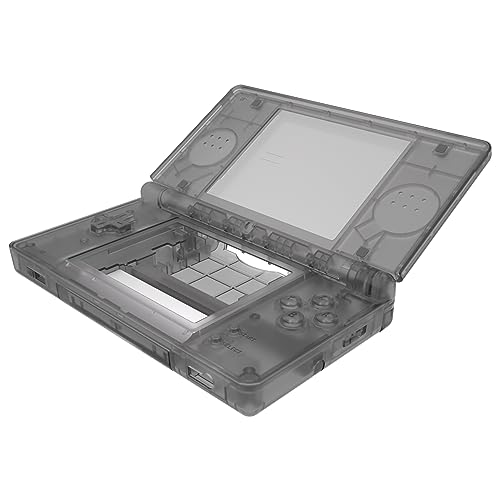
eXtremeRate Replacement Full Housing Shell for Nintendo DS Lite, Custom Handheld Console Case Cover with Buttons, Screen Lens for Nintendo DS Lite NDSL – Console NOT Included
From the brand


eXtremeRate is a gaming accessory development company, focused on quality and innovation. As one of the global leaders in video game accessories, eXtremeRate leads the way in the video gaming entertainment industry with customized, innovative items, and unique one-stop gaming modding solutions since 2010.
Very good quality shell, picked it up to replace my worn down original one. process is rather simple with their video guide on youtube, completed it in an afternoon. Only downside is the included screws. They don't screw in well, and are very weak and will strip easily. I had a better time simply reusing the original screws from the nintendo shell.
Very good quality shell, picked it up to replace my worn down original one. process is rather simple with their video guide on youtube, completed it in an afternoon. Only downside is the included screws. They don’t screw in well, and are very weak and will strip easily. I had a better time simply reusing the original screws from the nintendo shell.
This is a great shell:
There is an in-depth tutorial video on YouTube for this process. I inspected and cleaned my shell and shell components prior to use, and found the quality is very good. Installation is not easy for beginners so watch the whole installation video first before purchasing or attempting to do this. The quality is great, but I found two areas for improvement:
First: There are two parts this kit should include, but mine did not: 1: A new captive battery door screw. 2: a bezel for the lower touch screen.
Second: I think etching the lettering on the back of this case would really take this case up to the top of the industry. Small details like that really pop. I would have been willing to spend more on it if it had the etching.
(I would have uploaded pics of mine but the Amazon app bugged out).
heres a bit of play in the triggers. and 1 bolt for the hinge cover seemed to not grip the screw threads. in the end although the triggers are a bit wobbly im not worried and played on it daily for 2 weeks before I needed a nintendo break lol I would highly recommend but it lost the 1 star as its wasnt perfect.
heres a bit of play in the triggers. and 1 bolt for the hinge cover seemed to not grip the screw threads. in the end although the triggers are a bit wobbly im not worried and played on it daily for 2 weeks before I needed a nintendo break lol I would highly recommend but it lost the 1 star as its wasnt perfect.
Fantastic mod experience
This is the DS Lite case everybody should use.
This was my first GB/Nntndo mod experience, and I think this is a great first project for others as long as you are careful with the ribbon cables!
I only have one minor problem with my final product, that the stylus slot is a bit tight, but I believe I can get that fixed up still.
Color comments:
Atomic purple is less vibrant in real life. I was worried it would be too bright for the look I was going for. Combining it with parts of my black DS may have helped a bit.
Glacier blue was underwhelming and mostly clear in my interior lighting.
Smoked/Clear black feels accurate to product photos. It’s nice but I only wanted it as a backup in case I couldn’t use my original black case for parts.
I only got caught up by one undocumented thing, plus one minor complaint:
– the battery door screw is too short, but a longer one is provided in a separate plastic bag.
– some of the plastic pieces had sharp, white spots on the edges from being removed from a larger sheet of parts. I used a razor to shave this off, although even that was unnecessary.
Highlights:
– The provided instruction video is great.
– The kit is 200% complete. All screws included plus tons of spares. Replacement rubber with spares. Etc.
– The quality and fit and everything is great. I had no issues with reassembly
– The included tools work fine. It’s nice to get the Nintendo tri-blade driver, but I had to use one of my other Phillips #00 drivers for the other screws.
Not that tough with the right tools
I’ve changed many GBA SP shells but this was my first DS Lite swap. It wasnt that difficult, my iFixit tool kit had all the necessary bits. A good pair of tweezers helps to handle some of the smaller clips. Take your time and don’t over tighten screws, and you will be fine. I followed a video off youtube and had zero issues.
I knocked this one star only for the fact that its a nice quality fit, but doesn’t feel as premium as a standard ds lite.
I originally bought a Chinese replacement shell for my DS, but the hinge broke too easily and I had my two screens barely hanging on from a single ribbon cable. That's why I searched around for the best quality shell for my DS. This was what I found, and after installing it, it was miles ahead of the old replacement. Bonus points for having a soft-touch feel in your hands. One downside, though is that the plastic while durable, is pretty soft. This is a problem when you're screwing down the shell. If you put in too much strength, the screw holes are going to wear out, so be careful. Other than that, I highly recommend this shell for those who want a replacement.
I originally bought a Chinese replacement shell for my DS, but the hinge broke too easily and I had my two screens barely hanging on from a single ribbon cable. That’s why I searched around for the best quality shell for my DS. This was what I found, and after installing it, it was miles ahead of the old replacement. Bonus points for having a soft-touch feel in your hands. One downside, though is that the plastic while durable, is pretty soft. This is a problem when you’re screwing down the shell. If you put in too much strength, the screw holes are going to wear out, so be careful. Other than that, I highly recommend this shell for those who want a replacement.
Great Alternative to a Stock Shell
I bought this kit to fix a DS Lite that I had that had a broken hinge and was in bad shape.
The instructions were mostly easy to follow. I wish there was a little more clear packaging to mark out which screws went to each part of the DS.
It feels just as good in the hand as the stock shell, if not better. It’s got a clean feeling and the plastic is very sturdy.
I did manage to fix the casing and it did solve the broken hinge issue. However, I did not do something correct and my DS no longer works. That is no fault on the case itself but somewhat of the unclear instructions.
Overall, great product and would highly recommend.
Buona ma non perfetta
E’ forse la migliore shell aftermarket per DS Lite ma ha alcuni problemi:
1) Non chiaro dalle istruzioni, ma la cornice dello schermo inferiore va ELIMINATA, altrimenti la scocca non si chiude bene.
2) Le viti TRIWING sono pessime. Troppo morbide e si rovinano subito. Ho usato le viti originali.
3) La vite del coperchio batteria non abbastanza lunga. Ho deciso di usare un po’ la lima e adesso funziona, ma una soluzione pi rapida usare la vite originale.
4) Se montata con i bottoni originali ha qualche problema, meglio usare tutti gli accessori in dotazione.
I’d give this shell a 4/5 as a replacement for an OEM shell. There are some minor issues, but overall it’s a great choice if you’ve got a cracked shell, floppy hinge, noticeable scratches, or just want one of these color options. The reshell process is pretty complex for a beginner though — if this is your first reshell, I’d recommend at least starting with the simpler GBA SP before tackling the DS Lite. Skim the video guide to see what you’ll be up against.
Once the screws are in, all pieces have a good fit, I didn’t need to sand or trim anything. The inclusion of a matching stylus and slot 2 cover is greatly appreciated. Almost everything is flush, but is there is a slight lip between the top screen bezel and the housing. It shuts about 99%, but not completely — the rubber pads on the top part don’t quite touch the bottom when it closes. It’s thinner than an OEM shell, and while it’s not brittle it doesn’t feel quite as sturdy as their GBA SP shell, so I’d be wary of dropping it. I think the main housing would be fine in a minor tumble, but I’d be concerned if it fell on the hinge. While the SP shell’s buttons sat a bit shallower, the buttons in this kit sit just about the same as OEM so there’s no big difference in play-feel.
The video guide is pretty good, but you’ll want to reference the ifixit guide as well. The most important difference between the two is that the video doesn’t remove the Wi-fi daughterboard while the ifixit guide does — follow the ifixit guide here and remove the Wi-fi daughterboard, it’ll ensure you don’t damage the tiny, fragile digitizer connection (if you break this, you lose touchscreen functionality). Also be sure to remove any screen protectors prior to using the hair dryer on the screens, not sure how that would turn out. The top screen also remains uncovered for a bit during the reshell process, so when it comes time to apply the bezel I would recommend using the previously removed sticky frame to lightly pick up any dust or hair first, before it gets trapped behind forever. Lastly, reuse your OEM battery cover screw, it works better than the included battery cover screw.
All in all, a great reshell with just a couple minor imperfections. I would still order another one if I had another DS to fix.
The best aftermarket shell for the NDSL
This is the best NDSL shell I’ve installed so far. I’ve done a couple of shell replacements for this console before, and none has had such an excellent fit. Now, be mindful of the instructions: some of the other reviews say that the shell doesn’t fit well, but if you read them closely, you’ll find out the problem they had was not taking the bottom screen frame off, which is necessary, as the shell itself has this border molded in; you’ll end up having a crapy-feeling NDS if you don’t follow the instructions correctly.
It would be best if you also were careful when taking the screen frame off, as you could damage the digitizer.
If you work on handhelds you probaby already know that the options for replacement shells for the DS Lite are pretty dire. All of the third party shells are complete junk and original OEM shells are falling apart at this point. Thankfully you can still get a full console in decent shape for a decent price these days, but it won’t be that way forever.
I have purchased a few shell replacements from eXtremeRate in the past and have always been satisfied with the quality and price of thier products, so I was very excited to see that they were going to offer DS Lite shells. I bought one immediately and installed it.
Now DS Lites are very fiddly to work with, and I hope that future reviews will rate this product through that lens. The whole process is frustrating and it is very easy to ruin your device if you go in blind. eXtremerate posted an install video and I recommend watching it in full BEFORE you attempt this yourself, if you don’t know what you’re doing. I have reshelled 10s of DS Lites and it is still a frustrating experience evern when you know the tricks.
That being said, these are the best after market shells currently available. The molds and buttons are very accurate and no trimming or filing is required. I personally think the color options are cool, and hope to see more of them in the future. You also get servicable tools and spare parts of almost anything you may reasonably lose.
So why 4 stars? Although these are the best shells currently available, there is still room for improvement. Probably the biggest issue is the screws. This kit comes with 7 different, very similar types of screws. Even if you sort out the screws and follow along with the video, it is not always clear what screw you are supposed to be using where, and if you use the wrong one you can very easily ruin your shell or cross thread a post. In an ideal world eXtremeRate would standardize on 2-3 screws and adjust thier shells for that. If that isn’t possible, the install video NEEDS to be more clear on what to use where. This is the single biggest problem with the kit. The original DS Lite also had this problem, so its hard to fault eXtremeRate too much for this, but it is still disapointing.
All other issues are minor annoyances (to me).
-There is no DS or nintendo branding anywhere on the shell, for obvious reasons
-There are currently only transparent shell options. I love transparent shells as much as the next guy, but I feel like the DS is one of the consoles that benefits from it the least. The PCB is obscured on both sides of the console by the bottom screen and battery respectively, and the only thing you get a great view of are the mess of wires on the top screen for the speakers, wireless card and microphone. still kinda neat, but I feel like this is why nintendo didnt offer transparent shells to begin with. If this is what you like, great, but I would love to see some opaque shells too.
-Shell not compatible with original parts. I was hoping to keep my black buttons and shoulder buttons, but had issues with both and had to use the provided parts. The provided parts are of high quality so this is more of a matter of taste (and a nudge to sell different compatible button sets if you want more of my money)
TL;DR: If you need an aftermarket DS Lite shell, these are the best you can get. Make sure to watch the install video. Pay CLOSE attention to what screws to use where. Thank you eXtremeRate for filling this niche. Please make me a Sega Nomad Shell.