eXtremeRate Clear Orange Custom Faceplate Back Plate Shell
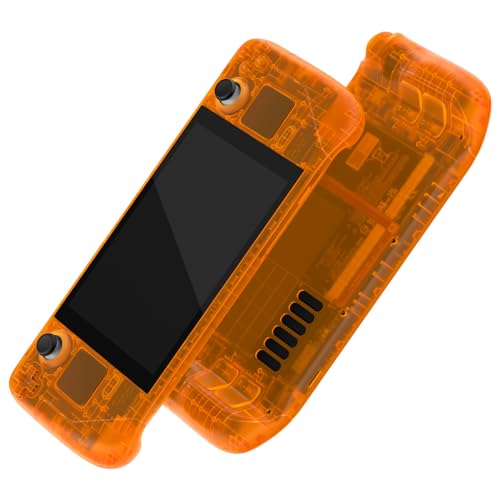
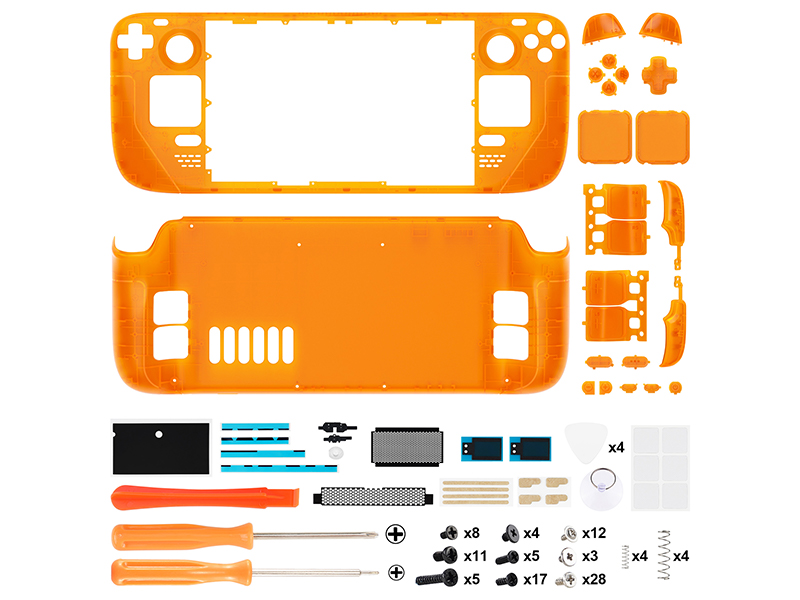
eXtremeRate Clear Orange Custom Faceplate Back Plate Shell for Steam Deck, Handheld Console Replacement Housing Case, DIY Full Set Shell with Buttons for Steam Deck Console – Console NOT Included
Find More Accessories
 Replacement Button | 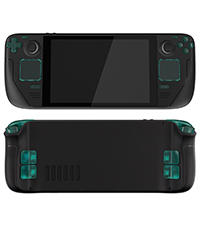 Replacement Button | 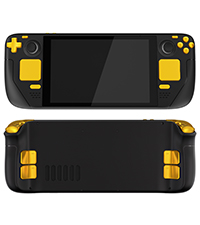 Replacement Button | 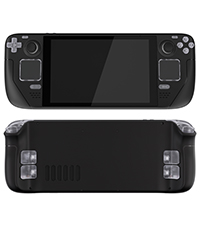 Replacement Button | 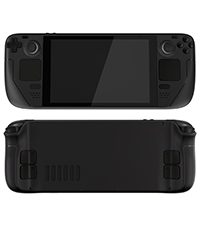 Replacement Button | 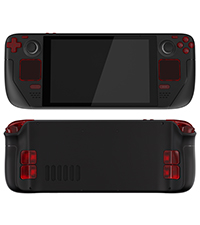 Replacement Button | |
| For eXtremeRate Steam Shell | ✔ | ✔ | ✔ | ✔ | ✔ | ✔ |
| Color | White | Clear Emerald Green | Chrome Gold | Clear | Black | Clear Red |
Replacement shells available in a variety of colors and patterns
 Cherry Blossoms Pink | 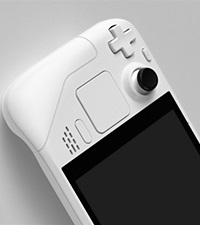 White |  Chameleon Purple Blue | 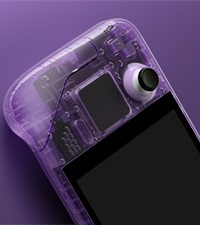 Clear Atomic Purple |  Scarlet Red |  Chrome Gold |  Wood Grain | |
How difficult is it to install to full set shells for Steam Deck?
Installation can be challenging, so we highly recommend watching our installation video.
Do I need to disassemble my handheld game console? Is soldering required?
Yes, to install the replacement shell, you will need to disassemble your handheld console, but no soldering is required.
What should we pay special attention to when installing replacement shells for the Steam Deck?
Please note that the screen needs to be disassembled to install the faceplate.
Don’t over heating and too long when heating the screen during disassembly.
Will there be any gaps between your backplate and the console? Will the trigger buttons get stuck?
No need to worry, our replacement backplates and trigger buttons are exactly like the originals. As long as they are installed correctly, you won’t encounter any of the issues mentioned above.
How do I clean my new console for steam deck after installing these replacement shells?
It is recommended to clean with a wipe with water. Do not spray water or al-cohol directly on the product surface. Do not use any other organic solvents for cleaning.
Very nice shell, but a complicated swapping process
Very impressed with the quality and fit of this shell. Everything is molded exactly the same size and dimensions as the Valve shell originally. It looks great, has a fantastic feel and surface finish, the buttons all fit together perfectly and work as expected, the instructional video is *very* thorough and good.
I’m particularly impressed with the detail of the shell, it includes replacement and color correct pieces for every single button, including the power/volume buttons, trackpad covers, the shoulder buttons, etc. Most of the time I’ve seen console replacement shells they usually only replace the “main” parts they can get away with. This is a super thorough kit!
My only complaints, if any, are that the screws given with the kit are just jumbled together in a single bag and it’s very difficult to tell which ones are supposed to be used where.
That said – and this is absolutely no fault of the replacement shell – this is a *really* intricate process to totally disassemble the Deck. Valve made the thing pretty repair friendly, the entire console can be disassembled with screws, *except* the screen. The screen is adhesion-ed on to the console, removing it is a stressful and frustrating process, and you risk damaging/breaking the screen in a couple ways. There’s also quite a few fragile ribbon cables inside with very small and finicky latches, pay attention to how the latches are flipped up and the cables removed, don’t yank on them too hard!
The instructional video included with the kit is REALLY good, it’s also REALLY long, don’t skip it, don’t try and find some shortcut, spend the time to sit down and follow along.
A few tips from my swap:
– Keep your screws really organized, I have a magnetic screw organizer mat, but some small bowls or piece of cardboard with some tape on it also works great. Don’t mix the screws up!
– When you remove the screen, be VERY careful not to stick the guitar pick/spudger too far under the screen, the instruction video says “don’t do more than 3mm” but doesn’t explain _why_ – the ribbon cable connecting the screen’s panel to it’s controller is very close to one of the side edges, it’s very easy to damage especially when you’re jabbing in there with a metal pick to try and pry the screen loose. Damage that cable and you’ll need a whole new screen!!!
– Replacing the trackpad covers is the only other really difficult part, the trackpad sits on a funky wavy spring along with it’s vibration motor for the haptics feedback, then the cover with the actual “tracking” part is snapped on top, there’s several ribbon cables and sensitive springs around it, so go slow and take your time! Use a hair dryer or heat gun to warm up the top of the trackpad before removing it from the adhesive
– Highly recommend getting a couple nicer spudgers or guitar picks for disassembly, the ones included in the kit are pretty cheap
Scary but WOW. Take your time.
Feels great, not quite oem but very very close.
Needs to come with a plastic guitar pick, don’t use the metal one that ships with it.
All the buttons work great and the trackpad seems very precise still.
Screws are not labeled, but pretty easy to tell what ones to use, they’re probably exactly the same. Times I just used the originals when screwing into non-plastic holes.
Will try and remember to update in 6 months to see how the colour holds out to uv rays.
This is a good, sturdy shell. Installation is a bit tricky, but their video guides you step by step through the process, and almost everything you need is included in the kit. I would recommend picking up tweezers, as those are not included, as well as a better quality suction cup for the screen removal, as the one provided is not the best quality. The buttons and touchpads included with the translucent green-blue shell are very smooth and for me personally are much more pleasant to use than the original ones. If you want to customize your LCD Steam Deck and aren't afraid of messing with the hardware, I recommend this.
This is a good, sturdy shell. Installation is a bit tricky, but their video guides you step by step through the process, and almost everything you need is included in the kit. I would recommend picking up tweezers, as those are not included, as well as a better quality suction cup for the screen removal, as the one provided is not the best quality. The buttons and touchpads included with the translucent green-blue shell are very smooth and for me personally are much more pleasant to use than the original ones. If you want to customize your LCD Steam Deck and aren’t afraid of messing with the hardware, I recommend this.
4 hours work, Medium skill. Described below
My friend and I both bought shells, he got one with a hazy purple and I the gradient (see last photo). The hazy has a better texture but is harder to see the internals, while the gradient is very slippery and smooth plastic but can see though it better. They both look great on, I didn’t consider the texture when buying but you might want to if you want to match your glossy or anti reflective screen. I didn’t use any of the buttons that came with my kit and reused the originals as the kit buttons were very glossy black. The only ones I had to use from the kit were the underside ones (they aren’t removable from the oiginal).
To put them on, independently it took both of us 4 hours each. Maybe just a little under. Don’t underestimate the complexity of these devices on the inside, I thought it might take an hour when starting but was very wrong. The kit comes with everything you need (except a hair dryer for heat) but you would do better with your own electronics dissasembly kit. It’s probably not suitable for absolute beginners but if you have ever pulled a laptop apart you can probably do this. There are video instructions for every step if you need them so it’s pretty hard to go wrong until you start doing the anxious stuff like pulling off the screen (be super careful and use a lot of heat).
I'm glad I did i
Pictures don’t make justice, this shell is beautiful!
It is really painful to do the swap, it took me like 3 hours and all the time I regretted what I was doing, telling to myself “why I’m doing this, I had a working steam deck, I don’t know if I can put it back together”
Follow the video, keep the order of pieces, take your time, be extra careful with the connectors.
I see in other reviews that they provide a metal pick to remove the screen, I got a plastic one and I recommend you using a plastic one, otherwise you could scratch the screen.
I kept the same screws and the same buttons, pads and triggers, I like them better.
One thing that happened to me is that when I was done and tested it, no control was working. I went over all the connections and found out a couple of ribbons that I had to push in completely. After that everything worked as before.
Another thing is that the left trigger was scratching something inside. I thought that the case was not perfect. I loosened the base plate that holds the trigger, pushed it to the center and tightened the screws again, the scratching was gone.
Now it looks amazing and also feels better in my hands. The finish is glossy.
Must have the patience
I was definitely hesitant to undertake this project but I have to admit it looks way better in person than in the preview photos.
This took me about 2 and a half hours. I only missed 2 screws (which I plan on going back in and figuring out where they came from). Highly recommend having a small magnetic screwdriver as the ones included are not. Or at least get a magnetizer.
If you are to take this on PLEASE use their youtube video and go step for step with it. I didn’t but I would recommend using the screws that come with the kit. A good bit of the original scres when reassembling didn’t fully take and were just spinning. It felt like I stripped out the holes but they are still snug. When it comes to removing the screen… BE PATIENT. Slow down, take your time, when in doubt USE MORE HEAT. I broke off a corner of the glass on my screen but didn’t lose any functionality. I opted just to get a replacemnt anyways instead of permanently adhering it back on. Honestly I would highly recommend just getting a screen replacement off the bat and go buck wild. Also it is almost guaranteed that you will damage your original she’ll, especially when trying to remove your screen.
All in all, this shell replacement is amazing, highly recommend for anyone that wants to really change up the look. Especially for anyone that loves the old transparent look of the old game boys. As much as I love DBrand, no skin can beat an outright shell swap like this.
It's worth the work it takes to install. Just get the proper heat tools to swap the screen. Ifixit has a great microwave pad that is great. I ruined my screen the first time.
It’s worth the work it takes to install. Just get the proper heat tools to swap the screen. Ifixit has a great microwave pad that is great. I ruined my screen the first time.
Nice case
It was not easy… Took around 3 hours for me. Screen detach was terrible procedure. But I did it and it looks and works nice
Good quality, good complication, I can recommend.
It was definitely a process but the instruction video was great. Plastic feels high quality and everything lined up and closed up perfectly. I used the original black buttons for cosmetic reasons but I did change the pads and triggers and they feel good.
It was definitely a process but the instruction video was great. Plastic feels high quality and everything lined up and closed up perfectly. I used the original black buttons for cosmetic reasons but I did change the pads and triggers and they feel good.
Quality Item
These looked great in the photos and I’m happy to say they do not dissapoint when you recieve them.
These sheel replacements look and feel great. A fun way to make your steam deck stand out. The plastic feels high quality and the colouring (I order the Chameleon Purple/Blue) looks outstanding. It’s not simply two tones, but actually has a pearlescent quality where the colours appear to shift from Blue to Purple depending on the angle of the light.
Includes several useful tools for making the replacement which is helpful. I would reccomend using plastic guitar pick rather than the metal one include. The metal one should work fine but a plastic one is a bit safer. Everything you need to complete the shell replacement is included in the box.
5.5/5
Amazing Results
Firstly, don’t be put off having a go! I don’t think it is hard as people say, as long as you give yourself time. Mine turned out fantastic, I am very happy. I recommend the following considerations before you buy 1. Get yourself your own toolkit. The suction cup is rubbish and the metal pick should not be used, use plastic instead. 2. Use a heat gun and keep moving, medium heat, for around 2 minutes. 3. Use isopropyl rubbing alcohol to get rid of remaining residue. Important to get rid of all glue!.
My only complaint is the screws are confusing, should be labelled up.
Really happy with results.
It looks good and I followed the official video step by step and took my time and it wasn’t until I completely finished that I realized that the bottom right & left were a little bit elevated. I thought it was just excessive screen adhesive pushing the screen upwards but I ended up fixing that and only then I realized that the front cover was broken in 2 spots so it’s not completely flush with the screen (at least on the bottom). I don’t feel like going through the hassle of redoing everything so I guess I’ll have to tolerate it :/
Hell to install
Be sure you’re comfortable with disassembling every part of your steam deck. You’ll be breaking glue to remove the screen, detaching 5-10 ribbon cables and prying touch pads apart.
The case itself is as well made as the original.
Okay, I was hesitant going into this project because the only other thing I worked on in the past was building my pc a few years ago. What helped was buying iFixit’s essential electronics toolkit. That toolkit had a pair of tweezers that I ended up using a lot, and a really good suction cup for the screen removal. The shell itself comes with two screwdrivers but it’s helpful to have more options. Past reviews say that the shell comes with a metal pick for the screen, but the package I got had plastic picks.
I followed extremerates youtube video super closely and bypassed taking apart the R2 and L2 triggers, because I wanted to use the stock buttons and triggers. For the paddles I had to pry them out of the original backplate.
The screen removal wasn’t extremely difficult, I just suggest that you go suuuuper slow and be patient with it. I inserted the pick on the bottom, left, and top sides of the screen and was able to be careful with the right side when the screen lifted off. I used a hair dryer and it worked perfectly.
The only thing I ran into was stripping one of the tiny screws when removing the skeleton from the front plate. All the screws in the deck were super soft.
Overall, I’m so happy with the result and it wasn’t as hard as I expected! Because I’m a novice and wanted to be careful, I’d say it took me 7 hours total. I used paper and tape to keep track of all the screws I took out so it was really easy putting the console back together. She’s beautiful!!!
C’est une coque pour Steam Deck qui vient remplacer celle d’origine, ce n’est pas fait pour tre coll par dessus. C’est clairement pas fait pour les dbutants, si vous n’avez pas l’habitude de rparer des appareils mobiles, je vous dconseille de commencer ce changement.
Vous devez dsassembler l’ensemble de l’appareil, je vous conseille de changer la coque si vous avez l’intention de changer la pte thermique ou autre.
Excellente qualité !
Excellente qualit !! La coque est trs solide, trs agrable au toucher, une fois referme, pas le moindre jeu !! Ni en haut ni en bas, pas de bruits “plastique contre plastique” type couic couic comme des coques bas de gamme (type coque de GBA aliexpress).
10/10.
On peut utiliser les vis d’origine ou celles fournies avec le kit. J’ai employ un mlange des 2, RAS.
Le changement est un peu long pour un premier. Mais, parfait.
PAR CONTRE : NE PAS UTILISER LES OUTILS FOURNIS.
Avec le mdiator en mtal vous allez dfoncer votre cran, pareil pour l’outil plastique pour sparer les coques.
J’ai un kit d’outil iFixit, et c’est le mieux.
J’ai utilis leurs mdiators bleus ULTRASOUPLES, et leur ventouse. Avec un cran bien chauff ! J’ai achet une compresse micro-ondable 10$ en pharmacie, type entorses ou autres. 45 sec au micro-ondes, sur l’cran 5 min et hop.
Patience is key!
After having a vinyl skin on my deck for a little while, I decided to take the plunge and buy the extremerate shell. I have zero experience with tear downs but I followed the tutorial on YouTube, pausing where necessary, which made the whole process a lot smoother.
The screen removal was the most stubborn element to take out of the original shell but I would strongly advise purchasing the iOpener kit from iFixit. Stick it in the microwave for a minute and then place it on each side for about 5 minutes – I did this whilst watching a 30 minute show on Netflix to pass the time! Using the iFixit suction tool, I was able to prise the screen off without using the pics. Make sure to use isopropyl to safely remove the adhesive left behind. After the screen removal it’s pretty much plain sailing from there.
I chose to keep the original buttons as a nice contrast to the translucent green; I will be putting some black extremerate back paddles on the rear too as I think that would look much slicker. The whole process probably took around 2.5 – 3 hoursif you like tinkering and enjoy projects that test your patience, the time will fly by as it did for me.
I’m really pleased with the end result, it feels nice to hold and the quality is fantastic. The fit is absolutely perfect and for the price of the kit, the value for money is second to none. My main problem was actually choosing the shell colour! I would definitely recommend this if you have the patience for such thingsI love a challenge so this was right up my street!
The aftermarket buttons especially the face buttons move around in their space a lot more than the original, they may be slightly smaller. I recommend using all of the original buttons and just keep the shell. My shell has a nice finish, but in the light i can see small dots of uneven coat. The space that the screen adheres to is ever so slightly larger so when I replaced the screen there’s a gap bigger than on the original.
Couldn’t decide on the best colour to go for but went with the white shell in the end.
Looks good but… if you have not stripped down devices before, this may be a little too complex for you.
The online video instructions are good, not sure why the white costs more than some of the other colours but, for the amount of design, effort and effor that has gone inyo the product , it is good value for money
What can I say? I’ve always been a sucker for clear electronics since the Gameboys back in the 90s. I was gonna go with atomic purple until I saw the emerald green. While it’s more of a blue/turquoise than a green it’s still one of a kind color.
Installation level: Advanced 9/10
Installation instructions: Great 8.5/10 (could use improvement regarding the screen removal)
Finished look: Fantastic 10/10
Case quality: 10/10
Buttons: 10/10
Do NOT I repeat DO NOT use the metal pick they include in the kit to remove your screen. It will 100 percent damage your screen bezel since it’s painted on under the glass by the manufacturer. Instead get yourself a set of soft plastic picks and an upgraded screen suction cup straight from iFixit.
With a hair dryer or heat gun, on low, heat the edges of the screen for a solid 15 minutes until the unit is decently warm throughout the entire screen. Then use the suction cup to get an edge started, and then slip the plastic pick underneath. No more than 2-3mm and run around the edges and the screen comes right out.
I was able to do this mod in a little under 5 hours and that was with coffee breaks in the kitchen and plenty of pausing to ensure I was following the instructions clearly. Take your time and be patient and it will come out great!
Really nice Shell for my steam deck
Was quite easy to for their YouTube along the way and I am really happy with the outcome. 100% on the kit apart from the sharp guitar pick
I did cut myself whilst removing the screen so I’d be careful when you get to that part. The kit has everything you need to get you through it for a stylish steam deck and it looks fantastic
Steam Deck un dispositivo altamente personalizzabile e metterci una scocca custom sicuramente il metodo migliore per farlo. eXtremeRate ci propone una scocca apparentemente stupenda. Vediamola in dettaglio.
Pro:
Materiali e design eccellenti
Kit che sostituisce ogni pezzo
Video guida fatta molto bene
Tantissimi colori e motivi disponibili
Ottimo prezzo
Contro:
Installarla difficilissimo
Le viti non sono ordinate nei sacchetti, sono buttate a caso
Il kit non include tutti gli strumenti necessari
Da sapere
Parto subito col dire che ne sconsiglio l’acquisto a chiunque non abbia una buona esperienza con l’assemblaggio di dispositivi elettronici. Steam Deck una console “accessibile”, ma questo non toglie che sia molto complesso, essendoci molti pezzi e molto piccoli.
eXtremeRate mette a disposizione una guida su YouTube davvero accurata, in cui mostra passo-passo come rimuovere ogni singola vite. Il video dura circa un’ora e venti, ma io credo di averci impiegato almeno otto ore a completare il tutto. E non senza fare danni: nel rimuovere la colla dello schermo, ho lasciato qualche graffio sul retro, che per si vede benissimo dal lato frontale.
Bench l’accuratezza del video, nel kit non sono inclusi tutti gli strumenti necessari. Troviamo due cacciaviti e un opening tool, tuttavia sono necessari anche una pinzetta, uno spudger e, soprattutto, un iOpener per sciogliere l’adesivo dello schermo. Con i soli strumenti del kit, non riuscirete a completare il processo.
Non ho per niente apprezzato il modo in cui le viti sono raggruppate, cio completamente a caso. Ci sono tante viti di forme e lunghezze diverse, che nel video vengono mostrate, ma bisogna sforzarsi a riconoscerle ad occhio perch sono distribuite nei sacchetti in maniera disordinata.
Il risultato finale discretamente buono. Le scocche sono bellissime (ammetto di avere un debole per il design crystal), ma stonano quei graffi che ho fatto. Inoltre, si vedono le bolle sotto i trackpad, causate dall’adesivo messo durante l’assemblaggio (a proposito: mettere le scocche nuove ai trackpad probabilmente la parte pi complessa).
Tirando le somme, non mi pento di aver messo questa scocca ma, forse, non lo rifarei. L’installazione un vero incubo, anche per chi smonta computer di professione, e francamente non lo augurerei neanche al mio peggior nemico. Ma se volete davvero personalizzare Steam Deck e ne siete altamente convinti, allora potrebbe uscirvi un bel lavoro.
A very difficult install, but an amazing look.
Installing this was rough. EXR warns about it, so I don’t blame them, but it bears repeating. I strongly recommend hitting iFixit for some tools, at the very least an iOpener. If not, like me, you’re likely to end up damaging or ruining your screen in the late steps of the disassembly. Parts aren’t expensive or hard to get, but why replace when you can save the original? After some minor disasters with a cracked screen (rice in a ziploc bag is *not* enough heat), I ordered parts from iFixit, finished the install, and it looks absolutely amazing.
So nothing bad on EXR’s part. They did a great job with what they provided, but I strongly recommend some additional tools to do things right the first time. Installing the shell was time consuming, but aside from the screen adhesive, it’s just a very long series of simple steps, and having your choice of case colors and finishes is great. Thanks ExtremeRate! You did it first and the quality is excellent.
It took more than a few hours to take apart and put back together.
I watched an installation video about 6 times… and while I did it.
The shell is lighter than the original… and also smoother.. almost slippery.
I used a heat gun to loosen the glue around the screen and used the guitar pick thing to cut the glue while it was being stretched by the suction cup.
That’s right, the guitar pick thing is actually sharp and you’re supposed to use it to cut the hot glue while it’s being pulled apart.
I had no problems or scratches on the backside of my screen and you won’t either if you take your time.
Take your time and you won’t strip and screws either.
If a screw seems tight, press down firmly with your screwdriver and continue to unscrew and you won’t strip one single screw.. unless you’re using the wrong size.
Anyways, it’s OK and everything, but the screen doesn’t fit very well, considering it took hours to reassemble..
Well, that might be a bit of an overstatement but, as you can see in the video, it doesn’t sit perfectly and that leaves a gap for all kinds of gross germs and stuff
Anyways, cool shell. Almost perfect.
Vraiment bie
La coque spciale console portable Steam est parfaite, elle protge totalement bien la console. Sa qualit est vraiment bonne et vite vraiment bien d’abmer la console surtout si elle tombait par mgarde
The clear / transparent shell looks great. I’m a little bit disappointed as the Emerald Green case isn’t as Green as I thought it would be in real life, it’s closer to a light blue / teal. I’m still satisfied overall.
The installation, however, was somewhat arduous, even for someone experienced with taking electronics apart. Take your time and be very careful when you’re disassembling your steam deck, especially with the screen and it’s ribbon cable. The instructional video was okay, but left out some important pieces of information, such as being mindful of the cables with prying the screen off. Use a plastic spudger and not the metal one that comes in the box.
For the track pads, the video failed to mention that the daughterboard is glued to the plastic trackpad housing. In the video, the woman prys it off in one movement, but that’s because the steam deck they’re using was already disassembled before as a demo unit, meaning there was no adhesive or glue when she pryed the daughterboard out. Be patient and use a hair dryer or heat gun to warm up the adhesive for the touchpads.
When placing down the new adhesives, make sure you take care to smooth it out as much as possible to remove the air bubbles, because the bubbles will be glaringly obvious through the clear shell. I found using a wide plastic pry tool helped a lot here, such as the ones from the ifixit toolkit.
One last thing I’ll say is for the final step when applying the sticker shielding to the inside of the back shell piece, be careful to take tou time smoothing out the airbubles here as the plastic is in a chocolate bar pattern and if you use too much force you can easily tear the sticker as your smoothing out the bubbles.
The overall process took much longer than an hour. You may be quicker if you’ve already disassembled your steam deck before.
While I had the heatsini off the APU I elected to replace the thermal paste with Noctua NT-H1 thermal paste just because I already had it apart.
Gorgeous shell not for the faint of hea
The shell itself looks fantastic – it’s smoother to the touch than the stock Steam Deck and the purple catches the light in a striking way. Fit and finish is easily on par with the stock shell.
The package includes all the screws, adhesives and other parts to refit your deck.
Couple of cautions:
-do not reuse the original screws, some are longer than those bundled
-exercise extreme care with the screen removal. Something like iFixit’s iOpener is a good way to heat the adhesive without damaging other parts and a plastic spudger or guitar pick is less likely to damage the screen than the included metal one
It’s also a personal preference but I think the end result looks better with the original buttons to give some contrast to the translucent purple shell (other than the purple bumpers). With the adhesive attached purple touchpads don’t look much different anyway.
Spices up handheld console
Taking a DIY plunge with my handheld console was an experience in itself. The replacement faceplate and backplate lent a vibrant persona to the device. Although the installation called for a fair bit of know-how, the end result was pleasing. And that clear atomic purple look, simply loved it.
I decided to keep the OEM steam and 3 dot buttons, and trackpads. I think the look is much nicer this way. Install took about 3 hours going slowly along with the video, and making sure to not strip any screws, crack any plastic, or scrape the screen. I used the metal tool, and didn’t scrape any black off, but I used a heat gun, and the screen alone took about 30 mins to come free. The fit is way better than my OEM shell, no gaps, no creaking, and the tackpad haltice are better since I did the screw torque equally on both sides. Prior, the case creaked when flexed, there was a gap on the right side, and 1 side haptics was way stronger than the other. Feels like a premium deck now. I also took the chance to apply some arctic silver paste, clean out the fan, and swap in hall effect joysticks. Go slow, watch what you are about to do before you do it, and it’s not actually that hard of a swap.
Honestly this is one of the best shells I’ve come across, let alone for the Steam Deck.
It feels great, looks fantastic and fit together arguably better than the stock shell. Mine creaked when the shell was pressed below the screen and this one didn’t, so clearly done something better than Valve to sort that out!
I did keep the original buttons though as it looks quite cheap going with all purple – but that’s just me.
The kit had everything you need to swap and Extreme Rate have a YouTube video that was really well done and easy to follow, so I’d recommend watching that like I did.
I can’t fault it and whilst this isn’t a reflection on the shell, it’s definitely not for the feint of heart. You take everything apart, including the screen (which I’d never done before) so I wouldnt do it as your first ever shell swap. If you do though, watch their video, take it slow and keep track of which screws go where so you don’t ruin any of the posts with the wrong screws.
My tip: I used several egg pots and scrap paper to say what they were – worked well!
Die Qualitt der Plastikteile ist wirklich gut, alles passt perfekt zusammen. Der Hersteller hat auf der Webseite eine sehr gute Videoanleitung verlinkt, mit der alle Schritte erklrt sind. Das Ergebnis sieht wahnsinnig gut aus und erfllt alle Erwartungen meiner 2000er-Nostalgie 🙂
Der Umbau ist jedoch nichts fr schwache Nerven – ich schraube viel, entwerfe selbst Platinen usw. Man darf sich auf ca. 4 Stunden Schrauberei einstellen. Das Steam Deck ist eine wirklich komplexe Konsole (hut ab an die Produktdesigner von Valve!) und man muss verdammt viele kleine Teile ausbauen – man zerlegt die Konsole hier 100% in die Einzelteile, da bleibt nichts mehr beisammen.
Meine Empfehlung: Man sollte neben den gelieferten Materialien noch einen einstellbaren Fhn oder besser eine Heiluft-Ltstation mit Temperaturregelung haben, um das Display und ein paar weitere verklebte Komponenten zu entfernen. Zudem ist etwas Reinigungsalkohol (IPA o..) fr die Klebereste am Display hilfreich. Eine Handvoll Gitarrenplektren machen das entfernen vom Display auch nochmal einfacher als nur das einzelne mitgelieferte Metallblttchen.
Unbedingt beachten: Ihr entfernt den Khler vom SoC des Steam Deck. Ihr solltet auch ein wenig neue Wrmeleitpaste haben um diese neu aufzutragen. Meine war schon arg zerbrselt und konnte nicht wiederverwendet werden, habe aber mein Steam Deck auch schon seit Launch. Mit sehr neuen Steam Decks ist die WLP evtl. noch flssig genug um neu verwendet zu werden.
Ich bin sehr zufrieden. 🙂