Spilay DIY Book Nook Kit,DIY Dollhouse Booknook Bookshelf
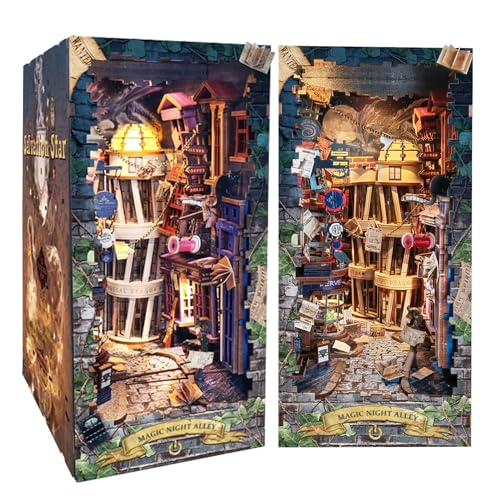
Spilay DIY Book Nook Kit,DIY Dollhouse Booknook Bookshelf Insert Decor Alley,Bookends Model Build kit with LED Light,Handmade Crafts Gifts for Birthday Christmas and Valentine's Day SQ16
From the brand


Spilay DIY Booknook Miniature
| Dimensions: | 27.3 x 19.89 x 5.89 cm; 1.19 Kilograms |
| Material: | Wood |
| Colour: | Magical Night Alley With Led Lights, English Manual |
| Batteries Required: | No |
| Age: | 14 years and up |
| Assembly: | Yes |
| Dimensions: | 27.3 x 19.89 x 5.89 cm; 1.19 Kilograms |
| Material: | Wood |
| Reference: | SQ16 |
Viel Arbeit aber es lohnt sich
Bin absolut begeistert von dem Ergebnis. Es war an manchen Stellen echt etwas schwierig, da die Anleitung auch manchmal nicht so genau war, daher hat’s auch sehr viel lnger gedauert als angegeben. Gerade bei der Verkabelung der Lichter muss man wirklich gut aufpassen sowie mit manchen Holzeilen, da bei etwas zu viel Druck, schnell was kaputt gehen kann. Ich hab mit eine Pinzette, Bastelklebe und Wattestbchen gearbeitet, so klappt das echt am besten. Ich empfehle es aufjedenfall klar weiter und im Bcherregal macht es echt was her.
Was für Bastler und Grüble
Das ist das zweite Book Nook, dass ich gemacht habe. Vorab ist zu zu erwhnen, dass die Anleitung in schwarz-wei ist. Das macht es zum Teil schwierig genau zu erkennen, wie etwas zusammen zu bauen ist. Alles im allem lsst es sich aber mit ein wenig Geschick und ein bisschen Mitdenken/Grbeln gut machen. Was mir besonders gut gefallen hat, war das “Begrnen” des kleinen Raums. Ich kann es allen weiterempfehlen, die Lust am Basteln haben. Ich erfreue mich an dem Book Nook. Es ist wirklich schn gestaltet.
Bought this as a gift so I can't comment on the quality of the product. Exterior package is very well done. Contents and basic information are listed very clearly on the outter packaging. The package is heavy for it's size. I will have to reserve further comments until I have feedback from the person I gifted it too.
Bought this as a gift so I can’t comment on the quality of the product. Exterior package is very well done. Contents and basic information are listed very clearly on the outter packaging. The package is heavy for it’s size. I will have to reserve further comments until I have feedback from the person I gifted it too.
Très beau
Ses super beau et j’ai ador mes il manquait une lumire j’ai pas pus finir j’ai du le renvoyer malheureusement il ont eu la gentillesse de venir le chercher et me rembourser un gros merci .mes je vais racheter car j’achte 1 chaque mois j’ai pogn la piqre lolll.
Mystical book nook 📚
This book decor is so cool! It is not for the faint of heart though. It took me almost two weeks to build this book nook slowly working on it little most nights after my toddler went to bed. I am one who loves puzzles and building legos and I did thoroughly enjoy this build. It does require a good amount of time and patience to build. I would compare the building process the 3D metal earth model builds but since it’s mainly wood components it’s actually easier on my finger tips than the 3d metal earth models. (The wood is pretty smooth and didn’t give any splinters) Additionally there’s less manipulation to each piece to prepare it for placement. The build isn’t too bad but, it is a time commitment and it does require patience. Assembly and instructions were pretty straight forward. Once assembled the book nook feels pretty sturdy and blends in seamlessly with my books.
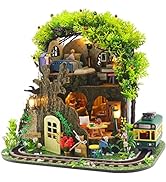
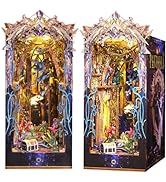
I ordered the fairy land with LED light and the lights are a pretty cool touch. They’re easy to set up and have a nice subtle ambiance to match the mixture book nook world. I am loving the look of my fairy book nook. It suites and blend in place with my books and brings a cool little touch of fantasy to my bookshelf. I love the way this book nook looks and I would happily recommend it to any puzzle and reading enthusiast. It’s a lovely addition to my book shelf and book shelf decor! As someone who loves puzzles and reading I would also say this would make an excellent gift too!
Enjoyed putting this together. I love puzzles so I thought this would be right up my alley. Super fun. It didn’t take me long to put together so a little expensive to do many more. I look forward to seeing on my shelf with my HP books!
Enjoyed putting this together. I love puzzles so I thought this would be right up my alley. Super fun. It didn’t take me long to put together so a little expensive to do many more. I look forward to seeing on my shelf with my HP books!
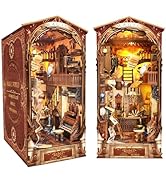
I like the wood for this. Pieces pop out really easy and only need a quick sanding on the connecting points. The printing is awesome. The pictures are really pretty and detailed and there is alot of color. I feel like this set comes with alot of pieces in general, but there is ALOT of assembly needed. So your really getting your band for your buck if your looking for something to keep you busy for a while. I also like that that there is alot of different textures. The wood, paper, vellum, mirrors, rocks, moss, and plants. It really gives it life. I also like that you get some creative freedom in using your greenery. I actually had a few left over pieces from other sets and added a few more. Wiring was easy, just follow the diagram and plug them in. No dust cover though. Overall a fun set that looks amazing and ,even though there's alot of small pieces and intricate gluing moments, not to difficult to assemble.
I like the wood for this. Pieces pop out really easy and only need a quick sanding on the connecting points. The printing is awesome. The pictures are really pretty and detailed and there is alot of color. I feel like this set comes with alot of pieces in general, but there is ALOT of assembly needed. So your really getting your band for your buck if your looking for something to keep you busy for a while. I also like that that there is alot of different textures. The wood, paper, vellum, mirrors, rocks, moss, and plants. It really gives it life. I also like that you get some creative freedom in using your greenery. I actually had a few left over pieces from other sets and added a few more. Wiring was easy, just follow the diagram and plug them in. No dust cover though. Overall a fun set that looks amazing and ,even though there’s alot of small pieces and intricate gluing moments, not to difficult to assemble.
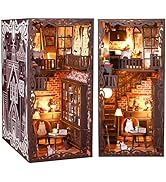
This is a well-designed book nook kit. Everything went together well and (unlike some kits) the wiring is plug-and-play. It did require gluing one of the wires in the front so that it would stay out of view. This is very much in the "wooden puzzle" style of book nook kits. There are a few beads, rhinestones, and glitter, but most parts are MDF wood. My biggest criticism is that the design wasn't very exciting. It is basically an alley (Diagon Alley from Harry Potter?) overlooked by lots of different styles of windows. Some are storefronts, but there isn't much indication of what kinds of stores these are. There are several signs, but they are either cryptic symbols (not the fun kind) or say something generic ("Silver, Brass, Copper"). There is one part of the street that can flip to reveal a "treasure", but this seems kind of random with no indication what this treasure relates to.
This is a well-designed book nook kit. Everything went together well and (unlike some kits) the wiring is plug-and-play. It did require gluing one of the wires in the front so that it would stay out of view. This is very much in the “wooden puzzle” style of book nook kits. There are a few beads, rhinestones, and glitter, but most parts are MDF wood. My biggest criticism is that the design wasn’t very exciting. It is basically an alley (Diagon Alley from Harry Potter?) overlooked by lots of different styles of windows. Some are storefronts, but there isn’t much indication of what kinds of stores these are. There are several signs, but they are either cryptic symbols (not the fun kind) or say something generic (“Silver, Brass, Copper”). There is one part of the street that can flip to reveal a “treasure”, but this seems kind of random with no indication what this treasure relates to.
I bought this set for my 11 year old daughter who is into Harry Potter and wizard stuff. This set was the perfect toy for her to customize a nook for her desk. The details are amazing and the instructions are well documented in detail in multiple languages. She took more than 3 hours to construct it.
I bought this set for my 11 year old daughter who is into Harry Potter and wizard stuff. This set was the perfect toy for her to customize a nook for her desk. The details are amazing and the instructions are well documented in detail in multiple languages. She took more than 3 hours to construct it.
This detailed box depicts a scene from fairyland and it is just stunning! My daughter and I worked on it together on and off and it took us about a week in total. The instructions are clear, but you do need to have your own glue and a ton of patience! We found that having small tweezers helped for some of the tiny pieces and also having a magnifying glass was helpful! We worked on it on the dining table and laid out a large piece of white bristol board on the table first to ensure that we would be able to see everything that was punched out. It looks nice at the end, but some of the pieces are very tiny, so at times it was very tiring on the eyes. Good project for those who are willing to work through all the steps. To be honest, at some points, we weren't sure about the instructions so we just skipped it or did what we thought the instructions meant, but it still turned out well and we are happy with the end result!
This detailed box depicts a scene from fairyland and it is just stunning! My daughter and I worked on it together on and off and it took us about a week in total. The instructions are clear, but you do need to have your own glue and a ton of patience! We found that having small tweezers helped for some of the tiny pieces and also having a magnifying glass was helpful! We worked on it on the dining table and laid out a large piece of white bristol board on the table first to ensure that we would be able to see everything that was punched out. It looks nice at the end, but some of the pieces are very tiny, so at times it was very tiring on the eyes. Good project for those who are willing to work through all the steps. To be honest, at some points, we weren’t sure about the instructions so we just skipped it or did what we thought the instructions meant, but it still turned out well and we are happy with the end result!
Very cool....and fairly complicated
This is so cool. I love books, and this is a nice addition to my bookshelves. The instructions are a bit hard to follow though. They are written in Mandarin and English, but the print is very small and sometimes they reference parts that I can’t find in the box. It will take several hours to put together. Also, it is for adults, not children.
UPDATE: This turned out so cool! The only issue I ran into was that there was too much wire and I ended up having to tape it in place.