Pironman 5 NVMe M.2 SSD PCIe Mini PC Case for Raspberry Pi 5
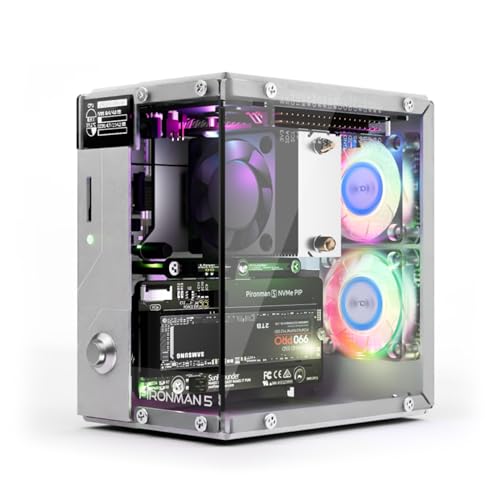
Pironman 5 NVMe M.2 SSD PCIe Mini PC Case for Raspberry Pi 5 with Tower Cooler+Dual RGB Fans, 0.96'' OLED Module, Safe Shutdown, Standard HDMI, RGB Effect, Stylish Design, High performance
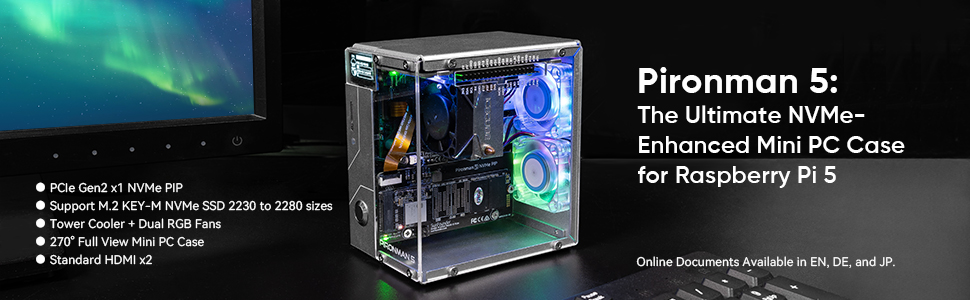

The Pironman 5 includes the Pi5 NVMe PIP (PCIe Peripheral Board), a PCIe adapter board specifically designed for NVMe solid-state drives. This board supports four sizes of NVMe SSDs: 2230, 2242, 2260, and 2280, all of which can be installed in an M.2 M key slot. The connection is certified for Gen 2.0 speeds (5 GT/sec), but can be forced to Gen 3.0 (10 GT/sec) for faster performance.
Compatible NVMe SSDs include:
ADATA Legend 700, 800, and XPG SX8200 Pro, Axe Memory Generic Drive, Crucial P2, P3, P3 Plus M.2, Inland PCIe NVMe SSD, KIOXIA EXCERIA and EXCERIA G2 NVMe SSD, Kingston KC3000, NV2, Lexar NM710, NM620, Netac NV3000, NV2000 NVMe SSD, Origin Inception TLC830 Pro NVMe SSD, Pineberry Pi Pinedrive (2280), PNY CS1030, Sabrent Rocket 4.0, Rocket Nano, Samsung 970 EVO Plus, 980, 980 Pro, Team MP33, Western Digital SN850, SN740, SN570, SN530, and Black SN750 SE (Phison Controller), and Blue SN550/SN580 series.
(If you know how to install the latest rpi-eeprom updates, pieeprom-2024-01-24.bin fixed the Western Digital Blue SN550 nvme boot issue.
Incompatible NVMe SSDs:
Due to compatibility issues, we recommend avoiding the following NVMe SSD drives equipped with a Phison controller:
Western Digital Green SN350 series,Black SN850 series, Black SN770, Inland tn446 nvme drive, Corsair MP600 SSD, Samsung PM991, Kingston OM8SEP4256Q-A0, Transcend 110Q (TS500GMTE110Q). Specifically, SN350 and SN570 prevent the Raspberry Pi 5 from booting at all.
The Detailed Online Tutorials can be found here: pironman5.rtfd.io. Online Tutorials Available in EN, DE and JP.
A great Pi project that looks amazing!
This an amazing case that took me right back to my early days of building PC’s from seperate components.
I must admit that it was both surprised and a little bit worrried about the amount of seperate pieces that this kit contains. It really is just like a full PC build scaled down. You can tell that a lot of thought has gone into this. Aside from the case itself you also get light up fans, coolers, power switch and extension boards. Pair it with an M.2 drive (I had a spare from my son’s PC upgrade) an you’ve got yourself a full tower computer!
The instructions were clear and easy to follow. All the components seem a little daunting at first, but if you lay them all out and follow the instructions slowly and carefully then it all starts to make sense.
Once done you’ll end up with a sturdy great looking case.
Highly reccommended.
Class up your Pi!
I love my Raspberry Pi projects, and till now the case the Pi enclosure has been the least inspiring aspect. The Pironman 5 brings extended functionality by adding SSD capabilities, additional and fuller featured ports, and for the cool factor – a beautifully laid-out case with viewing windows and controllable LEDs! I have to admit, I had to have this case just for the awesome light displays with a view of the tech guts. The second biggest appeal is the SSD which allows for booting right from the SSD and bypassing the SSD card.
I purchased a Crucial PCle 3.0 NVMe M.2 500GB SSD for booting, as well as a new RPI 5. The build was straightforward. Pironman provides excellent stepwise instructions. I used the included screwdriver and multi-wrench and did not need any other tools. In addition to the printed instructions, their website has additional details on how to convert the boot process to SSD, as well as adding the Pironman dashboard and controls. That was great because once I installed the Pi OS, I could VNC from my PC and copy/paste the command lines without having to type anything! Again here, the instructions on the website were clear and correct, just following them was foolproof.
Minor notes:
* The instruction sheet calls for M3.5*8 screws for the acrylic widows but supplies M3.5*10 (which are the right size).
* There was one rivet missing its retaining piece – not a problem because the kit had extras.
* The letters etched into the acrylic sheets are cut with the protective coverings on. When you peel the protection off, all the closed loop letters and numbers have bits of the cover left – you have to carefully use a pin to flick them off.
* The Pironman5 command lines wouldn’t work for me. I kept getting permission errors. Finally, I realized I had to prefix the commands with “sudo”. The Pironman dashboard accessible by your networked computer works fine and allows even easier access to all the features in the settings screen.
* While testing, I noticed the RGB fans were not running or lighting up. On examination, I noticed the jumper for Fans was off by one pin – in other words was not jumpered properly. So, off came the front cover and I put the jumper on properly. Note: While doing this, I realized the Hat board was not fully seated on the RPI connector pins – you really have to push down on the Hat board to make a secure connection – it shouldn’t be wobbly at all.
* The directions advise you to change BOOT_ORDER=0xf416 for booting from the SSD, SD, USB in that order. I changed it to # BOOT_ORDER=0xf461 to boot from SD, SSD, USB in that order. That way it’s easy to use the system as a test bed for other projects just by inserting a SD. Just leave the SD out to boot from SSD for Pironman.
* As usual with enclosures like this with lots of screws, I like to leave all exterior screws loose until final assembly to make it easier to line up case parts.
I really appreciated that Pironman provided extras of almost everything – you can see in one of my photos all the extras left over. That can save a lot of pain if you drop a bit, or if you have a defective rivet as in my case.
This is a fun project with high-quality construction, excellent directions, and a significant WOW factor. You’ll have fun playing with the LED controls – there are references on how to control the LEDs and components under program control that I’ll look into. For now, I’m looking forward to putting this case out where it will be very visible!
An awesome place to start if you're getting into the world of Pi!
This raspberry pi case is absolutely outstanding quality, and is a great place for any new pi hobbyist to start off. First of all, the build quality of the case is very good and the fact that there a lot of different ports to use is great, albeit only 2 of them are usb 3.0, which kind of sucks but is understandable. It also comes with 2 HDMI ports, which is awesome, and also a slot for an NVMe M.2 SSD, which opens up a plethora of possibilities for storage and more.
I’m definitely going to be using this for one of my latest projects, and it looks great on my desk. With an installed module you can even control the lighting and the OLED panel on the case itself.
A raspberry in style.
A great looking case that my partner has build with spare parts to complete it.
The clear panels are clear and perfectly made.
Feels rock solid and has decent ventilation too.
All the ports work.
We love this.
Molto bello e funzionale
Molto bello e funzionale. Va montato, ma le istruzioni a colori sono chiarissime ed reperibile online un video della SunFounder altrettanto chiaro. I vari componenti sono suddivisi in bustine opportunamente etichettate. E’ consiglibile utilizzarlo con il sistema operativo Raspberry Pi OS (64 bit) per scaricare il software necessario alle sue funzionalit (p.e. il funzionamento del display e la gestione dei ventilatori).
L’effetto Wow garantito!
Sleek Raspberry Pi 5 Case with SSD Enclosure
I have been using this Raspberry Pi 5 case for my project. Overall, it features a slim and sleek design and an SSD enclosure, with a minor USB port limitation.
Pros:
* The case has a slim and sleek design, making it an attractive addition to any setup.
* It includes an SSD enclosure, providing convenient storage options for your Raspberry Pi.
Cons:
* Two of the USB ports are capped at USB 2.0, which may limit data transfer speeds for some devices.
In conclusion, this Raspberry Pi 5 case is a stylish and functional choice with an SSD enclosure, though the USB 2.0 port limitation may be a drawback for high-speed peripherals.
Excellent mini tower. Works great.
This is a brilliant little mini tower setup. It’s my first intro to using Raspberry Pi, so I ordered a new 8gb Pi 5 to install in it.
This works really well. I found the easiest thing to do was to run the OS initially from a memory card, the flash the OS onto the installed NVME m.2 SSD. I had a spare 256gb one, so I stalled the OS onto it from within the OS on card.
Installation was actually fairly simple, with easy to follow instructions.
Initial issue…now resolved:
My only issue is that the OLED display doesn’t work. I’ve tried reconnecting it, but it seems to be dead. I’ve contacted the seller via their customer service system to see if there is an solution. That’s the only reason to drop 1 star as it’s otherwise a 5 star product. There are plenty of ports too, making it so easy to use. I plan to connect a hdmi wireless dongle with it, allowing me to run it from the one area of my lounge but use it on the main TV.
For what you get, this is excellent value.
Update: it seems a module has to be installed via the terminal. This was easy in the end, guided from the manufacturer’s website.
It’s all working perfectly now. You can even alter the LEDs and fans via this same module.
Great starting point.
I have always wanted a raspberry pi but didn’t really know where to start with them. I had researched and found it quite daunting, but when I got the opportunity to test this case, it gave me the confidence I needed to get started, and to put together a very attractive mini pc. This kit has everything you need to get started (apart from the raspberry pi itself of course) the components are all very high quality, and the aluminium case is sturdy and feels premium. The instructions are clearly laid out and easy to follow, especially for someone like me who wouldn’t know where to start. The entire kit builds around the raspberry pi, until you have a mini pc which looks great even as a display piece. It is much smaller than expected, but I suppose a case for a small motherboard isn’t going to be huge. It is easy to store, and with the new pi it packs quite a punch. The fans keep the pi cool, and the lighting and clear display make it look stunning, and worth buying. It also makes the pi much more user friendly, and turns it into something entirely new. I also love the power button function, which connects seamlessly with the pi.I wouldn’t hesitate to recommend this. 5*